
DMCG5 User Guide
Page 1
Before connecting, operating or adjusting this product, please read the instructions completely. Owner's Manual for advanced features Digital Camera DMC-G5 Model No. Register online at www.panasonic.com/register (U.S. customers only) VQT4H13 F0612MC0
Before connecting, operating or adjusting this product, please read the instructions completely. Owner's Manual for advanced features Digital Camera DMC-G5 Model No. Register online at www.panasonic.com/register (U.S. customers only) VQT4H13 F0612MC0
DMCG5 User Guide
Page 2
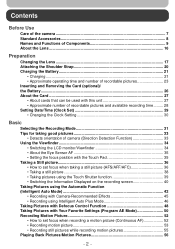
...• Changing the Clock Setting 30 Basic Selecting the Recording Mode 31 Tips for taking good pictures 33 • Detects orientation of camera (Direction Detection Function 33 Using the Viewfinder 34 • Switching the LCD monitor/Viewfinder 34 • About the Eye Sensor AF... the Information Displayed on the recording screen 40 Taking Pictures using the Automatic Function (Intelligent Auto Mode 42 • Recording with Camera-Recommended Effects 45 • Recording using Intelligent Auto Plus Mode 46 Taking Pictures with Defocus Control Function 48 Taking Pictures with Your...
...• Changing the Clock Setting 30 Basic Selecting the Recording Mode 31 Tips for taking good pictures 33 • Detects orientation of camera (Direction Detection Function 33 Using the Viewfinder 34 • Switching the LCD monitor/Viewfinder 34 • About the Eye Sensor AF... the Information Displayed on the recording screen 40 Taking Pictures using the Automatic Function (Intelligent Auto Mode 42 • Recording with Camera-Recommended Effects 45 • Recording using Intelligent Auto Plus Mode 46 Taking Pictures with Defocus Control Function 48 Taking Pictures with Your...
DMCG5 User Guide
Page 7
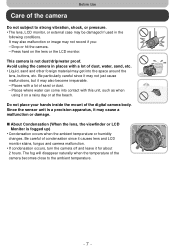
...cause malfunctions, but it for about 2 hours. The fog will disappear naturally when the temperature of the digital camera body. Places with this unit, such as when using the camera in the following conditions. It may also malfunction or image may be damaged if used in places with a lot...water, sand, etc. • Liquid, sand and other foreign material may also become irreparable. - Do not place your hands inside the mount of the camera becomes close to strong vibration, shock, or pressure. • The lens, LCD monitor, or external case may not record if you: - Drop or ...
...cause malfunctions, but it for about 2 hours. The fog will disappear naturally when the temperature of the digital camera body. Places with this unit, such as when using the camera in the following conditions. It may also malfunction or image may be damaged if used in places with a lot...water, sand, etc. • Liquid, sand and other foreign material may also become irreparable. - Do not place your hands inside the mount of the camera becomes close to strong vibration, shock, or pressure. • The lens, LCD monitor, or external case may not record if you: - Drop or ...
DMCG5 User Guide
Page 8
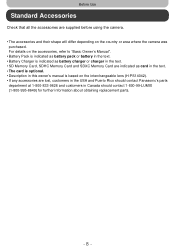
... are lost, customers in the USA and Puerto Rico should contact Panasonic's parts department at 1-800-833-9626 and customers in this owner's manual is based on the interchangeable lens (H-PS14042). • If any accessories are supplied before using the camera. • The accessories and their shape will differ depending on the... Canada should contact 1-800-99-LUMIX (1-800-995-8649) for further information about obtaining replacement parts. - 8 - For details on the country or area where the camera was purchased.
... are lost, customers in the USA and Puerto Rico should contact Panasonic's parts department at 1-800-833-9626 and customers in this owner's manual is based on the interchangeable lens (H-PS14042). • If any accessories are supplied before using the camera. • The accessories and their shape will differ depending on the... Canada should contact 1-800-99-LUMIX (1-800-995-8649) for further information about obtaining replacement parts. - 8 - For details on the country or area where the camera was purchased.
DMCG5 User Guide
Page 9
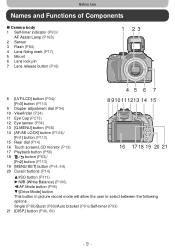
Before Use Names and Functions of Components ∫ Camera body 1 Self-timer indicator (P93)/ AF Assist Lamp (P168) 2 Sensor 3 Flash (P84) 4 Lens fitting mark (P17) 5 Mount 6 Lens lock pin 7 Lens release button (P18) 1 23 ...
Before Use Names and Functions of Components ∫ Camera body 1 Self-timer indicator (P93)/ AF Assist Lamp (P168) 2 Sensor 3 Flash (P84) 4 Lens fitting mark (P17) 5 Mount 6 Lens lock pin 7 Lens release button (P18) 1 23 ...
DMCG5 User Guide
Page 10
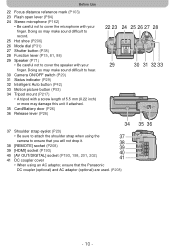
Doing so may make sound difficult to hear. 30 Camera ON/OFF switch (P29) 31 Status indicator (P29) 32 Intelligent Auto button (P42) 33 Motion picture button (P53) 34 Tripod ...29 30 31 32 33 34 37 Shoulder strap eyelet (P20) • Be sure to attach the shoulder strap when using the 37 camera to ensure that you will not drop it. 38 38 [REMOTE] socket (P208) 39 39 [HDMI] socket (P193) 40 [AV ...(P193, 198, 201, 202) 41 DC coupler cover 40 41 • When using an AC adaptor, ensure that the Panasonic DC coupler (optional) and AC adaptor (optional) are used. (P208) 35 36 - 10 -
Doing so may make sound difficult to hear. 30 Camera ON/OFF switch (P29) 31 Status indicator (P29) 32 Intelligent Auto button (P42) 33 Motion picture button (P53) 34 Tripod ...29 30 31 32 33 34 37 Shoulder strap eyelet (P20) • Be sure to attach the shoulder strap when using the 37 camera to ensure that you will not drop it. 38 38 [REMOTE] socket (P208) 39 39 [HDMI] socket (P193) 40 [AV ...(P193, 198, 201, 202) 41 DC coupler cover 40 41 • When using an AC adaptor, ensure that the Panasonic DC coupler (optional) and AC adaptor (optional) are used. (P208) 35 36 - 10 -

DMCG5 User Guide
Page 12
... the LCD monitor as shown below. 1 Open the LCD monitor. (Maximum 180 o) 2 It can be damaged. Before Use LCD Monitor At the time when this camera is purchased, the LCD monitor is recommended that are in a low position. • It can be rotated 180o forward. 3 Return the monitor to its original... not to use excessive force as it may be rotated 180o forward. Note • When not using the LCD monitor it is stowed in the camera body.
... the LCD monitor as shown below. 1 Open the LCD monitor. (Maximum 180 o) 2 It can be damaged. Before Use LCD Monitor At the time when this camera is purchased, the LCD monitor is recommended that are in a low position. • It can be rotated 180o forward. 3 Return the monitor to its original... not to use excessive force as it may be rotated 180o forward. Note • When not using the LCD monitor it is stowed in the camera body.
DMCG5 User Guide
Page 13
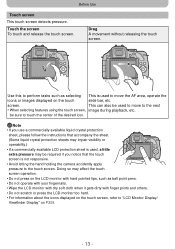
... or images displayed on the LCD monitor with hard pointed tips, such as selecting This is not responsive. • Avoid letting the hand holding the camera accidently apply pressure to the next • When selecting features using the touch screen, image during playback, etc. be used to move to the touch...
... or images displayed on the LCD monitor with hard pointed tips, such as selecting This is not responsive. • Avoid letting the hand holding the camera accidently apply pressure to the next • When selecting features using the touch screen, image during playback, etc. be used to move to the touch...
DMCG5 User Guide
Page 14
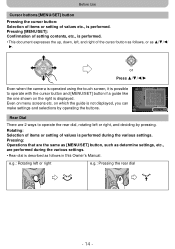
... settings, etc., are the same as [MENU/SET] button, such as 3/4/2/ 1. Pressing: Operations that are performed during the various settings. or Press 3/4/2/1 Even when the camera is operated using the touch screen, it is displayed. Even on which the guide is performed. • This document expresses the up, down, left or...
... settings, etc., are the same as [MENU/SET] button, such as 3/4/2/ 1. Pressing: Operations that are performed during the various settings. or Press 3/4/2/1 Even when the camera is operated using the touch screen, it is displayed. Even on which the guide is performed. • This document expresses the up, down, left or...

DMCG5 User Guide
Page 15
... for the lens in use. • When using an interchangeable lens (H-PS14042) that supports the power zoom (electrically operated zoom), the camera assigns the [ZOOM] operation. • When using an interchangeable lens (H-FS014042, H-FS45150) that does not support the power zoom, the... it is [AUTO]. 1 Select [Function Lever] in the [Custom] menu. Item [AUTO] [ZOOM] [EXP.] Settings When the lens is replaced, the camera automatically assigns the setting suitable for Exposure Compensation (P88). Slide the lever to left or right to operate. ∫ To assign a function to the function...
... for the lens in use. • When using an interchangeable lens (H-PS14042) that supports the power zoom (electrically operated zoom), the camera assigns the [ZOOM] operation. • When using an interchangeable lens (H-FS014042, H-FS45150) that does not support the power zoom, the... it is [AUTO]. 1 Select [Function Lever] in the [Custom] menu. Item [AUTO] [ZOOM] [EXP.] Settings When the lens is replaced, the camera automatically assigns the setting suitable for Exposure Compensation (P88). Slide the lever to left or right to operate. ∫ To assign a function to the function...
DMCG5 User Guide
Page 16
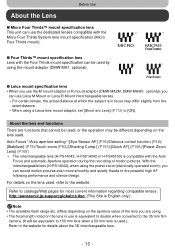
... - 16 - For certain lenses, the actual distance at which the subject is used.) Refer to the website for most current information regarding compatible lenses. http://panasonic.jp/support/global/cs/dsc/ (This Site is compatible with the Four Thirds mount specification can be used by using a Leica lens mount adaptor, set..., or the operation may differ slightly from the rated distance. - you can use is equivalent to double when converted to the 35 mm film camera. (It will be equivalent to 100 mm lens when a 50 mm lens is in use Leica M Mount or Leica R Mount interchangeable lenses. -
... - 16 - For certain lenses, the actual distance at which the subject is used.) Refer to the website for most current information regarding compatible lenses. http://panasonic.jp/support/global/cs/dsc/ (This Site is compatible with the Four Thirds mount specification can be used by using a Leica lens mount adaptor, set..., or the operation may differ slightly from the rated distance. - you can use is equivalent to double when converted to the 35 mm film camera. (It will be equivalent to 100 mm lens when a 50 mm lens is in use Leica M Mount or Leica R Mount interchangeable lenses. -
DMCG5 User Guide
Page 17
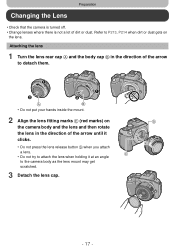
... to detach them. • Do not put your hands inside the mount. 2 Align the lens fitting marks C (red marks) on the lens. Refer to the camera body as the lens mount may get scratched. 3 Detach the lens cap. - 17 - Attaching the lens 1 Turn the lens rear cap A and the body cap... a lens. • Do not try to attach the lens when holding it at an angle to P213, P214 when dirt or dust gets on the camera body and the lens and then rotate the lens in the direction of dirt or dust.
... to detach them. • Do not put your hands inside the mount. 2 Align the lens fitting marks C (red marks) on the lens. Refer to the camera body as the lens mount may get scratched. 3 Detach the lens cap. - 17 - Attaching the lens 1 Turn the lens rear cap A and the body cap... a lens. • Do not try to attach the lens when holding it at an angle to P213, P214 when dirt or dust gets on the camera body and the lens and then rotate the lens in the direction of dirt or dust.
DMCG5 User Guide
Page 18
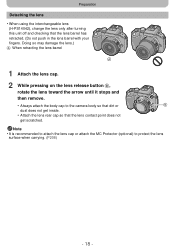
Note • It is recommended to attach the lens cap or attach the MC Protector (optional) to the camera body so that dirt or dust does not get scratched. Doing so may damage the lens.) A When retracting the lens barrel 1 Attach the lens ...
Note • It is recommended to attach the lens cap or attach the MC Protector (optional) to the camera body so that dirt or dust does not get scratched. Doing so may damage the lens.) A When retracting the lens barrel 1 Attach the lens ...
DMCG5 User Guide
Page 20
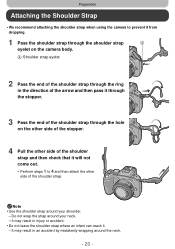
Preparation Attaching the Shoulder Strap • We recommend attaching the shoulder strap when using the camera to 4 and then attach the other side of the shoulder strap and then check that it will not come out. • Perform steps 1 to prevent ... strap where an infant can reach it through the stopper. 3 Pass the end of the shoulder strap through the shoulder strap eyelet on the camera body. It may result in an accident by mistakenly wrapping around your shoulder. -
Preparation Attaching the Shoulder Strap • We recommend attaching the shoulder strap when using the camera to 4 and then attach the other side of the shoulder strap and then check that it will not come out. • Perform steps 1 to prevent ... strap where an infant can reach it through the stopper. 3 Pass the end of the shoulder strap through the shoulder strap eyelet on the camera body. It may result in an accident by mistakenly wrapping around your shoulder. -
DMCG5 User Guide
Page 21
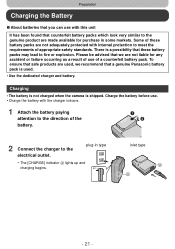
...To ensure that safe products are used . • Use the dedicated charger and battery. Charging • The battery is not charged when the camera is shipped. Some of these battery packs may lead to fire or explosion. Preparation Charging the Battery ∫ About batteries that you can use with... this unit It has been found that a genuine Panasonic battery pack is used , we are not liable for purchase in type • The [CHARGE] indicator A lights up and charging begins. 90°...
...To ensure that safe products are used . • Use the dedicated charger and battery. Charging • The battery is not charged when the camera is shipped. Some of these battery packs may lead to fire or explosion. Preparation Charging the Battery ∫ About batteries that you can use with... this unit It has been found that a genuine Panasonic battery pack is used , we are not liable for purchase in type • The [CHARGE] indicator A lights up and charging begins. 90°...
DMCG5 User Guide
Page 23
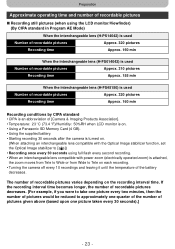
...160 min Recording conditions by CIPA standard • CIPA is an abbreviation of [Camera & Imaging Products Association]. • Temperature: 23 oC (73.4 oF)/Humidity: 50%RH when LCD monitor is on. • Using a Panasonic SD Memory Card (4 GB). • Using the supplied battery. • ...Starting recording 30 seconds after the camera is turned on. (When attaching an interchangeable lens compatible with the Optical Image stabilizer function, ...
...160 min Recording conditions by CIPA standard • CIPA is an abbreviation of [Camera & Imaging Products Association]. • Temperature: 23 oC (73.4 oF)/Humidity: 50%RH when LCD monitor is on. • Using a Panasonic SD Memory Card (4 GB). • Using the supplied battery. • ...Starting recording 30 seconds after the camera is turned on. (When attaching an interchangeable lens compatible with the Optical Image stabilizer function, ...
DMCG5 User Guide
Page 25
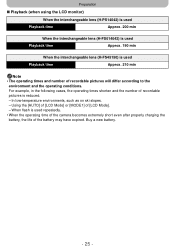
... interchangeable lens (H-FS014042) is used Playback time Approx. 190 min When the interchangeable lens (H-FS45150) is used repeatedly. • When the operating time of the camera becomes extremely short even after properly charging the battery, the life of the battery may have expired. In low-temperature environments, such as on ski...
... interchangeable lens (H-FS014042) is used Playback time Approx. 190 min When the interchangeable lens (H-FS45150) is used repeatedly. • When the operating time of the camera becomes extremely short even after properly charging the battery, the life of the battery may have expired. In low-temperature environments, such as on ski...
DMCG5 User Guide
Page 26
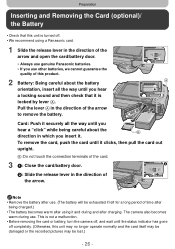
...card out upright. This is not a malfunction. • Before removing the card or battery, turn the camera off, and wait until the status indicator has gone off . • We recommend using a Panasonic card. 1 Slide the release lever in the direction of the arrow and open the card/battery door. ...operate normally and the card itself may be damaged or the recorded pictures may be exhausted if left for a long period of the arrow. The camera also becomes warm during and after charging. Note • Remove the battery after use . Preparation Inserting and Removing the Card (optional)/ the ...
...card out upright. This is not a malfunction. • Before removing the card or battery, turn the camera off, and wait until the status indicator has gone off . • We recommend using a Panasonic card. 1 Slide the release lever in the direction of the arrow and open the card/battery door. ...operate normally and the card itself may be damaged or the recorded pictures may be exhausted if left for a long period of the arrow. The camera also becomes warm during and after charging. Note • Remove the battery after use . Preparation Inserting and Removing the Card (optional)/ the ...
DMCG5 User Guide
Page 27
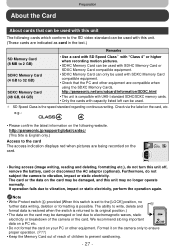
...longer operate normally. Format it on the card. • During access (image writing, reading and deleting, formatting etc.), do not subject the camera to prevent swallowing. - 27 - Check via the label on the following cards which conform to the SD video standard can be used with ... Note • Write-Protect switch A provided (When this switch is set to vibration, impact or static electricity, perform the operation again. http://panasonic.net/avc/sdcard/information/SDXC.html • This unit is compatible with UHS-I standard SDHC/SDXC memory cards. • Only the cards with...
...longer operate normally. Format it on the card. • During access (image writing, reading and deleting, formatting etc.), do not subject the camera to prevent swallowing. - 27 - Check via the label on the following cards which conform to the SD video standard can be used with ... Note • Write-Protect switch A provided (When this switch is set to vibration, impact or static electricity, perform the operation again. http://panasonic.net/avc/sdcard/information/SDXC.html • This unit is compatible with UHS-I standard SDHC/SDXC memory cards. • Only the cards with...
DMCG5 User Guide
Page 29
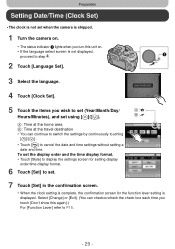
... date and time settings without setting a date and time. Preparation Setting Date/Time (Clock Set) • The clock is not set when the camera is shipped. 1 Turn the camera on. • The status indicator 1 lights when you turn this again].) For [Function Lever] refer to P15. - 29 - To set the display order...
... date and time settings without setting a date and time. Preparation Setting Date/Time (Clock Set) • The clock is not set when the camera is shipped. 1 Turn the camera on. • The status indicator 1 lights when you turn this again].) For [Function Lever] refer to P15. - 29 - To set the display order...


