
Operating Instruction
Page 2
█ Contents Read this first 3 Before Use 4 Attaching the Lens / Detaching the Lens 4 Before replacing the projection lens 4 Attaching the Lens 5 Detaching the Lens 5 Projection relationships 6 Lens position setup and focus adjustment 8 Lens position setup (Using projector functions 8 Lens position setup (Using the supplied lens shift gauge 9 Focus Adjustment Function 9 Specifications 10 Dimensions 10 Dimensional relationship Appendix 2-ENGLISH
█ Contents Read this first 3 Before Use 4 Attaching the Lens / Detaching the Lens 4 Before replacing the projection lens 4 Attaching the Lens 5 Detaching the Lens 5 Projection relationships 6 Lens position setup and focus adjustment 8 Lens position setup (Using projector functions 8 Lens position setup (Using the supplied lens shift gauge 9 Focus Adjustment Function 9 Specifications 10 Dimensions 10 Dimensional relationship Appendix 2-ENGLISH
Operating Instruction
Page 4
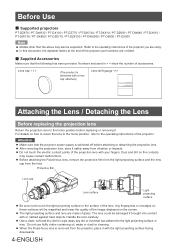
... switched off before replacing or removing it with your fingers. The lens could be damaged if brought into contact with a lens cap attached.) Lens shift gauge Attaching the Lens / Detaching the Lens Before replacing the projection lens Return the projection lens to the operating instructions of the projection lens with the light projecting surface facing downwards. 4-ENGLISH zz Use...
... switched off before replacing or removing it with your fingers. The lens could be damaged if brought into contact with a lens cap attached.) Lens shift gauge Attaching the Lens / Detaching the Lens Before replacing the projection lens Return the projection lens to the operating instructions of the projection lens with the light projecting surface facing downwards. 4-ENGLISH zz Use...
Operating Instruction
Page 8
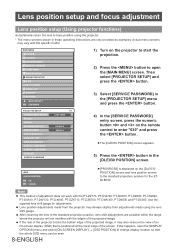
... position, lens shift adjustments are only provided as examples. PROJECTOR SETUP STARTUP INPUT SELECT RS-232C STATUS NO SIGNAL SHUT-OFF REMOTE2 MODE FUNCTION BUTTON DATE AND TIME LENS CALIBRATION SAVE ALL USER DATA LOAD ALL USER DATA INITIALIZE SERVICE PASSWORD 2/2 LAST USED SW1234567 ET-LAD120 DISABLE...This method of an On-screen display (OSD) that the whole OSD menu can be seen. 8-ENGLISH Use the supplied lens shift gauge for the ETDLE030. LENS DLE030 POSITION OK ENTER MENU CANCEL zz[PROGRESS] is positioned at the lower edge of the projected image. Then select [PROJECTOR...
... position, lens shift adjustments are only provided as examples. PROJECTOR SETUP STARTUP INPUT SELECT RS-232C STATUS NO SIGNAL SHUT-OFF REMOTE2 MODE FUNCTION BUTTON DATE AND TIME LENS CALIBRATION SAVE ALL USER DATA LOAD ALL USER DATA INITIALIZE SERVICE PASSWORD 2/2 LAST USED SW1234567 ET-LAD120 DISABLE...This method of an On-screen display (OSD) that the whole OSD menu can be seen. 8-ENGLISH Use the supplied lens shift gauge for the ETDLE030. LENS DLE030 POSITION OK ENTER MENU CANCEL zz[PROGRESS] is positioned at the lower edge of the projected image. Then select [PROJECTOR...
Operating Instruction
Page 9
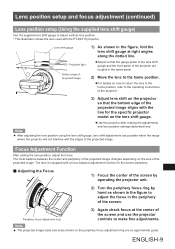
... After adjusting the lens position using the lens shift gauge, lens shift adjustments are an approximate guide. Lens position setup and focus adjustment (continued) Lens position setup (Using the supplied lens shift gauge) Use the supplied lens shift gauge to adjust vertical lens position. * This illustration shows the lens used with the ...the projector controls to adjust the focus in the figure, fold the lens shift gauge at the center of the projected image aligns with the PT-DZ770 projector. ENGLISH-9 Lens shift gauge Projected light Bottom edge of projected image 1) As shown in ...
... After adjusting the lens position using the lens shift gauge, lens shift adjustments are an approximate guide. Lens position setup and focus adjustment (continued) Lens position setup (Using the supplied lens shift gauge) Use the supplied lens shift gauge to adjust vertical lens position. * This illustration shows the lens used with the ...the projector controls to adjust the focus in the figure, fold the lens shift gauge at the center of the projected image aligns with the PT-DZ770 projector. ENGLISH-9 Lens shift gauge Projected light Bottom edge of projected image 1) As shown in ...

