
Operating Instructions
Page 3
... sheet and separation sheet 33 Changing the Reference Plate Setting 34 Care and Maintenance Clearing Paper Jams 36 ≥ Removing paper jams from the feed part 36 ≥ Removing paper jams from exit path 36 ≥ If the paper cannot be removed by pulling it forward 36 Cleaning the Unit 37...
... sheet and separation sheet 33 Changing the Reference Plate Setting 34 Care and Maintenance Clearing Paper Jams 36 ≥ Removing paper jams from the feed part 36 ≥ Removing paper jams from exit path 36 ≥ If the paper cannot be removed by pulling it forward 36 Cleaning the Unit 37...

Operating Instructions
Page 4
...provide reasonable protection against harmful interference when the equipment is operated in a place with the instruction manual, may be required to part 15 of this equipment in a residential area is supplied by the manufacturer. This equipment generates, uses, and can radiate radio... cord not lighter than ordinary polyvinyl chloride flexible cord according to the Material Safety Data Sheet (MSDS). • Please ask your Panasonic sales company about obtaining the Material Safety Data Sheet. KEEP AWAY FROM FIRE. Keep these instructions completely. WARNING • Do not...
...provide reasonable protection against harmful interference when the equipment is operated in a place with the instruction manual, may be required to part 15 of this equipment in a residential area is supplied by the manufacturer. This equipment generates, uses, and can radiate radio... cord not lighter than ordinary polyvinyl chloride flexible cord according to the Material Safety Data Sheet (MSDS). • Please ask your Panasonic sales company about obtaining the Material Safety Data Sheet. KEEP AWAY FROM FIRE. Keep these instructions completely. WARNING • Do not...
Operating Instructions
Page 36
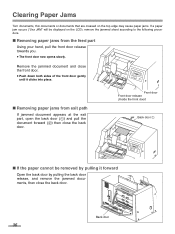
... of the front door gently until it forward Open the back door by pulling it clicks into place. ∫ Removing paper jams from the feed part Using your hand, pull the front door release towards you. ≥ The front door now opens slowly. Back door 36 Front door Front door... the LCD), remove the jammed sheet according to the following procedure. ∫ Removing paper jams from exit path If jammed document appears at the exit part, open the back door (1) and pull the document forward (2) then close the back door. Clearing Paper Jams Torn documents, thin documents or documents that...
... of the front door gently until it forward Open the back door by pulling it clicks into place. ∫ Removing paper jams from the feed part Using your hand, pull the front door release towards you. ≥ The front door now opens slowly. Back door 36 Front door Front door... the LCD), remove the jammed sheet according to the following procedure. ∫ Removing paper jams from exit path If jammed document appears at the exit part, open the back door (1) and pull the document forward (2) then close the back door. Clearing Paper Jams Torn documents, thin documents or documents that...
Operating Instructions
Page 37
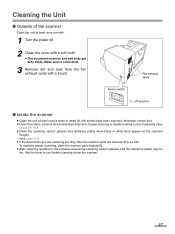
... when black or white lines appear on the scanned images. (See page 41.) ≥ If the documents you are scanning are dirty, then the scanner parts will become dirty as well. Wait for them . 3 Remove dirt and dust from the fan exhaust vents with a soft cloth. ≥ The document insertion and... scanner ≥ Clean the unit at least once a month. 1 Turn the power off. 2 Clean the cover with a brush. To maintain proper scanning, clean the scanner parts frequently. ≥ After scanning operations, the surfaces around the scanning section glasses and the reference plates may be hot.
... when black or white lines appear on the scanned images. (See page 41.) ≥ If the documents you are scanning are dirty, then the scanner parts will become dirty as well. Wait for them . 3 Remove dirt and dust from the fan exhaust vents with a soft cloth. ≥ The document insertion and... scanner ≥ Clean the unit at least once a month. 1 Turn the power off. 2 Clean the cover with a brush. To maintain proper scanning, clean the scanner parts frequently. ≥ After scanning operations, the surfaces around the scanning section glasses and the reference plates may be hot.
Operating Instructions
Page 49
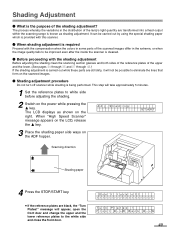
...purpose of the upper and the lower. (See pages 34 through 35 and 37 through 42.) If the shading adjustment is carried out while these parts are still dirty, it will not be possible to eliminate the lines that form on the scanned images. ¥ Shading adjustment procedure Do not turn... the special shading paper which is provided with this scanner. ¥ When shading adjustment is required Proceed with the compensation when the colors in some parts of the scanned images differ in the distribution of the lamp's light quantity are black, the "Turn Plates!" It can be improved even after the...
...purpose of the upper and the lower. (See pages 34 through 35 and 37 through 42.) If the shading adjustment is carried out while these parts are still dirty, it will not be possible to eliminate the lines that form on the scanned images. ¥ Shading adjustment procedure Do not turn... the special shading paper which is provided with this scanner. ¥ When shading adjustment is required Proceed with the compensation when the colors in some parts of the scanned images differ in the distribution of the lamp's light quantity are black, the "Turn Plates!" It can be improved even after the...
Operating Instructions
Page 50
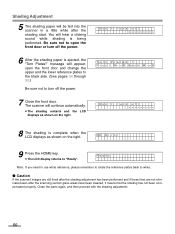
... continue automatically. ≥ The shading restarts and the LCD displays as shown on the right. F r o n t : W- > B > B a c k : W- > B Don ' t t u r n o f f 8 The shading is ejected, the "Turn Plates!" Clean the parts again, and then proceed with the shading adjustment. 50
... continue automatically. ≥ The shading restarts and the LCD displays as shown on the right. F r o n t : W- > B > B a c k : W- > B Don ' t t u r n o f f 8 The shading is ejected, the "Turn Plates!" Clean the parts again, and then proceed with the shading adjustment. 50