
Digital Proprietary Telephone
Page 1
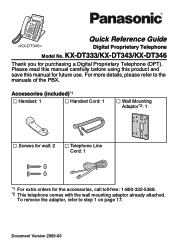
... future use. Document Version 2009-03 To remove the adaptor, refer to the manuals of the PBX. For more details, please refer to step 1 on page 17. KX-DT333/KX-DT343/KX-DT346 Thank you for purchasing a Digital Proprietary Telephone (DPT). Quick Reference Guide Digital Proprietary Telephone Model No.
... future use. Document Version 2009-03 To remove the adaptor, refer to the manuals of the PBX. For more details, please refer to step 1 on page 17. KX-DT333/KX-DT343/KX-DT346 Thank you for purchasing a Digital Proprietary Telephone (DPT). Quick Reference Guide Digital Proprietary Telephone Model No.
Digital Proprietary Telephone
Page 10
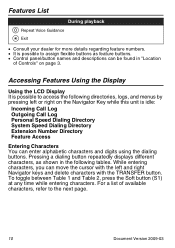
...playback Repeat Voice Guidance Exit • Consult your dealer for more details regarding feature numbers. • It is possible to the next page. 10 Document Version 2009-03 Pressing a dialing button repeatedly displays different characters, as feature buttons. • Control panel/button names and ... the following directories, logs, and menus by pressing left and right Navigator keys and delete characters with the left or right on page 3. While entering characters, you can enter alphabetic characters and digits using the dialing buttons. For a list of available characters, refer...
...playback Repeat Voice Guidance Exit • Consult your dealer for more details regarding feature numbers. • It is possible to the next page. 10 Document Version 2009-03 Pressing a dialing button repeatedly displays different characters, as feature buttons. • Control panel/button names and ... the following directories, logs, and menus by pressing left and right Navigator keys and delete characters with the left or right on page 3. While entering characters, you can enter alphabetic characters and digits using the dialing buttons. For a list of available characters, refer...
Digital Proprietary Telephone
Page 17
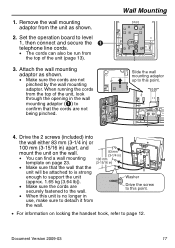
... not pinched by the wall mounting adaptor. Washer Drive the screw to this point. 4. Remove the wall mounting adaptor from the top of the unit (page 13). 3. Wall Mounting Slide the wall mounting adaptor up to this point. • For information on the wall. • You can also be attached... no longer in use, make sure to detach it from the top of the unit, look through the opening in the wall mounting adaptor (A) to page 12. Wall Mounting 1. Document Version 2009-03 17 Set the operation board to level 1, then connect and secure the telephone line cords. • The...
... not pinched by the wall mounting adaptor. Washer Drive the screw to this point. 4. Remove the wall mounting adaptor from the top of the unit (page 13). 3. Wall Mounting Slide the wall mounting adaptor up to this point. • For information on the wall. • You can also be attached... no longer in use, make sure to detach it from the top of the unit, look through the opening in the wall mounting adaptor (A) to page 12. Wall Mounting 1. Document Version 2009-03 17 Set the operation board to level 1, then connect and secure the telephone line cords. • The...

Digital Proprietary Telephone
Page 23
Drive the screws into the wall as indicated. 2. for base unit 83 mm (3-1/4 in) 100 mm (3-15/16 in) Document Version 2009-03 One screw at either point 23 wall One screw here WALL MOUNTING TEMPLATE 1. Hook the unit onto the screw heads. If the dimensions of this page. Note: Make sure to set the print size to correspond with the size of the paper output still deviate slightly from the measurements indicated here, use the measurements indicated here.
Drive the screws into the wall as indicated. 2. for base unit 83 mm (3-1/4 in) 100 mm (3-15/16 in) Document Version 2009-03 One screw at either point 23 wall One screw here WALL MOUNTING TEMPLATE 1. Hook the unit onto the screw heads. If the dimensions of this page. Note: Make sure to set the print size to correspond with the size of the paper output still deviate slightly from the measurements indicated here, use the measurements indicated here.

