
Installation Guide
Page 2
Installation/Troubleshooting Introduction How to easily configure the camera. • Operating Instructions (Included on the Setup CD-ROM) Operating Instructions explains about operations, settings, features and the cleaning method when using the camera. The Installation/Troubleshooting helps you to Use This Documentation The camera includes ...
Installation/Troubleshooting Introduction How to easily configure the camera. • Operating Instructions (Included on the Setup CD-ROM) Operating Instructions explains about operations, settings, features and the cleaning method when using the camera. The Installation/Troubleshooting helps you to Use This Documentation The camera includes ...

Installation Guide
Page 5
Installation/Troubleshooting Table of Contents 1 Before Using 6 1.1 1.1.1 1.1.2 1.1.3 IMPORTANT SAFETY INSTRUCTIONS 6 FCC and Other Information 7 Security Cautions 8 User Name and Password Protection 8 1.2 Included Items 9 1.3 1.3.1 1.3.2 1.3.3 Camera Feature Locations 10 Front View 10 Rear View 11 Bottom View ...
Installation/Troubleshooting Table of Contents 1 Before Using 6 1.1 1.1.1 1.1.2 1.1.3 IMPORTANT SAFETY INSTRUCTIONS 6 FCC and Other Information 7 Security Cautions 8 User Name and Password Protection 8 1.2 Included Items 9 1.3 1.3.1 1.3.2 1.3.3 Camera Feature Locations 10 Front View 10 Rear View 11 Bottom View ...
Installation Guide
Page 6
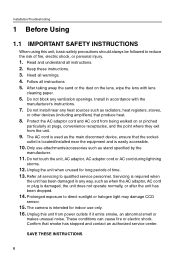
... required when the unit has been damaged in accordance with lens cleaning paper. 6. Prolonged exposure to qualified service personnel. Heed all instructions. 5. After taking away the sand or the dust on or pinched particularly at plugs, convenience receptacles, and the point where they...or personal injury. 1. Protect the AC adaptor cord and AC cord from being walked on the lens, wipe the lens with the manufacturer's instructions. 7. Unplug the unit when unused for indoor use attachments/accessories such as radiators, heat registers, stoves, or other devices (including amplifiers)...
... required when the unit has been damaged in accordance with lens cleaning paper. 6. Prolonged exposure to qualified service personnel. Heed all instructions. 5. After taking away the sand or the dust on or pinched particularly at plugs, convenience receptacles, and the point where they...or personal injury. 1. Protect the AC adaptor cord and AC cord from being walked on the lens, wipe the lens with the manufacturer's instructions. 7. Unplug the unit when unused for indoor use attachments/accessories such as radiators, heat registers, stoves, or other devices (including amplifiers)...
Installation Guide
Page 7
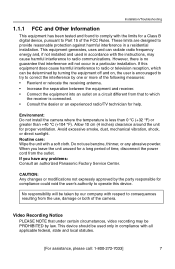
...that interference will be PROHIBITED by our company with respect to consequences resulting from the outlet. Routine care: Wipe the unit with the instructions, may be taken by law. If you leave the unit unused for a long period of the camera. Installation/Troubleshooting 1.1.1 FCC and...not use , damage or both of time, disconnect the power cord from the use benzine, thinner, or any problems: Consult an authorized Panasonic Factory Service Center. CAUTION: Any changes or modifications not expressly approved by the party responsible for compliance could void the user's authority to...
...that interference will be PROHIBITED by our company with respect to consequences resulting from the outlet. Routine care: Wipe the unit with the instructions, may be taken by law. If you leave the unit unused for a long period of the camera. Installation/Troubleshooting 1.1.1 FCC and...not use , damage or both of time, disconnect the power cord from the use benzine, thinner, or any problems: Consult an authorized Panasonic Factory Service Center. CAUTION: Any changes or modifications not expressly approved by the party responsible for compliance could void the user's authority to...

Installation Guide
Page 8
This information should not be repaired with a company not related to Panasonic, make back-up copies of files, if necessary, and reset this product to factory default. • ...access or information leaks). • You are responsible for the security settings, such as videos, still images and internet contents etc. Panasonic Communications Co., Ltd. 1.1.3 User Name and Password Protection The use of a User Name and Password, this may result in access...individuals from accessing the camera. If you do not have the latest version of the Operating Instructions in the Setup CD-ROM) 8
This information should not be repaired with a company not related to Panasonic, make back-up copies of files, if necessary, and reset this product to factory default. • ...access or information leaks). • You are responsible for the security settings, such as videos, still images and internet contents etc. Panasonic Communications Co., Ltd. 1.1.3 User Name and Password Protection The use of a User Name and Password, this may result in access...individuals from accessing the camera. If you do not have the latest version of the Operating Instructions in the Setup CD-ROM) 8

Installation Guide
Page 11
1.3.2 Rear View Ethernet (LAN) port (See page 12) Analog Video Output (See page 14) 1.3.3 Bottom View FACTORY DEFAULT RESET button (See page 121 of the Operating Instructions on the Setup CD-ROM) Hole for Ceiling Plate A (See page 35) Installation/Troubleshooting External I/O (See page 119 of the Operating Instructions on the Setup CD-ROM) DC IN jack (See page 13) Hook for AC adaptor cord (See page 13) MAC Address and Serial Number are indicated on the label. [For assistance, please call: 1-800-272-7033] 11
1.3.2 Rear View Ethernet (LAN) port (See page 12) Analog Video Output (See page 14) 1.3.3 Bottom View FACTORY DEFAULT RESET button (See page 121 of the Operating Instructions on the Setup CD-ROM) Hole for Ceiling Plate A (See page 35) Installation/Troubleshooting External I/O (See page 119 of the Operating Instructions on the Setup CD-ROM) DC IN jack (See page 13) Hook for AC adaptor cord (See page 13) MAC Address and Serial Number are indicated on the label. [For assistance, please call: 1-800-272-7033] 11

Installation Guide
Page 12
Ethernet port Ethernet cable To your router Note These instructions assume your PC is already connected to the Internet and your router. Connect the Ethernet cable to your network includes a router. 2. LAN ports WAN port To the outlet To the camera To your modem To your router with an Ethernet cable to set up the camera. 1. Installation/Troubleshooting 1.4 Connecting the Camera to Your Router Connect the camera to your PC Ethernet cable (Straight Cat5 cable) (Customer-provided) 12 Connect the Ethernet cable (customer-provided) to the camera.
Ethernet port Ethernet cable To your router Note These instructions assume your PC is already connected to the Internet and your router. Connect the Ethernet cable to your network includes a router. 2. LAN ports WAN port To the outlet To the camera To your modem To your router with an Ethernet cable to set up the camera. 1. Installation/Troubleshooting 1.4 Connecting the Camera to Your Router Connect the camera to your PC Ethernet cable (Straight Cat5 cable) (Customer-provided) 12 Connect the Ethernet cable (customer-provided) to the camera.

Installation Guide
Page 15
Insert the Setup CD-ROM into the CD-ROM drive of the Operating Instructions on the Setup CD-ROM for details. 1. Click [Camera Setup]. Installation/Troubleshooting 1.6 Setting up the Camera to easily set up the camera. Installs Network Camera ...
Insert the Setup CD-ROM into the CD-ROM drive of the Operating Instructions on the Setup CD-ROM for details. 1. Click [Camera Setup]. Installation/Troubleshooting 1.6 Setting up the Camera to easily set up the camera. Installs Network Camera ...
Installation Guide
Page 20
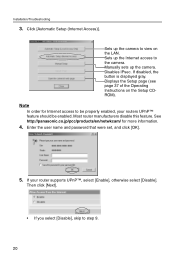
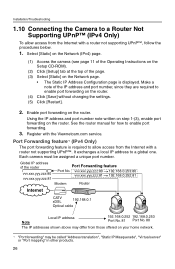
Enter the user name and password that were set, and click [OK]. 5. See http://panasonic.co.jp/pcc/products/en/netwkcam/ for Internet access to the camera. Manually sets up the Internet access to be properly enabled, your router supports ...UPnP™, select [Enable], otherwise select [Disable]. If disabled, the button is displayed gray. Displays the Setup page (see page 37 of the Operating Instructions on the LAN. If your routers UPnP™ feature should be enabled. Most router manufacturers disable this feature. Then click [Next]. • If you select...
Enter the user name and password that were set, and click [OK]. 5. See http://panasonic.co.jp/pcc/products/en/netwkcam/ for Internet access to the camera. Manually sets up the Internet access to be properly enabled, your router supports ...UPnP™, select [Enable], otherwise select [Disable]. If disabled, the button is displayed gray. Displays the Setup page (see page 37 of the Operating Instructions on the LAN. If your routers UPnP™ feature should be enabled. Most router manufacturers disable this feature. Then click [Next]. • If you select...

Installation Guide
Page 21
...to configure the router's Port Forwarding by UPnP" is displayed, your router's UPnP™ or set , and click [OK]. 8. Follow the displayed instructions for registration. • If the message "Failed to step 9. 7. Enable your router may not support UPnP™ or UPnP™ is displayed,... user name and password that the router is displayed. For detailed information, access at http://panasonic.co.jp/pcc/products/en/ netwkcam/. • If the message "Failed to the Panasonic Network Camera support website at http://www.viewnetcam.com. • If you have multiple cameras...
...to configure the router's Port Forwarding by UPnP" is displayed, your router's UPnP™ or set , and click [OK]. 8. Follow the displayed instructions for registration. • If the message "Failed to step 9. 7. Enable your router may not support UPnP™ or UPnP™ is displayed,... user name and password that the router is displayed. For detailed information, access at http://panasonic.co.jp/pcc/products/en/ netwkcam/. • If the message "Failed to the Panasonic Network Camera support website at http://www.viewnetcam.com. • If you have multiple cameras...
Installation Guide
Page 26
Select [Static] on the Network (IPv4) page. (1) Access the camera (see page 11 of the Operating Instructions on the Setup CD-ROM). (2) Click [Setup] tab at the top of the page. (3) Select [Static] on the Network page. • The Static IP Address ...
Select [Static] on the Network (IPv4) page. (1) Access the camera (see page 11 of the Operating Instructions on the Setup CD-ROM). (2) Click [Setup] tab at the top of the page. (3) Select [Static] on the Network page. • The Static IP Address ...

Installation Guide
Page 29
... access the camera, see page 30). Register with the Viewnetcam.com service on the Viewnetcam.com page (see page 59 of the Operating Instructions on page 26. [For assistance, please call: 1-800-272-7033] 29 Installation/Troubleshooting 5. Pan / Tilt Scan Network Camera Zoom Focus... Preset Program Alarm Brightness - Note • See page 15 of the Operating Instructions on the Setup CD-ROM for Security Warning window when using a router not supporting UPnP™ Follow the procedures shown on the Setup...
... access the camera, see page 30). Register with the Viewnetcam.com service on the Viewnetcam.com page (see page 59 of the Operating Instructions on page 26. [For assistance, please call: 1-800-272-7033] 29 Installation/Troubleshooting 5. Pan / Tilt Scan Network Camera Zoom Focus... Preset Program Alarm Brightness - Note • See page 15 of the Operating Instructions on the Setup CD-ROM for Security Warning window when using a router not supporting UPnP™ Follow the procedures shown on the Setup...
Installation Guide
Page 30
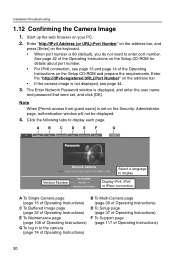
See page 42 of Operating Instructions) 30 Click the following tabs to display Display IPv4, IPv6 or IPsec connection. A B C D E F G Top Single Multi Buffered Image Setup Maintenance Support Login Network Camera Version Number KX-HCM280A Version ∗.∗∗ Running in to enter port..., see page 44. 3. A To Single Camera page (page 15 of Operating Instructions) C To Buffered Image page (page 32 of Operating Instructions) E To Maintenance page (page 108 of the Operating Instructions on your PC. 2. Enter the "http://(IPv6-registered URL):Port Number" on ...
See page 42 of Operating Instructions) 30 Click the following tabs to display Display IPv4, IPv6 or IPsec connection. A B C D E F G Top Single Multi Buffered Image Setup Maintenance Support Login Network Camera Version Number KX-HCM280A Version ∗.∗∗ Running in to enter port..., see page 44. 3. A To Single Camera page (page 15 of Operating Instructions) C To Buffered Image page (page 32 of Operating Instructions) E To Maintenance page (page 108 of the Operating Instructions on your PC. 2. Enter the "http://(IPv6-registered URL):Port Number" on ...
Installation Guide
Page 31
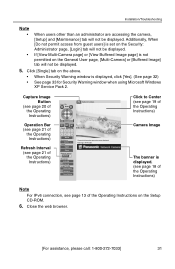
...] tab will not be displayed. 5. Capture Image Button (see page 20 of the Operating Instructions) Operation Bar (see page 21 of the Operating Instructions) Refresh Interval (see page 13 of the Operating Instructions) Pan / Tilt Scan Network Camera Zoom Focus Preset Program Alarm Brightness - Additionally, When ...] 31 Click to Center (see page 19 of the Operating Instructions) Camera Image The banner is displayed. (see page 18 of the Operating Instructions) Note For IPv6 connection, see page 21 of the Operating Instructions on the General User page, [Multi-Camera] or [Buffered Image...
...] tab will not be displayed. 5. Capture Image Button (see page 20 of the Operating Instructions) Operation Bar (see page 21 of the Operating Instructions) Refresh Interval (see page 13 of the Operating Instructions) Pan / Tilt Scan Network Camera Zoom Focus Preset Program Alarm Brightness - Additionally, When ...] 31 Click to Center (see page 19 of the Operating Instructions) Camera Image The banner is displayed. (see page 18 of the Operating Instructions) Note For IPv6 connection, see page 21 of the Operating Instructions on the General User page, [Multi-Camera] or [Buffered Image...
Installation Guide
Page 32
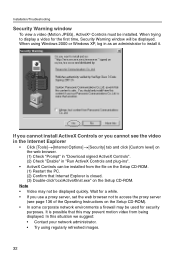
Wait for a while. • If you cannot see page 136 of the Operating Instructions on the Setup CD-ROM. It is possible that Internet Explorer is closed. (3) Double-click"ocx\ActiveXInst.exe" on the Setup CD-ROM). • In ...
Wait for a while. • If you cannot see page 136 of the Operating Instructions on the Setup CD-ROM. It is possible that Internet Explorer is closed. (3) Double-click"ocx\ActiveXInst.exe" on the Setup CD-ROM). • In ...

Installation Guide
Page 34
... vibrations etc. They are indispensable for setting network parameters after mounting the camera and for future customer servicing Note • Mounting and cabling instructions described in this Operating Instructions follow generally accepted guidelines suitable for future reference. Installation/Troubleshooting 1.13 Mounting Two ways of mounting are shown in this section. Record both...
... vibrations etc. They are indispensable for setting network parameters after mounting the camera and for future customer servicing Note • Mounting and cabling instructions described in this Operating Instructions follow generally accepted guidelines suitable for future reference. Installation/Troubleshooting 1.13 Mounting Two ways of mounting are shown in this section. Record both...

Installation Guide
Page 35
... Plate B on the ceiling with Screws B. • Fix the Ceiling Plate B more than 100 mm (4 inches) off the wall or other side of the Operating Instructions on the Ceiling Mount the camera at an even place where vibrations etc. When there is firmly mounted on Camera Setup window (see page 65...
... Plate B on the ceiling with Screws B. • Fix the Ceiling Plate B more than 100 mm (4 inches) off the wall or other side of the Operating Instructions on the Ceiling Mount the camera at an even place where vibrations etc. When there is firmly mounted on Camera Setup window (see page 65...
Installation Guide
Page 39
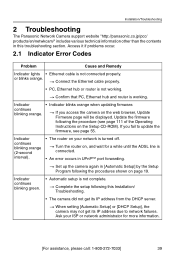
Installation/Troubleshooting 2 Troubleshooting The Panasonic Network Camera support website "http://panasonic.co.jp/pcc/ products/en/netwkcam/" includes various technical information other than the contents in this Installation/ Troubleshooting. • The camera did not get its ... setting [Automatic Setup] or [DHCP Setup], the camera may not get its IP address due to update the firmware, see page 111 of the Operating Instructions on the web browser, Update Firmware page will be displayed. If you fail to network failures. Set up the camera again in UPnP™ port...
Installation/Troubleshooting 2 Troubleshooting The Panasonic Network Camera support website "http://panasonic.co.jp/pcc/ products/en/netwkcam/" includes various technical information other than the contents in this Installation/ Troubleshooting. • The camera did not get its ... setting [Automatic Setup] or [DHCP Setup], the camera may not get its IP address due to update the firmware, see page 111 of the Operating Instructions on the web browser, Update Firmware page will be displayed. If you fail to network failures. Set up the camera again in UPnP™ port...
Installation Guide
Page 40
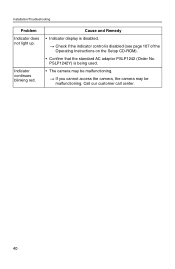
PSLP1242Y) is being used. • The camera may be malfunctioning. Call our customer call center. 40 Check if the indicator control is disabled. If you cannot access the camera, the camera may be malfunctioning. Installation/Troubleshooting Problem Indicator does not light up. Cause and Remedy • Indicator display is disabled (see page 107 of the Operating Instructions on the Setup CD-ROM). • Confirm that the standard AC adaptor PSLP1242 (Order No. Indicator continues blinking red.
PSLP1242Y) is being used. • The camera may be malfunctioning. Call our customer call center. 40 Check if the indicator control is disabled. If you cannot access the camera, the camera may be malfunctioning. Installation/Troubleshooting Problem Indicator does not light up. Cause and Remedy • Indicator display is disabled (see page 107 of the Operating Instructions on the Setup CD-ROM). • Confirm that the standard AC adaptor PSLP1242 (Order No. Indicator continues blinking red.
Installation Guide
Page 42
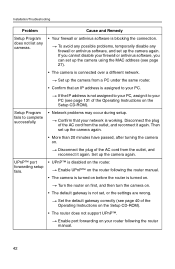
...™ port forwarding setup fails. • UPnP™ is not assigned to your PC, assign it to your PC (see page 131 of the Operating Instructions on the Setup CD-ROM). • The router does not support UPnP™. Set the default gateway correctly (see page 27). • The camera is... than 20 minutes have passed, after turning the camera on. Then set up the camera using the MAC address (see page 40 of the Operating Instructions on . Disconnect the plug of the AC cord from the outlet, and reconnect it again. Set up the camera again. Set up the camera from...
...™ port forwarding setup fails. • UPnP™ is not assigned to your PC, assign it to your PC (see page 131 of the Operating Instructions on the Setup CD-ROM). • The router does not support UPnP™. Set the default gateway correctly (see page 27). • The camera is... than 20 minutes have passed, after turning the camera on. Then set up the camera using the MAC address (see page 40 of the Operating Instructions on . Disconnect the plug of the AC cord from the outlet, and reconnect it again. Set up the camera again. Set up the camera from...