

Multi-line Phone
Page 4
... Preparation Location of Controls 6 Display 8 Installation 9 Installing the Batteries 9 Connecting the Handset and AC Adaptor 10 Connecting Telephone Line Cords 11 Connecting a Communication Device 14 Programmable Settings 15 Time and Date 15 Assigning the Extension Number 17 Programming Summary 19 Dialing Mode ... ID Service 29 Using the Caller List 30 Viewing the Caller List 30 Calling Back from the Caller List 32 Editing the Caller's Phone Number 33 The Caller ID Number Auto Edit Feature 34 Storing Caller List Information in the Directory or in the One-Touch Dialer Memory...
... Preparation Location of Controls 6 Display 8 Installation 9 Installing the Batteries 9 Connecting the Handset and AC Adaptor 10 Connecting Telephone Line Cords 11 Connecting a Communication Device 14 Programmable Settings 15 Time and Date 15 Assigning the Extension Number 17 Programming Summary 19 Dialing Mode ... ID Service 29 Using the Caller List 30 Viewing the Caller List 30 Calling Back from the Caller List 32 Editing the Caller's Phone Number 33 The Caller ID Number Auto Edit Feature 34 Storing Caller List Information in the Directory or in the One-Touch Dialer Memory...

Multi-line Phone
Page 61
... telephone number on the cradle, the call to make or answer a call. • If you misdial when making a call, press [SP-PHONE/HEADSET] twice and dial again. • You can switch the call : 1-800-211-PANA(7262) 61 Useful Information Headset Jack Hook •...; If you disconnect the optional headset during a conversation with the handset on page 3. Please use only a Panasonic KX-TCA60, KX-TCA86, KX-TCA88, KX-TCA91 or KX-TCA92 headset. Fasten the headset cord to have a normal conversation, disconnect the headset. If you can press the line button, instead of the ...
... telephone number on the cradle, the call to make or answer a call. • If you misdial when making a call, press [SP-PHONE/HEADSET] twice and dial again. • You can switch the call : 1-800-211-PANA(7262) 61 Useful Information Headset Jack Hook •...; If you disconnect the optional headset during a conversation with the handset on page 3. Please use only a Panasonic KX-TCA60, KX-TCA86, KX-TCA88, KX-TCA91 or KX-TCA92 headset. Fasten the headset cord to have a normal conversation, disconnect the headset. If you can press the line button, instead of the ...

Multi-line Phone
Page 62
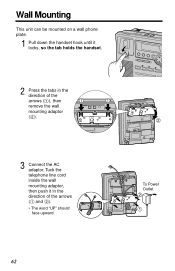
Wall Mounting This unit can be mounted on a wall phone plate. 1 Pull down the handset hook until it in the direction of the arrows (# and $). • The word "UP" should face upward. To Power Outlet 2 1 62 Tuck the telephone line cord inside the wall mounting adaptor, then push it locks, so the tab holds the handset. 2 Press the tabs in the direction of the arrows (#), then 1 1 remove the wall mounting adaptor ($). 2 3 Connect the AC adaptor.
Wall Mounting This unit can be mounted on a wall phone plate. 1 Pull down the handset hook until it in the direction of the arrows (# and $). • The word "UP" should face upward. To Power Outlet 2 1 62 Tuck the telephone line cord inside the wall mounting adaptor, then push it locks, so the tab holds the handset. 2 Press the tabs in the direction of the arrows (#), then 1 1 remove the wall mounting adaptor ($). 2 3 Connect the AC adaptor.
Multi-line Phone
Page 4
... Preparation Location of Controls 6 Display 8 Installation 9 Installing the Batteries 9 Connecting the Handset and AC Adaptor 10 Connecting Telephone Line Cords 11 Connecting a Communication Device 14 Programmable Settings 15 Time and Date 15 Assigning the Extension Number 17 Programming Summary 19 Dialing Mode ... ID Service 29 Using the Caller List 30 Viewing the Caller List 30 Calling Back from the Caller List 32 Editing the Caller's Phone Number 33 The Caller ID Number Auto Edit Feature 34 Storing Caller List Information in the Directory or in the One-Touch Dialer Memory...
... Preparation Location of Controls 6 Display 8 Installation 9 Installing the Batteries 9 Connecting the Handset and AC Adaptor 10 Connecting Telephone Line Cords 11 Connecting a Communication Device 14 Programmable Settings 15 Time and Date 15 Assigning the Extension Number 17 Programming Summary 19 Dialing Mode ... ID Service 29 Using the Caller List 30 Viewing the Caller List 30 Calling Back from the Caller List 32 Editing the Caller's Phone Number 33 The Caller ID Number Auto Edit Feature 34 Storing Caller List Information in the Directory or in the One-Touch Dialer Memory...

Multi-line Phone
Page 61
... headset by lifting it from being disconnected. To order, call : 1-800-211-PANA(7262) 61 Useful Information Fasten the headset cord to prevent it off the cradle. • If you cannot switch the call to the speakerphone. • During a conversation using...to have a normal conversation, disconnect the headset. Please use only a Panasonic KX-TCA60, KX-TCA86, KX-TCA88, KX-TCA91 or KX-TCA92 headset. Headset Jack Hook • The illustration of pressing [SP-PHONE/HEADSET]. 2 To hang up, press [SP-PHONE/HEADSET]. > < To adjust the headset receiver volume (4 levels): While...
... headset by lifting it from being disconnected. To order, call : 1-800-211-PANA(7262) 61 Useful Information Fasten the headset cord to prevent it off the cradle. • If you cannot switch the call to the speakerphone. • During a conversation using...to have a normal conversation, disconnect the headset. Please use only a Panasonic KX-TCA60, KX-TCA86, KX-TCA88, KX-TCA91 or KX-TCA92 headset. Headset Jack Hook • The illustration of pressing [SP-PHONE/HEADSET]. 2 To hang up, press [SP-PHONE/HEADSET]. > < To adjust the headset receiver volume (4 levels): While...
Multi-line Phone
Page 62
To Power Outlet 2 1 62 Wall Mounting This unit can be mounted on a wall phone plate. 1 Pull down the handset hook until it in the direction of the arrows (# and $). • The word "UP" should face upward. Tuck the telephone line cord inside the wall mounting adaptor, then push it locks, so the tab holds the handset. 2 Press the tabs in the direction of the arrows (#), then 1 1 remove the wall mounting adaptor ($). 2 3 Connect the AC adaptor.
To Power Outlet 2 1 62 Wall Mounting This unit can be mounted on a wall phone plate. 1 Pull down the handset hook until it in the direction of the arrows (# and $). • The word "UP" should face upward. Tuck the telephone line cord inside the wall mounting adaptor, then push it locks, so the tab holds the handset. 2 Press the tabs in the direction of the arrows (#), then 1 1 remove the wall mounting adaptor ($). 2 3 Connect the AC adaptor.


