

KXTG5480S User Guide
Page 2
... Copyright: This material is prohibited without the written consent of Panasonic Communications Co., Ltd. © 2005 Panasonic Communications Co., Ltd. PQKL10063Z4 1 2 Caller ID and Call Waiting Service, where available, are telephone company services. PQJA10075Z 1 1 A Handset Cover (p. 15) A Battery (p. 15) Order No. ... ID and Call Waiting with Caller ID services (CWID). Attach your new Panasonic cordless telephone. All other reproduction, in whole or in part, is copyrighted by Panasonic Communications Co., Ltd., and may be reproduced for purchasing your purchase receipt ...
... Copyright: This material is prohibited without the written consent of Panasonic Communications Co., Ltd. © 2005 Panasonic Communications Co., Ltd. PQKL10063Z4 1 2 Caller ID and Call Waiting Service, where available, are telephone company services. PQJA10075Z 1 1 A Handset Cover (p. 15) A Battery (p. 15) Order No. ... ID and Call Waiting with Caller ID services (CWID). Attach your new Panasonic cordless telephone. All other reproduction, in whole or in part, is copyrighted by Panasonic Communications Co., Ltd., and may be reproduced for purchasing your purchase receipt ...

KXTG5480S User Guide
Page 3
...receiver or the speaker. Base unit location/Noise Calls are transmitted between the base unit and handset using wireless radio waves. For assistance, please call: 1-800-211-PANA(7262) 3 Note: • If you use the handset near a microwave oven which is powered by a rechargeable Nickel-Metal Hydride (Ni-MH) ...'s base unit and closer to the base unit. • If you use (p. 15). Charge the battery for 6 hours before initial use the handset near another cordless phone. Move away from the microwave oven and closer to your base unit. For Best Performance Battery charge The...
...receiver or the speaker. Base unit location/Noise Calls are transmitted between the base unit and handset using wireless radio waves. For assistance, please call: 1-800-211-PANA(7262) 3 Note: • If you use the handset near a microwave oven which is powered by a rechargeable Nickel-Metal Hydride (Ni-MH) ...'s base unit and closer to the base unit. • If you use (p. 15). Charge the battery for 6 hours before initial use the handset near another cordless phone. Move away from the microwave oven and closer to your base unit. For Best Performance Battery charge The...
KXTG5480S User Guide
Page 4
...Location of Controls 6 Displays 9 Installation 11 Connecting the AC Adaptor . . 11 Connecting the Telephone Line Cord 12 Installing the Battery in the Handset 15 Battery Charge 15 Programmable Settings 17 Programming Guidelines. . . . . 17 Function Menu Table 18 Date and Time 19 Display Language 20 Dialing...'s Recording Time . . . . . 29 Number of Rings 30 Recording Mode 31 Message Alert 31 Telephone System Making Calls 32 Using the Handset 32 Using the Base Unit 36 Answering Calls 38 Using the Other Line During a Conversation 39 Caller ID Service 40 Using the Caller List 41...
...Location of Controls 6 Displays 9 Installation 11 Connecting the AC Adaptor . . 11 Connecting the Telephone Line Cord 12 Installing the Battery in the Handset 15 Battery Charge 15 Programmable Settings 17 Programming Guidelines. . . . . 17 Function Menu Table 18 Date and Time 19 Display Language 20 Dialing...'s Recording Time . . . . . 29 Number of Rings 30 Recording Mode 31 Message Alert 31 Telephone System Making Calls 32 Using the Handset 32 Using the Base Unit 36 Answering Calls 38 Using the Other Line During a Conversation 39 Caller ID Service 40 Using the Caller List 41...
KXTG5480S User Guide
Page 5
...Service Users). . 59 For Call Waiting Service Users 59 FLASH Button 60 Incoming Call Tone 61 Line Selection 62 Key Tone 63 Re-registering the Handset . . . 64 Answering System Automatic Answering Operation 65 Setting the Unit to Answer Calls 65 Monitoring Incoming Calls . . . . 66 Listening ...to Messages 67 Using the Base Unit 67 Using the Handset (Remote Operation 68 Erasing Messages 71 Recording a Memo Message 72 Transferring a Call to the Answering System 73 Remote Operation from a Touch Tone ...
...Service Users). . 59 For Call Waiting Service Users 59 FLASH Button 60 Incoming Call Tone 61 Line Selection 62 Key Tone 63 Re-registering the Handset . . . 64 Answering System Automatic Answering Operation 65 Setting the Unit to Answer Calls 65 Monitoring Incoming Calls . . . . 66 Listening ...to Messages 67 Using the Base Unit 67 Using the Handset (Remote Operation 68 Erasing Messages 71 Recording a Memo Message 72 Transferring a Call to the Answering System 73 Remote Operation from a Touch Tone ...

KXTG5480S User Guide
Page 7
Preparation Telephone System Answering System Useful Information Handset Back side Location of Controls Speaker Ringer/Message Alert Indicator (p. 31, 38) Antenna Display (p. 9) Receiver Headset Jack (p. 81) [ ] (TALK) Button (p. 32) [ ] (Speakerphone) Button (p. 32) [ ] (TONE) ...
Preparation Telephone System Answering System Useful Information Handset Back side Location of Controls Speaker Ringer/Message Alert Indicator (p. 31, 38) Antenna Display (p. 9) Receiver Headset Jack (p. 81) [ ] (TALK) Button (p. 32) [ ] (Speakerphone) Button (p. 32) [ ] (TONE) ...
KXTG5480S User Guide
Page 8
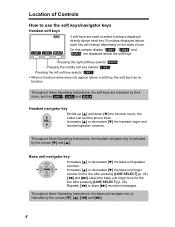
... IN USE SPIPRIVACY1 3 soft keys are used to select functions displayed directly above each key. Throughout these Operating Instructions, the handset navigator key is indicated by their icons, such as LINE1 , LINE2 and SEARCH . Throughout these Operating Instructions, the base unit... On this sample display, " LINE1 ", " LINE2 " and " SEARCH " are indicated by the arrows [d], [B], []. 8 Pressing the middle soft key selects " LINE2 ". Handset navigator key Scrolls up [B] and down [d] the function menu, the Caller List and the phone book. Increases [B] or decreases [d] the...
... IN USE SPIPRIVACY1 3 soft keys are used to select functions displayed directly above each key. Throughout these Operating Instructions, the handset navigator key is indicated by their icons, such as LINE1 , LINE2 and SEARCH . Throughout these Operating Instructions, the base unit... On this sample display, " LINE1 ", " LINE2 " and " SEARCH " are indicated by the arrows [d], [B], []. 8 Pressing the middle soft key selects " LINE2 ". Handset navigator key Scrolls up [B] and down [d] the function menu, the Caller List and the phone book. Increases [B] or decreases [d] the...

KXTG5480S User Guide
Page 9
...your conversation. 5 The battery icon indicates battery strength (p. 15). 6 The display shows the dialed number, call : 1-800-211-PANA(7262) 9 Preparation Displays Handset 1 23 4 5 L1 L2 SP VE PRIVACY1 10 missed calls D01 6 7 LINE1 LINE2 SEARCH 1 " L1 " and " L2 " indicate the status... of the corresponding soft keys which are using the handset speakerphone. 3 " VE " indicates Voice Enhancer mode is on (p. 35). 4 "PRIVACY" indicates Call Privacy mode is on the handset or base unit, or the Answering System is answering a call is being used. Flashing ...
...your conversation. 5 The battery icon indicates battery strength (p. 15). 6 The display shows the dialed number, call : 1-800-211-PANA(7262) 9 Preparation Displays Handset 1 23 4 5 L1 L2 SP VE PRIVACY1 10 missed calls D01 6 7 LINE1 LINE2 SEARCH 1 " L1 " and " L2 " indicate the status... of the corresponding soft keys which are using the handset speakerphone. 3 " VE " indicates Voice Enhancer mode is on (p. 35). 4 "PRIVACY" indicates Call Privacy mode is on the handset or base unit, or the Answering System is answering a call is being used. Flashing ...

KXTG5480S User Guide
Page 15
...as indicated by the icons shown in the Caller List. Replace the old battery with a new one (p. 16). Close the cover and charge the handset for 6 hours before initial use. • The unit beeps once, the CHARGE indicator lights and "Charging" is displayed. • When the ...battery is fully charged, "Charge completed" is indicated by the arrow. Battery Charge Place the handset on the base unit for 6 hours. Close the cover. 2 1 Preparation Telephone System Answering System Useful Information To replace the battery: Press the ...
...as indicated by the icons shown in the Caller List. Replace the old battery with a new one (p. 16). Close the cover and charge the handset for 6 hours before initial use. • The unit beeps once, the CHARGE indicator lights and "Charging" is displayed. • When the ...battery is fully charged, "Charge completed" is indicated by the arrow. Battery Charge Place the handset on the base unit for 6 hours. Close the cover. 2 1 Preparation Telephone System Answering System Useful Information To replace the battery: Press the ...

KXTG5480S User Guide
Page 16
...to recycle this battery. "3" flashes, or - Clean more often if the unit is displayed on how to keep your Panasonic battery is in use . the handset beeps intermittently while it is fully charged, you can actually talk on the base unit. Please call 1-800-8-BATTERY for 6... • If you leave the handset off the base unit. • If the battery has been discharged, the handset will give you place the handset on the handset will be shortened. Please order a new Panasonic HHR-P104 battery at all times, place the handset on page 2. Actual battery performance ...
...to recycle this battery. "3" flashes, or - Clean more often if the unit is displayed on how to keep your Panasonic battery is in use . the handset beeps intermittently while it is fully charged, you can actually talk on the base unit. Please call 1-800-8-BATTERY for 6... • If you leave the handset off the base unit. • If the battery has been discharged, the handset will give you place the handset on the handset will be shortened. Please order a new Panasonic HHR-P104 battery at all times, place the handset on page 2. Actual battery performance ...
KXTG5480S User Guide
Page 17
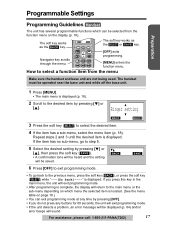
...; To go to step 5. 5 Select the desired setting by pressing [d] or [B]. Programmable Settings Preparation Telephone System Answering System Useful Information Programming Guidelines Handset The unit has several programmable functions which menu the selected item is located. (See the menu table on the display (p. 18). The... handset must be operated near the base unit and while off the base unit. 1 Press [MENU]. • The main menu is displayed. Repeat ...
...; To go to step 5. 5 Select the desired setting by pressing [d] or [B]. Programmable Settings Preparation Telephone System Answering System Useful Information Programming Guidelines Handset The unit has several programmable functions which menu the selected item is located. (See the menu table on the display (p. 18). The... handset must be operated near the base unit and while off the base unit. 1 Press [MENU]. • The main menu is displayed. Repeat ...
KXTG5480S User Guide
Page 18
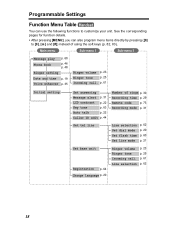
Programmable Settings Function Menu Table Handset You can also program menu items directly by pressing ([0] to customize your unit. Main menu Sub-menu I Sub-menu II Message play Phone book p. 68 p. ...
Programmable Settings Function Menu Table Handset You can also program menu items directly by pressing ([0] to customize your unit. Main menu Sub-menu I Sub-menu II Message play Phone book p. 68 p. ...

KXTG5480S User Guide
Page 19
Programmable Settings Preparation Telephone System Answering System Useful Information Date and Time Handset We recommend you set the date and time so that the unit will not adjust the date and time. To set correctly. Date:|12.31.... @=AM/PM f g SAVE 5 Press the soft key ( SAVE ). • The date and time are displayed. Start again from the base unit display. • If the handset beeps 3 times, the date and time were not set June 15, 2005, enter "06 15 05".) (2) Enter 4 digits for the month, day and year. (Ex...
Programmable Settings Preparation Telephone System Answering System Useful Information Date and Time Handset We recommend you set the date and time so that the unit will not adjust the date and time. To set correctly. Date:|12.31.... @=AM/PM f g SAVE 5 Press the soft key ( SAVE ). • The date and time are displayed. Start again from the base unit display. • If the handset beeps 3 times, the date and time were not set June 15, 2005, enter "06 15 05".) (2) Enter 4 digits for the month, day and year. (Ex...

KXTG5480S User Guide
Page 20
..." by pressing [d] or [B], then press the soft key ( SELECT ). To change the display language again using direct commands (p. 83). Dialing Mode Handset If you cannot read, change from English to Spanish, press the soft key ( ESPAÑOL ). The factory preset is "English". 1 Press ...[MENU]. Programmable Settings Display Language Handset You can also select the display language by pressing [d] or [B]. 5 When Spanish is selected, press the soft key ( GUARDAR ), then press [OFF...
..." by pressing [d] or [B], then press the soft key ( SELECT ). To change the display language again using direct commands (p. 83). Dialing Mode Handset If you cannot read, change from English to Spanish, press the soft key ( ESPAÑOL ). The factory preset is "English". 1 Press ...[MENU]. Programmable Settings Display Language Handset You can also select the display language by pressing [d] or [B]. 5 When Spanish is selected, press the soft key ( GUARDAR ), then press [OFF...

KXTG5480S User Guide
Page 21
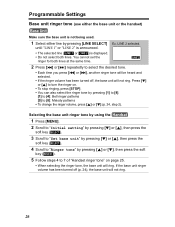
...buttons on the base unit do not light properly, or the line status icons ( L1 and L2 ) are not displayed on the handset properly, the line mode selection is preset to select the line. Preparation Telephone System Answering System Useful Information Programmable Settings Line Mode... Handset The line mode for both lines is incorrect. Set tel line Set line mode 5 Press [d] (Line1) or [B] (Line2) to "B" and generally should...
...buttons on the base unit do not light properly, or the line status icons ( L1 and L2 ) are not displayed on the handset properly, the line mode selection is preset to select the line. Preparation Telephone System Answering System Useful Information Programmable Settings Line Mode... Handset The line mode for both lines is incorrect. Set tel line Set line mode 5 Press [d] (Line1) or [B] (Line2) to "B" and generally should...

KXTG5480S User Guide
Page 22
...). 4 Select the desired contrast by pressing [d] or [B], then press the soft key ( SELECT ). 3 Scroll to press [C] or [s]. Programmable Settings Auto Talk Handset The Auto Talk feature allows you change the line selection feature from "Auto" to "Line 1" or "Line 2" (p. 62), the Auto Talk feature will change....number of LCD contrast. You do not need to "Auto talk" by pressing [d] or [B], then press the soft key ( SELECT ). LCD Contrast Handset There are 6 levels of steps indicates the contrast level. Ex. If the other line receives a call , leave the Auto Talk feature turned off. ...
...). 4 Select the desired contrast by pressing [d] or [B], then press the soft key ( SELECT ). 3 Scroll to press [C] or [s]. Programmable Settings Auto Talk Handset The Auto Talk feature allows you change the line selection feature from "Auto" to "Line 1" or "Line 2" (p. 62), the Auto Talk feature will change....number of LCD contrast. You do not need to "Auto talk" by pressing [d] or [B], then press the soft key ( SELECT ). LCD Contrast Handset There are 6 levels of steps indicates the contrast level. Ex. If the other line receives a call , leave the Auto Talk feature turned off. ...

KXTG5480S User Guide
Page 23
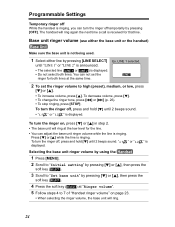
...change and ring. • The number of steps indicates the volume level. • To turn the ringer off for outside calls. See "Handset ringer tone" on page 25, step 5. 6 Press the soft key ( SAVE ). • To select the other line, repeat from ...Ringer volume 4 Press [d] (Line1) or [B] (Line2) to "Ringer setting" by pressing [d] or [B]. Press [d] or [B] while the handset is displayed. Handset ringer volume Handset 1 Press [MENU]. 2 Scroll to select the line. Ex. Preparation Telephone System Answering System Useful Information Programmable Settings Ringer Volume You can also...
...change and ring. • The number of steps indicates the volume level. • To turn the ringer off for outside calls. See "Handset ringer tone" on page 25, step 5. 6 Press the soft key ( SAVE ). • To select the other line, repeat from ...Ringer volume 4 Press [d] (Line1) or [B] (Line2) to "Ringer setting" by pressing [d] or [B]. Press [d] or [B] while the handset is displayed. Handset ringer volume Handset 1 Press [MENU]. 2 Scroll to select the line. Ex. Preparation Telephone System Answering System Useful Information Programmable Settings Ringer Volume You can also...
KXTG5480S User Guide
Page 24
... off, press and hold [d] until 2 beeps sound. • " L 1 " or " L 2 " is displayed. Selecting the base unit ringer volume by using the Handset 1 Press [MENU]. 2 Scroll to "Initial setting" by pressing [d] or [B], then press the soft key ( SELECT ). 3 Scroll to "Set base unit" by pressing [OFF].... [d]. • To change the ringer tone, press [] (p. 26). • To stop ringing, press [STOP]. You can not set the ringer volume to 7 of "Handset ringer volume" on , press [d] or [B] in step 2. • The base unit will ring at "Ringer volume". 5 Follow steps 4 to high (preset), medium,...
... off, press and hold [d] until 2 beeps sound. • " L 1 " or " L 2 " is displayed. Selecting the base unit ringer volume by using the Handset 1 Press [MENU]. 2 Scroll to "Initial setting" by pressing [d] or [B], then press the soft key ( SELECT ). 3 Scroll to "Set base unit" by pressing [OFF].... [d]. • To change the ringer tone, press [] (p. 26). • To stop ringing, press [STOP]. You can not set the ringer volume to 7 of "Handset ringer volume" on , press [d] or [B] in step 2. • The base unit will ring at "Ringer volume". 5 Follow steps 4 to high (preset), medium,...

KXTG5480S User Guide
Page 25
...company with 2 or 3 consecutive rings, select a bell ringer pattern (Tone 1 to 4). LINE 1 is preset to "Tone 2". • You cannot change . Handset ringer tone Handset 1 Press [MENU]. 2 Scroll to "Ringer setting" by pressing [d] or [B], then press the soft key ( SELECT ). 3 Scroll to "Ringer tone" by ...to a Distinctive Ring Service (such as IDENTA-RING) from step 3. 7 Press [OFF]. If the ringer volume has been turned off, the handset will ring alternately. "Tone 1" to [8]: Melody patterns To adjust the ringer volume, press the soft key ( VOLUME ). For assistance, please...
...company with 2 or 3 consecutive rings, select a bell ringer pattern (Tone 1 to 4). LINE 1 is preset to "Tone 2". • You cannot change . Handset ringer tone Handset 1 Press [MENU]. 2 Scroll to "Ringer setting" by pressing [d] or [B], then press the soft key ( SELECT ). 3 Scroll to "Ringer tone" by ...to a Distinctive Ring Service (such as IDENTA-RING) from step 3. 7 Press [OFF]. If the ringer volume has been turned off, the handset will ring alternately. "Tone 1" to [8]: Melody patterns To adjust the ringer volume, press the soft key ( VOLUME ). For assistance, please...
KXTG5480S User Guide
Page 26
...line ( LINE 1 or LINE 2 ) is not being used. 1 Select either line by pressing [1] to [8]. [1] to [4]: Bell ringer patterns [5] to 7 of "Handset ringer tone" on . • To stop ringing, press [STOP]. • You can also select the ringer tone by pressing [LINE SELECT] Ex. LINE 2 selected. ...Selecting the base unit ringer tone by using the Handset 1 Press [MENU]. 2 Scroll to "Initial setting" by pressing [d] or [B], then press the soft key ( SELECT ). 3 Scroll to "Set base ...
...line ( LINE 1 or LINE 2 ) is not being used. 1 Select either line by pressing [1] to [8]. [1] to [4]: Bell ringer patterns [5] to 7 of "Handset ringer tone" on . • To stop ringing, press [STOP]. • You can also select the ringer tone by pressing [LINE SELECT] Ex. LINE 2 selected. ...Selecting the base unit ringer tone by using the Handset 1 Press [MENU]. 2 Scroll to "Initial setting" by pressing [d] or [B], then press the soft key ( SELECT ). 3 Scroll to "Set base ...

KXTG5480S User Guide
Page 29
... key ( SELECT ) at "Set answering". Each line has its own setting. Preparation Telephone System Answering System Useful Information Preparing the Answering System Caller's Recording Time Handset You can also select the recording time by pressing [1], [2], [3], or [0] (Greeting only). 7 Press the soft key ( SAVE ). • To select the other line, repeat from...
... key ( SELECT ) at "Set answering". Each line has its own setting. Preparation Telephone System Answering System Useful Information Preparing the Answering System Caller's Recording Time Handset You can also select the recording time by pressing [1], [2], [3], or [0] (Greeting only). 7 Press the soft key ( SAVE ). • To select the other line, repeat from...


