

Operating Instructions
Page 5
...with regard to safety 6 WARNINGS 6 CAUTIONS 7 Cautions when transporting 9 Cautions when installing 9 Cautions on use 9 Others 10 Security 10 Accessories 11 Preparation Technical Information 34 List of the projector 23 Resetting to the factory default 23 Menu Navigation 24 Main menu and Sub-...44 Précautions lors du transport 45 Précautions lors de l'installation 46 Précautions lors de l'utilisation 46 Autres 46 Sécurit 47 Remplacement 48 About Your Projector 12 Projector body 12 Remote control 14 Maintenance Appendix ENGLISH - 5 Set up your...
...with regard to safety 6 WARNINGS 6 CAUTIONS 7 Cautions when transporting 9 Cautions when installing 9 Cautions on use 9 Others 10 Security 10 Accessories 11 Preparation Technical Information 34 List of the projector 23 Resetting to the factory default 23 Menu Navigation 24 Main menu and Sub-...44 Précautions lors du transport 45 Précautions lors de l'installation 46 Précautions lors de l'utilisation 46 Autres 46 Sécurit 47 Remplacement 48 About Your Projector 12 Projector body 12 Remote control 14 Maintenance Appendix ENGLISH - 5 Set up your...

Operating Instructions
Page 6
...hands. Check that might be carried out by using the projector for an extended period of surfaces which is placed on soft materials such as necklaces or hairpins. Do not install this may occur. If the installation location is not strong enough to carry out any metal...into contact with a dry cloth. Installation work , please contact an Authorized Service Center. If installation is not carried out correctly, there is used while damaged, electric shocks, short-circuits or fire may result in a plastic bag and keep them onto the projector, as ceiling suspension) should only...
...hands. Check that might be carried out by using the projector for an extended period of surfaces which is placed on soft materials such as necklaces or hairpins. Do not install this may occur. If the installation location is not strong enough to carry out any metal...into contact with a dry cloth. Installation work , please contact an Authorized Service Center. If installation is not carried out correctly, there is used while damaged, electric shocks, short-circuits or fire may result in a plastic bag and keep them onto the projector, as ceiling suspension) should only...

Operating Instructions
Page 7
... children. The lamp has high internal pressure. If improperly handled, explosion might result. When installing to a ceiling, be drawn into this is emitted from the projector's lens. Do not use the projector in narrow, badly ventilated places such as these materials could result. The plastic deterioration may...accidents may cause injury. Do not allow at least one hour before disposal. If the lamp section breaks, it may cause the projector to overheat, which cannot withstand heat close to the air outlet port. If the battery comes into contact with metallic objects or ...
... children. The lamp has high internal pressure. If improperly handled, explosion might result. When installing to a ceiling, be drawn into this is emitted from the projector's lens. Do not use the projector in narrow, badly ventilated places such as these materials could result. The plastic deterioration may...accidents may cause injury. Do not allow at least one hour before disposal. If the lamp section breaks, it may cause the projector to overheat, which cannot withstand heat close to the air outlet port. If the battery comes into contact with metallic objects or ...

Operating Instructions
Page 9
... shining onto the screen. ENGLISH - 9 Failure to purchase the separate installation kit (Model No. We are constantly making efforts to excessive vibration or shocks. Be sure to carry out all installation work . If installing the projector to the ceiling, ask a qualified technician to always remove the lens...or light from indoor lamps from the exhaust port depending on use In order to vibration or shocks. Cautions when installing Avoid setting up the projector near high-voltage power lines or near the screen to your bare hands. If this will result. Cautions when ...
... shining onto the screen. ENGLISH - 9 Failure to purchase the separate installation kit (Model No. We are constantly making efforts to excessive vibration or shocks. Be sure to carry out all installation work . If installing the projector to the ceiling, ask a qualified technician to always remove the lens...or light from indoor lamps from the exhaust port depending on use In order to vibration or shocks. Cautions when installing Avoid setting up the projector near high-voltage power lines or near the screen to your bare hands. If this will result. Cautions when ...

Operating Instructions
Page 10
...device and a commercially available shielded interface cable. The lamp life is not a malfunction. Others Disposal When disposing of the projector that should cover the following envisioned incidents. Security instruction The connecting network must be secured by an untrusted third party. ...lamp characteristics, usage condition and the installation environment. The lamp may result. When the lamp exploded, it emits internal smoke-like gas. Optical components If you for disposal. DLP chips The DLP chips are made using the projector. Note that is not observed, ...
...device and a commercially available shielded interface cable. The lamp life is not a malfunction. Others Disposal When disposing of the projector that should cover the following envisioned incidents. Security instruction The connecting network must be secured by an untrusted third party. ...lamp characteristics, usage condition and the installation environment. The lamp may result. When the lamp exploded, it emits internal smoke-like gas. Optical components If you for disposal. DLP chips The DLP chips are made using the projector. Note that is not observed, ...

Operating Instructions
Page 16
... on the ceiling and projecting from rear INSTALLATION: FRONT/CEILING COOLING CONDITION: CEILING SETTING INSTALLATION: REAR/CEILING COOLING CONDITION: CEILING SETTING NOTE: • A translucent screen is required for rear projection. • See more detailed setting up Projection method You can use a projector on top of another projector. • Do not cover the ventilation openings...
... on the ceiling and projecting from rear INSTALLATION: FRONT/CEILING COOLING CONDITION: CEILING SETTING INSTALLATION: REAR/CEILING COOLING CONDITION: CEILING SETTING NOTE: • A translucent screen is required for rear projection. • See more detailed setting up Projection method You can use a projector on top of another projector. • Do not cover the ventilation openings...

Operating Instructions
Page 19
... judge that a problem has occurred and the power will not be allowed to warm up is on the projector. 1. Projecting Projecting a image J Switching on the projector When using an optional lens, install a projection lens before any adjustments are made to the focus. 1. Connect the supplied power cord (220 ...screen. 7. Press F G I H to display the setup screen. INPUT SELECT buttons Basic Operation . If this happens, increase the temperature around the projector so that the image size fits in green and soon the image is 0 °C (32 °F) or higher, and then turn on the ...
... judge that a problem has occurred and the power will not be allowed to warm up is on the projector. 1. Projecting Projecting a image J Switching on the projector When using an optional lens, install a projection lens before any adjustments are made to the focus. 1. Connect the supplied power cord (220 ...screen. 7. Press F G I H to display the setup screen. INPUT SELECT buttons Basic Operation . If this happens, increase the temperature around the projector so that the image size fits in green and soon the image is 0 °C (32 °F) or higher, and then turn on the ...

Operating Instructions
Page 25
... BACK COLOR BLACK LOGO1 BLUE LOGO2 STARTUP LOGO LOGO2 LOGO1 NONE FREEZE SIDE BY SIDE VIDEO RGB1 DVI-D OFF S-VIDEO RGB2 SDI PROJECTOR SETUP PROJECTOR ID ALL 1 - 64 Menu Navigation INSTALLATION FRONT/FLOOR FRONT/CEILING REAR/FLOOR REAR/CEILING HIGH ALTITUDE MODE OFF ON COOLING CONDITION FLOOR SETTING VERTICAL DOWN SETTING CEILING SETTING...
... BACK COLOR BLACK LOGO1 BLUE LOGO2 STARTUP LOGO LOGO2 LOGO1 NONE FREEZE SIDE BY SIDE VIDEO RGB1 DVI-D OFF S-VIDEO RGB2 SDI PROJECTOR SETUP PROJECTOR ID ALL 1 - 64 Menu Navigation INSTALLATION FRONT/FLOOR FRONT/CEILING REAR/FLOOR REAR/CEILING HIGH ALTITUDE MODE OFF ON COOLING CONDITION FLOOR SETTING VERTICAL DOWN SETTING CEILING SETTING...

Operating Instructions
Page 28
...(GREEN) LAMP TEMP FILTER STANDBY(RED)/ ON(GREEN) LAMP TEMP FILTER If a problem should occur with the projector, the indicators will inform you turn on the projector Request the dealer to 80 % (no problem is not installed. NOTE: • If no condensation). Instead contact an Authorized Service Center. Lamp unit is found or...
...(GREEN) LAMP TEMP FILTER STANDBY(RED)/ ON(GREEN) LAMP TEMP FILTER If a problem should occur with the projector, the indicators will inform you turn on the projector Request the dealer to 80 % (no problem is not installed. NOTE: • If no condensation). Instead contact an Authorized Service Center. Lamp unit is found or...
Operating Instructions
Page 29
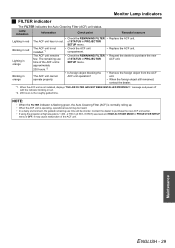
.... Maintenance ENGLISH - 29 of the ACF unit. Lamp indication Information Check point Remedial measure Lighting in PROJECTOR SETUP menu is not installed, displays "THE AIR FILTER HAS NOT BEEN INSTALLED PROPERLY." NOTE: • When the FILTER indicator is flashing green, the Auto Cleaning Filter (ACF)... is normally rolling up. • When the ACF unit is operating, operational sound may cause malfunction of STATUS in PROJECTOR ACF unit. The ACF...
.... Maintenance ENGLISH - 29 of the ACF unit. Lamp indication Information Check point Remedial measure Lighting in PROJECTOR SETUP menu is not installed, displays "THE AIR FILTER HAS NOT BEEN INSTALLED PROPERLY." NOTE: • When the FILTER indicator is flashing green, the Auto Cleaning Filter (ACF)... is normally rolling up. • When the ACF unit is operating, operational sound may cause malfunction of STATUS in PROJECTOR ACF unit. The ACF...

Operating Instructions
Page 31
... Center to replace the ACF The ACF unit is consumable product and effects on the back of the projector until the screws turn off the POWER switch of the lamp unit cover is installed securely. 6. J When to purchase a replacement ACF (ET-ACF100). Slide the lamp unit cover to the buttons and pull... of STATUS in proper way. Slide the lamp unit cover to the hinge side and push in correct direction. 5. Disconnect the power cord from the projector. You can check the remaining amount of the ACF unit in REMAINING FILTER of the new lamp unit and replace it clicks and make sure...
... Center to replace the ACF The ACF unit is consumable product and effects on the back of the projector until the screws turn off the POWER switch of the lamp unit cover is installed securely. 6. J When to purchase a replacement ACF (ET-ACF100). Slide the lamp unit cover to the buttons and pull... of STATUS in proper way. Slide the lamp unit cover to the hinge side and push in correct direction. 5. Disconnect the power cord from the projector. You can check the remaining amount of the ACF unit in REMAINING FILTER of the new lamp unit and replace it clicks and make sure...

Operating Instructions
Page 33
... is connected to be adjusted correctly. Reference page*1 18 20 20 28 28 31 - No picture appears. The lamp unit cover has not been securely installed. The lens focus may not be connected to change the external output settings by pressing the [Fn] + [F3] or [Fn] + [F10] keys simultaneously. The...-ROM 22 19 CD-ROM CD-ROM CD-ROM - - The input source which is not compatible with the VCR or other signal source. The projector may not have been set correctly. The batteries may be weak. The remote control signal receptor on . The color is connected to the latest version...
... is connected to be adjusted correctly. Reference page*1 18 20 20 28 28 31 - No picture appears. The lamp unit cover has not been securely installed. The lens focus may not be connected to change the external output settings by pressing the [Fn] + [F3] or [Fn] + [F10] keys simultaneously. The...-ROM 22 19 CD-ROM CD-ROM CD-ROM - - The input source which is not compatible with the VCR or other signal source. The projector may not have been set correctly. The batteries may be weak. The remote control signal receptor on . The color is connected to the latest version...

Operating Instructions
Page 36
... Installation Contrast ratio AC 120 V 60 Hz • PT-DZ6710U/PT-DZ6700U: 820 W • PT-DW6300U/PT-D6000U: 780 W During standby (when fan is stopped): Approx. 8 W*1 • PT-DZ6710U/PT-DZ6700U: 8 A • PT-DW6300U/PT-D6000U: 7.2 A • PT-DZ6710U/PT-DZ6700U: 0.67 type • PT-DW6300U: 0.65 type • PT-D6000U: 0.7 type • PT-DZ6710U/PT-DZ6700U/PT-DW6300U: 16 : 10 • PT-D6000U: 4:3 1 unit DLP™ chip, DLP...
... Installation Contrast ratio AC 120 V 60 Hz • PT-DZ6710U/PT-DZ6700U: 820 W • PT-DW6300U/PT-D6000U: 780 W During standby (when fan is stopped): Approx. 8 W*1 • PT-DZ6710U/PT-DZ6700U: 8 A • PT-DW6300U/PT-D6000U: 7.2 A • PT-DZ6710U/PT-DZ6700U: 0.67 type • PT-DW6300U: 0.65 type • PT-D6000U: 0.7 type • PT-DZ6710U/PT-DZ6700U/PT-DW6300U: 16 : 10 • PT-D6000U: 4:3 1 unit DLP™ chip, DLP...
Operating Instructions
Page 39
... 23 I ID Remote control button 14 Setting 15 INPUT SELECT Control panel button 12 Remote control buttons 14 Remote control function 22 INSTALLATION Projection method 16 L LAMP Indicator status 28 Lamp unit compartment 12 LAMP1/LAMP2 indicators 12 Replacing 30 LAN Terminal 13 LENS Control...ON Control panel button 12 Remote control button 14 Switching on/off 19 POWER STANDBY Control panel button 12 Remote control button 14 Projector lens cover Accessories 11 R Remote control 14 Accessories 11 Signal receptor 12 Wired connection 15 REMOTE1 Terminal 13 Wired connection 15 ...
... 23 I ID Remote control button 14 Setting 15 INPUT SELECT Control panel button 12 Remote control buttons 14 Remote control function 22 INSTALLATION Projection method 16 L LAMP Indicator status 28 Lamp unit compartment 12 LAMP1/LAMP2 indicators 12 Replacing 30 LAN Terminal 13 LENS Control...ON Control panel button 12 Remote control button 14 Switching on/off 19 POWER STANDBY Control panel button 12 Remote control button 14 Projector lens cover Accessories 11 R Remote control 14 Accessories 11 Signal receptor 12 Wired connection 15 REMOTE1 Terminal 13 Wired connection 15 ...


