

PTD5500U User Guide
Page 1
PT-D5500UL Read these instructions completely before operating this unit. TQBJ 0148-1 Operating Instructions DLPTM Based Projector Commercial Use PT-D5500U Model No.
PT-D5500UL Read these instructions completely before operating this unit. TQBJ 0148-1 Operating Instructions DLPTM Based Projector Commercial Use PT-D5500U Model No.

PTD5500U User Guide
Page 2
...pleased with a three-pin grounding-type power plug. DO NOT OPEN MISE EN GARDE- Do not defeat the purpose of your Panasonic DLPTM based projector. We hope it in the space provided below and retain this booklet in the literature accompanying the product. WARNUNG- Do not ...remove the grounding pin on its back. If you might require. Dear Panasonic Customer: This instruction booklet provides all the necessary operating information...
...pleased with a three-pin grounding-type power plug. DO NOT OPEN MISE EN GARDE- Do not defeat the purpose of your Panasonic DLPTM based projector. We hope it in the space provided below and retain this booklet in the literature accompanying the product. WARNUNG- Do not ...remove the grounding pin on its back. If you might require. Dear Panasonic Customer: This instruction booklet provides all the necessary operating information...

PTD5500U User Guide
Page 4
...Precautions with regard to safety 5 Accessories 7 Precautions on handling 8 Name and function of parts 9 Remote control 9 Front and side of the projector 11 Rear view of the main unit/Controls on rear panel ..........12 Side-mounted connection terminals 13 Using the remote control unit 14 Loading dry... cells 14 Effective range of remote control operation 14 Setting projector ID number to remote control 15 Using the remote control as a PC mouse 15 Using a wired remote control 16 Installation 17 ...
...Precautions with regard to safety 5 Accessories 7 Precautions on handling 8 Name and function of parts 9 Remote control 9 Front and side of the projector 11 Rear view of the main unit/Controls on rear panel ..........12 Side-mounted connection terminals 13 Using the remote control unit 14 Loading dry... cells 14 Effective range of remote control operation 14 Setting projector ID number to remote control 15 Using the remote control as a PC mouse 15 Using a wired remote control 16 Installation 17 ...

PTD5500U User Guide
Page 5
... inspection, adjustment and repair work (such as this condition may result in a place which is not strong enough to take the full weight of the projector. • If the installation location is not strong enough, it may fall down or tip over , and injury or damage could result. Precautions with ...objects, bend it excessively, twist it, pull it may result in such cases, otherwise fire or electric shocks could result. • Do not use the projector in fire or electric shocks. Do not remove the cover or modify it from the wall outlet. Clean the power cord plug regularly to it...
... inspection, adjustment and repair work (such as this condition may result in a place which is not strong enough to take the full weight of the projector. • If the installation location is not strong enough, it may fall down or tip over , and injury or damage could result. Precautions with ...objects, bend it excessively, twist it, pull it may result in such cases, otherwise fire or electric shocks could result. • Do not use the projector in fire or electric shocks. Do not remove the cover or modify it from the wall outlet. Clean the power cord plug regularly to it...

PTD5500U User Guide
Page 6
... from remote control unit, keep it . Insulate the battery using only the hole used for at least one hour before moving the projector. • Moving the projector with cables still attached can cause death by a qualified technician. • The lamp unit has high internal pressure. Do not bring...if swallowed. • If the battery is pulled, the cord will become damaged, and fire, short-circuits or serious electric shocks may cause the projector to the air outlet port. • Heated air comes out of children. • The battery can damage the cables, which cannot withstand heat...
... from remote control unit, keep it . Insulate the battery using only the hole used for at least one hour before moving the projector. • Moving the projector with cables still attached can cause death by a qualified technician. • The lamp unit has high internal pressure. Do not bring...if swallowed. • If the battery is pulled, the cord will become damaged, and fire, short-circuits or serious electric shocks may cause the projector to the air outlet port. • Heated air comes out of children. • The battery can damage the cables, which cannot withstand heat...

PTD5500U User Guide
Page 7
...the wall outlet as a safety precaution before the season for humid weather arrives. Do not look directly into the lens while the projector is being cleaned out, it may explode or leak, and fire, injury or contamination of the battery compartment and surrounding area may...are correct. • If the battery is a injury hazard. Do not use the old lamp unit. • The lamp section may result. Ask your projector. Remote control unit [N2QAEA000023 x 1] Power cord [K2CF3EH00001 x 1] Wired cable for remote control Battery for the openings beside the optical lens, during horizontal ...
...the wall outlet as a safety precaution before the season for humid weather arrives. Do not look directly into the lens while the projector is being cleaned out, it may explode or leak, and fire, injury or contamination of the battery compartment and surrounding area may...are correct. • If the battery is a injury hazard. Do not use the old lamp unit. • The lamp section may result. Ask your projector. Remote control unit [N2QAEA000023 x 1] Power cord [K2CF3EH00001 x 1] Wired cable for remote control Battery for the openings beside the optical lens, during horizontal ...

PTD5500U User Guide
Page 8
...specialized technician for low ceiling: Model No. If a vinyl sheet sucked up and blocks the air filter intake port, the internal temperature of the projector may burst shortly after the first lighting. • The possibility of burst increases when the lamp is used hours. • The life cycle of...-voltage electrical power lines or power sources. Install the product in the vicinity of driving power and others or mounted in place when transporting the projector or carrying it over 2 700 m (8 881.5') above sea level, set the "Fan Control1", described on page 35, to vibration and ...
...specialized technician for low ceiling: Model No. If a vinyl sheet sucked up and blocks the air filter intake port, the internal temperature of the projector may burst shortly after the first lighting. • The possibility of burst increases when the lamp is used hours. • The life cycle of...-voltage electrical power lines or power sources. Install the product in the vicinity of driving power and others or mounted in place when transporting the projector or carrying it over 2 700 m (8 881.5') above sea level, set the "Fan Control1", described on page 35, to vibration and ...

PTD5500U User Guide
Page 9
... (page 28) Displays and clears the Main Menu. Also use numeric buttons. 9 FREEZE button (page 25) Press this button to Projector > Remote control operation indicator lamp The lamp flashes when any remote control button is pressed. SYSTEM SELECTOR button System switching can control the..."OPTION2" screen from Main Menu. SHUTTER button (page 25) Press this button to the "l" position. Operation mode selector (Computer/Numeric, Projector) switch (page 15) Put this button while projecting an image automatically corrects the picture positioning on the power if the MAIN POWER has ...
... (page 28) Displays and clears the Main Menu. Also use numeric buttons. 9 FREEZE button (page 25) Press this button to Projector > Remote control operation indicator lamp The lamp flashes when any remote control button is pressed. SYSTEM SELECTOR button System switching can control the..."OPTION2" screen from Main Menu. SHUTTER button (page 25) Press this button to the "l" position. Operation mode selector (Computer/Numeric, Projector) switch (page 15) Put this button while projecting an image automatically corrects the picture positioning on the power if the MAIN POWER has ...

PTD5500U User Guide
Page 10
... to the left mouse button when the operation mode is switched to the left and right mouse buttons. Name and function of projectors, these buttons serve to specify a particular projector. PAGE UP/PAGE DOWN buttons These buttons correspond to the PAGE UP/PAGE DOWN buttons on the main unit. Numeric (0-9) buttons In...
... to the left mouse button when the operation mode is switched to the left and right mouse buttons. Name and function of projectors, these buttons serve to specify a particular projector. PAGE UP/PAGE DOWN buttons These buttons correspond to the PAGE UP/PAGE DOWN buttons on the main unit. Numeric (0-9) buttons In...
PTD5500U User Guide
Page 11
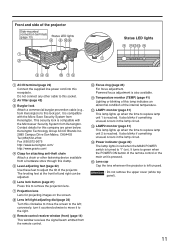
...with the Microsaver Security System from Kensington. It also blinks if something unusual occurs in the lamp circuit. Lens left ; Front and side of the projector Side-mounted connection terminals (page 13) Status LED lights Status LED lights AC IN terminal (page 22) Connect the supplied line power cord into ... lock is turned to replace lamp unit 1 is left and right can be adjusted. Temperature monitor (TEMP) (page 41) Lighting or blinking of the projector. LAMP2 monitor (page 41) This lamp lights up when the time to "I" (on the screen. Lens cap Cap the lens whenever the...
...with the Microsaver Security System from Kensington. It also blinks if something unusual occurs in the lamp circuit. Lens left ; Front and side of the projector Side-mounted connection terminals (page 13) Status LED lights Status LED lights AC IN terminal (page 22) Connect the supplied line power cord into ... lock is turned to replace lamp unit 1 is left and right can be adjusted. Temperature monitor (TEMP) (page 41) Lighting or blinking of the projector. LAMP2 monitor (page 41) This lamp lights up when the time to "I" (on the screen. Lens cap Cap the lens whenever the...

PTD5500U User Guide
Page 12
... coming from the remote control. RGB1 button (page 22) Switches to run function. The on-screen display (OSD) selection menu can also return to the projector. ENTER button (page 28) Press this button while projecting an image automatically corrects the picture positioning on the screen. Name and function of parts Rear...
... coming from the remote control. RGB1 button (page 22) Switches to run function. The on-screen display (OSD) selection menu can also return to the projector. ENTER button (page 28) Press this button while projecting an image automatically corrects the picture positioning on the screen. Name and function of parts Rear...

PTD5500U User Guide
Page 13
...page 20) DVI-D signals are used to input RGB or YPBPR signals (BNC). RGB (YPBPR)1 input terminal (pages 19, 20) A terminal to control the projector from your PC (D-SUB 9-pin female). RGB (YPBPR)2 input terminal (page 20) A terminal to this terminal (D-SUB 9-pin female). REMOTE2 IN terminal The user... VIDEO IN terminal (page 19) An input terminal for video signals. (BNC) S-VIDEO IN terminal (page 19) An input terminal for controlling the projector from the PC. (10Base-T/100Base-TX compliant) REMOTE1 lN/OUT terminal (page 16) When two or more main units are applied to this terminal. ...
...page 20) DVI-D signals are used to input RGB or YPBPR signals (BNC). RGB (YPBPR)1 input terminal (pages 19, 20) A terminal to control the projector from your PC (D-SUB 9-pin female). RGB (YPBPR)2 input terminal (page 20) A terminal to this terminal (D-SUB 9-pin female). REMOTE2 IN terminal The user... VIDEO IN terminal (page 19) An input terminal for video signals. (BNC) S-VIDEO IN terminal (page 19) An input terminal for controlling the projector from the PC. (10Base-T/100Base-TX compliant) REMOTE1 lN/OUT terminal (page 16) When two or more main units are applied to this terminal. ...

PTD5500U User Guide
Page 14
...; (Front) (Rear) Remote 15˚ control 15˚ [Top view] 15˚ [Side view] 15˚ Figure 1 Remote control Screen Projector Attention • Do not drop the remote control unit. • Do not expose remote control unit to any liquid. • Do not use NiCd...control Figure 2 Remote control receiver window (rear) Note • When the remote control is approx. 7 meters from the beam receiver on the projector (figure 1). Into battery compartment, with their polarities are correct. 1. Using the remote control unit Loading dry cells When loading batteries into the ...
...; (Front) (Rear) Remote 15˚ control 15˚ [Top view] 15˚ [Side view] 15˚ Figure 1 Remote control Screen Projector Attention • Do not drop the remote control unit. • Do not expose remote control unit to any liquid. • Do not use NiCd...control Figure 2 Remote control receiver window (rear) Note • When the remote control is approx. 7 meters from the beam receiver on the projector (figure 1). Into battery compartment, with their polarities are correct. 1. Using the remote control unit Loading dry cells When loading batteries into the ...

PTD5500U User Guide
Page 15
...number (0 to 9) buttons to the Computer position. • ENTER button Pressing the front, rear, left mouse button. The ID number of the projector is pressed, the projector can operate the remote control. Using the remote control as a PC mouse Left click ( ) button PAGE UP button ENTER button Right click ( ... DOWN button Operation mode selector switch Click button Operation mode selector switch Put the knob to enter the 2-digit ID number set by the projector. When the dry cells are left mouse button. • PAGE UP button This button can be used as a mouse, please purchase ...
...number (0 to 9) buttons to the Computer position. • ENTER button Pressing the front, rear, left mouse button. The ID number of the projector is pressed, the projector can operate the remote control. Using the remote control as a PC mouse Left click ( ) button PAGE UP button ENTER button Right click ( ... DOWN button Operation mode selector switch Click button Operation mode selector switch Put the knob to enter the 2-digit ID number set by the projector. When the dry cells are left mouse button. • PAGE UP button This button can be used as a mouse, please purchase ...

PTD5500U User Guide
Page 16
... remote control in the environment in which an obstacle stands in the system, connect the units with the supplied remote control cable to the secondary projector 16
... remote control in the environment in which an obstacle stands in the system, connect the units with the supplied remote control cable to the secondary projector 16

PTD5500U User Guide
Page 17
... : Distance from center of lens to page 57 for SW obtained above can then be used with the PT-D5500U/D5500UL projector depending on user's needs or viewing conditions. When an SXGA signal is recommended that you use the projection distance for the ... the projection lenses available as optional accessories. Projection Scheme 2 Table standing Ceiling mount (Default position) Rear projection Front projection Projection Scheme 1 I;nstallation geometry After the projector is 4:3. LW = 0.0370 x SD - 0.0650 LT = 0.0488 x SD - 0.0638 (LW,LT: m SD: inch) For 16 : 9 aspect...
... : Distance from center of lens to page 57 for SW obtained above can then be used with the PT-D5500U/D5500UL projector depending on user's needs or viewing conditions. When an SXGA signal is recommended that you use the projection distance for the ... the projection lenses available as optional accessories. Projection Scheme 2 Table standing Ceiling mount (Default position) Rear projection Front projection Projection Scheme 1 I;nstallation geometry After the projector is 4:3. LW = 0.0370 x SD - 0.0650 LT = 0.0488 x SD - 0.0638 (LW,LT: m SD: inch) For 16 : 9 aspect...

PTD5500U User Guide
Page 18
...5- S clock shield T. D. level), and digital signal from PC. • Some PC models are not compatible with the PT-D5500U/D5500UL projector. • The pin assignments on the S-VIDEO IN port are as follows (interface with TMDS port on the RGB2 input port are as...T. S data 0+ T. S data 5+ T. M. Pins and : Valid if the PC has the corresponding function. • The pin assignments on the screen to the projector, carefully read the owners manual supplied with the equipment once again. • All cable connections should be made with the entire system devices, including the...
...5- S clock shield T. D. level), and digital signal from PC. • Some PC models are not compatible with the PT-D5500U/D5500UL projector. • The pin assignments on the S-VIDEO IN port are as follows (interface with TMDS port on the RGB2 input port are as...T. S data 0+ T. S data 5+ T. M. Pins and : Valid if the PC has the corresponding function. • The pin assignments on the screen to the projector, carefully read the owners manual supplied with the equipment once again. • All cable connections should be made with the entire system devices, including the...

PTD5500U User Guide
Page 19
If this is the case, connect a TBC between the projector and the video deck. • If nonstandard burst signals are connected, the image may be sure to use the one with a video deck, be distorted. ... (Connect PB) Green(Connect Y) Digital Hi-vision video deck Attention • When connecting with a built-in time base corrector (TBC) or use a TBC between the projector and the video deck. 19
If this is the case, connect a TBC between the projector and the video deck. • If nonstandard burst signals are connected, the image may be sure to use the one with a video deck, be distorted. ... (Connect PB) Green(Connect Y) Digital Hi-vision video deck Attention • When connecting with a built-in time base corrector (TBC) or use a TBC between the projector and the video deck. 19

PTD5500U User Guide
Page 21
Remove the lens. While holding down the lens lock button, turn off the projector's power. • Do not touch the lens signal contact. Lens lock button Note • Before replacing the lens, turn the lens further counterclockwise. Dust or ...
Remove the lens. While holding down the lens lock button, turn off the projector's power. • Do not touch the lens signal contact. Lens lock button Note • Before replacing the lens, turn the lens further counterclockwise. Dust or ...
PTD5500U User Guide
Page 22
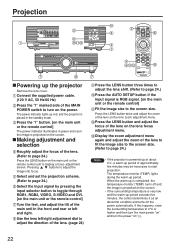
... adjustment dial to adjust the direction of the MAIN POWER switch to start projection. When the warm-up red, and the projector is placed in green and soon the image is projected on the main unit or the remote control] Fit the image size...the zoom of the lens to fit the image size to the screen size. (Refer to page 24.) Note • If the projector is very low and the warm-up period of the lens. (Refer to page 24.) Press the LENS button on the power.... on the lens zoom adjustment menu. The temperature monitor (TEMP) lights during the warm-up the projector Remove the lens cover.
... adjustment dial to adjust the direction of the MAIN POWER switch to start projection. When the warm-up red, and the projector is placed in green and soon the image is projected on the main unit or the remote control] Fit the image size...the zoom of the lens to fit the image size to the screen size. (Refer to page 24.) Note • If the projector is very low and the warm-up period of the lens. (Refer to page 24.) Press the LENS button on the power.... on the lens zoom adjustment menu. The temperature monitor (TEMP) lights during the warm-up the projector Remove the lens cover.


