

PTF300NTU User Guide
Page 1
PT-F300NTU PT-F300U (PT-F300NTU) Before operating this product, please read the instructions carefully and save this manual for future use. TQBJ0279-1 ENGLISH Operating Instructions LCD Projector Commercial Use Model No.
PT-F300NTU PT-F300U (PT-F300NTU) Before operating this product, please read the instructions carefully and save this manual for future use. TQBJ0279-1 ENGLISH Operating Instructions LCD Projector Commercial Use Model No.

PTF300NTU User Guide
Page 2
... to insert the plug into the outlet, contact an electrician. Disposal may be of sufficient magnitude to constitute a risk of your Panasonic LCD projector. Model number: PT-F300NTU/PT-F300U Serial number: WARNING: TO REDUCE THE RISK OF FIRE OR ELECTRIC SHOCK, DONOT EXPOSE THIS...legal requirements regarding the use the accessory cord in a manner which is equipped with the projector for power supplies up to at the directive 2004/108/EC, article 9(2) Panasonic Testing Center Panasonic Service Europe, a division of the grounding plug. Before connecting, operating or adjusting this...
... to insert the plug into the outlet, contact an electrician. Disposal may be of sufficient magnitude to constitute a risk of your Panasonic LCD projector. Model number: PT-F300NTU/PT-F300U Serial number: WARNING: TO REDUCE THE RISK OF FIRE OR ELECTRIC SHOCK, DONOT EXPOSE THIS...legal requirements regarding the use the accessory cord in a manner which is equipped with the projector for power supplies up to at the directive 2004/108/EC, article 9(2) Panasonic Testing Center Panasonic Service Europe, a division of the grounding plug. Before connecting, operating or adjusting this...

PTF300NTU User Guide
Page 4
...when installing 8 Cautions on use 9 Security 9 Accessories 10 Preparation Read this first 11 Minimum required setting screen 11 About Your Projector 12 Projector body 12 Remote control 14 Getting Started Setting up 15 Screen size and throw distance 15 Projection method 16 Front leg adjusters and...28 Using the laser pointer 28 Controlling the volume of the speaker 29 ENGLISH - 4 Start projecting See "Switching the projector on/off the projector 23 Projecting an image 24 Selecting the input signal 24 Positioning the image 24 Remote control operation 25 Operating range 25...
...when installing 8 Cautions on use 9 Security 9 Accessories 10 Preparation Read this first 11 Minimum required setting screen 11 About Your Projector 12 Projector body 12 Remote control 14 Getting Started Setting up 15 Screen size and throw distance 15 Projection method 16 Front leg adjusters and...28 Using the laser pointer 28 Controlling the volume of the speaker 29 ENGLISH - 4 Start projecting See "Switching the projector on/off the projector 23 Projecting an image 24 Selecting the input signal 24 Positioning the image 24 Remote control operation 25 Operating range 25...

PTF300NTU User Guide
Page 5
...CAPTION SETTING 38 STARTUP LOGO 39 AUTO SETUP 39 SIGNAL SEARCH 39 BACK COLOR 39 WIDE MODE 39 SXGA MODE 39 OTHER FUNCTIONS 40 PROJECTOR SETUP menu 41 STATUS 41 COMPUTER2 SELECT 41 NO SIGNAL SHUT-OFF 41 INITIAL START UP 41 INSTALLATION 42 HIGH ALTITUDE MODE 42 EMULATE... menu 46 Items in NETWORK menu 46 TEMP, LAMP and FILTER Indicators 47 Managing the indicated problems 47 Care and Replacement 48 Cleaning the projector 48 Replacing the Lamp unit 48 Replacing the Auto Cleaning Filter (ACF 49 Troubleshooting 51 Appendix Technical Information 52 List of compatible signals 52...
...CAPTION SETTING 38 STARTUP LOGO 39 AUTO SETUP 39 SIGNAL SEARCH 39 BACK COLOR 39 WIDE MODE 39 SXGA MODE 39 OTHER FUNCTIONS 40 PROJECTOR SETUP menu 41 STATUS 41 COMPUTER2 SELECT 41 NO SIGNAL SHUT-OFF 41 INITIAL START UP 41 INSTALLATION 42 HIGH ALTITUDE MODE 42 EMULATE... menu 46 Items in NETWORK menu 46 TEMP, LAMP and FILTER Indicators 47 Managing the indicated problems 47 Care and Replacement 48 Cleaning the projector 48 Replacing the Lamp unit 48 Replacing the Auto Cleaning Filter (ACF 49 Troubleshooting 51 Appendix Technical Information 52 List of compatible signals 52...

PTF300NTU User Guide
Page 6
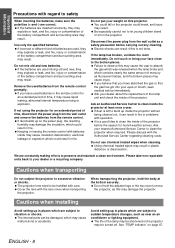
...that might be necessary. Important Information Precautions with regard to safety WARNINGS If you notice smoke, strange smells or noise coming from the projector, disconnect the power plug from the wall outlet. Check that injury or electric shocks may result in fire or electric shocks. If ...the plug is used while damaged, electric shocks, short-circuits or fire may cause the projector to overheat, which can damage the insulation, which are coming loose from the wall outlet immediately when problem occurred. Do not damage ...
...that might be necessary. Important Information Precautions with regard to safety WARNINGS If you notice smoke, strange smells or noise coming from the projector, disconnect the power plug from the wall outlet. Check that injury or electric shocks may result in fire or electric shocks. If ...the plug is used while damaged, electric shocks, short-circuits or fire may cause the projector to overheat, which can damage the insulation, which are coming loose from the wall outlet immediately when problem occurred. Do not damage ...

PTF300NTU User Guide
Page 7
... fire, electric shocks or plastic deterioration. Do not allow infants or pets to observe this port [allow it . Do not place the projector on top of the air outlet port. Important Information Precautions with regard to disconnect the power plug from the wall outlet. Fire or electric... shocks can result. Before replacing the lamp, be sure to safety Do not touch the leaked liquid from the projector. When disconnecting the power cord, hold the plug, not the cord. If you are away from the batteries. Failure to observe this light...
... fire, electric shocks or plastic deterioration. Do not allow infants or pets to observe this port [allow it . Do not place the projector on top of the air outlet port. Important Information Precautions with regard to disconnect the power plug from the wall outlet. Fire or electric... shocks can result. Before replacing the lamp, be sure to safety Do not touch the leaked liquid from the projector. When disconnecting the power cord, hold the plug, not the cord. If you are away from the batteries. Failure to observe this light...
PTF300NTU User Guide
Page 8
... replacement of the lamp unit and check the inside of the battery compartment and surrounding area may result. You could fall or the projector could result in places which are correct. Do not touch or bring your dealer or a recycling company. Please discuss with care....the remote control for humid weather arrives. Cover the lens with regard to build up in fire or problems with batteries inside the projector without being cleaned out, it may result. Cautions when installing Avoid setting up inside may cause insulation deterioration, electrical leakage or explosion...
... replacement of the lamp unit and check the inside of the battery compartment and surrounding area may result. You could fall or the projector could result in places which are correct. Do not touch or bring your dealer or a recycling company. Please discuss with care....the remote control for humid weather arrives. Cover the lens with regard to build up in fire or problems with batteries inside the projector without being cleaned out, it may result. Cautions when installing Avoid setting up inside may cause insulation deterioration, electrical leakage or explosion...

PTF300NTU User Guide
Page 9
...by firewall or others. When the lamp exploded, it . Locking out or prevent anyone else. Change your bare hands. Do not share your LCD. ENGLISH - 9 You will be carried out by an untrusted third party. Cautions on use of blue, green or red. Moreover, when not ... the same image for the password. Occasionally, a few stuck pixels may explode only occasionally after the instructed lamp replacement timing. If using the projector. Please note that should only be magnified and projected onto the screen. See "HIGH ALTITUDE MODE" on page 56 for use . It is...
...by firewall or others. When the lamp exploded, it . Locking out or prevent anyone else. Change your bare hands. Do not share your LCD. ENGLISH - 9 You will be carried out by an untrusted third party. Cautions on use of blue, green or red. Moreover, when not ... the same image for the password. Occasionally, a few stuck pixels may explode only occasionally after the instructed lamp replacement timing. If using the projector. Please note that should only be magnified and projected onto the screen. See "HIGH ALTITUDE MODE" on page 56 for use . It is...
PTF300NTU User Guide
Page 10
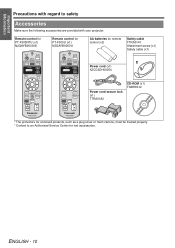
... products, such as a plug cover or foam cartons, must be treated properly. * Contact to safety Accessories Make sure the following accessories are provided with your projector. ENGLISH - 10
... products, such as a plug cover or foam cartons, must be treated properly. * Contact to safety Accessories Make sure the following accessories are provided with your projector. ENGLISH - 10

PTF300NTU User Guide
Page 11
... projecting from front Setting on a desk/floor and projecting from rear Mounting on page 30. HIGH ALTITUDE MODE If you use the projector at high elevation, the HIGH ALTITUDE MODE setting need to be ON to select the required setting. See "Menu Navigation" on the...fan speed high. NOTE: • At 1 400 - 2700 m (4 593 - 8 858 ft) above sea level, the setting must be displayed again unless the projector is initialized. You can change the each setting from rear PLEASE SELECT LANGUAGE SELECT ENTER 2. See "INITIALIZE ALL" on the HIGH ALTITUDE MODE setting. Select...
... projecting from front Setting on a desk/floor and projecting from rear Mounting on page 30. HIGH ALTITUDE MODE If you use the projector at high elevation, the HIGH ALTITUDE MODE setting need to be ON to select the required setting. See "Menu Navigation" on the...fan speed high. NOTE: • At 1 400 - 2700 m (4 593 - 8 858 ft) above sea level, the setting must be displayed again unless the projector is initialized. You can change the each setting from rear PLEASE SELECT LANGUAGE SELECT ENTER 2. See "INITIALIZE ALL" on the HIGH ALTITUDE MODE setting. Select...

PTF300NTU User Guide
Page 12
...; Do not cover the ventilation openings or place anything within 50 cm (20") of the front panel cover to protect the lens. Preparation About Your Projector Projector body J Top and front view Indicators Power indicator (page 22) LAMP indicator (page 47) TEMP indicator (page 47) FILTER indicator (page 47) Remote control signal... (page 24) Speaker Front panel cover Hold both sides of the top corner of them as this may cause damage or injury. • While the projector is not in use, keep the front panel cover closed to open or close.
...; Do not cover the ventilation openings or place anything within 50 cm (20") of the front panel cover to protect the lens. Preparation About Your Projector Projector body J Top and front view Indicators Power indicator (page 22) LAMP indicator (page 47) TEMP indicator (page 47) FILTER indicator (page 47) Remote control signal... (page 24) Speaker Front panel cover Hold both sides of the top corner of them as this may cause damage or injury. • While the projector is not in use, keep the front panel cover closed to open or close.

PTF300NTU User Guide
Page 13
VIDEO IN Connect an RCA composite video cable. VARIABLE AUDIO OUT Connect an audio cable for inputting audio signal. MAIN POWER Switch the projector on page 55. DVI-D IN Connect a DVI-D cable (Single). AUDIO IN Connect audio cables for outputting audio signals to the VARIABLE AUDIO OUT.... Auto cleaning filter (ACF) compartment (page 49) Front leg adjusters Screw up/down to adjust the projection angle. (page 16) About Your Projector Lamp unit compartment (page 48) Air exhaust port Heated air comes out of them as this opening. COMPUTER AUDIO IN Connect audio cables for network...
VIDEO IN Connect an RCA composite video cable. VARIABLE AUDIO OUT Connect an audio cable for inputting audio signal. MAIN POWER Switch the projector on page 55. DVI-D IN Connect a DVI-D cable (Single). AUDIO IN Connect audio cables for outputting audio signals to the VARIABLE AUDIO OUT.... Auto cleaning filter (ACF) compartment (page 49) Front leg adjusters Screw up/down to adjust the projection angle. (page 16) About Your Projector Lamp unit compartment (page 48) Air exhaust port Heated air comes out of them as this opening. COMPUTER AUDIO IN Connect audio cables for network...
PTF300NTU User Guide
Page 14
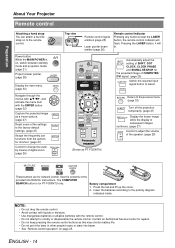
.... (page 32) Capture the projected image as a frozen picture. (page 27) Reset some of the provided CD-ROM for PT-F300NTU only. Preparation About Your Projector Remote control Attaching a hand strap You can attach a favorite strap on page 25. See the contents of the settings to the factory default settings. (page...
.... (page 32) Capture the projected image as a frozen picture. (page 27) Reset some of the provided CD-ROM for PT-F300NTU only. Preparation About Your Projector Remote control Attaching a hand strap You can attach a favorite strap on page 25. See the contents of the settings to the factory default settings. (page...

PTF300NTU User Guide
Page 15
... (m) = 0.0604 x SD (") - 0.05 NOTE: • See page 57 for the screen size and throw distance of 16:9. • Do not use the projector at a raised or a horizontally tilted position as 4:3 SD SW Screen SH Getting Started All measurements and the calculation results below are approximate and may differ.... Projected image Shown as it may result in shortening the component's life. • For the best quality of the projector. • Make sure the projector lens surface is parallel with 2.0x zoom lens. Overtilting may cause malfunction of the projection image, install a screen where...
... (m) = 0.0604 x SD (") - 0.05 NOTE: • See page 57 for the screen size and throw distance of 16:9. • Do not use the projector at a raised or a horizontally tilted position as 4:3 SD SW Screen SH Getting Started All measurements and the calculation results below are approximate and may differ.... Projected image Shown as it may result in shortening the component's life. • For the best quality of the projector. • Make sure the projector lens surface is parallel with 2.0x zoom lens. Overtilting may cause malfunction of the projection image, install a screen where...

PTF300NTU User Guide
Page 16
...INSTALLATION" on page 24. ENGLISH - 16 Setting up /down the front leg adjusters to control the angle of the projector for rear projection. • When mounting the projector on the ceiling, the optional ceiling mount bracket (ET-PKF100H, ET-PKF100S) is required for adjusting the throwing angle. ... comes out of the following 4 projection methods. Front leg adjusters and throwing angle You can screw up Projection method You can use the projector with any of the air exhaust port. J Setting on a desk/floor and J Setting on a desk/floor and projecting from front projecting...
...INSTALLATION" on page 24. ENGLISH - 16 Setting up /down the front leg adjusters to control the angle of the projector for rear projection. • When mounting the projector on the ceiling, the optional ceiling mount bracket (ET-PKF100H, ET-PKF100S) is required for adjusting the throwing angle. ... comes out of the following 4 projection methods. Front leg adjusters and throwing angle You can screw up Projection method You can use the projector with any of the air exhaust port. J Setting on a desk/floor and J Setting on a desk/floor and projecting from front projecting...

PTF300NTU User Guide
Page 17
...% of the projection Up to about 27 % of the lens. Screw the lens shift lever clockwise to unlock. 3. Q Horizontal shift You can place the projector where the projector lens is up to 50% vertically off -center from the screen and the adjust the image position with the lens shift lever. Up to... the lever right: Image moves to the right Shifting the lever left: Image moves to the left Q Vertical shift You can place the projector where the projector lens is up to 27% horizontally off -center from the screen and then adjust the image position with the lens shift lever. Screw the...
...% of the projection Up to about 27 % of the lens. Screw the lens shift lever clockwise to unlock. 3. Q Horizontal shift You can place the projector where the projector lens is up to 50% vertically off -center from the screen and the adjust the image position with the lens shift lever. Up to... the lever right: Image moves to the right Shifting the lever left: Image moves to the left Q Vertical shift You can place the projector where the projector lens is up to 27% horizontally off -center from the screen and then adjust the image position with the lens shift lever. Screw the...

PTF300NTU User Guide
Page 18
...on page 24. ENGLISH - 18 Q When the screen position is fixed H Projector Placement V Vertical center of screen SH Screen SW Q When the projector position is fixed 50% Center of lens Shift range Getting Started 50% 27% 27% Projector NOTE: • When the projector is located right in front of the screen and the lens...the lens shift lever is at the horizontal limit of the shift range, you cannot move the lever to the vertical limit. • When the projector is tilted and you adjust KEYSTONE, the center of the screen and the lens need to be realigned. • Do not attempt to locate ...
...on page 24. ENGLISH - 18 Q When the screen position is fixed H Projector Placement V Vertical center of screen SH Screen SW Q When the projector position is fixed 50% Center of lens Shift range Getting Started 50% 27% 27% Projector NOTE: • When the projector is located right in front of the screen and the lens...the lens shift lever is at the horizontal limit of the shift range, you cannot move the lever to the vertical limit. • When the projector is tilted and you adjust KEYSTONE, the center of the screen and the lens need to be realigned. • Do not attempt to locate ...

PTF300NTU User Guide
Page 19
Connecting example: Computers Computers Monitor Getting Started Audio system Computer for the LAN network connection. ENGLISH - 19 Connections Before connection to the projector Read and follow the operating and connecting instructions of each peripheral device to the COMPUTER terminals, you can switch the audio input terminal between COMPUTER ...
Connecting example: Computers Computers Monitor Getting Started Audio system Computer for the LAN network connection. ENGLISH - 19 Connections Before connection to the projector Read and follow the operating and connecting instructions of each peripheral device to the COMPUTER terminals, you can switch the audio input terminal between COMPUTER ...

PTF300NTU User Guide
Page 21
... power supply. Rail guide Latch 3. Latch 4. Depress the latch and slide the cover off the main power. Power indicator lights in use. • If the projector is switched on /off the electric power supply any time by unplugging the power plug from the wall outlet or by the internal power supply... cord. • Ensure all the way in . Make sure the shape of the power plug and the AC IN terminal on the back of the projector and slide it in . Place the latch to a wall outlet. Rail guide 3. Hold the plug and unplug the power cord from the wall outlet. 2. Align...
... power supply. Rail guide Latch 3. Latch 4. Depress the latch and slide the cover off the main power. Power indicator lights in use. • If the projector is switched on /off the electric power supply any time by unplugging the power plug from the wall outlet or by the internal power supply... cord. • Ensure all the way in . Make sure the shape of the power plug and the AC IN terminal on the back of the projector and slide it in . Place the latch to a wall outlet. Rail guide 3. Hold the plug and unplug the power cord from the wall outlet. 2. Align...

PTF300NTU User Guide
Page 22
... Indicator status No illumination or flashing RED Lit Flashing GREEN ORANGE Flashing Lit Lit Flashing Status The MAIN POWER is switched off and the projector is cooling the lamp. When the LAMP or TEMP indicator is flashing, not available to switch on again when cooling the lamp and ...recovering to projection mode. Projecting. Press the power button to start the projection after a short time. NOTE: • If the projector is switched on /off . (When NETWORK STANDBY in NETWORK menu or IN STANDBY MODE of the power. Basic Operation ENGLISH - 22 Switching the...
... Indicator status No illumination or flashing RED Lit Flashing GREEN ORANGE Flashing Lit Lit Flashing Status The MAIN POWER is switched off and the projector is cooling the lamp. When the LAMP or TEMP indicator is flashing, not available to switch on again when cooling the lamp and ...recovering to projection mode. Projecting. Press the power button to start the projection after a short time. NOTE: • If the projector is switched on /off . (When NETWORK STANDBY in NETWORK menu or IN STANDBY MODE of the power. Basic Operation ENGLISH - 22 Switching the...


