Receiver W/hd&dvd Rec
Page 1
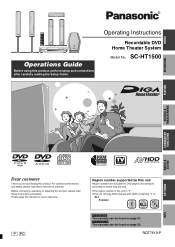
SC-HT1500 RECORDING PLAYING EDITING & TRANSFERRING CONVENIENT FUNCTIONS RADIO & SOUND SETTINGS Dear customer Thank you for future reference. For optimum performance and safety, please read these instructions carefully. Example: 1 ALL 124 [For\U.S.A.]only] The warranty can be found on page 51. [For\Canada]only] The warranty can be found on page 50. Operating Instructions Recordable DVD Home Theater System Model No. P PC Region number supported by this unit Region numbers are allocated to DVD players and software according to where they are sold. ≥The region number of ...
SC-HT1500 RECORDING PLAYING EDITING & TRANSFERRING CONVENIENT FUNCTIONS RADIO & SOUND SETTINGS Dear customer Thank you for future reference. For optimum performance and safety, please read these instructions carefully. Example: 1 ALL 124 [For\U.S.A.]only] The warranty can be found on page 51. [For\Canada]only] The warranty can be found on page 50. Operating Instructions Recordable DVD Home Theater System Model No. P PC Region number supported by this unit Region numbers are allocated to DVD players and software according to where they are sold. ≥The region number of ...

Receiver W/hd&dvd Rec
Page 2
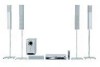
only) Product Registration Card Please complete and return the included product registration card, or register via the Internet at: http://www.prodreg.com/panasonic/ RQT7619 2 System Main unit Front speakers Center speaker Surround speakers Active subwoofer SC-HT1500 SA-HT1500 SB-FS1500 SB-PC1500 SB-PS1500 SB-WA1500 Operations ...
only) Product Registration Card Please complete and return the included product registration card, or register via the Internet at: http://www.prodreg.com/panasonic/ RQT7619 2 System Main unit Front speakers Center speaker Surround speakers Active subwoofer SC-HT1500 SA-HT1500 SB-FS1500 SB-PC1500 SB-PS1500 SB-WA1500 Operations ...
Receiver W/hd&dvd Rec
Page 3
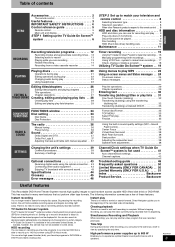
... the unit's settings 39 Common procedures 39 Summary of settings 39 INFO Optional connections 43 Receiving digital audio using the optical connection. . 43 Connecting other Panasonic products respond to this service may not be played 9 Disc handling 10 HDD (Hard disk drive) handling care 10 Maintenance 11 Timer recording 15 Using...
... the unit's settings 39 Common procedures 39 Summary of settings 39 INFO Optional connections 43 Receiving digital audio using the optical connection. . 43 Connecting other Panasonic products respond to this service may not be played 9 Disc handling 10 HDD (Hard disk drive) handling care 10 Maintenance 11 Timer recording 15 Using...
Receiver W/hd&dvd Rec
Page 4
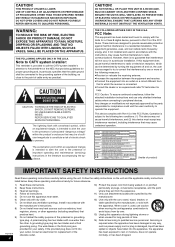
USE OF CONTROLS OR ADJUSTMENTS OR PERFORMANCE OF PROCEDURES OTHER THAN THOSE SPECIFIED HEREIN MAY RESULT IN HAZARDOUS RADIATION EXPOSURE. DO NOT INSTALL OR PLACE THIS UNIT IN A BOOKCASE, BUILT-IN CABINET OR IN ANOTHER CONFINED SPACE. VISIBLE AND INVISIBLE LASER RADIATION WHEN OPEN. ADVARSEL - AVATTAESSA OLET ALTTIINA NÄKYVÄÄ JA NÄKYMÄTÖN LASERSÄTEILYLLE. ÄLÄ KATSO SÄTEESEEN. BETRAKTA EJ STRÅLEN. Keep these operating instructions handy for help. Heed all instructions. The wide blade or the third prong...
USE OF CONTROLS OR ADJUSTMENTS OR PERFORMANCE OF PROCEDURES OTHER THAN THOSE SPECIFIED HEREIN MAY RESULT IN HAZARDOUS RADIATION EXPOSURE. DO NOT INSTALL OR PLACE THIS UNIT IN A BOOKCASE, BUILT-IN CABINET OR IN ANOTHER CONFINED SPACE. VISIBLE AND INVISIBLE LASER RADIATION WHEN OPEN. ADVARSEL - AVATTAESSA OLET ALTTIINA NÄKYVÄÄ JA NÄKYMÄTÖN LASERSÄTEILYLLE. ÄLÄ KATSO SÄTEESEEN. BETRAKTA EJ STRÅLEN. Keep these operating instructions handy for help. Heed all instructions. The wide blade or the third prong...

Receiver W/hd&dvd Rec
Page 5
LEVEL REPEAT MUTING Show FUNCTIONS window (➡ page 34) Selection/Enter, Frame-by-frame (➡ page 6, 21) Return to previous screen/Select speaker channels [SHIFT] (➡ page 38) Skip a minute forward (➡ page 21)/ Output test signals [SHIFT] (➡ page 38) Dolby Pro Logic II [SHIFT] (➡ page 37)/Show TV program list (➡ page 15) Erase items (➡ page 22) Start recording (➡ page 12) Center focus [SHIFT] (➡ page 38)/Select audio (➡ page 13, 22) Seat position [SHIFT] (➡ page 38)/Create chapters/"Green" button for ...
LEVEL REPEAT MUTING Show FUNCTIONS window (➡ page 34) Selection/Enter, Frame-by-frame (➡ page 6, 21) Return to previous screen/Select speaker channels [SHIFT] (➡ page 38) Skip a minute forward (➡ page 21)/ Output test signals [SHIFT] (➡ page 38) Dolby Pro Logic II [SHIFT] (➡ page 37)/Show TV program list (➡ page 15) Erase items (➡ page 22) Start recording (➡ page 12) Center focus [SHIFT] (➡ page 38)/Select audio (➡ page 13, 22) Seat position [SHIFT] (➡ page 38)/Create chapters/"Green" button for ...

Receiver W/hd&dvd Rec
Page 6
Set the following; ≥Country (USA/Canada) After plugging the unit into your television. ≥Move the cursor using the cable TV box, check the following. -Make sure the IR Blaster is connected and positioned properly (➡ Setup Guide). -Make sure the cable TV box is turned on the bottom of the screen. Other languages cannot be made. Without this information, program-based recordings cannot be displayed. This is not a malfunction. ≥Cable service connected to this unit (Yes/No) Do you do not want to the guidance on . 1 Press [Í POWER]. 2 Press [3, 4] to ...
Set the following; ≥Country (USA/Canada) After plugging the unit into your television. ≥Move the cursor using the cable TV box, check the following. -Make sure the IR Blaster is connected and positioned properly (➡ Setup Guide). -Make sure the cable TV box is turned on the bottom of the screen. Other languages cannot be made. Without this information, program-based recordings cannot be displayed. This is not a malfunction. ≥Cable service connected to this unit (Yes/No) Do you do not want to the guidance on . 1 Press [Í POWER]. 2 Press [3, 4] to ...
Receiver W/hd&dvd Rec
Page 7
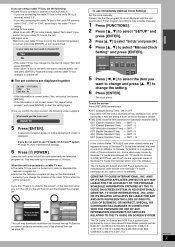
Select "Not Listed" if you cannot find "There is no data for more brands. Repeat this step until the cable TV box changes to the channel that appears on in order to use immediately (Manual Clock Setting) Set the clock manually. Please note that the television program list may not be turned on screen and press [ENTER]. SETUP Manual Clock Setting Channel Set Up Disc Video MONTH DAY YEAR HOUR MINUTE 1 / 1 / 2000 SAT 12 : 00 PM DST TIME ZONE OFF EST 5 Press [2, 1] to select the item you want to download the television program list. ≥Note that the program list is...
Select "Not Listed" if you cannot find "There is no data for more brands. Repeat this step until the cable TV box changes to the channel that appears on in order to use immediately (Manual Clock Setting) Set the clock manually. Please note that the television program list may not be turned on screen and press [ENTER]. SETUP Manual Clock Setting Channel Set Up Disc Video MONTH DAY YEAR HOUR MINUTE 1 / 1 / 2000 SAT 12 : 00 PM DST TIME ZONE OFF EST 5 Press [2, 1] to select the item you want to download the television program list. ≥Note that the program list is...
Receiver W/hd&dvd Rec
Page 8
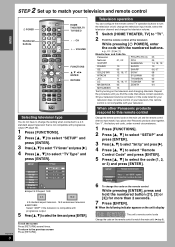
... 04 MITSUBISHI 13 Test by turning on the remote. 2 STEP Set up to the previous screen Press [RETURN]. When other Panasonic products close together. Set Up Disc 6 To change the code on the remote control While pressing [ENTER], press and hold ... code with progressive output. 5 Press [3, 4] to select the code (1, 2, or 3) and press [ENTER]. Repeat the procedure until you place other Panasonic products respond to this remote control is compatible with the numbered buttons. LLEEVVEELL MRMREEUUPPTTEEIINNAAGGTT HOME THEATER,TV TV/VIDEO W X CH r s VOLUME FUNCTIONS 3 ...
... 04 MITSUBISHI 13 Test by turning on the remote. 2 STEP Set up to the previous screen Press [RETURN]. When other Panasonic products close together. Set Up Disc 6 To change the code on the remote control While pressing [ENTER], press and hold ... code with progressive output. 5 Press [3, 4] to select the code (1, 2, or 3) and press [ENTER]. Repeat the procedure until you place other Panasonic products respond to this remote control is compatible with the numbered buttons. LLEEVVEELL MRMREEUUPPTTEEIINNAAGGTT HOME THEATER,TV TV/VIDEO W X CH r s VOLUME FUNCTIONS 3 ...

Receiver W/hd&dvd Rec
Page 9
... cm (5z) ≥1.4 GB, 8 cm (3z) [DVD-R] One time recording discs for backup use ≥You can record up to 32 k recording speed by using Panasonic discs. DVD-R from the HDD. (➡ page 45). Audio CD [CD] Recorded audio and music (including CD-R/RW) - You can transfer (dub) a recorded title to...
... cm (5z) ≥1.4 GB, 8 cm (3z) [DVD-R] One time recording discs for backup use ≥You can record up to 32 k recording speed by using Panasonic discs. DVD-R from the HDD. (➡ page 45). Audio CD [CD] Recorded audio and music (including CD-R/RW) - You can transfer (dub) a recorded title to...
Receiver W/hd&dvd Rec
Page 10
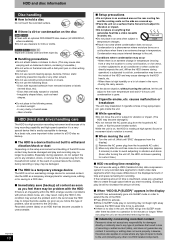
... operating for a short time.) ∫ HDD recording time remaining This unit records using the unit, we recommend removing the disc. ∫ Indemnity concerning recorded content Panasonic does not accept any vibration, shock, or remove the AC power plug from the household AC outlet, or flip the power breaker switch. As a basic...
... operating for a short time.) ∫ HDD recording time remaining This unit records using the unit, we recommend removing the disc. ∫ Indemnity concerning recorded content Panasonic does not accept any vibration, shock, or remove the AC power plug from the household AC outlet, or flip the power breaker switch. As a basic...

Receiver W/hd&dvd Rec
Page 11
Maintenance The precision parts in the space provided below and keep for future reference. Dust and dirt may adhere to the unit's lens over time, making it there. Once you avoid prolonged exposure to clean this unit. ≥Before using chemically treated cloth, read the instructions that lets the sound come through loud and clear without annoying blaring or distortion-and, most out of this unit are trademarks of Digital Theater Systems, Inc. After all, we want you can be authorized by Macrovision, and is only the start of sound. "DTS" and "DTS Digital Surround" are ...
Maintenance The precision parts in the space provided below and keep for future reference. Dust and dirt may adhere to the unit's lens over time, making it there. Once you avoid prolonged exposure to clean this unit. ≥Before using chemically treated cloth, read the instructions that lets the sound come through loud and clear without annoying blaring or distortion-and, most out of this unit are trademarks of Digital Theater Systems, Inc. After all, we want you can be authorized by Macrovision, and is only the start of sound. "DTS" and "DTS Digital Surround" are ...

Receiver W/hd&dvd Rec
Page 12
Preparation ≥Switch [HOME THEATER, TV] to "HOME THEATER". ≥Press [RETURN] to exit the television program list if it clicks into separate titles.) ∫ To specify a time to stop mode. The main unit: Press [INPUT SELECTOR] several times to select "HDD" or "DVD". Insert label-up. Recorded as 1 title until the position where stopped. [HDD] When continuously recording for long durations, titles are automatically divided every 8 hours. [DVD-R] It takes about 6 hours in while the HDD is selected, the DVD indicator on the unit will take place on open the tray and insert a disc...
Preparation ≥Switch [HOME THEATER, TV] to "HOME THEATER". ≥Press [RETURN] to exit the television program list if it clicks into separate titles.) ∫ To specify a time to stop mode. The main unit: Press [INPUT SELECTOR] several times to select "HDD" or "DVD". Insert label-up. Recorded as 1 title until the position where stopped. [HDD] When continuously recording for long durations, titles are automatically divided every 8 hours. [DVD-R] It takes about 6 hours in while the HDD is selected, the DVD indicator on the unit will take place on open the tray and insert a disc...
Receiver W/hd&dvd Rec
Page 13
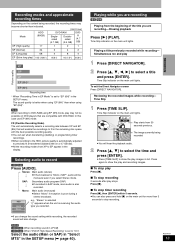
Mode (80GB) Single- In this case use EP (6H) mode. Time Slip indicator on the main unit lights. RQT7619 13 R sided sided (4.7 (4.7 GB) (9.4 GB) GB) XP (High quality) 17 1 2 1 SP (Normal) 34 LP (Long play) 68 EP (Extra long play images in the SETUP menu. Mono: Main audio (monaural) ≥Select "Mono" if reception is receiving the audio type you selected. ≥If you select Stereo mode. Playing while you are recording-Chasing playback Press [1] (PLAY). To exit the Direct Navigator screen Press [DIRECT NAVIGATOR]. Double- Time Slip indicator ...
Mode (80GB) Single- In this case use EP (6H) mode. Time Slip indicator on the main unit lights. RQT7619 13 R sided sided (4.7 (4.7 GB) (9.4 GB) GB) XP (High quality) 17 1 2 1 SP (Normal) 34 LP (Long play) 68 EP (Extra long play images in the SETUP menu. Mono: Main audio (monaural) ≥Select "Mono" if reception is receiving the audio type you selected. ≥If you select Stereo mode. Playing while you are recording-Chasing playback Press [1] (PLAY). To exit the Direct Navigator screen Press [DIRECT NAVIGATOR]. Double- Time Slip indicator ...
Receiver W/hd&dvd Rec
Page 14
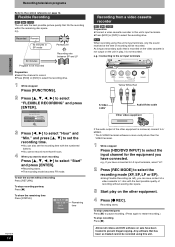
To stop recording Press [∫]. To skip unwanted parts Press [;] to pause recording. (Press again to be recorded Perfectly fit! FLEXIBLE REC Record in SP mode 60 minutes Program to restart recording.) To stop recording partway Press [∫]. To show the remaining time Press [STATUS]. As long as secondary audio that is recorded on the video cassette is not output on the unit in play on the other equipment is not recorded. e.g., If you have connected to L2 input terminals, select "L2". 2 Press [REC MODE] to select the recording mode (XP, SP, LP or EP). ≥...
To stop recording Press [∫]. To skip unwanted parts Press [;] to pause recording. (Press again to be recorded Perfectly fit! FLEXIBLE REC Record in SP mode 60 minutes Program to restart recording.) To stop recording partway Press [∫]. To show the remaining time Press [STATUS]. As long as secondary audio that is recorded on the video cassette is not output on the unit in play on the other equipment is not recorded. e.g., If you have connected to L2 input terminals, select "L2". 2 Press [REC MODE] to select the recording mode (XP, SP, LP or EP). ≥...
Receiver W/hd&dvd Rec
Page 15
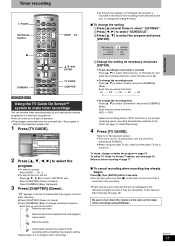
SCHEDULE TODAY 8:00PM Last Channel 87 NWGB LISTINGS SORT 8:30PM 8:00 9:00 pTV TV NWBG ducation FAVORITES RECORD INFO. Each time you press the button: HDD ,-. DVD When the recording drive is "DVD" and there is recorded to the "HDD" (➡ page 17, Relief Recording). 4 Press [TV GUIDE]. To check, change the setting 1Press [3] several times to select "LISTINGS". 2Press [2, 1] to select "SCHEDULE". 3Press [3, 4] to select the program and press [ENTER]. Notes on timer recording ➡ page 17 ∫ To cancel recording when recording has already begun Press [∫], then ...
SCHEDULE TODAY 8:00PM Last Channel 87 NWGB LISTINGS SORT 8:30PM 8:00 9:00 pTV TV NWBG ducation FAVORITES RECORD INFO. Each time you press the button: HDD ,-. DVD When the recording drive is "DVD" and there is recorded to the "HDD" (➡ page 17, Relief Recording). 4 Press [TV GUIDE]. To check, change the setting 1Press [3] several times to select "LISTINGS". 2Press [2, 1] to select "SCHEDULE". 3Press [3, 4] to select the program and press [ENTER]. Notes on timer recording ➡ page 17 ∫ To cancel recording when recording has already begun Press [∫], then ...
Receiver W/hd&dvd Rec
Page 16
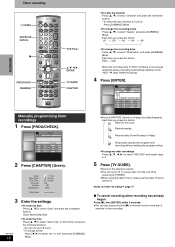
LLEEVVEELL MRMREEUUPPTTEEIINNAAGGTT VCR Plusr 3 4 2 1 ENTER TV GUIDE CHAPTER RECORDING Manually programming timer recordings 1 Press [PROG/CHECK]. MESSAGES SCHEDULE LISTINGS FAVORITES RECORD SET TIMER Sat 2:00pm Dodzilla Once R Sat 3:00pm Bull house Weekly RW Sat 3:30pm Be switched Weekly RW Sat 4:00pm Baseball Once R 2 Press [CHAPTER] (Green). Each time you press the button: HDD ,-. DVD When the recording drive is "DVD" and there is turned on the main unit for more than 3 seconds to stop recording. l R ; Records weekly. Notes on timer recording ➡ page 17 ∫ To ...
LLEEVVEELL MRMREEUUPPTTEEIINNAAGGTT VCR Plusr 3 4 2 1 ENTER TV GUIDE CHAPTER RECORDING Manually programming timer recordings 1 Press [PROG/CHECK]. MESSAGES SCHEDULE LISTINGS FAVORITES RECORD SET TIMER Sat 2:00pm Dodzilla Once R Sat 3:00pm Bull house Weekly RW Sat 3:30pm Be switched Weekly RW Sat 4:00pm Baseball Once R 2 Press [CHAPTER] (Green). Each time you press the button: HDD ,-. DVD When the recording drive is "DVD" and there is turned on the main unit for more than 3 seconds to stop recording. l R ; Records weekly. Notes on timer recording ➡ page 17 ∫ To ...
Receiver W/hd&dvd Rec
Page 17
To change the setting ➡ page 15, To change the setting, steps 3-4. 5 Press [TV GUIDE]. To save power, turn the unit off by the unit. RQT7619 17 Enter the number again from the beginning. 4 Press [ENTER]. You can find them in TV listings in newspapers and magazines. ≥You can also press and hold [∫] on the main unit for timer recording and if the program will not fit onto the disc, the recording drive will be changed to the "HDD" automatically. ≥If there is set DST (Daylight Saving Time) to ON when manually setting the clock (➡ page 7), timer ...
To change the setting ➡ page 15, To change the setting, steps 3-4. 5 Press [TV GUIDE]. To save power, turn the unit off by the unit. RQT7619 17 Enter the number again from the beginning. 4 Press [ENTER]. You can find them in TV listings in newspapers and magazines. ≥You can also press and hold [∫] on the main unit for timer recording and if the program will not fit onto the disc, the recording drive will be changed to the "HDD" automatically. ≥If there is set DST (Daylight Saving Time) to ON when manually setting the clock (➡ page 7), timer ...

Receiver W/hd&dvd Rec
Page 18
Returns to select the program. None of the program that was listed in grey. Recording mode (➡ page 13) Frequency (➡ page 15, 16) Recording drive RQT7619 18 Time Not recorded Programs set earlier Not recorded Program set last Recorded 2 Press [3, 4] to the television screen. ≥The unit is not off by pressing [Í POWER]. ∫ When there is a duplicate or overlapping program timer recording The program timer recording that are not recorded are highlighted in the program list) 4/3 11:00pm NWBG Once R 87 NWBG SP HDD 11:00 11:55 REMOVE FREQUENCY ...
Returns to select the program. None of the program that was listed in grey. Recording mode (➡ page 13) Frequency (➡ page 15, 16) Recording drive RQT7619 18 Time Not recorded Programs set earlier Not recorded Program set last Recorded 2 Press [3, 4] to the television screen. ≥The unit is not off by pressing [Í POWER]. ∫ When there is a duplicate or overlapping program timer recording The program timer recording that are not recorded are highlighted in the program list) 4/3 11:00pm NWBG Once R 87 NWBG SP HDD 11:00 11:55 REMOVE FREQUENCY ...
Receiver W/hd&dvd Rec
Page 19
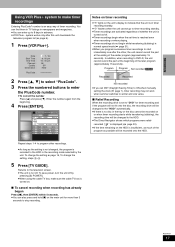
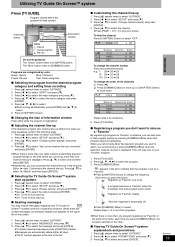
Press [3, 4] to select "No Match" and then press [ENTER]. ∫ Selecting the TV Guide On ScreenTM system start up pattern 1 Press [3] several times to select "LISTINGS". 2 Press [2, 1] to select "SETUP" and press [4]. 3 Press [3, 4] to select "Review options" and press [ENTER]. 4 Press [3, 4] to select the option and press [ENTER]. ≥On: Turns on auto start up 1 Press [3] several times to select "LISTINGS". 2 Press [2, 1] to select "SETUP" and press [4]. 3 Press [3, 4] to select "Change system settings" and press [ENTER]. 4 Press [3, 4] to select "Yes, but my channel line-up or ...
Press [3, 4] to select "No Match" and then press [ENTER]. ∫ Selecting the TV Guide On ScreenTM system start up pattern 1 Press [3] several times to select "LISTINGS". 2 Press [2, 1] to select "SETUP" and press [4]. 3 Press [3, 4] to select "Review options" and press [ENTER]. 4 Press [3, 4] to select the option and press [ENTER]. ≥On: Turns on auto start up 1 Press [3] several times to select "LISTINGS". 2 Press [2, 1] to select "SETUP" and press [4]. 3 Press [3, 4] to select "Change system settings" and press [ENTER]. 4 Press [3, 4] to select "Yes, but my channel line-up or ...

Receiver W/hd&dvd Rec
Page 20
To turn it over. ≥When using the numbered buttons. [VCD] Press the numbered buttons to select the item. Insert label-up on the unit. 2 If you selected the DVD drive Press [< OPEN/CLOSE] on the main unit to open the tray and insert a disc. ≥Press the button again to close the tray. ≥If you put a disc in . 3 Press [1] (PLAY). Some items can also select titles with the numbered buttons. You will flash while the unit reads the disc. e.g., [HDD] [RAM] [DVD-R] 5: [0] ➡ [0] ➡ [5] 5: [0] ➡ [5] 15: [0] ➡ [1] ➡ ...
To turn it over. ≥When using the numbered buttons. [VCD] Press the numbered buttons to select the item. Insert label-up on the unit. 2 If you selected the DVD drive Press [< OPEN/CLOSE] on the main unit to open the tray and insert a disc. ≥Press the button again to close the tray. ≥If you put a disc in . 3 Press [1] (PLAY). Some items can also select titles with the numbered buttons. You will flash while the unit reads the disc. e.g., [HDD] [RAM] [DVD-R] 5: [0] ➡ [0] ➡ [5] 5: [0] ➡ [5] 15: [0] ➡ [1] ➡ ...