
Operating Instructions
Page 9
... License Agreement 87 Setup [1] Installation 88 Installing VideoCam Suite 88 Uninstalling the software 89 [2] Connection and recognition 90 About the PC display 90 To disconnect USB cable safely .......... 91 Using software [1] Using VideoCam Suite 92 Reading the operating instructions of the software 92 DVD COPY function 92 Upload to YouTube 93...
... License Agreement 87 Setup [1] Installation 88 Installing VideoCam Suite 88 Uninstalling the software 89 [2] Connection and recognition 90 About the PC display 90 To disconnect USB cable safely .......... 91 Using software [1] Using VideoCam Suite 92 Reading the operating instructions of the software 92 DVD COPY function 92 Upload to YouTube 93...
Operating Instructions
Page 10
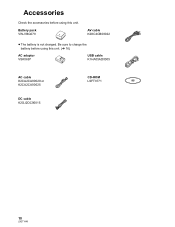
Battery pack VW-VBG070 AV cable K2KC4CB00022 p The battery is not charged. Accessories Check the accessories before using this unit. (F 16) AC adaptor VSK0697 USB cable K1HA05AD0005 AC cable K2CA2CA00029 or K2CA2CA00025 DC cable K2GJ2DC00015 CD-ROM LSFT0771 10 LSQT1449 Be sure to charge the battery before using this unit.
Battery pack VW-VBG070 AV cable K2KC4CB00022 p The battery is not charged. Accessories Check the accessories before using this unit. (F 16) AC adaptor VSK0697 USB cable K1HA05AD0005 AC cable K2CA2CA00029 or K2CA2CA00025 DC cable K2GJ2DC00015 CD-ROM LSFT0771 10 LSQT1449 Be sure to charge the battery before using this unit.
Operating Instructions
Page 15
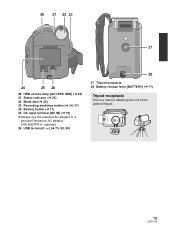
20 21 22 23 27 24 25 26 20 HDD access lamp [ACCESS HDD] (F 23) 21 Status indicator (F 25) 22 Mode dial (F 25) 23 Recording start/stop button (F 34, 37) 24 Battery holder (F 17) 25 DC input terminal [DC IN] (F 19) p Always use the supplied AC adaptor or a genuine Panasonic AC adaptor (VW-AD21PP-K; optional). 26 USB terminal [ ] (F 75, 82, 90) 28 27 Tripod receptacle 28 Battery release lever [BATTERY] (F 17) Tripod receptacle This is a hole for attaching the unit to the optional tripod. 15 LSQT1449
20 21 22 23 27 24 25 26 20 HDD access lamp [ACCESS HDD] (F 23) 21 Status indicator (F 25) 22 Mode dial (F 25) 23 Recording start/stop button (F 34, 37) 24 Battery holder (F 17) 25 DC input terminal [DC IN] (F 19) p Always use the supplied AC adaptor or a genuine Panasonic AC adaptor (VW-AD21PP-K; optional). 26 USB terminal [ ] (F 75, 82, 90) 28 27 Tripod receptacle 28 Battery release lever [BATTERY] (F 17) Tripod receptacle This is a hole for attaching the unit to the optional tripod. 15 LSQT1449

Operating Instructions
Page 27
... are selected as starting . recording not starting and ending recording to be displayed only when the [MEDIA SELECT] is set to AC adaptor Lusing the USB for 4 times When an error occurs e.g. Language selection You can select the language displayed on the screen. (F 98) [POWER LCD] (F 31) 27 LSQT1449...
... are selected as starting . recording not starting and ending recording to be displayed only when the [MEDIA SELECT] is set to AC adaptor Lusing the USB for 4 times When an error occurs e.g. Language selection You can select the language displayed on the screen. (F 98) [POWER LCD] (F 31) 27 LSQT1449...
Operating Instructions
Page 74
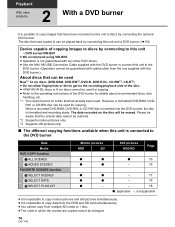
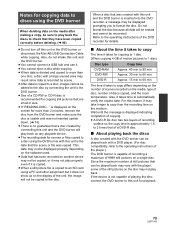
... different copying functions available when this unit UDVD burner/VW-BN1 p We recommend using VW-BN1. Playback With other DVD drives. p Use the Mini AB USB Connection Cable supplied with the DVD burner to connect this unit to discs by connecting the optional DVD burner. The disc that was copied to...
... different copying functions available when this unit UDVD burner/VW-BN1 p We recommend using VW-BN1. Playback With other DVD drives. p Use the Mini AB USB Connection Cable supplied with the DVD burner to connect this unit to discs by connecting the optional DVD burner. The disc that was copied to...
Operating Instructions
Page 75
... adaptor supplied with the DVD burner to the DVD burner. may be displayed after connecting the DVD burner to this happens, disconnect the Mini AB USB Connection Cable from the unit and remove the disc from this unit. 2 Connect this unit to the AC adaptor. 3 Turn on the power ... to use it. p If the DVD burner is usable and was not inserted upside down. (F 74) 75 LSQT1449 Mini A Mini B Mini AB USB Connection Cable (supplied with the DVD burner) DVD burner (optional) p Connect the Mini A terminal to this unit with a disc already inserted, the message "CANNOT CHECK...
... adaptor supplied with the DVD burner to the DVD burner. may be displayed after connecting the DVD burner to this happens, disconnect the Mini AB USB Connection Cable from the unit and remove the disc from this unit. 2 Connect this unit to the AC adaptor. 3 Turn on the power ... to use it. p If the DVD burner is usable and was not inserted upside down. (F 74) 75 LSQT1449 Mini A Mini B Mini AB USB Connection Cable (supplied with the DVD burner) DVD burner (optional) p Connect the Mini A terminal to this unit with a disc already inserted, the message "CANNOT CHECK...
Operating Instructions
Page 76
... to return to discs. After confirming that are necessary for copying by disc type. To finish, eject the disc and disconnect the Mini AB USB Connection Cable. p Motion picture scenes indicated with the following procedures. [BURN DISC] [HDD] or [SD CARD] [VIDEO] [DVD COPY] [ADDED SCENES] 2 Select [YES], then press...
... to return to discs. After confirming that are necessary for copying by disc type. To finish, eject the disc and disconnect the Mini AB USB Connection Cable. p Motion picture scenes indicated with the following procedures. [BURN DISC] [HDD] or [SD CARD] [VIDEO] [DVD COPY] [ADDED SCENES] 2 Select [YES], then press...
Operating Instructions
Page 77
.... 77 LSQT1449 p Up to a single DVD disc. [HDD] [SD] 1 Select menus with the same contents. To finish, eject the disc and disconnect the Mini AB USB Connection Cable. FAVORITE SCENES function It is possible to one disc. * The units of usable capacity on a DVD disc are 1 MBN1,048,576 bytes. 3 Select...
.... 77 LSQT1449 p Up to a single DVD disc. [HDD] [SD] 1 Select menus with the same contents. To finish, eject the disc and disconnect the Mini AB USB Connection Cable. FAVORITE SCENES function It is possible to one disc. * The units of usable capacity on a DVD disc are 1 MBN1,048,576 bytes. 3 Select...
Operating Instructions
Page 78
...-RW disc is displayed. p Up to 50 dates can be set with the same contents. To finish, eject the disc and disconnect the Mini AB USB Connection Cable. Selecting the scenes by date to copy to discs [HDD] [SD] Scenes recorded with this unit are selectively copied by date to DVD...
...-RW disc is displayed. p Up to 50 dates can be set with the same contents. To finish, eject the disc and disconnect the Mini AB USB Connection Cable. Selecting the scenes by date to copy to discs [HDD] [SD] Scenes recorded with this unit are selectively copied by date to DVD...
Operating Instructions
Page 79
... playback. 79 LSQT1449 is displayed on the screen for more than one disc, a disc with a large unused area may not play back. p You cannot connect a USB hub and use it takes time to automatically verify the copied data. p When data is divided and copied to more than the recording time on... it may be displayed prompting you to format the disc. Also, do not shake this unit or the DVD burner or disconnect the Mini AB USB Connection Cable while copying. Since the maximum number of still pictures that they have been copied correctly before deleting. (F 80) p Do not turn off this...
... playback. 79 LSQT1449 is displayed on the screen for more than one disc, a disc with a large unused area may not play back. p You cannot connect a USB hub and use it takes time to automatically verify the copied data. p When data is divided and copied to more than the recording time on... it may be displayed prompting you to format the disc. Also, do not shake this unit or the DVD burner or disconnect the Mini AB USB Connection Cable while copying. Since the maximum number of still pictures that they have been copied correctly before deleting. (F 80) p Do not turn off this...
Operating Instructions
Page 80
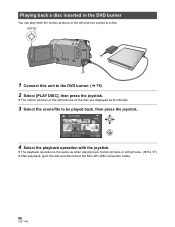
... the disc are displayed as when playing back motion pictures or still pictures. (F 54, 57) p After playback, eject the disc and disconnect the Mini AB USB Connection Cable. 80 LSQT1449 ENTER 1 Connect this unit to a disc. Playing back a disc inserted in the DVD burner You can play back the motion pictures...
... the disc are displayed as when playing back motion pictures or still pictures. (F 54, 57) p After playback, eject the disc and disconnect the Mini AB USB Connection Cable. 80 LSQT1449 ENTER 1 Connect this unit to a disc. Playing back a disc inserted in the DVD burner You can play back the motion pictures...
Operating Instructions
Page 81
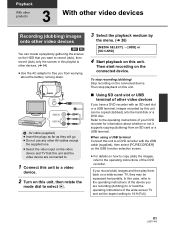
... instructions of the device you record (dub) images and then play them back on the connected device. Then stop recording (dubbing) Stop recording on the USB function selection screen. p For details on this playlist to other devices. (F 64) p Use the AC adaptor to record (dub), then record (dub)... in this unit. p Select the video input on the video device and TV that you want to free you have a DVD recorder with the USB cable (supplied), then select [PC/RECORDER] on the connected device. Playback With other products 3 With other video devices Recording (dubbing) images onto ...
... instructions of the device you record (dub) images and then play them back on the connected device. Then stop recording (dubbing) Stop recording on the USB function selection screen. p For details on this playlist to other devices. (F 64) p Use the AC adaptor to record (dub), then record (dub)... in this unit. p Select the video input on the video device and TV that you want to free you have a DVD recorder with the USB cable (supplied), then select [PC/RECORDER] on the connected device. Playback With other products 3 With other video devices Recording (dubbing) images onto ...
Operating Instructions
Page 82
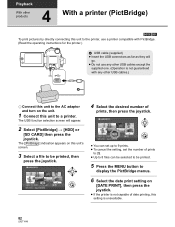
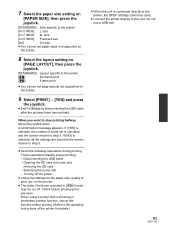
...p If the printer is not capable of date printing, this setting is not guaranteed with PictBridge. (Read the operating instructions for the printer.) USB cable (supplied) p Insert the USB connectors as far as they will appear. 2 Select [PictBridge] [HDD] or [SD CARD] then press the joystick. The [ ] indication ... selection screen will go. p To cancel the setting, set up to 9 prints. p Do not use a printer compatible with any other USB cables except the supplied one. (Operation is unavailable. 82 LSQT1449 p Up to 8 files can set the number of prints to [0]. Playback With ...
...p If the printer is not capable of date printing, this setting is not guaranteed with PictBridge. (Read the operating instructions for the printer.) USB cable (supplied) p Insert the USB connectors as far as they will appear. 2 Select [PictBridge] [HDD] or [SD CARD] then press the joystick. The [ ] indication ... selection screen will go. p To cancel the setting, set up to 9 prints. p Do not use a printer compatible with any other USB cables except the supplied one. (Operation is unavailable. 82 LSQT1449 p Up to 8 files can set the number of prints to [0]. Playback With ...
Operating Instructions
Page 83
...the printer [ ]: No frame print [ ]: Frame print p You cannot set is selected, the number of print, etc. p Exit PictBridge by disconnecting the USB cable after the pictures have been printed. p Avoid the following operations during printing. on the printer. 9 Select [PRINT] [YES] and press the joystick. If... recorded in [ 0.2 ] mode may be used. These operations disable proper printing. Check before printing. (Refer to step 3. LDisconnecting the USB cable LOpening the SD card slot cover and removing the SD card LSwitching the mode dial LTurning off . Do not use...
...the printer [ ]: No frame print [ ]: Frame print p You cannot set is selected, the number of print, etc. p Exit PictBridge by disconnecting the USB cable after the pictures have been printed. p Avoid the following operations during printing. on the printer. 9 Select [PRINT] [YES] and press the joystick. If... recorded in [ 0.2 ] mode may be used. These operations disable proper printing. Check before printing. (Refer to step 3. LDisconnecting the USB cable LOpening the SD card slot cover and removing the SD card LSwitching the mode dial LTurning off . Do not use...
Operating Instructions
Page 85
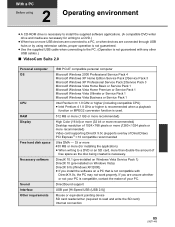
...installed on Windows Vista Service Pack 1) DirectX 10 (pre-installed on Windows Vista) DirectX 9.0c (Windows XP/2000) p If you are connected through USB hubs or by using 2 Operating environment p A CD-ROM drive is necessary to install the supplied software applications. (A compatible DVD writer drive and media...free space as the disc being created is necessary. If you install the software on a PC that is not compatible with any other USB cables.) w VideoCam Suite 2.0 Personal computer OS CPU RAM Display Free hard disk space Necessary software Sound Interface Other requirements IBM PC/...
...installed on Windows Vista Service Pack 1) DirectX 10 (pre-installed on Windows Vista) DirectX 9.0c (Windows XP/2000) p If you are connected through USB hubs or by using 2 Operating environment p A CD-ROM drive is necessary to install the supplied software applications. (A compatible DVD writer drive and media...free space as the disc being created is necessary. If you install the software on a PC that is not compatible with any other USB cables.) w VideoCam Suite 2.0 Personal computer OS CPU RAM Display Free hard disk space Necessary software Sound Interface Other requirements IBM PC/...
Operating Instructions
Page 86
... Windows Vista Home Premium/Ultimate/Business: 1 GB or more Windows XP/2000: 128 MB or more (256 MB or more recommended) USB port p The USB equipment operates with this software are fulfilled, some personal computers cannot be guaranteed on all DVD players. p If using Windows Vista, administrative... requirements, an error may run slowly when you play in all DVD drives. p If your PC, if it does not support Hi-Speed USB (USB 2.0), for Windows only. p Even if the system requirements mentioned in these operating instructions are not guaranteed to disc. p Supplied CD-ROM is...
... Windows Vista Home Premium/Ultimate/Business: 1 GB or more Windows XP/2000: 128 MB or more (256 MB or more recommended) USB port p The USB equipment operates with this software are fulfilled, some personal computers cannot be guaranteed on all DVD players. p If using Windows Vista, administrative... requirements, an error may run slowly when you play in all DVD drives. p If your PC, if it does not support Hi-Speed USB (USB 2.0), for Windows only. p Even if the system requirements mentioned in these operating instructions are not guaranteed to disc. p Supplied CD-ROM is...
Operating Instructions
Page 90
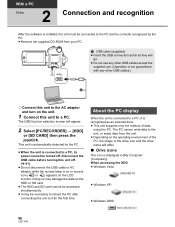
... as far as an external drive. p When the unit is connected to a PC, its power cannot be turned off . (F 91) p Do not disconnect the USB cable or AC adaptor while the access lamp is on or access icon ( or ) appears on the unit. 1 Connect this unit to a PC. The PC ... (Computer)]. This unit is connected to the PC and be connected to a PC, it for the first time. Doing so may be accessed simultaneously. The USB function selection screen will differ. p The HDD and SD card cannot be necessary to the unit, or erase data from your PC. p This unit supports...
... as far as an external drive. p When the unit is connected to a PC, its power cannot be turned off . (F 91) p Do not disconnect the USB cable or AC adaptor while the access lamp is on or access icon ( or ) appears on the unit. 1 Connect this unit to a PC. The PC ... (Computer)]. This unit is connected to the PC and be connected to a PC, it for the first time. Doing so may be accessed simultaneously. The USB function selection screen will differ. p The HDD and SD card cannot be necessary to the unit, or erase data from your PC. p This unit supports...
Operating Instructions
Page 91
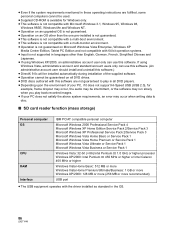
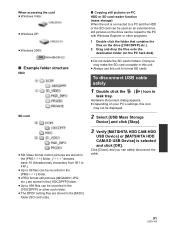
... hard disk). w Copying still pictures on PC HDD or SD card reader function (mass storage) When the unit is selected and click [OK]. To disconnect USB cable safely 1 Double click the ( ) icon in the [PRG___] folder. p Depending on your PC's settings, this unit. When accessing the card p Windows Vista: p ...Doing so may make the SD card unusable in this icon may not be displayed. 2 Select [USB Mass Storage Device] and click [Stop]. 3 Verify [MATSHITA HDD CAM-HDD USB Device] or [MATSHITA HDD CAM-SD USB Device] is connected to a PC and the HDD or the SD card can be recorded in ...
... hard disk). w Copying still pictures on PC HDD or SD card reader function (mass storage) When the unit is selected and click [OK]. To disconnect USB cable safely 1 Double click the ( ) icon in the [PRG___] folder. p Depending on your PC's settings, this unit. When accessing the card p Windows Vista: p ...Doing so may make the SD card unusable in this icon may not be displayed. 2 Select [USB Mass Storage Device] and click [Stop]. 3 Verify [MATSHITA HDD CAM-HDD USB Device] or [MATSHITA HDD CAM-SD USB Device] is connected to a PC and the HDD or the SD card can be recorded in ...
Operating Instructions
Page 93
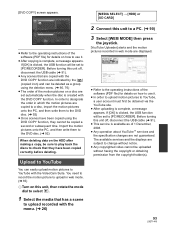
... sure to play back the discs to check that has a scene to upload recorded with the menu. (F 26) 2 Connect this unit off , disconnect the USB cable (F 91). Before turning this unit to a PC. (F 90) 3 Select [WEB MODE] then press the joystick. [YouTube Uploader] starts and the... motion pictures recorded in which the motion pictures are displayed. Before turning this unit off , disconnect the USB cable (F 91). The available services and the displays are not guaranteed. If [OK] is created with the VideoCam Suite. If [OK] is complete...
... sure to play back the discs to check that has a scene to upload recorded with the menu. (F 26) 2 Connect this unit off , disconnect the USB cable (F 91). Before turning this unit to a PC. (F 90) 3 Select [WEB MODE] then press the joystick. [YouTube Uploader] starts and the... motion pictures recorded in which the motion pictures are displayed. Before turning this unit off , disconnect the USB cable (F 91). The available services and the displays are not guaranteed. If [OK] is created with the VideoCam Suite. If [OK] is complete...
Operating Instructions
Page 94
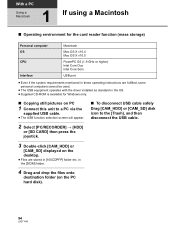
...the files onto destination folder (on the PC hard disk). 94 LSQT1449 p The USB function selection screen will appear. w To disconnect USB cable safely Drag [CAM_HDD] or [CAM_SD] disk icon to the [Trash], and then disconnect the USB cable. 2 Select [PC/RECORDER] [HDD] or [SD CARD] then press... the joystick. 3 Double-click [CAM_HDD] or [CAM_SD] displayed on PC 1 Connect this unit to a PC via the supplied USB cable. in the OS. With a PC Using a Macintosh 1 If using a Macintosh w Operating environment for Windows only. p Files are stored in these operating...
...the files onto destination folder (on the PC hard disk). 94 LSQT1449 p The USB function selection screen will appear. w To disconnect USB cable safely Drag [CAM_HDD] or [CAM_SD] disk icon to the [Trash], and then disconnect the USB cable. 2 Select [PC/RECORDER] [HDD] or [SD CARD] then press... the joystick. 3 Double-click [CAM_HDD] or [CAM_SD] displayed on PC 1 Connect this unit to a PC via the supplied USB cable. in the OS. With a PC Using a Macintosh 1 If using a Macintosh w Operating environment for Windows only. p Files are stored in these operating...

