
Facsimile
Page 4
...; Installing Your Machine ...19 „ Remove All Shipping Tapes and All Packing Materials 20 „ Load Paper ...21 „ Install the Toner Cartridge ...23 Installing Your Machine ...25 Setting the Dialing Method (Tone or Pulse 26 Adjusting the Volume ...27 „ Setting the Monitor Volume ...27 ...132; Using the Internet Fax Feature ...36 Replacing Consumables 38 „ Adding Paper (Paper Trays: Tray-1 and Tray-2 38 „ Replacing the Toner Cartridge...40 Problem Solving ...44 „ If You Have Any of These Problems 44 „ User(U)/Jam(J) Error Codes...46 „ Removing a Misfed ...
...; Installing Your Machine ...19 „ Remove All Shipping Tapes and All Packing Materials 20 „ Load Paper ...21 „ Install the Toner Cartridge ...23 Installing Your Machine ...25 Setting the Dialing Method (Tone or Pulse 26 Adjusting the Volume ...27 „ Setting the Monitor Volume ...27 ...132; Using the Internet Fax Feature ...36 Replacing Consumables 38 „ Adding Paper (Paper Trays: Tray-1 and Tray-2 38 „ Replacing the Toner Cartridge...40 Problem Solving ...44 „ If You Have Any of These Problems 44 „ User(U)/Jam(J) Error Codes...46 „ Removing a Misfed ...

Facsimile
Page 6
...any liquid container such as staples or clips on the machine. Never open flame. Consumable Safeguards Never dispose of toner or a toner cartridge into the machine, they can short-circuit internal components, and cause fire or electric shocks. If metal and flammable parts get medical ...Keep SD Memory Card/verification stamp out of the reach of time, unplug it. Do not place any unusual condition, contact your authorized Panasonic dealer. Safety Information When the machine is left connected to a power source for a long period, degraded insulation can cause electric shocks,...
...any liquid container such as staples or clips on the machine. Never open flame. Consumable Safeguards Never dispose of toner or a toner cartridge into the machine, they can short-circuit internal components, and cause fire or electric shocks. If metal and flammable parts get medical ...Keep SD Memory Card/verification stamp out of the reach of time, unplug it. Do not place any unusual condition, contact your authorized Panasonic dealer. Safety Information When the machine is left connected to a power source for a long period, degraded insulation can cause electric shocks,...

Facsimile
Page 7
..., maintain ample distance from the machine immediately, and contact your authorized Panasonic dealer. If a sheet of time to your authorized Panasonic dealer. It can cause a short circuit and fire. Consumable Safeguards Never heat the drum cartridge, or scratch its surface. A heated or scratched drum can withstand ...avoid injuries or burns. Pull out paper trays slowly to unplug the power cord from the machine immediately, and contact your authorized Panasonic dealer. A piece of torn paper are left in fire or electric shock. Doing so can cause fire. Disconnect the power cord...
..., maintain ample distance from the machine immediately, and contact your authorized Panasonic dealer. If a sheet of time to your authorized Panasonic dealer. It can cause a short circuit and fire. Consumable Safeguards Never heat the drum cartridge, or scratch its surface. A heated or scratched drum can withstand ...avoid injuries or burns. Pull out paper trays slowly to unplug the power cord from the machine immediately, and contact your authorized Panasonic dealer. A piece of torn paper are left in fire or electric shock. Doing so can cause fire. Disconnect the power cord...

Facsimile
Page 9
Do not use only genuine Panasonic Toner Cartridge (UG-5570) designed for the UG-5570 is based on the coverage, temperature, humidity, media, etc. Please ensure that only Panasonic Brand supplies are examples of certain documents. Note: Average yield is approximately 10,000 pages (3%... 15A, 120V AC outlet is 1000 W. Therefore, the average yield cannot be installed in your machine. The yield of a Toner Cartridge varies depending on 3% coverage of the printable area with the following are used to 3% coverage printing. Penalties of fines and/or imprisonment...
Do not use only genuine Panasonic Toner Cartridge (UG-5570) designed for the UG-5570 is based on the coverage, temperature, humidity, media, etc. Please ensure that only Panasonic Brand supplies are examples of certain documents. Note: Average yield is approximately 10,000 pages (3%... 15A, 120V AC outlet is 1000 W. Therefore, the average yield cannot be installed in your machine. The yield of a Toner Cartridge varies depending on 3% coverage of the printable area with the following are used to 3% coverage printing. Penalties of fines and/or imprisonment...

Facsimile
Page 14
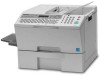
ENGLISH Main Unit and Accessories Unpack the carton and check that you have all the illustrated accessories. Machine Telephone Line Cable Operating Instructions Toner Cartridge Power Cord Recording Paper Tray CD-ROM Directory Sheet Holder 14
ENGLISH Main Unit and Accessories Unpack the carton and check that you have all the illustrated accessories. Machine Telephone Line Cable Operating Instructions Toner Cartridge Power Cord Recording Paper Tray CD-ROM Directory Sheet Holder 14

Facsimile
Page 15
For more details, refer to the Printing the Directory Sheet in the Operating Instructions (For Advanced Operations) of provided booklet. 15 ENGLISH External View 1 Insert the Directory Sheet Holder. (see Note 1) Control Panel ADF (Automatic Document Feeder) Recording Paper Tray Sub Document Tray Toner Cartridge Right Cover Jam Cover Paper Tray (Tray-1) 2nd Paper Tray (Tray-2) (optional) NOTE 1.
For more details, refer to the Printing the Directory Sheet in the Operating Instructions (For Advanced Operations) of provided booklet. 15 ENGLISH External View 1 Insert the Directory Sheet Holder. (see Note 1) Control Panel ADF (Automatic Document Feeder) Recording Paper Tray Sub Document Tray Toner Cartridge Right Cover Jam Cover Paper Tray (Tray-1) 2nd Paper Tray (Tray-2) (optional) NOTE 1.
Facsimile
Page 19
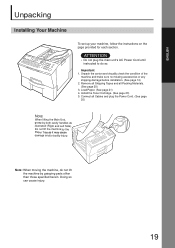
... Cord until instructed to do not lift the machine by both cavity handles as it may cause damage and/or bodily injury. Install the Toner Cartridge. (See page 23) 5. ENGLISH Unpacking Installing Your Machine To set up your machine, follow the instructions on the page provided for each section...
... Cord until instructed to do not lift the machine by both cavity handles as it may cause damage and/or bodily injury. Install the Toner Cartridge. (See page 23) 5. ENGLISH Unpacking Installing Your Machine To set up your machine, follow the instructions on the page provided for each section...

Facsimile
Page 23
... the protective cover unless you are ready to use the recommended Panasonic Toner Cartridge. Continued on one side during transportation. • For optimum copy quality, use it with the line under the arrow as illustrated below, and insert the Toner Cartridge into the machine. Caution: Be careful not to scratch the ...surface of the OPC Drum, and not to direct sunlight or bright light. 4 Align the top of the machine. 3 Rock the Toner Cartridge back and forth as shown 10 to 15 times to light. To prevent optical exposure problems, do not expose the OPC Drum to touch it...
... the protective cover unless you are ready to use the recommended Panasonic Toner Cartridge. Continued on one side during transportation. • For optimum copy quality, use it with the line under the arrow as illustrated below, and insert the Toner Cartridge into the machine. Caution: Be careful not to scratch the ...surface of the OPC Drum, and not to direct sunlight or bright light. 4 Align the top of the machine. 3 Rock the Toner Cartridge back and forth as shown 10 to 15 times to light. To prevent optical exposure problems, do not expose the OPC Drum to touch it...
Facsimile
Page 24
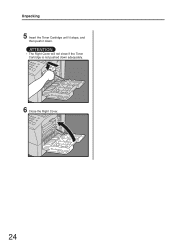
Unpacking 5 Insert the Toner Cartridge until it stops, and then push it down adequately. 6 Close the Right Cover. 24 ATTENTION • The Right Cover will not close if the Toner Cartridge is not pushed down .
Unpacking 5 Insert the Toner Cartridge until it stops, and then push it down adequately. 6 Close the Right Cover. 24 ATTENTION • The Right Cover will not close if the Toner Cartridge is not pushed down .

Facsimile
Page 40
Replace the Toner Cartridge before the Toner runs out. TONER IS RUNNING LOW U13 When ordering the Toner Cartridge, print the Order Form using the Toner Cartridge Order Form. OR 3 3:TONER ORDER FORM? PRESS SET TO PRINT 4 40 OR 2 MAINTENANCE (3-6) ENTER NO. Replacing Consumables Replacing the Toner Cartridge „ Low Toner message will follow this progression Order the Toner Cartridge using the following procedures, and fax it to your authorized Panasonic dealer. 1 FUNCTION (1-9) ENTER NO.
Replace the Toner Cartridge before the Toner runs out. TONER IS RUNNING LOW U13 When ordering the Toner Cartridge, print the Order Form using the Toner Cartridge Order Form. OR 3 3:TONER ORDER FORM? PRESS SET TO PRINT 4 40 OR 2 MAINTENANCE (3-6) ENTER NO. Replacing Consumables Replacing the Toner Cartridge „ Low Toner message will follow this progression Order the Toner Cartridge using the following procedures, and fax it to your authorized Panasonic dealer. 1 FUNCTION (1-9) ENTER NO.

Facsimile
Page 41
... sunlight or bright light. 2 Push up the Cartridge, and then pull it out. 4 Rock the Toner Cartridge back and forth as toner may accumulate on the next page... 41 Caution: Be careful not to use the recommended Panasonic Toner Cartridge. Do not remove the protective cover unless you... are ready to scratch the surface of the machine. The OPC Drum is sensitive to spread the toner evenly inside the Cartridge. ATTENTION • Shake the cartridge well, as shown 10 to...
... sunlight or bright light. 2 Push up the Cartridge, and then pull it out. 4 Rock the Toner Cartridge back and forth as toner may accumulate on the next page... 41 Caution: Be careful not to use the recommended Panasonic Toner Cartridge. Do not remove the protective cover unless you... are ready to scratch the surface of the machine. The OPC Drum is sensitive to spread the toner evenly inside the Cartridge. ATTENTION • Shake the cartridge well, as shown 10 to...

Facsimile
Page 42
Replacing Consumables 5 Align the top of the Toner Cartridge with the line under the arrow as illustrated below message appears on the next page. 12 42 ...the Right Cover is not pushed down adequately. 8 The below , and insert the Toner Cartridge into the machine. 7 Close the Right Cover. 6 Insert the Toner Cartridge until it stops, and then push it down. This message is not displayed if you change... the Toner Cartridge after the OUT OF TONER is selected in Step 9 , the image density may be inadequate and may ...
Replacing Consumables 5 Align the top of the Toner Cartridge with the line under the arrow as illustrated below message appears on the next page. 12 42 ...the Right Cover is not pushed down adequately. 8 The below , and insert the Toner Cartridge into the machine. 7 Close the Right Cover. 6 Insert the Toner Cartridge until it stops, and then push it down. This message is not displayed if you change... the Toner Cartridge after the OUT OF TONER is selected in Step 9 , the image density may be inadequate and may ...

Facsimile
Page 44
... the provided CD-ROM.) The User Error code U13 will stop. 1. After setting the clock, the blinking will appear on the display if the Toner Cartridge runs out of the machine. 1. Check Print Reduction settings. (Refer to see if the recording paper is installed if this symptom occurs frequently. If memory...
... the provided CD-ROM.) The User Error code U13 will stop. 1. After setting the clock, the blinking will appear on the display if the Toner Cartridge runs out of the machine. 1. Check Print Reduction settings. (Refer to see if the recording paper is installed if this symptom occurs frequently. If memory...

Facsimile
Page 45
... the best 9 possible print quality. (Refer to the receiving party that they have a problem. If copy is NG, replace the Toner Cartridge. 40 1. Check the connection of toner. If copy is OK, your machine has no problem, report to the Operating Instructions (For Advanced... Operations) on the display. If copy is -- Journal report quality is NG, clean the Document Scanning Area. 1. Replace the Toner Cartridge. 40 Your Toner Cartridge may need to choose a different paper for the best 9 possible print quality. (Refer to the receiving party that they have a ...
... the best 9 possible print quality. (Refer to the receiving party that they have a problem. If copy is NG, replace the Toner Cartridge. 40 1. Check the connection of toner. If copy is OK, your machine has no problem, report to the Operating Instructions (For Advanced... Operations) on the display. If copy is -- Journal report quality is NG, clean the Document Scanning Area. 1. Replace the Toner Cartridge. 40 Your Toner Cartridge may need to choose a different paper for the best 9 possible print quality. (Refer to the receiving party that they have a ...

Facsimile
Page 46
When the Machine Error Code (E Code) (for other location(s). If the E Code reappears, contact your local Panasonic Authorized Dealer. Problem Solving User(U) / Jam(J) Error Codes 1234 U20 U16 U13 U06 U07 „ User Codes (U Code) Code U06 U07 U13 Check Points Right ... above for service personnel) appears on the provided CD-ROM) Remove misfed paper(s) inside the machine. (See page 49) Code U16 U20 Check Points Toner Cartridge is open. Code J71, J72, J74 J75, J92, J93 Check Points Remove document(s) in the machine. Jam Cover is not installed correctly. Low Toner or...
When the Machine Error Code (E Code) (for other location(s). If the E Code reappears, contact your local Panasonic Authorized Dealer. Problem Solving User(U) / Jam(J) Error Codes 1234 U20 U16 U13 U06 U07 „ User Codes (U Code) Code U06 U07 U13 Check Points Right ... above for service personnel) appears on the provided CD-ROM) Remove misfed paper(s) inside the machine. (See page 49) Code U16 U20 Check Points Toner Cartridge is open. Code J71, J72, J74 J75, J92, J93 Check Points Remove document(s) in the machine. Jam Cover is not installed correctly. Low Toner or...
Facsimile
Page 49
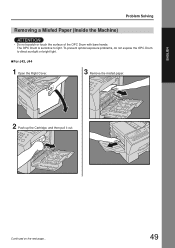
To prevent optical exposure problems, do not expose the OPC Drum to light. The OPC Drum is sensitive to direct sunlight or bright light. „For J43, J44 1 Open the Right Cover. 3 Remove the misfed paper. 2 Push up the Cartridge, and then pull it out. ENGLISH Problem Solving Removing a Misfed Paper (Inside the Machine) ATTENTION • Do not scratch or touch the surface of the OPC Drum with bare hands. Continued on the next page... 49
To prevent optical exposure problems, do not expose the OPC Drum to light. The OPC Drum is sensitive to direct sunlight or bright light. „For J43, J44 1 Open the Right Cover. 3 Remove the misfed paper. 2 Push up the Cartridge, and then pull it out. ENGLISH Problem Solving Removing a Misfed Paper (Inside the Machine) ATTENTION • Do not scratch or touch the surface of the OPC Drum with bare hands. Continued on the next page... 49
Facsimile
Page 50
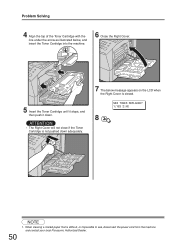
...50 NOTE 1. Problem Solving 1 4 Align the top of the Toner Cartridge with the line under the arrow as illustrated below, and insert the Toner Cartridge into the machine. 6 Close the Right Cover. 5 Insert the Toner Cartridge until it stops, and then push it down adequately. 7 The below ...message appears on the LCD when the Right Cover is difficult, or impossible to see, disconnect the power cord from the machine and contact your local Panasonic...
...50 NOTE 1. Problem Solving 1 4 Align the top of the Toner Cartridge with the line under the arrow as illustrated below, and insert the Toner Cartridge into the machine. 6 Close the Right Cover. 5 Insert the Toner Cartridge until it stops, and then push it down adequately. 7 The below ...message appears on the LCD when the Right Cover is difficult, or impossible to see, disconnect the power cord from the machine and contact your local Panasonic...


