Laser Facsimile
Page 3
... User Parameters 24 Setting the Date and Time 24 Setting Your LOGO 25 Setting Your Character ID 26 Setting Your ID Number (Fax Telephone Number) 27 3 PROGRAMMING YOUR MACHINE One-Touch/Abbreviated Dialing Numbers 29 Entering One-Touch/Abbreviated Dialing Numbers 29 Changing or ...Erasing One-Touch/Abbreviated Dialing Numbers 31 Printing Out a Directory Sheet 33 Customizing Your Machine 34 Setting the Fax Parameters 34 Fax Parameter Table 35 4 BASIC OPERATIONS Loading Documents 39 Documents You Can Send 39 Documents You Cannot Send 39 How to Load...
... User Parameters 24 Setting the Date and Time 24 Setting Your LOGO 25 Setting Your Character ID 26 Setting Your ID Number (Fax Telephone Number) 27 3 PROGRAMMING YOUR MACHINE One-Touch/Abbreviated Dialing Numbers 29 Entering One-Touch/Abbreviated Dialing Numbers 29 Changing or ...Erasing One-Touch/Abbreviated Dialing Numbers 31 Printing Out a Directory Sheet 33 Customizing Your Machine 34 Setting the Fax Parameters 34 Fax Parameter Table 35 4 BASIC OPERATIONS Loading Documents 39 Documents You Can Send 39 Documents You Cannot Send 39 How to Load...

Laser Facsimile
Page 5
... Code 85 Operating Your Machine with the Access Code (Restrict all operations) 86 Operating Your Machine with the Access Code (Restrict access of Fax Parameters only) 86 Receive To Memory 87 Setting the RCV To Memory Password 87 Setting RCV To Memory 87 Printing Out Documents 88 Distinctive ...Ring Detector (DRD 89 Fax Cover Sheet 90 General Description 90 To use the Fax Cover Sheet 90 PIN Code Access 92 Selecting the Access Method (Prefix or Suffix) 92 Dialing with a PIN ...
... Code 85 Operating Your Machine with the Access Code (Restrict all operations) 86 Operating Your Machine with the Access Code (Restrict access of Fax Parameters only) 86 Receive To Memory 87 Setting the RCV To Memory Password 87 Setting RCV To Memory 87 Printing Out Documents 88 Distinctive ...Ring Detector (DRD 89 Fax Cover Sheet 90 General Description 90 To use the Fax Cover Sheet 90 PIN Code Access 92 Selecting the Access Method (Prefix or Suffix) 92 Dialing with a PIN ...
Laser Facsimile
Page 6
... General Description 140 To set the Sub-address into a One-Touch/ABBR. JOURNAL) 147 One-Touch/Abbreviated and Directory Search List 149 Program List 152 FAX Parameter List 153 8 PROBLEM SOLVING Troubleshooting 155 If You Have Any of These Problems 155 Information Codes 157 Clearing a Recording Paper Jam 160 Clearing a Document...
... General Description 140 To set the Sub-address into a One-Touch/ABBR. JOURNAL) 147 One-Touch/Abbreviated and Directory Search List 149 Program List 152 FAX Parameter List 153 8 PROBLEM SOLVING Troubleshooting 155 If You Have Any of These Problems 155 Information Codes 157 Clearing a Recording Paper Jam 160 Clearing a Document...

Laser Facsimile
Page 11
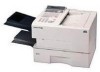
... fax machines, the UF-885/895 dials as soon as the first page has been scanned. Multiple LOGO Plain paper printing means you can continue to 120* standard pages into memory in a single phone call. Introduction Thank you very much for purchasing the Panafax UF-885/895. 1 The UF-885/...895 is one of the most popular features of the UF-885/895. After the UF-885/895 stores your originals. Journal and Individual XMT Journal.
... fax machines, the UF-885/895 dials as soon as the first page has been scanned. Multiple LOGO Plain paper printing means you can continue to 120* standard pages into memory in a single phone call. Introduction Thank you very much for purchasing the Panafax UF-885/895. 1 The UF-885/...895 is one of the most popular features of the UF-885/895. After the UF-885/895 stores your originals. Journal and Individual XMT Journal.
Laser Facsimile
Page 12
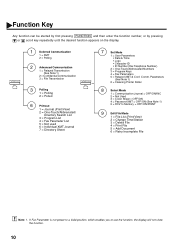
If Fax Parameter is not preset to a Valid position, which enables you to Memory = OFF/ON/PRINT 9 Edit File Mode 1 = File List (Print/View) 2 = Change Time/Station 3...1 = Relayed Transmission (See Note 1) 2 = Confidential Communication 3 = File Transmission FUNCTION 3 Polling 1 = Polling 2 = Polled 6 Printout 1 = Journal (Print/View) 2 = One-Touch/Abbreviated/ Directory Search List 3 = Program List 4 = Fax Parameter List 5 = Not used 6 = Individual XMT Journal 7 = Directory Sheet 7 Set Mode 1 = User Parameters • Date & Time • Logo • Character ID • ID Number...
If Fax Parameter is not preset to a Valid position, which enables you to Memory = OFF/ON/PRINT 9 Edit File Mode 1 = File List (Print/View) 2 = Change Time/Station 3...1 = Relayed Transmission (See Note 1) 2 = Confidential Communication 3 = File Transmission FUNCTION 3 Polling 1 = Polling 2 = Polled 6 Printout 1 = Journal (Print/View) 2 = One-Touch/Abbreviated/ Directory Search List 3 = Program List 4 = Fax Parameter List 5 = Not used 6 = Individual XMT Journal 7 = Directory Sheet 7 Set Mode 1 = User Parameters • Date & Time • Logo • Character ID • ID Number...
Laser Facsimile
Page 24
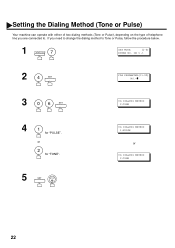
If you are connected to Tone or Pulse, follow the procedure below. 1 FUNCTION 7 SET MODE (1-6) ENTER NO. or 2 for "PULSE". Setting the Dialing Method (Tone or Pulse) Your machine can operate with either of two dialing methods (Tone or Pulse), depending on the type of telephone line you need to change the dialing method to . OR ∨ ∧ 2 4 SET FAX PARAMETER(01-99) NO.=❚ 3 0 6 SET 06 DIALING METHOD 2:TONE 41 for "TONE". 5 SET STOP 06 DIALING METHOD 1:PULSE or 06 DIALING METHOD 2:TONE 22
If you are connected to Tone or Pulse, follow the procedure below. 1 FUNCTION 7 SET MODE (1-6) ENTER NO. or 2 for "PULSE". Setting the Dialing Method (Tone or Pulse) Your machine can operate with either of two dialing methods (Tone or Pulse), depending on the type of telephone line you need to change the dialing method to . OR ∨ ∧ 2 4 SET FAX PARAMETER(01-99) NO.=❚ 3 0 6 SET 06 DIALING METHOD 2:TONE 41 for "TONE". 5 SET STOP 06 DIALING METHOD 1:PULSE or 06 DIALING METHOD 2:TONE 22
Laser Facsimile
Page 25
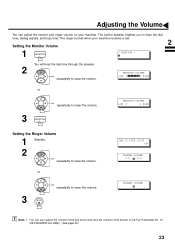
The ringer sounds when your machine. or + VOLUME repeatedly to raise the volume. - The built-in the Fax Parameter No. 10 (KEY/BUZZER VOLUME). (See page 35) 23 or + VOLUME repeatedly to lower the volume. - 3 MONITOR MONITOR VOLUME LOW HIGH MONITOR VOLUME LOW [ ] ...
The ringer sounds when your machine. or + VOLUME repeatedly to raise the volume. - The built-in the Fax Parameter No. 10 (KEY/BUZZER VOLUME). (See page 35) 23 or + VOLUME repeatedly to lower the volume. - 3 MONITOR MONITOR VOLUME LOW HIGH MONITOR VOLUME LOW [ ] ...
Laser Facsimile
Page 26
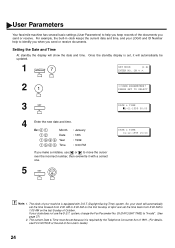
... At standby the display will automatically set the time back from 2:00 AM to 3:00 AM on the last Sunday of October. system, change the Fax Parameter No. 35 (DAYLIGHT TIME) to identify you when you send or receive. The clock of your state does not use or to 1:00 AM...
... At standby the display will automatically set the time back from 2:00 AM to 3:00 AM on the last Sunday of October. system, change the Fax Parameter No. 35 (DAYLIGHT TIME) to identify you when you send or receive. The clock of your state does not use or to 1:00 AM...
Laser Facsimile
Page 29
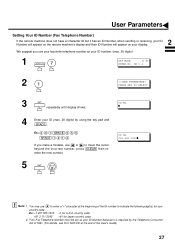
... for U.S.A. You may use or to indicate the following digit(s) for your ID number. (max. 20 digits) 1 FUNCTION 7 SET MODE (1-6) ENTER NO. Your Fax Telephone Number must be set as your country code. ID NO. ❚ 4 Enter your ID Number because it has an ID Number, when sending or... until display shows; Ex :+1 201 555 1212 +1 for Japan country code. 2. OR ∨ ∧ 21 1:USER PARAMETERS? User Parameters Setting Your ID Number (Fax Telephone Number) 2 If the remote machine does not have a Character ID but it is required by using the key pad and SPACE .
... for U.S.A. You may use or to indicate the following digit(s) for your ID number. (max. 20 digits) 1 FUNCTION 7 SET MODE (1-6) ENTER NO. Your Fax Telephone Number must be set as your country code. ID NO. ❚ 4 Enter your ID Number because it has an ID Number, when sending or... until display shows; Ex :+1 201 555 1212 +1 for Japan country code. 2. OR ∨ ∧ 21 1:USER PARAMETERS? User Parameters Setting Your ID Number (Fax Telephone Number) 2 If the remote machine does not have a Character ID but it is required by using the key pad and SPACE .
Laser Facsimile
Page 36
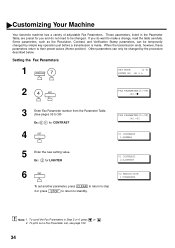
...Resolution, Contrast, and Verification Stamp parameters, can only be temporarily changed by the procedure described below. Other parameters can be changed . To print out a Fax Parameter List, see Note 2) 02 RESOLUTION 1:STANDARD Note: 1. These parameters, listed in Step 2 or 4, press or . 2. If you and do... want to make a change, read the table carefully. OR ∨ ∧ 2 4 SET FAX PARAMETER(01-99) NO.=❚ 3 Enter Fax Parameter number from the Parameter Table. (See pages 35 to their preset values (Home position). Setting the...
...Resolution, Contrast, and Verification Stamp parameters, can only be temporarily changed by the procedure described below. Other parameters can be changed . To print out a Fax Parameter List, see Note 2) 02 RESOLUTION 1:STANDARD Note: 1. These parameters, listed in Step 2 or 4, press or . 2. If you and do... want to make a change, read the table carefully. OR ∨ ∧ 2 4 SET FAX PARAMETER(01-99) NO.=❚ 3 Enter Fax Parameter number from the Parameter Table. (See pages 35 to their preset values (Home position). Setting the...

Laser Facsimile
Page 37
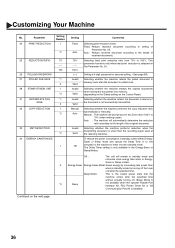
...*2 Invalid Valid Selecting whether the machine receives to memory when recording paper runs out, toner runs out or recording paper is jammed. Customizing Your Machine Fax Parameter Table No. Inside : Inside TX copy area. 2 Outside Outside : Outside TX copy area. 3 No print No print : Header is stored... in memory, 2 On see Fax Parameter No. 28. 05 MEMORY 1 Off Setting the home position of the MEMORY key. *2 On 06 DIALING METHOD 1 Pulse Selecting the dialing method. ...
...*2 Invalid Valid Selecting whether the machine receives to memory when recording paper runs out, toner runs out or recording paper is jammed. Customizing Your Machine Fax Parameter Table No. Inside : Inside TX copy area. 2 Outside Outside : Outside TX copy area. 3 No print No print : Header is stored... in memory, 2 On see Fax Parameter No. 28. 05 MEMORY 1 Off Setting the home position of the MEMORY key. *2 On 06 DIALING METHOD 1 Pulse Selecting the dialing method. ...
Laser Facsimile
Page 38
... ratio from 70% to the length of received documents. Setting a 4-digit password for the machine to enter into memory. (depending on the Stamp setting on Fax Parameter No. 24. Auto : The machine will prompt you for the Zoom ratio (100% to 120 minutes) for secured polling. (See page 68) Selecting whether...
... ratio from 70% to the length of received documents. Setting a 4-digit password for the machine to enter into memory. (depending on the Stamp setting on Fax Parameter No. 24. Auto : The machine will prompt you for the Zoom ratio (100% to 120 minutes) for secured polling. (See page 68) Selecting whether...
Laser Facsimile
Page 39
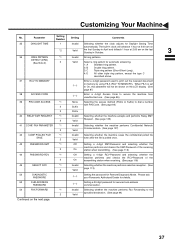
... *1 2 Invalid Valid Selecting whether the machine accepts and performs Relay XMT Request. (See page 133) 41 CONF. Please ask your Panasonic Authorized Dealer for details. 53 SUB-ADDRESS PASSWORD (----) Setting a 20-digit password for Remote Diagnostic Mode. When F8-5 is polled once... (See page 113) 2 Valid 52 DIAGNOSTIC PASSWORD (----) Setting the password for secured sub-address communication. 54 FAX FORWARD *1 Invalid Selecting whether the machine performs Fax Forwarding to print out the received document in October. 3 36 RING PATTERN DETECT (DRD) (See Note 2) ...
... *1 2 Invalid Valid Selecting whether the machine accepts and performs Relay XMT Request. (See page 133) 41 CONF. Please ask your Panasonic Authorized Dealer for details. 53 SUB-ADDRESS PASSWORD (----) Setting a 20-digit password for Remote Diagnostic Mode. When F8-5 is polled once... (See page 113) 2 Valid 52 DIAGNOSTIC PASSWORD (----) Setting the password for secured sub-address communication. 54 FAX FORWARD *1 Invalid Selecting whether the machine performs Fax Forwarding to print out the received document in October. 3 36 RING PATTERN DETECT (DRD) (See Note 2) ...
Laser Facsimile
Page 40
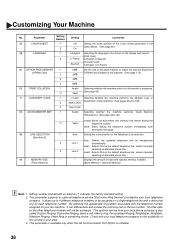
...the amount of the page memory to be answered. All other calls on the other telephone numbers will not be shown on the fax number. Valid: Starts dialing the telephone number immediately after storing the first page. 88 LINE SELECTION *1 Auto Setting the home position...similar. By selecting the appropriate ring pattern associated with an asterisk (*) indicates the factory standard setting. 2. This optional service from your fax machine. This parameter is available only when the G3 Communication Port Option is also called Custom Ringing, Distinctive Ringing, Ident-a-call on the...
...the amount of the page memory to be answered. All other calls on the other telephone numbers will not be shown on the fax number. Valid: Starts dialing the telephone number immediately after storing the first page. 88 LINE SELECTION *1 Auto Setting the home position...similar. By selecting the appropriate ring pattern associated with an asterisk (*) indicates the factory standard setting. 2. This optional service from your fax machine. This parameter is available only when the G3 Communication Port Option is also called Custom Ringing, Distinctive Ringing, Ident-a-call on the...
Laser Facsimile
Page 43
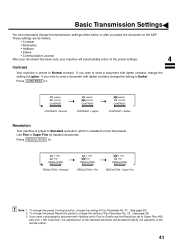
... contrast, change the setting to Darker. FINE FINE RESOLUTION RESOLUTION = Fine S - To change the preset Resolution position, change the setting of Fax Parameter No. 02. (See page 35) 3. Press CONTRAST to: DARKER LIGHTER CONTRAST CONTRAST = Normal DARKER LIGHTER CONTRAST CONTRAST = Lighter DARKER ...Press RCESOONLTURTAISOTN to: (see Note 1) Your machine is suitable for detailed documents. To change the preset Contrast position, change the setting of Fax Parameter No. 01. (See page 35) 2. If you place the document on the ADF. FINE FINE RESOLUTION RESOLUTION = Super Fine...
... contrast, change the setting to Darker. FINE FINE RESOLUTION RESOLUTION = Fine S - To change the preset Resolution position, change the setting of Fax Parameter No. 02. (See page 35) 3. Press CONTRAST to: DARKER LIGHTER CONTRAST CONTRAST = Normal DARKER LIGHTER CONTRAST CONTRAST = Lighter DARKER ...Press RCESOONLTURTAISOTN to: (see Note 1) Your machine is suitable for detailed documents. To change the preset Contrast position, change the setting of Fax Parameter No. 01. (See page 35) 2. If you place the document on the ADF. FINE FINE RESOLUTION RESOLUTION = Super Fine...
Laser Facsimile
Page 44
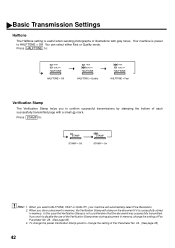
... Verification Stamp (see Note 2) (see Note 1) The Halftone setting is preset to HALFTONE = Off. To change the preset Verification Stamp position, change the setting of Fax Parameter No. 28. (See page 36) 3. Your machine is useful when sending photographs or illustrations with a small mark. Press STAMP to confirm successful transmissions by... (see Note 3) The Verification Stamp helps you wish to disable the use of the Verification Stamp when storing document in memory, change the setting of Fax Parameter No. 04. (See page 35) 42
... Verification Stamp (see Note 2) (see Note 1) The Halftone setting is preset to HALFTONE = Off. To change the preset Verification Stamp position, change the setting of Fax Parameter No. 28. (See page 36) 3. Your machine is useful when sending photographs or illustrations with a small mark. Press STAMP to confirm successful transmissions by... (see Note 3) The Verification Stamp helps you wish to disable the use of the Verification Stamp when storing document in memory, change the setting of Fax Parameter No. 04. (See page 35) 42
Laser Facsimile
Page 45
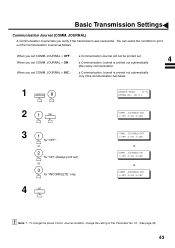
... 1:OFF 2:ON 3:INC or COMM. JOURNAL=ON 1:OFF 2:ON 3:INC or COMM. or 2 for "INCOMPLETE" only. 4 SET (see Note 1) COMM. To change the setting of Fax Parameter No. 12. (See page 35) 43 When you set COMM. JOURNAL=INC 1:OFF 2:ON 3:INC 3 1 for "OFF". Basic Transmission Settings Communication Journal (COMM. JOURNAL...
... 1:OFF 2:ON 3:INC or COMM. JOURNAL=ON 1:OFF 2:ON 3:INC or COMM. or 2 for "INCOMPLETE" only. 4 SET (see Note 1) COMM. To change the setting of Fax Parameter No. 12. (See page 35) 43 When you set COMM. JOURNAL=INC 1:OFF 2:ON 3:INC 3 1 for "OFF". Basic Transmission Settings Communication Journal (COMM. JOURNAL...

Laser Facsimile
Page 47
...? 1:YES 2:NO STOP . FILE SAVE) to "Valid" in advance. (See page 36) To retry the incomplete documents, refer to erase the documents, change Fax Parameter No. 31 (INC. If you do not want to page 84. CODE=XXX 4. To stop the transmission. SAVE AS INCOMP.FILE? 1:YES 2:NO ... the machine 15 PAGES COMPLETED stores all the documents into memory first before transmitting. The File Number of the display while storing the document. If Fax Parameter No. 82 (Quick Memory XMT) is installed. 3. If no answer at the upper right * STORE * NO.003 corner of the document...
...? 1:YES 2:NO STOP . FILE SAVE) to "Valid" in advance. (See page 36) To retry the incomplete documents, refer to erase the documents, change Fax Parameter No. 31 (INC. If you do not want to page 84. CODE=XXX 4. To stop the transmission. SAVE AS INCOMP.FILE? 1:YES 2:NO ... the machine 15 PAGES COMPLETED stores all the documents into memory first before transmitting. The File Number of the display while storing the document. If Fax Parameter No. 82 (Quick Memory XMT) is installed. 3. If no answer at the upper right * STORE * NO.003 corner of the document...
Laser Facsimile
Page 48
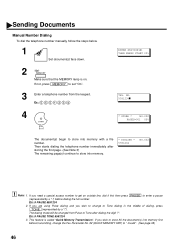
...❚ 4 START * STORE * NO.002 PAGES=001 05% The document(s) begin to " Invalid". (See page 38) 46 Ex: 5 5 5 1 2 3 4 TEL. If you wish to change the Fax Parameter No. 82 (QUICK MEMORY XMT) to store into memory first before dialing the full number. Ex: 9 PAUSE 5551234 2. If not, press MEMORY to store...
...❚ 4 START * STORE * NO.002 PAGES=001 05% The document(s) begin to " Invalid". (See page 38) 46 Ex: 5 5 5 1 2 3 4 TEL. If you wish to change the Fax Parameter No. 82 (QUICK MEMORY XMT) to store into memory first before dialing the full number. Ex: 9 PAUSE 5551234 2. If not, press MEMORY to store...
Laser Facsimile
Page 49
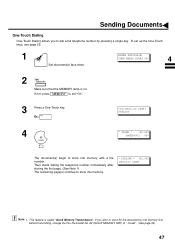
... a single key. Sending Documents One-Touch Dialing One-Touch Dialing allows you wish to store All the document(s) into memory first before transmitting, change the Fax Parameter No. 82 (QUICK MEMORY XMT) to store into memory with a file number. To set "On". 3 Press a One-Touch key.
... a single key. Sending Documents One-Touch Dialing One-Touch Dialing allows you wish to store All the document(s) into memory first before transmitting, change the Fax Parameter No. 82 (QUICK MEMORY XMT) to store into memory with a file number. To set "On". 3 Press a One-Touch key.


