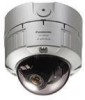

Network Camera
Page 8
... Installing the Camera 21 Connecting the Cables 25 Adjusting the Camera 28 Handling SD Memory Cards 32 Insertion and Removal of SD Memory Cards 32 Heater Unit 33 How to Install the Heater Unit 33 Connection Examples 34 Network Setup 35 Installing the Software 35 Using the Panasonic IP Setup Software ...to Set Up the Camera 35 Monitor Images on a PC 37 Monitor images from a single...
... Installing the Camera 21 Connecting the Cables 25 Adjusting the Camera 28 Handling SD Memory Cards 32 Insertion and Removal of SD Memory Cards 32 Heater Unit 33 How to Install the Heater Unit 33 Connection Examples 34 Network Setup 35 Installing the Software 35 Using the Panasonic IP Setup Software ...to Set Up the Camera 35 Monitor Images on a PC 37 Monitor images from a single...

Network Camera
Page 35
... 20 minutes elapses since the camera was turned on. • The IP setup software cannot be used on the camera. For details, refer to Set Up the Camera Use the Panasonic IP Setup Software provided (from the camera or by double clicking "nwcv3setup.exe" on the CD-ROM provided, and then following . • Network Camera View3 To display images...
... 20 minutes elapses since the camera was turned on. • The IP setup software cannot be used on the camera. For details, refer to Set Up the Camera Use the Panasonic IP Setup Software provided (from the camera or by double clicking "nwcv3setup.exe" on the CD-ROM provided, and then following . • Network Camera View3 To display images...
Network Camera
Page 36
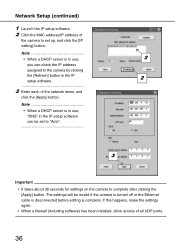
... Ethernet cable is disconnected before setting is in use , "DNS" in the IP setup software can check the IP address assigned to complete after clicking the [Apply] button. Network Setup (continued) 1 Launch the IP setup software. 2 Click the MAC address/IP address of the camera to set to "Auto". 3 Important • It takes about 30 seconds...
... Ethernet cable is disconnected before setting is in use , "DNS" in the IP setup software can check the IP address assigned to complete after clicking the [Apply] button. Network Setup (continued) 1 Launch the IP setup software. 2 Click the MAC address/IP address of the camera to set to "Auto". 3 Important • It takes about 30 seconds...

Network Camera
Page 40
Monitor Images on the PC. 2 Enter the IP address designated using the Panasonic IP setup software (→ page 35) in the address box of the browser. (Example: http://192.168.0.10) 3 Press the [Enter] key. tion", the window for "User Authentica- When "ON" is selected for entering the user name and password is displayed. • "Live" page 4 Display images from a single camera • Web browser screen 2 1 Launch the web browser on a PC (continued) Monitor images from the camera. 40
Monitor Images on the PC. 2 Enter the IP address designated using the Panasonic IP setup software (→ page 35) in the address box of the browser. (Example: http://192.168.0.10) 3 Press the [Enter] key. tion", the window for "User Authentica- When "ON" is selected for entering the user name and password is displayed. • "Live" page 4 Display images from a single camera • Web browser screen 2 1 Launch the web browser on a PC (continued) Monitor images from the camera. 40

Network Camera
Page 41
..." page will become unavailable. 41 For further information about registering cameras, refer to page 6. For details on the required PC environment...multi-screen from multiple cameras can be displayed on a multi-screen. 4 cameras can be registered as a group, and camera images for up to 8 cameras (2 groups) can be displayed simultaneously in a local area network, configure the web ...the performance of the camera:port number". • When the DDNS function has been set to "ON", enter "http://host name registered to DDNS server.nmdns.net/". • When this camera is "12345". Not.e...&#...
..." page will become unavailable. 41 For further information about registering cameras, refer to page 6. For details on the required PC environment...multi-screen from multiple cameras can be displayed on a multi-screen. 4 cameras can be registered as a group, and camera images for up to 8 cameras (2 groups) can be displayed simultaneously in a local area network, configure the web ...the performance of the camera:port number". • When the DDNS function has been set to "ON", enter "http://host name registered to DDNS server.nmdns.net/". • When this camera is "12345". Not.e...&#...

Network Camera
Page 48
...(continued) Shutter speed Electronic sensitivity enhancement White balance Digital noise reduction Electronic zoom Camera title VMD alarm Scene change detection alarm Privacy zone • Lens Type Focal length F number Focus range Angle of view Adjusting angle • Network Network Image resolution Image MPEG-4 compression system JPEG Refresh interval Total bit rate Supported ... frame rate limited at JPEG/MPEG4 simultaneous operation) Unlimited/64 kbps/128 kbps/256 kbps/ 512 kbps/1024 kbps/2048 kbps/4096 kbps TCP/IP, UDP/IP, HTTP, RTP, FTP, SMTP, DHCP, DNS, DDNS, NTP, SNMP 48
...(continued) Shutter speed Electronic sensitivity enhancement White balance Digital noise reduction Electronic zoom Camera title VMD alarm Scene change detection alarm Privacy zone • Lens Type Focal length F number Focus range Angle of view Adjusting angle • Network Network Image resolution Image MPEG-4 compression system JPEG Refresh interval Total bit rate Supported ... frame rate limited at JPEG/MPEG4 simultaneous operation) Unlimited/64 kbps/128 kbps/256 kbps/ 512 kbps/1024 kbps/2048 kbps/4096 kbps TCP/IP, UDP/IP, HTTP, RTP, FTP, SMTP, DHCP, DNS, DDNS, NTP, SNMP 48
Network Camera
Page 49
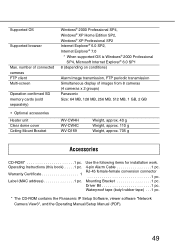
... periodic transmission Simultaneous display of images from 8 cameras (4 cameras x 2 groups) Panasonic Size: 64 MB, 128 MB, 256 MB, 512 MB, 1 GB, 2 GB WV-CW4H WV-CW4C WV-Q169 Weight, approx. 40 g Weight, approx.... 110 g Weight, approx. 705 g Accessories CD-ROM 1 pc. Use the following items for installation work. 4-pin Alarm Cable 1 pc. RJ-45 female-female conversion connector 1 pc. Waterproof tape (butyl rubber tape) . . . 1 pc. * The CD-ROM contains the Panasonic IP Setup Software, viewer software "Network Camera...
... periodic transmission Simultaneous display of images from 8 cameras (4 cameras x 2 groups) Panasonic Size: 64 MB, 128 MB, 256 MB, 512 MB, 1 GB, 2 GB WV-CW4H WV-CW4C WV-Q169 Weight, approx. 40 g Weight, approx.... 110 g Weight, approx. 705 g Accessories CD-ROM 1 pc. Use the following items for installation work. 4-pin Alarm Cable 1 pc. RJ-45 female-female conversion connector 1 pc. Waterproof tape (butyl rubber tape) . . . 1 pc. * The CD-ROM contains the Panasonic IP Setup Software, viewer software "Network Camera...


