
WVSC385E User Guide
Page 1
WV-SC385 WV-SC385E WV-SC385 LOCK OPEN Before attempting to connect or operate this product, please read these instructions carefully and save this manual. The model number is abbreviated in some descriptions in this manual for future use. Installation Guide Network Camera Model No.
WV-SC385 WV-SC385E WV-SC385 LOCK OPEN Before attempting to connect or operate this product, please read these instructions carefully and save this manual. The model number is abbreviated in some descriptions in this manual for future use. Installation Guide Network Camera Model No.
WVSC385E User Guide
Page 6
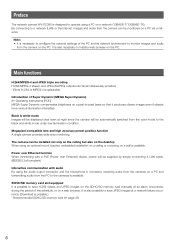
...compensates brightness on a pixel-to install a web browser on a network (10BASE-T/100BASE-TX). Preface The network camera WV-SC385 is designed to a network (LAN) or the Internet, images and audio from the camera can be monitored on a PC via a network. By connecting to operate using a PC on the PC.... By using an optional mount bracket, embedded installation on a ceiling or mounting on a PC and transmitting audio from the PC to the cameras is available. Power over Ethernet function When connecting with a PoE (Power over Ethernet) device, power will be automatically switched from the color...
...compensates brightness on a pixel-to install a web browser on a network (10BASE-T/100BASE-TX). Preface The network camera WV-SC385 is designed to a network (LAN) or the Internet, images and audio from the camera can be monitored on a PC via a network. By connecting to operate using a PC on the PC.... By using an optional mount bracket, embedded installation on a ceiling or mounting on a PC and transmitting audio from the PC to the cameras is available. Power over Ethernet function When connecting with a PoE (Power over Ethernet) device, power will be automatically switched from the color...

WVSC385E User Guide
Page 7
... Audio may be heard if a sound card is necessary to read the operating instructions on the provided CD-ROM. System requirements for the WV-SC385 (NTSC model), WV-SC385E (PAL model) as follows. • Installation Guide: Explains how to install and connect devices, as well as how to connect ...and configure the network. • Operating Instructions (PDF): Explains how to perform the settings and how to operate this camera. About the user manuals ...
... Audio may be heard if a sound card is necessary to read the operating instructions on the provided CD-ROM. System requirements for the WV-SC385 (NTSC model), WV-SC385E (PAL model) as follows. • Installation Guide: Explains how to install and connect devices, as well as how to connect ...and configure the network. • Operating Instructions (PDF): Explains how to perform the settings and how to operate this camera. About the user manuals ...

WVSC385E User Guide
Page 13
Major operating controls Camera mount bracket (accessory) OPEN FRONT LOCK WV-SC385 LOCK OPEN Safety wire (fixed with the mount bracket) Decorative cover (accessory) Camera Front view Transparent part (over the lens) WV-SC385 SDHC/SD memory card slot cover Panasonic logo plate WV-SC385 SDHC/SD memory card slot 13
Major operating controls Camera mount bracket (accessory) OPEN FRONT LOCK WV-SC385 LOCK OPEN Safety wire (fixed with the mount bracket) Decorative cover (accessory) Camera Front view Transparent part (over the lens) WV-SC385 SDHC/SD memory card slot cover Panasonic logo plate WV-SC385 SDHC/SD memory card slot 13

WVSC385E User Guide
Page 15
...support the total weight, the area shall be sufficiently reinforced or the optional ceiling mount bracket for the camera, WV-Q105, or the optional ceiling embedding bracket, WV-Q155S/ WV-Q155C, shall be installed on concrete ceiling: Fix with anchor bolts (M6). (Recommended tightening torque: ...lbf} or more. • If a ceiling board such as plaster board WV-SC385 Camera mount bracket (accessory) Decorative cover (accessory) Camera 15 wiring through a hole in the ceiling) (☞ page 20). The camera can be placed upside down on a ceiling, there are descriptions of the ...
...support the total weight, the area shall be sufficiently reinforced or the optional ceiling mount bracket for the camera, WV-Q105, or the optional ceiling embedding bracket, WV-Q155S/ WV-Q155C, shall be installed on concrete ceiling: Fix with anchor bolts (M6). (Recommended tightening torque: ...lbf} or more. • If a ceiling board such as plaster board WV-SC385 Camera mount bracket (accessory) Decorative cover (accessory) Camera 15 wiring through a hole in the ceiling) (☞ page 20). The camera can be placed upside down on a ceiling, there are descriptions of the ...
WVSC385E User Guide
Page 19
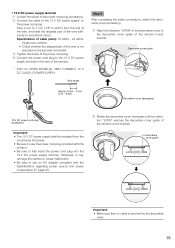
...• The 12 V DC power supply shall be insulated from the end of the wire, and twist the stripped part of the camera mount bracket. WV-SC385 Decorative cover (accessory) w Rotate the decorative cover clockwise until the indication "LOCK" reaches the decorative cover guide of the wire sufficiently to... cover (accessory). r Connect the power cord plug to fully insert the power cord plug into the 12 V DC power supply terminal. WV-SC385 LOCK OPEN Decorative cover guide LOCK OPEN LOCK OPEN Important: • Make sure that no cable is securely connected. Specification of cable (...
...• The 12 V DC power supply shall be insulated from the end of the wire, and twist the stripped part of the camera mount bracket. WV-SC385 Decorative cover (accessory) w Rotate the decorative cover clockwise until the indication "LOCK" reaches the decorative cover guide of the wire sufficiently to... cover (accessory). r Connect the power cord plug to fully insert the power cord plug into the 12 V DC power supply terminal. WV-SC385 LOCK OPEN Decorative cover guide LOCK OPEN LOCK OPEN Important: • Make sure that no cable is securely connected. Specification of cable (...
WVSC385E User Guide
Page 20
... through a hole in the ceiling" section (☞ page 19). Install the camera by following step 1 and steps 3 - 9 of the "Wire through a hole in the ceiling" section (☞ pages 16 - 18). Function] tab of the setup menu. (☞ Operating Instructions (PDF)) WV-SC385 Important: • Prepare four fixing screws (M4 or M6) to make...
... through a hole in the ceiling" section (☞ page 19). Install the camera by following step 1 and steps 3 - 9 of the "Wire through a hole in the ceiling" section (☞ pages 16 - 18). Function] tab of the setup menu. (☞ Operating Instructions (PDF)) WV-SC385 Important: • Prepare four fixing screws (M4 or M6) to make...
WVSC385E User Guide
Page 21
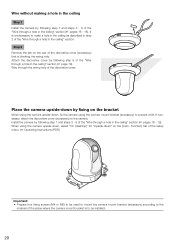
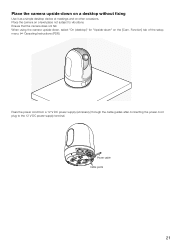
... Instructions (PDF)) WV-SC385 Pass the power cord from a 12 V DC power supply (accessory) through the cable guides after connecting the power cord plug to vibrations. Power cable Cable guide 21 4321 MONITOROUT EXT I/O Place the camera upside-down " on the [Cam. Place the camera on other occasions.... Ensure that the camera does not fall. When using the camera upside-down, select "On (desktop)" for "Upside-down on a desktop ...
... Instructions (PDF)) WV-SC385 Pass the power cord from a 12 V DC power supply (accessory) through the cable guides after connecting the power cord plug to vibrations. Power cable Cable guide 21 4321 MONITOROUT EXT I/O Place the camera upside-down " on the [Cam. Place the camera on other occasions.... Ensure that the camera does not fall. When using the camera upside-down, select "On (desktop)" for "Upside-down on a desktop ...
WVSC385E User Guide
Page 23
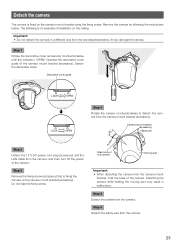
... using the fixing screw. Detach the camera The camera is fixing the camera on the camera mount bracket (accessory). The following the instructions below . Decorative cover guide WV-SC385 LOCK OPEN LOCK OPEN LOCK OPEN Step 4 Rotate the camera counterclockwise to detach the camera from the camera mount bracket, hold the base of the camera Moving part Important: • When...
... using the fixing screw. Detach the camera The camera is fixing the camera on the camera mount bracket (accessory). The following the instructions below . Decorative cover guide WV-SC385 LOCK OPEN LOCK OPEN LOCK OPEN Step 4 Rotate the camera counterclockwise to detach the camera from the camera mount bracket, hold the base of the camera Moving part Important: • When...


