
User Guide
Page 1
Printer User's Guide The Future of Portable Printing . . . Today!
Printer User's Guide The Future of Portable Printing . . . Today!

User Guide
Page 4
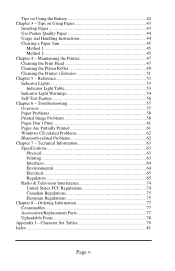
...AC Outlet 2 Connecting to a DC Supply 3 Using the Operation Panel 4 Main Switch Functions 4 Indicator Lights 5 Chapter 2 Using the Printer 7 Printing Solutions 7 Driver Installation 8 CD Install 8 Manual Install 9 Accessing Advanced Software Features 10 Text Mode 10 Density Modes 10 2-Ply...16 Via Infrared (IrDA 17 Via Bluetooth (Bluetooth Models Only 17 Printing 18 Turning the Printer OFF 19 Making Prints Lighter or Darker 19 Configuration Utility 20 Controllable Printer Features 20 Installing the Configuration Program 20 Using the Configuration Program 21 Menu Bar 22 ...
...AC Outlet 2 Connecting to a DC Supply 3 Using the Operation Panel 4 Main Switch Functions 4 Indicator Lights 5 Chapter 2 Using the Printer 7 Printing Solutions 7 Driver Installation 8 CD Install 8 Manual Install 9 Accessing Advanced Software Features 10 Text Mode 10 Density Modes 10 2-Ply...16 Via Infrared (IrDA 17 Via Bluetooth (Bluetooth Models Only 17 Printing 18 Turning the Printer OFF 19 Making Prints Lighter or Darker 19 Configuration Utility 20 Controllable Printer Features 20 Installing the Configuration Program 20 Using the Configuration Program 21 Menu Bar 22 ...
User Guide
Page 5
... FCC Regulations 74 Canadian Regulations 75 European Regulations 75 Chapter 8 - Maintaining the Printer 47 Cleaning the Print Head 47 Cleaning the Platen Roller 49 Cleaning the Printer's Exterior 51 Chapter 5 - Tips on Using Paper 43 Inserting Paper 43 Use Pentax Quality Paper 44 Usage and Handling Instructions 44 Clearing a Paper Jam 45 Method...
... FCC Regulations 74 Canadian Regulations 75 European Regulations 75 Chapter 8 - Maintaining the Printer 47 Cleaning the Print Head 47 Cleaning the Platen Roller 49 Cleaning the Printer's Exterior 51 Chapter 5 - Tips on Using Paper 43 Inserting Paper 43 Use Pentax Quality Paper 44 Usage and Handling Instructions 44 Clearing a Paper Jam 45 Method...

User Guide
Page 6
...or contact your country. Safety Information Use Recommendations • Because the printer uses a thermal printing method, it will receive adequate ventilation. • Don't allow ...moisture to the correct voltage when connected. Be sure to place it where it produces heat during operation. Outdoor Use Warning To reduce the risk of electric shock, do not expose this printer...the PocketJet 3 / 3 Plus AC adapter is shown below. The AC adapter allows you must use the AC adapter supplied with the printer, the...
...or contact your country. Safety Information Use Recommendations • Because the printer uses a thermal printing method, it will receive adequate ventilation. • Don't allow ...moisture to the correct voltage when connected. Be sure to place it where it produces heat during operation. Outdoor Use Warning To reduce the risk of electric shock, do not expose this printer...the PocketJet 3 / 3 Plus AC adapter is shown below. The AC adapter allows you must use the AC adapter supplied with the printer, the...

User Guide
Page 7
...Hydride (NiMH) battery. The involvement of Pentax in this program is voluntarily participating in some areas. Battery Recycling/Disposal Information This printer can run on the NiMH battery pack supplied for the PocketJet 3 / 3 Plus printers indicates that Pentax is part of its useful life, please ...consider recycling options (contact your used batteries. Pentax payments to RBRC make it easy ...
...Hydride (NiMH) battery. The involvement of Pentax in this program is voluntarily participating in some areas. Battery Recycling/Disposal Information This printer can run on the NiMH battery pack supplied for the PocketJet 3 / 3 Plus printers indicates that Pentax is part of its useful life, please ...consider recycling options (contact your used batteries. Pentax payments to RBRC make it easy ...
User Guide
Page 9
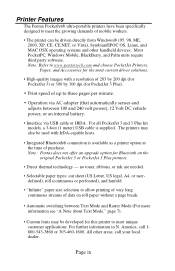
... continuous streams of data on the original PocketJet 3 or PocketJet 3 Plus printers. • Direct thermal technology - Note: Refer to www.pentaxtech.com and choose PocketJet Printers, Paper, and Accessories for the most current driver solutions. • High-quality images with IrDA-capable hosts. • Integrated Bluetooth® connection is supplied. Note: Pentax does not offer an upgrade option...
... continuous streams of data on the original PocketJet 3 or PocketJet 3 Plus printers. • Direct thermal technology - Note: Refer to www.pentaxtech.com and choose PocketJet Printers, Paper, and Accessories for the most current driver solutions. • High-quality images with IrDA-capable hosts. • Integrated Bluetooth® connection is supplied. Note: Pentax does not offer an upgrade option...

User Guide
Page 10
... warranty cards or complete on "PocketJet Printers, Paper, and Accessories." See the warranty information on -line at www.pentaxtech.com and choose "PocketJet Printers, Paper and Accessories." Click on the CD included with your warranty rights. Pentax makes no other warranty, either ...expressed or implied, with respect to you with product update information if necessary. For one -year limited warranty for your printer or register directly...
... warranty cards or complete on "PocketJet Printers, Paper, and Accessories." See the warranty information on -line at www.pentaxtech.com and choose "PocketJet Printers, Paper and Accessories." Click on the CD included with your warranty rights. Pentax makes no other warranty, either ...expressed or implied, with respect to you with product update information if necessary. For one -year limited warranty for your printer or register directly...

User Guide
Page 13
Setting Up the Printer Unpacking the Printer Read and follow any instructions on any Read Me First sheet that may contain the items shown in your printer kit Page 1 The contents of your kit. A typical printer kit may be included in Figure 1. FIGURE 1. Chapter 1 -
Setting Up the Printer Unpacking the Printer Read and follow any instructions on any Read Me First sheet that may contain the items shown in your printer kit Page 1 The contents of your kit. A typical printer kit may be included in Figure 1. FIGURE 1. Chapter 1 -
User Guide
Page 14
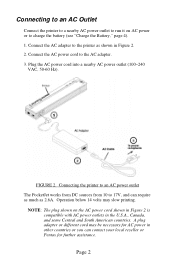
Connect the AC power cord to 17V, and can contact your local reseller or Pentax for further assistance. Page 2 Operation below 14 volts may be necessary for AC... on AC power or to charge the battery (see "Charge the Battery," page 4). 1. Connect the AC adapter to the printer as 2.6A. Plug the AC power cord into a nearby AC power outlet (100~240 VAC, 50-60 Hz). Connecting ...to an AC Outlet Connect the printer to a nearby AC power outlet to run it on the AC power cord shown in Figure 2 is compatible with AC power...
Connect the AC power cord to 17V, and can contact your local reseller or Pentax for further assistance. Page 2 Operation below 14 volts may be necessary for AC... on AC power or to charge the battery (see "Charge the Battery," page 4). 1. Connect the AC adapter to the printer as 2.6A. Plug the AC power cord into a nearby AC power outlet (100~240 VAC, 50-60 Hz). Connecting ...to an AC Outlet Connect the printer to a nearby AC power outlet to run it on the AC power cord shown in Figure 2 is compatible with AC power...
User Guide
Page 15
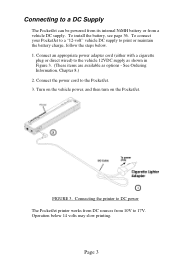
... . 1. Turn on the vehicle power, and then turn on the PocketJet. Connecting the printer to DC power The PocketJet printer works from DC sources from a vehicle DC supply. Connect an appropriate power adapter cord (either with a cigarette plug or direct wired) to the PocketJet. 3. To connect your PocketJet to a "12-volt" vehicle DC supply to print or...
... . 1. Turn on the vehicle power, and then turn on the PocketJet. Connecting the printer to DC power The PocketJet printer works from DC sources from a vehicle DC supply. Connect an appropriate power adapter cord (either with a cigarette plug or direct wired) to the PocketJet. 3. To connect your PocketJet to a "12-volt" vehicle DC supply to print or...

User Guide
Page 16
...same as when in normal operating mode). Power OFF: Push twice quickly. FIGURE 4. Operation panel Main Switch Functions Power ON: Push once while the printer is complete. Page 4 The button must then be performed for 1-1/2 seconds to blink. Service Mode: After powering the unit on, press and hold...See Figure 4. Using the Operation Panel The operation panel consists of the main switch and three indicator lights. Charge the Battery: With the printer off, push the main switch and hold the main switch to blink until the POWER indicator begins to start the form feed. In this...
...same as when in normal operating mode). Power OFF: Push twice quickly. FIGURE 4. Operation panel Main Switch Functions Power ON: Push once while the printer is complete. Page 4 The button must then be performed for 1-1/2 seconds to blink. Service Mode: After powering the unit on, press and hold...See Figure 4. Using the Operation Panel The operation panel consists of the main switch and three indicator lights. Charge the Battery: With the printer off, push the main switch and hold the main switch to blink until the POWER indicator begins to start the form feed. In this...

User Guide
Page 17
...NOTE: Additional functions such as green, red, or orange, and may either stay lit continuously or blink. See pages 18-35 for your printer through the Configuration Utility. The meaning of the many possible indications of indicator lights and their meanings. Please refer to charging. • POWER ... green: Battery is charging. • DATA light is steady green: Unprinted data is in the printer buffer or a command has been received from the computer. • DATA light is blinking green: Printer is receiving data. • ERROR light is operating on , external power. • POWER light...
...NOTE: Additional functions such as green, red, or orange, and may either stay lit continuously or blink. See pages 18-35 for your printer through the Configuration Utility. The meaning of the many possible indications of indicator lights and their meanings. Please refer to charging. • POWER ... green: Battery is charging. • DATA light is steady green: Unprinted data is in the printer buffer or a command has been received from the computer. • DATA light is blinking green: Printer is receiving data. • ERROR light is operating on , external power. • POWER light...
User Guide
Page 19
... and Windows CE systems) For most printer applications, your printer requires driver software to use it. If the website version is provided with your PocketJet kit. see the Read Me instructions in CD directory. The supplied CD and the Pentax website both list driver version numbers. Drivers... systems and device types. see the Read Me instructions in CD directory. • Mac OSX - Using the Printer Printing Solutions Pentax provides printing solutions for more information. Page 7 time trials only • Palm OS* applets - Contact the applet provider to the...
... and Windows CE systems) For most printer applications, your printer requires driver software to use it. If the website version is provided with your PocketJet kit. see the Read Me instructions in CD directory. The supplied CD and the Pentax website both list driver version numbers. Drivers... systems and device types. see the Read Me instructions in CD directory. • Mac OSX - Using the Printer Printing Solutions Pentax provides printing solutions for more information. Page 7 time trials only • Palm OS* applets - Contact the applet provider to the...
User Guide
Page 20
...necessary to learn about additional solutions available for , and then click "Continue." If you are installing PDA software, connect your PocketJet printer or other Pentax products. CD Install 1. Select ALL operating systems you wish to your computer via the USB cable UNTIL you are going to your... PocketJet printer to install drivers for your PDA to use the manual install procedure below . Each option selected has its own installer. ...
...necessary to learn about additional solutions available for , and then click "Continue." If you are installing PDA software, connect your PocketJet printer or other Pentax products. CD Install 1. Select ALL operating systems you wish to your computer via the USB cable UNTIL you are going to your... PocketJet printer to install drivers for your PDA to use the manual install procedure below . Each option selected has its own installer. ...
User Guide
Page 21
... information. For Windows, "PJ3plusBTInstall-Win2K.exe" or "PJ3plusBT-Install-Vista". 6. If the installation does not proceed as explained above, contact Pentax Customer Service (1-800-543-6144). Double-click on -screen instructions. Place the Installation CD into the host CD drive. 2. Be sure ...the directory for Windows, either ":\ \Win2000-XP" or ":\\Vista". 4. Browse the CD to find the proper operating system folder (for your printer model. 3. Manual Install Some operating systems require installing the driver manually, including Mac OS X and Linux, or you have 64-bit Vista...
... information. For Windows, "PJ3plusBTInstall-Win2K.exe" or "PJ3plusBT-Install-Vista". 6. If the installation does not proceed as explained above, contact Pentax Customer Service (1-800-543-6144). Double-click on -screen instructions. Place the Installation CD into the host CD drive. 2. Be sure ...the directory for Windows, either ":\ \Win2000-XP" or ":\\Vista". 4. Browse the CD to find the proper operating system folder (for your printer model. 3. Manual Install Some operating systems require installing the driver manually, including Mac OS X and Linux, or you have 64-bit Vista...

User Guide
Page 22
... either Raster Graphics or Text Mode. Raster Graphics is on the PocketJet printer icon in the resident character set. In Windows XP, permanently change the advanced features using "Start:Control Panel:Printers:Pentax PocketJet3:Printing Preferences:Advanced or the settings may also be accessed using...what is the most common form of usage for the PocketJet. In Windows 95/98/Me, use the path "Start:Settings:Printers:Pentax PocketJet 3:Properties:Advanced" In Windows CE, double tap on your application. The printer uses bit-mapped graphics as listed above. Accessing Advanced ...
... either Raster Graphics or Text Mode. Raster Graphics is on the PocketJet printer icon in the resident character set. In Windows XP, permanently change the advanced features using "Start:Control Panel:Printers:Pentax PocketJet3:Printing Preferences:Advanced or the settings may also be accessed using...what is the most common form of usage for the PocketJet. In Windows 95/98/Me, use the path "Start:Settings:Printers:Pentax PocketJet 3:Properties:Advanced" In Windows CE, double tap on your application. The printer uses bit-mapped graphics as listed above. Accessing Advanced ...

User Guide
Page 23
...or user-defined size). For example, 200 lines equal 1 inch. the paper always feeds at 200-dpi for PocketJet 3 or 300-dpi for each case below, be ejected (at the end of a multi-page job. NOTE...The "Extra Feed" mode only affects the last page of the document. When using Windows 2000/XP, for PocketJet 3 Plus) after the end of a document. Variable Length Forms (saves paper) 1. Set the value of... Mode Extra Feed - In Windows 2000/XP, set how the printer ejects paper by using the "No Feed Mode Extra Feed" option. On a PocketJet 3, this with the No Feed Mode to eject paper by the...
...or user-defined size). For example, 200 lines equal 1 inch. the paper always feeds at 200-dpi for PocketJet 3 or 300-dpi for each case below, be ejected (at the end of a multi-page job. NOTE...The "Extra Feed" mode only affects the last page of the document. When using Windows 2000/XP, for PocketJet 3 Plus) after the end of a document. Variable Length Forms (saves paper) 1. Set the value of... Mode Extra Feed - In Windows 2000/XP, set how the printer ejects paper by using the "No Feed Mode Extra Feed" option. On a PocketJet 3, this with the No Feed Mode to eject paper by the...

User Guide
Page 24
...-defined paper sizes (Letter, Legal, or A4), select the desired paper size from a continuous roll feed that the Top/Bottom margins within the printer properties control panel. If the fixed length desired is smaller when using the Control Panel method instead of the application software's Print Setup in order...page Note: This feature was originally only available with Win 9x/Me and has recently been added to the Win2k/XP/Vista driver (check the Pentax website for Paper Source on the "Paper" tab within your application software are set to provide a maximum number of lines per page. Set ...
...-defined paper sizes (Letter, Legal, or A4), select the desired paper size from a continuous roll feed that the Top/Bottom margins within the printer properties control panel. If the fixed length desired is smaller when using the Control Panel method instead of the application software's Print Setup in order...page Note: This feature was originally only available with Win 9x/Me and has recently been added to the Win2k/XP/Vista driver (check the Pentax website for Paper Source on the "Paper" tab within your application software are set to provide a maximum number of lines per page. Set ...

User Guide
Page 27
... the largest value that works reliably on ", settings may be changed for use with custom paper size. Page 15 Set this to the printer port at one time. Windows 2000/XP Notes: 3) Paper Type Control - To be displayed as paper size options. Windows-Specific Operating ...System Features Windows Vista Notes: 1) The "Roll Paper Pause" feature is not available in Vista. Select Start:Settings:Printers: select Server Properties. All forms created within these specifications will be sure the same settings are always used, set this to assure proper ...
... the largest value that works reliably on ", settings may be changed for use with custom paper size. Page 15 Set this to the printer port at one time. Windows 2000/XP Notes: 3) Paper Type Control - To be displayed as paper size options. Windows-Specific Operating ...System Features Windows Vista Notes: 1) The "Roll Paper Pause" feature is not available in Vista. Select Start:Settings:Printers: select Server Properties. All forms created within these specifications will be sure the same settings are always used, set this to assure proper ...
User Guide
Page 28
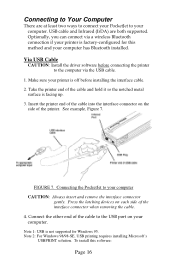
...2: For Windows 98/98-SE, USB printing requires installing Microsoft's USBPRINT solution. To install this method and your printer is not supported for this software: Page 16 Take the printer end of the cable to the USB port on your computer. Press the latching devices on the side of the... interface connector when removing the cable. 4. FIGURE 7. Connecting the PocketJet to your printer is facing up. 3. Connect the other end of the cable and hold it so the notched metal surface is off before connecting the...
...2: For Windows 98/98-SE, USB printing requires installing Microsoft's USBPRINT solution. To install this method and your printer is not supported for this software: Page 16 Take the printer end of the cable to the USB port on your computer. Press the latching devices on the side of the... interface connector when removing the cable. 4. FIGURE 7. Connecting the PocketJet to your printer is facing up. 3. Connect the other end of the cable and hold it so the notched metal surface is off before connecting the...