
Owner's Manual
Page 81
1 Technical section Connecting/removing the embrojde unit Changing the presser foot Connecting the Power cord and foot control Switching the machine Ofl Lowering the feed dog Inserting/removiflg the Creative Fantasy card Inserting/removing the hoop/frame in/from the embroide unit Bringing the presser foot to embroidery/darning Position Page 6 Page 6 Page 7 Page 7 Page 7 Page 7 Page 8 Page 8 C 0 4C., C) 0 Cu C, C Ca,) g0 g 0 Ea, & 0 0 2 Cxu C) 5 Cu Cl, 1-
1 Technical section Connecting/removing the embrojde unit Changing the presser foot Connecting the Power cord and foot control Switching the machine Ofl Lowering the feed dog Inserting/removiflg the Creative Fantasy card Inserting/removing the hoop/frame in/from the embroide unit Bringing the presser foot to embroidery/darning Position Page 6 Page 6 Page 7 Page 7 Page 7 Page 7 Page 8 Page 8 C 0 4C., C) 0 Cu C, C Ca,) g0 g 0 Ea, & 0 0 2 Cxu C) 5 Cu Cl, 1-
Owner's Manual
Page 83
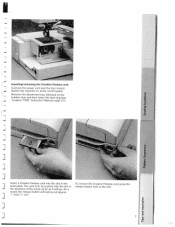
... the - Remove the attachment tray, followed by the ' bobbin door and then lower the feed dog (see - To remove the Creative Fantasy card press the J base-plate. a) x a) 7 0 I- Inserting/removing the Creative Fantasy card 7 Connect the power cord and the foot control. Switch the machine on at the on/off switch. "creative 7560" Instruction Manual, page 27).
... the - Remove the attachment tray, followed by the ' bobbin door and then lower the feed dog (see - To remove the Creative Fantasy card press the J base-plate. a) x a) 7 0 I- Inserting/removing the Creative Fantasy card 7 Connect the power cord and the foot control. Switch the machine on at the on/off switch. "creative 7560" Instruction Manual, page 27).


