
Owner's Manual
Page 4
...Front side 1:8 Rear side 1:9 Top parts 1:9 Accessory tray 1:9 Parts of the embroidery unit 1:10 Included accessories 1:10 Presser feet 1:11 Stitch overview 1:12 Utility stitches 1:12 Decorative stitches 1:16 Alphabets 1:22 2 Preparations 2:1 Unpacking 2:2 Connect to the power...programs 2:14 Embroidery Machine Communication module.... 2:14 How to update your machine 2:14 Soft Touch Buttons and indicators 2:15 3 PFAFF® creative™ Color Touch Screen 3:1 Start view 3:2 Main parts 3:2 Task bar 3:2 Option bar 3:3 Common icons 3:3 Selection menu...
...Front side 1:8 Rear side 1:9 Top parts 1:9 Accessory tray 1:9 Parts of the embroidery unit 1:10 Included accessories 1:10 Presser feet 1:11 Stitch overview 1:12 Utility stitches 1:12 Decorative stitches 1:16 Alphabets 1:22 2 Preparations 2:1 Unpacking 2:2 Connect to the power...programs 2:14 Embroidery Machine Communication module.... 2:14 How to update your machine 2:14 Soft Touch Buttons and indicators 2:15 3 PFAFF® creative™ Color Touch Screen 3:1 Start view 3:2 Main parts 3:2 Task bar 3:2 Option bar 3:3 Common icons 3:3 Selection menu...

Owner's Manual
Page 9
... 39 40 41 45 44 43 42 46 47 48 Accessory tray 46 48 Introduction Embroidery unit overview (type BE20) 49. Level adjusting feet 51. Embroidery hoop connection assembly 54. Embroidery arm 49 50 Embroidery unit accessory tray 50 54 53 52 51 1:9 Handle 33. Pre-...needles and other accessories. Take-up lever Accessory trays The accessory trays feature special compartments for presser feet and bobbins, plus space for threading and bobbin winding 36. Space for presser feet 48. Auxiliary spool pin 43. Removable tray for accessories 47. Embroidery unit accesssory tray 52. ...
... 39 40 41 45 44 43 42 46 47 48 Accessory tray 46 48 Introduction Embroidery unit overview (type BE20) 49. Level adjusting feet 51. Embroidery hoop connection assembly 54. Embroidery arm 49 50 Embroidery unit accessory tray 50 54 53 52 51 1:9 Handle 33. Pre-...needles and other accessories. Take-up lever Accessory trays The accessory trays feature special compartments for presser feet and bobbins, plus space for threading and bobbin winding 36. Space for presser feet 48. Auxiliary spool pin 43. Removable tray for accessories 47. Embroidery unit accesssory tray 52. ...

Owner's Manual
Page 10
... cord • USB cord (P/N:412 62 59-04) • Needles • MicroÀber cloth • 5D™ Embroidery Machine Communication CD • creative sensation™ Embroidery collection Presser feet 0A - Stylus 56. USB Embroidery stick 60. Screwdriver 61. Spool cap, large (2) 64. Multi-purpose tool 67. Standard presser foot with IDT™...
... cord • USB cord (P/N:412 62 59-04) • Needles • MicroÀber cloth • 5D™ Embroidery Machine Communication CD • creative sensation™ Embroidery collection Presser feet 0A - Stylus 56. USB Embroidery stick 60. Screwdriver 61. Spool cap, large (2) 64. Multi-purpose tool 67. Standard presser foot with IDT™...

Owner's Manual
Page 21
Four direction stitches 6.4 Sewing techniques - Stacking stitches 1:21 Handlook quilt stitches Introduction 6.3 Sewing techniques - Optional feet stitches 6.2 Sewing techniques - 5.7 Maxi 2 (monogram) 5.7 Maxi 2 (monogram) 6.1 Sewing techniques -
Four direction stitches 6.4 Sewing techniques - Stacking stitches 1:21 Handlook quilt stitches Introduction 6.3 Sewing techniques - Optional feet stitches 6.2 Sewing techniques - 5.7 Maxi 2 (monogram) 5.7 Maxi 2 (monogram) 6.1 Sewing techniques -

Owner's Manual
Page 31
... cut-out. Disengaging the IDT™ system Raise the presser foot. IDT™ system (Integrated dual feed) For sewing any fabric precisely PFAFF® creative sensation™ sewing and embroidery machine provides the ideal solution: the integrated dual feed, IDT™ system. The material is fed precisely, eliminating ...top and bottom at the same time. Engaging the IDT™ system Important: For all work with the IDT™ system use presser feet with two Àngers at the back (A). Place the screwdriver under the needle plate as silk and rayon. To replace the needle plate...
... cut-out. Disengaging the IDT™ system Raise the presser foot. IDT™ system (Integrated dual feed) For sewing any fabric precisely PFAFF® creative sensation™ sewing and embroidery machine provides the ideal solution: the integrated dual feed, IDT™ system. The material is fed precisely, eliminating ...top and bottom at the same time. Engaging the IDT™ system Important: For all work with the IDT™ system use presser feet with two Àngers at the back (A). Place the screwdriver under the needle plate as silk and rayon. To replace the needle plate...

Owner's Manual
Page 62
... and lower with straight stitch. Use Quick help (30) on page 4:20. Note: Make sure that the IDT™ system is selected. Note: Optional spring feet can select between three different free-motion options. a b c d 16 30 Sewing mode 4:8 Read more about free-motion sewing on the symbol for the Dynamic spring...Stitch width safety in free- Do not use with each stitch to create fantastic effects. Free-motion options (16) A All stitches on your local authorized PFAFF® dealer. A spring foot will lower automatically and the fabric must be sewn in Machine settings.
... and lower with straight stitch. Use Quick help (30) on page 4:20. Note: Make sure that the IDT™ system is selected. Note: Optional spring feet can select between three different free-motion options. a b c d 16 30 Sewing mode 4:8 Read more about free-motion sewing on the symbol for the Dynamic spring...Stitch width safety in free- Do not use with each stitch to create fantastic effects. Free-motion options (16) A All stitches on your local authorized PFAFF® dealer. A spring foot will lower automatically and the fabric must be sewn in Machine settings.

Owner's Manual
Page 68
... foot can be moved to the right. Use the multi purpose tool to sew in zippers. Increasing the stitch length may require some special presser feet and accessories. Tip! Sewing in zippers There are different ways to balance the height of the zipper. For all types of zippers it enters close...
... foot can be moved to the right. Use the multi purpose tool to sew in zippers. Increasing the stitch length may require some special presser feet and accessories. Tip! Sewing in zippers There are different ways to balance the height of the zipper. For all types of zippers it enters close...

Owner's Manual
Page 75
These techniques may require some special presser feet and accessories. When selecting a stitch in the stitch Àeld (B). To change the direction of the starting point is indicated by touching one of the ...
These techniques may require some special presser feet and accessories. When selecting a stitch in the stitch Àeld (B). To change the direction of the starting point is indicated by touching one of the ...

Owner's Manual
Page 96
Preparations C Embroidery unit overview (type BE20) A Embroidery unit release button B Level adjusting feet C Embroidery unit accessory tray C D Embroidery unit socket E Embroidery hoop connection assembly F Embroidery arm Note: A smaller embroidery unit... Center marks M G I H J D L K 7:2 Embroidery unit accessory tray Use the tray in the embroidery unit to purchase at your local authorized PFAFF® dealer. Embroidery hoop overview G Embroidery hoop connector H Outer hoop I Inner hoop J Quick release K Retaining screw L Ribs for embroidering. B F A E B Embroidery...
Preparations C Embroidery unit overview (type BE20) A Embroidery unit release button B Level adjusting feet C Embroidery unit accessory tray C D Embroidery unit socket E Embroidery hoop connection assembly F Embroidery arm Note: A smaller embroidery unit... Center marks M G I H J D L K 7:2 Embroidery unit accessory tray Use the tray in the embroidery unit to purchase at your local authorized PFAFF® dealer. Embroidery hoop overview G Embroidery hoop connector H Outer hoop I Inner hoop J Quick release K Retaining screw L Ribs for embroidering. B F A E B Embroidery...
Owner's Manual
Page 97
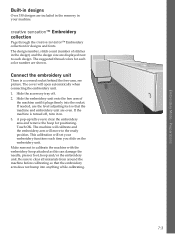
...Slide the accessory tray off , turn it plugs Àrmly into anything while calibrating. 7:3 If needed, use the level adjusting feet so that the embroidery arm does not bump into the socket. The machine will calibrate and the embroidery arm will move to clear...colors for each color number are even. If the machine is a covered socket behind the free-arm, see picture. creative sensation™ Embroidery collection Page through the creative sensation™ Embroidery collection for positioning. The cover will set your machine. Be sure to the ready position. Touch OK. ...
...Slide the accessory tray off , turn it plugs Àrmly into anything while calibrating. 7:3 If needed, use the level adjusting feet so that the embroidery arm does not bump into the socket. The machine will calibrate and the embroidery arm will move to clear...colors for each color number are even. If the machine is a covered socket behind the free-arm, see picture. creative sensation™ Embroidery collection Page through the creative sensation™ Embroidery collection for positioning. The cover will set your machine. Be sure to the ready position. Touch OK. ...

Owner's Manual
Page 159
... 3:16 Insert a new stitch point 6:4 Insert a stitch or letter 5:3 Inserting the bobbin 2:8 Installation code 2:13 K Knee-lift 1:10, 2:3 L Language 3:9 LED lights 1:8, 2:3 Adjust 3:14 Level adjusting feet 1:9, 7:2 Lid 1:8 Light settings 3:14 Line positioning, select 8:14 List view 10:3 Load a design 8:3 Load a Àle 10:5 Load a font 8:3 Load a font from another location 8:26...
... 3:16 Insert a new stitch point 6:4 Insert a stitch or letter 5:3 Inserting the bobbin 2:8 Installation code 2:13 K Knee-lift 1:10, 2:3 L Language 3:9 LED lights 1:8, 2:3 Adjust 3:14 Level adjusting feet 1:9, 7:2 Lid 1:8 Light settings 3:14 Line positioning, select 8:14 List view 10:3 Load a design 8:3 Load a Àle 10:5 Load a font 8:3 Load a font from another location 8:26...

Owner's Manual
Page 160
..., 9:7 Patchwork program 4:13, 4:19 PDF Guides 2:14 Personal designs 8:3, 10:4 Personal Àles 10:4 Personal fonts 10:4 Personal menu 3:5 PFAFF® creative™ Color Touch Screen 1:8 Piecing the quilt top 4:19 Pop-ups Embroidery edit 8:27 Embroidery stitch-out 9:12 Files & Folders 10:7 Sequencing...4:20 Straight stitch needle plate 4:19 R Raise and lower the presser foot 4:3 Redo 8:7 Removable bobbin holder 1:9 Removable tray for presser feet 1:9 Remove presser foot 2:11 Remove the embroidery unit 7:4 Remove the needle plate 2:9 Rename a Àle or folder 10:6 Replace...
..., 9:7 Patchwork program 4:13, 4:19 PDF Guides 2:14 Personal designs 8:3, 10:4 Personal Àles 10:4 Personal fonts 10:4 Personal menu 3:5 PFAFF® creative™ Color Touch Screen 1:8 Piecing the quilt top 4:19 Pop-ups Embroidery edit 8:27 Embroidery stitch-out 9:12 Files & Folders 10:7 Sequencing...4:20 Straight stitch needle plate 4:19 R Raise and lower the presser foot 4:3 Redo 8:7 Removable bobbin holder 1:9 Removable tray for presser feet 1:9 Remove presser foot 2:11 Remove the embroidery unit 7:4 Remove the needle plate 2:9 Rename a Àle or folder 10:6 Replace...

