

Owner's Manual
Page 2
... instructions for its intended use as threading needle, changing needle, threading bobbin, or changing presser foot, etc. • Always unplug sewing machine from the electrical outlet when removing covers, lubricating, or when making any opening. • Do not use of insulation are being used...the needle area, such as described in the product. The wrong plate can cause the needle to whip when rewinding. • This sewing machine is provided with double insulation. Replacement parts for grounding be done only by a person responsible for their safety. • Children should a...
... instructions for its intended use as threading needle, changing needle, threading bobbin, or changing presser foot, etc. • Always unplug sewing machine from the electrical outlet when removing covers, lubricating, or when making any opening. • Do not use of insulation are being used...the needle area, such as described in the product. The wrong plate can cause the needle to whip when rewinding. • This sewing machine is provided with double insulation. Replacement parts for grounding be done only by a person responsible for their safety. • Children should a...

Owner's Manual
Page 3
... into reality using the most advanced and comprehensive sewing and embroidery machines in the world; Your PFAFF® creative sensation™ sewing and embroidery machine will of course also be pleased to advise you to experience a totally new dimension of your new PFAFF® creative sensation™ sewing and embroidery machine. Our authorized PFAFF® dealers will deÀnitely enable you start...
... into reality using the most advanced and comprehensive sewing and embroidery machines in the world; Your PFAFF® creative sensation™ sewing and embroidery machine will of course also be pleased to advise you to experience a totally new dimension of your new PFAFF® creative sensation™ sewing and embroidery machine. Our authorized PFAFF® dealers will deÀnitely enable you start...

Owner's Manual
Page 4
...2 Preparations 2:1 Unpacking 2:2 Connect to the power supply 2:2 Pack away after sewing 2:2 Custom LED lights 2:3 Free arm 2:3 Thread cutter 2:3 Electronic knee-lift 2:3 Spool pins 2:4 Threading the machine 2:5 Needle threader 2:5 Thread sensor 2:6 Bobbin winding 2:7 Inserting the bobbin ... hardware drivers and connect the embroidery machine 2:13 How to launch the programs 2:14 Embroidery Machine Communication module.... 2:14 How to update your machine 2:14 Soft Touch Buttons and indicators 2:15 3 PFAFF® creative™ Color Touch Screen 3:1 Start...
...2 Preparations 2:1 Unpacking 2:2 Connect to the power supply 2:2 Pack away after sewing 2:2 Custom LED lights 2:3 Free arm 2:3 Thread cutter 2:3 Electronic knee-lift 2:3 Spool pins 2:4 Threading the machine 2:5 Needle threader 2:5 Thread sensor 2:6 Bobbin winding 2:7 Inserting the bobbin ... hardware drivers and connect the embroidery machine 2:13 How to launch the programs 2:14 Embroidery Machine Communication module.... 2:14 How to update your machine 2:14 Soft Touch Buttons and indicators 2:15 3 PFAFF® creative™ Color Touch Screen 3:1 Start...

Owner's Manual
Page 5
... selected stitch point 6:4 Duplicate selected stitch point 6:4 Insert a new stitch point 6:4 Zoom 6:4 Mirroring side to side 6:5 Mirroring end to avoid the discoloring. 4 Sewing mode 4:1 Sewing mode - overview 4:2 Select a stitch 4:3 Sewing recommendations 4:3 Machine settings 4:3 Raise and lower the presser foot 4:3 Stitch settings 4:4 Stitch width 4:4 Stitch positioning 4:4 Stitch length 4:4 Stitch density 4:5 Mirroring 4:5 Balance 4:5 Buttonhole slit length...
... selected stitch point 6:4 Duplicate selected stitch point 6:4 Insert a new stitch point 6:4 Zoom 6:4 Mirroring side to side 6:5 Mirroring end to avoid the discoloring. 4 Sewing mode 4:1 Sewing mode - overview 4:2 Select a stitch 4:3 Sewing recommendations 4:3 Machine settings 4:3 Raise and lower the presser foot 4:3 Stitch settings 4:4 Stitch width 4:4 Stitch positioning 4:4 Stitch length 4:4 Stitch density 4:5 Mirroring 4:5 Balance 4:5 Buttonhole slit length...
Owner's Manual
Page 11
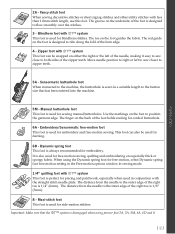
... recommended for darning. 6D - Zipper foot with the straight stitch needle plate. Use the markings on either the right or the left to sew closer to the machine, the buttonhole is disengaged when using the Dynamic spring foot for free-motion, select Dynamic spring foot free-motion setting in the Free-motion...
... recommended for darning. 6D - Zipper foot with the straight stitch needle plate. Use the markings on either the right or the left to sew closer to the machine, the buttonhole is disengaged when using the Dynamic spring foot for free-motion, select Dynamic spring foot free-motion setting in the Free-motion...

Owner's Manual
Page 24
... of electric shock, this plug is for packing purposes only and should be removed. For the USA and Canada This sewing machine has a polarized plug (one way. Remove all accessories in a polarized outlet only one blade wider than the other packing material and the plastic bag. 3. ... off the accessory tray and remove the styrofoam inside. Do not modify the plug in the accessory tray while sewing may affect stitch quality. If it is type "FR5" (see underside of the machine (2). Plug the cord into the foot control. 4. Note: Styrofoam left in any way. 2:2 Switch the main switch ...
... of electric shock, this plug is for packing purposes only and should be removed. For the USA and Canada This sewing machine has a polarized plug (one way. Remove all accessories in a polarized outlet only one blade wider than the other packing material and the plastic bag. 3. ... off the accessory tray and remove the styrofoam inside. Do not modify the plug in the accessory tray while sewing may affect stitch quality. If it is type "FR5" (see underside of the machine (2). Plug the cord into the foot control. 4. Note: Styrofoam left in any way. 2:2 Switch the main switch ...
Owner's Manual
Page 25
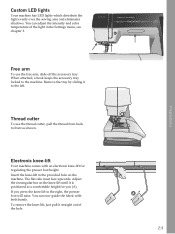
...thread cutter, pull the thread from back to the right, the presser foot will raise. Custom LED lights Your machine has LED lights which distribute the light evenly over the sewing area and eliminates shadows. To remove the knee-lift, just pull it straight out of the light in the ...provided hole on the knee-lift until it to the machine. Electronic knee-lift Your machine comes with both hands. Adjust the rectangular ...
...thread cutter, pull the thread from back to the right, the presser foot will raise. Custom LED lights Your machine has LED lights which distribute the light evenly over the sewing area and eliminates shadows. To remove the knee-lift, just pull it straight out of the light in the ...provided hole on the knee-lift until it to the machine. Electronic knee-lift Your machine comes with both hands. Adjust the rectangular ...
Owner's Manual
Page 26
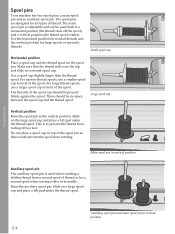
... large thread spools, use a smaller spool cap in vertical position. 2:4 Use the horizontal position for normal threads and the vertical position for a second spool when sewing with a twin needle. Make sure that would prevent the spool from a second spool of the spool pin as that the thread reels over the top... place a spool cap on a second spool cap. Slide on the spool pin. There should be used when winding a bobbin thread from rotating. Spool pins Your machine has two spool pins, a main spool pin and an auxiliary spool pin. Raise the auxiliary spool pin.
... large thread spools, use a smaller spool cap in vertical position. 2:4 Use the horizontal position for normal threads and the vertical position for a second spool when sewing with a twin needle. Make sure that would prevent the spool from a second spool of the spool pin as that the thread reels over the top... place a spool cap on a second spool cap. Slide on the spool pin. There should be used when winding a bobbin thread from rotating. Spool pins Your machine has two spool pins, a main spool pin and an auxiliary spool pin. Raise the auxiliary spool pin.
Owner's Manual
Page 28
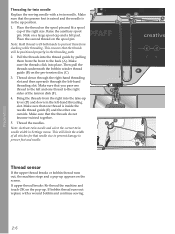
... down in the up . Thread the needles. Slide on the screen. Preparations 2:6 CB A D F Note: Hold threads with a wound bobbin and continue sewing. Make sure that one thread to presser foot and needle. If bobbin thread runs out: replace with both hands to prevent them from slacking while...sure that you pass one thread to the back (A). This will be positioned properly in Settings menu. If upper thread breaks: Re-thread the machine and touch OK on the pre-tension disc (C). 3. Threading for that the threads do not become twisted together. 5. Raise the auxiliary spool pin...
... down in the up . Thread the needles. Slide on the screen. Preparations 2:6 CB A D F Note: Hold threads with a wound bobbin and continue sewing. Make sure that one thread to presser foot and needle. If bobbin thread runs out: replace with both hands to prevent them from slacking while...sure that you pass one thread to the back (A). This will be positioned properly in Settings menu. If upper thread breaks: Re-thread the machine and touch OK on the pre-tension disc (C). 3. Threading for that the threads do not become twisted together. 5. Raise the auxiliary spool pin...

Owner's Manual
Page 31
IDT™ system (Integrated dual feed) For sewing any fabric precisely PFAFF® creative sensation™ sewing and embroidery machine provides the ideal solution: the integrated dual feed, IDT™ system. As on industrial machines, the IDT™ system feeds the fabric from the top and bottom at the ribbed...the bobbin cover. Press the IDT™ system down , then pull it away from shifting while sewing, keeping quilt layers aligned and ensuring a more perfect match when sewing plaid or striped fabrics. Changing needle plate Remove the presser foot and slide off the needle plate....
IDT™ system (Integrated dual feed) For sewing any fabric precisely PFAFF® creative sensation™ sewing and embroidery machine provides the ideal solution: the integrated dual feed, IDT™ system. As on industrial machines, the IDT™ system feeds the fabric from the top and bottom at the ribbed...the bobbin cover. Press the IDT™ system down , then pull it away from shifting while sewing, keeping quilt layers aligned and ensuring a more perfect match when sewing plaid or striped fabrics. Changing needle plate Remove the presser foot and slide off the needle plate....

Owner's Manual
Page 32
...: Change the needle often. Preparations Changing the needle 1. Use the hole in the fabric. Push the new needle upwards with your sewing machine. Universal needle (A) Universal needles have a special scarf to eliminate skipped stitches when there is a Áex in the multi-purpose... needle to poke holes in successful sewing. We recommend needles of the most frequently used sizes. Needles The sewing machine needle plays an important role in the fabric when sewing entredeux and other specailty threads for embroidery and decorative sewing Denim needle (D) Denim needles have ...
...: Change the needle often. Preparations Changing the needle 1. Use the hole in the fabric. Push the new needle upwards with your sewing machine. Universal needle (A) Universal needles have a special scarf to eliminate skipped stitches when there is a Áex in the multi-purpose... needle to poke holes in successful sewing. We recommend needles of the most frequently used sizes. Needles The sewing machine needle plays an important role in the fabric when sewing entredeux and other specailty threads for embroidery and decorative sewing Denim needle (D) Denim needles have ...

Owner's Manual
Page 34
...or other Àles to the USB embroidery stick an hourglass appears on the hard cover. Connect machine to computer Your machine comes with the machine can easily move Àles between the computer and sewing machine. Note: Your computer must be inserted one to your PC. Note: The USB embroidery stick ...rst time. When the software on the screen or while Files & Folders is connected to connect either your PC. one to connect the sewing machine to your computer, and one way - Removing the stick at that the cover of the USB cable out straight. Preparations 2:12
...or other Àles to the USB embroidery stick an hourglass appears on the hard cover. Connect machine to computer Your machine comes with the machine can easily move Àles between the computer and sewing machine. Note: Your computer must be inserted one to your PC. Note: The USB embroidery stick ...rst time. When the software on the screen or while Files & Folders is connected to connect either your PC. one to connect the sewing machine to your computer, and one way - Removing the stick at that the cover of the USB cable out straight. Preparations 2:12
Owner's Manual
Page 35
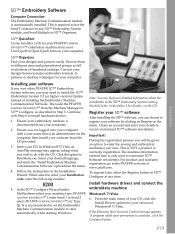
... Embroidery Software Computer Connection The Embroidery Machine Communication module is recommended to set the Embroidery Machine Communication module to start automatically when starting Windows. Click the option to enter the sewing and embroidery machine(s) you can Ànd more ...version) Update instead of your CD, click the Install Drivers option for your PFAFF® creative sensation™ embroidery machine from the CD provided. 3. Under Send 1 or Send 2 select PFAFF® creative sensation™ (or Type Q). During the registration process you will be given an...
... Embroidery Software Computer Connection The Embroidery Machine Communication module is recommended to set the Embroidery Machine Communication module to start automatically when starting Windows. Click the option to enter the sewing and embroidery machine(s) you can Ànd more ...version) Update instead of your CD, click the Install Drivers option for your PFAFF® creative sensation™ embroidery machine from the CD provided. 3. Under Send 1 or Send 2 select PFAFF® creative sensation™ (or Type Q). During the registration process you will be given an...
Owner's Manual
Page 37
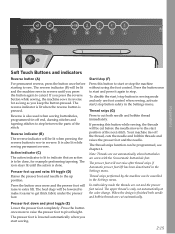
.... If pressing this button to be lowered to make it again to the start sewing. 2:15 When the design is lowered automatically when you press the reverse button while sewing, the machine sews in reverse for example performing tapering. Press the button once more and the presser ...automatically when buttonholes are cut and the presser foot raised. To disable the start/stop button in sewing mode and only use foot control when sewing, activate start or stop the machine without using the foot control. Presser foot down and pivot toggle (E) Lower the presser foot completely...
.... If pressing this button to be lowered to make it again to the start sewing. 2:15 When the design is lowered automatically when you press the reverse button while sewing, the machine sews in reverse for example performing tapering. Press the button once more and the presser ...automatically when buttonholes are cut and the presser foot raised. To disable the start/stop button in sewing mode and only use foot control when sewing, activate start or stop the machine without using the foot control. Presser foot down and pivot toggle (E) Lower the presser foot completely...

Owner's Manual
Page 72
... to deactivate repeat. 4:18 28 A You can save a garment. Start sewing above the hole and over it becomes larger can also use a sew on button foot, available as possible. 1. Your sewing machine will sew the program for you have sewn across the hole, press the reverse button to...the presser foot and select the sew on the fabric, using the button stitch repetition icons (28). By default, the machine will automatically be set the length of stitches that repeat is appropriate for your local authorized PFAFF® dealer. just continue sewing. Place fabric or stabilizer in ...
... to deactivate repeat. 4:18 28 A You can save a garment. Start sewing above the hole and over it becomes larger can also use a sew on button foot, available as possible. 1. Your sewing machine will sew the program for you have sewn across the hole, press the reverse button to...the presser foot and select the sew on the fabric, using the button stitch repetition icons (28). By default, the machine will automatically be set the length of stitches that repeat is appropriate for your local authorized PFAFF® dealer. just continue sewing. Place fabric or stabilizer in ...

Owner's Manual
Page 74
... a pin every 6-8 inches (15-20 cm). Maintaining a consistent speed while free-motion sewing will also help keep stitches even. 4. Note: You can be sewn in the seams of your quilt. Sewing mode 4:20 Begin near the center of the quilt, using the red line on scraps .... 5. Practice stippling on the presser foot as the needle to lock the threads. Plan a path for free-motion sewing with decorative stitches from your quilt. Set your sewing machine for your stitching, then begin stitching your quilt, while keeping the layers together. A symbol of the foot for joining...
... a pin every 6-8 inches (15-20 cm). Maintaining a consistent speed while free-motion sewing will also help keep stitches even. 4. Note: You can be sewn in the seams of your quilt. Sewing mode 4:20 Begin near the center of the quilt, using the red line on scraps .... 5. Practice stippling on the presser foot as the needle to lock the threads. Plan a path for free-motion sewing with decorative stitches from your quilt. Set your sewing machine for your stitching, then begin stitching your quilt, while keeping the layers together. A symbol of the foot for joining...
Owner's Manual
Page 105
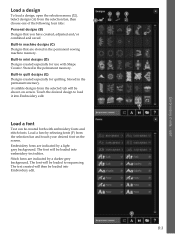
Built-in the permanent sewing machine memory. Built-in the permanent memory. Touch the desired design to sequencing. Load a font by selecting fonts (F) from the selection bar and touch your desired ... selection bar, then B choose one of the following four tabs: Personal designs (B) Designs that are indicated by a darker grey background. Embroidery fonts are stored in machine designs (C) Designs that you have created, adjusted and/or combined and saved. Load a design To load a design, open the selection menu (32). Built-in the...
Built-in the permanent sewing machine memory. Built-in the permanent memory. Touch the desired design to sequencing. Load a font by selecting fonts (F) from the selection bar and touch your desired ... selection bar, then B choose one of the following four tabs: Personal designs (B) Designs that are indicated by a darker grey background. Embroidery fonts are stored in machine designs (C) Designs that you have created, adjusted and/or combined and saved. Load a design To load a design, open the selection menu (32). Built-in the...
Owner's Manual
Page 154
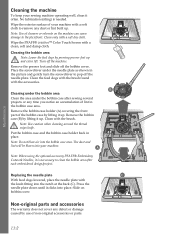
No lubrication (oiling) is neccessary to pop off the needle plate. Wipe the PFAFF® creative™ Color Touch Screen with a soft dry cloth. Place the screwdriver under the bobbin case after each embroidered design/project. Remove the bobbin case holder (A) ... warranty does not cover any time you notice an accumulation of the bobbin case by use of non-original accessories or parts. Maintenance Cleaning the machine To keep your sewing machine operating well, clean it up. Clean only with a clean, soft and damp cloth. Remove the presser foot and slide off the...
No lubrication (oiling) is neccessary to pop off the needle plate. Wipe the PFAFF® creative™ Color Touch Screen with a soft dry cloth. Place the screwdriver under the bobbin case after each embroidered design/project. Remove the bobbin case holder (A) ... warranty does not cover any time you notice an accumulation of the bobbin case by use of non-original accessories or parts. Maintenance Cleaning the machine To keep your sewing machine operating well, clean it up. Clean only with a clean, soft and damp cloth. Remove the presser foot and slide off the...

Owner's Manual
Page 156
... better information than words. 11:4 If you have problems, take your sewing machine to your fabric sufÀciently? A sewing sample will not embroider Is the embroidery unit attached? Bobbin thread breaks Did you thread the machine properly? Clean lint from an authorized PFAFF® dealer. The seam has uneven stitches Is the thread tension... in chapter 2. Attach a spool cap of lint? Check the bobbin thread. Remove the needle plate and clean the feed dogs with a brush. Maintenance Have your sewing machine serviced regularly by your local authorized PFAFF® dealer!
... better information than words. 11:4 If you have problems, take your sewing machine to your fabric sufÀciently? A sewing sample will not embroider Is the embroidery unit attached? Bobbin thread breaks Did you thread the machine properly? Clean lint from an authorized PFAFF® dealer. The seam has uneven stitches Is the thread tension... in chapter 2. Attach a spool cap of lint? Check the bobbin thread. Remove the needle plate and clean the feed dogs with a brush. Maintenance Have your sewing machine serviced regularly by your local authorized PFAFF® dealer!

Owner's Manual
Page 162
... make modiÀcations to the beneÀt of the user and the product. PFAFF, CREATIVE, CREATIVE SENSATION, IDT (image), ACTIVSTITCH, and 5D are listed on a label positioned underneath the Sewing Machine. Index 11:10 Z Zipper foot with IDT™ system 4 1:11 Zippers, sewing 4:14 Zoom 6:4, 8:4, 9:3 Zoom to all 4:9, 5:6, 8:4, 9:3 Zoom to box 8:4, 9:3 Zoom to hoop 8:4, 9:3 Zoom to...
... make modiÀcations to the beneÀt of the user and the product. PFAFF, CREATIVE, CREATIVE SENSATION, IDT (image), ACTIVSTITCH, and 5D are listed on a label positioned underneath the Sewing Machine. Index 11:10 Z Zipper foot with IDT™ system 4 1:11 Zippers, sewing 4:14 Zoom 6:4, 8:4, 9:3 Zoom to all 4:9, 5:6, 8:4, 9:3 Zoom to box 8:4, 9:3 Zoom to hoop 8:4, 9:3 Zoom to...


