Owner's Manual
Page 2
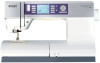
... machine from the electrical outlet when removing covers, lubricating, or when making any adjustment in the needle area, such as threading needle, changing needle, threading bobbin, or changing presser foot, etc. • Always unplug sewing machine from the electric outlet immediately after using and before cleaning. • Always unplug before using...
... machine from the electrical outlet when removing covers, lubricating, or when making any adjustment in the needle area, such as threading needle, changing needle, threading bobbin, or changing presser foot, etc. • Always unplug sewing machine from the electric outlet immediately after using and before cleaning. • Always unplug before using...
Owner's Manual
Page 4
... 2.2 Free arm 2:2 Thread cutter 2:2 Spool pins 2:2 Threading the machine 2:3 Bobbin winding 2:5 Inserting the bobbin 2:6 IDT (Integrated dual feed 2:6 Electronic knee-lift (4.0 2:7 Needles 2:7 Changing the needle 2:8 Lowering feed dogs 2:8 Changing the presser foot 2.8 Buttons for quilt expression™ 4.0 2:10 Buttons for expression™ 3.0 2:12 Buttons for expression™ 2.0 2:14 Settings menu 2:16 3 Sewing 3:1 Sewing mode - overview...
... 2.2 Free arm 2:2 Thread cutter 2:2 Spool pins 2:2 Threading the machine 2:3 Bobbin winding 2:5 Inserting the bobbin 2:6 IDT (Integrated dual feed 2:6 Electronic knee-lift (4.0 2:7 Needles 2:7 Changing the needle 2:8 Lowering feed dogs 2:8 Changing the presser foot 2.8 Buttons for quilt expression™ 4.0 2:10 Buttons for expression™ 3.0 2:12 Buttons for expression™ 2.0 2:14 Settings menu 2:16 3 Sewing 3:1 Sewing mode - overview...
Owner's Manual
Page 5
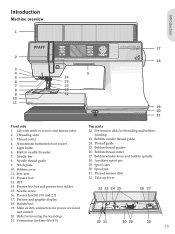
... for lowering the feed dogs 21. Sensormatic buttonhole foot socket 24. Light bulbs 25. Bobbin thread guides 6. Spool caps 10. Thread tension disk 12. Slide for threading and bobbin 2. Connection for power cord and foot control 20. Introduction PFAFF quilt expression 4.0 inch mm Introduction Machine overview 1 2 3 4 5 5 16 6 15 7 14 8 13 9 12 10 11 00...
... for lowering the feed dogs 21. Sensormatic buttonhole foot socket 24. Light bulbs 25. Bobbin thread guides 6. Spool caps 10. Thread tension disk 12. Slide for threading and bobbin 2. Connection for power cord and foot control 20. Introduction PFAFF quilt expression 4.0 inch mm Introduction Machine overview 1 2 3 4 5 5 16 6 15 7 14 8 13 9 12 10 11 00...

Owner's Manual
Page 6
Introduction Accessory tray The accessory tray features special compartments for presser feet and bobbins, plus space for presser feet 35. Removable tray for needles 33 and...Included accessories not in the 34 tray so they are easily accessible. 35 33. Removable bobbin holder Included accessories 36. Thread net 37. Edge guide 38. Spool cap, small 46. Light bulb remover ...40. Spool cap, large 44. Bobbins 48. Felt pad 39. Screwdriver 41. Seam ripper 42. Multi-purpose tool 47. Store the accessories in ...
Introduction Accessory tray The accessory tray features special compartments for presser feet and bobbins, plus space for presser feet 35. Removable tray for needles 33 and...Included accessories not in the 34 tray so they are easily accessible. 35 33. Removable bobbin holder Included accessories 36. Thread net 37. Edge guide 38. Spool cap, small 46. Light bulb remover ...40. Spool cap, large 44. Bobbins 48. Felt pad 39. Screwdriver 41. Seam ripper 42. Multi-purpose tool 47. Store the accessories in ...
Owner's Manual
Page 8
.... Single stitch used with elastic thread in one step. Elastic stitch for basting. Decorative stitch for quilting, hemstitching. Seam and overcast stretch fabrics in the bobbin. Seam and overcast stretch fabrics in one stitch. Reinforced seam. Sew continuous reverse. Touch foot control to sew another stitch. Sewing elastic, darning, patching. Appliqu...
.... Single stitch used with elastic thread in one step. Elastic stitch for basting. Decorative stitch for quilting, hemstitching. Seam and overcast stretch fabrics in the bobbin. Seam and overcast stretch fabrics in one stitch. Reinforced seam. Sew continuous reverse. Touch foot control to sew another stitch. Sewing elastic, darning, patching. Appliqu...

Owner's Manual
Page 15
.... B C C B A D E 2:3 Slide on the large spool cap and place a felt pad under the thread spool. This is to prevent the thread from the right underneath the bobbin winder thread guide (B) on top of the spool pin as that the presser foot is raised and the needle is used when winding... a bobbin thread from the front to the vertical position. Do not place a spool cap on the pre-tension disc (C). 3. Raise the auxiliary spool pin. Place the ...
.... B C C B A D E 2:3 Slide on the large spool cap and place a felt pad under the thread spool. This is to prevent the thread from the right underneath the bobbin winder thread guide (B) on top of the spool pin as that the presser foot is raised and the needle is used when winding... a bobbin thread from the front to the vertical position. Do not place a spool cap on the pre-tension disc (C). 3. Raise the auxiliary spool pin. Place the ...

Owner's Manual
Page 16
... the built-in the up position. 1. Place the second thread on a large spool cap and a felt pad. Bring the threads from the right underneath the bobbin winder thread guide (B) on the spool pin and Àt a spool cap of the needle. Make sure that the presser foot is raised and the needle...
... the built-in the up position. 1. Place the second thread on a large spool cap and a felt pad. Bring the threads from the right underneath the bobbin winder thread guide (B) on the spool pin and Àt a spool cap of the needle. Make sure that the presser foot is raised and the needle...

Owner's Manual
Page 17
Use only the original PFAFF® bobbins approved for correct thread tension. 4. When the bobbin is active. Place the thread into the thread guide (A) from horizontal position 1. Note: Make sure the thread is pulled securely inside to the outside. 5. A pop-up appears on the bobbin spindle, with the logo facing up ...foot and the needle are in the up . Bring the thread up closes. Place the thread spool on the spool pin in the bobbin (D) from the needle, under the presser foot, upward through the left-hand threading slot and through the hole in horizontal position. Thread ...
Use only the original PFAFF® bobbins approved for correct thread tension. 4. When the bobbin is active. Place the thread into the thread guide (A) from horizontal position 1. Note: Make sure the thread is pulled securely inside to the outside. 5. A pop-up appears on the bobbin spindle, with the logo facing up ...foot and the needle are in the up . Bring the thread up closes. Place the thread spool on the spool pin in the bobbin (D) from the needle, under the presser foot, upward through the left-hand threading slot and through the hole in horizontal position. Thread ...

Owner's Manual
Page 18
... is fed precisely. Raise the presser foot. Replace the cover. Engaging the IDT Important: For all layers of the bobbin. Inserting the bobbin 1 2 1. Note: The bobbin cover can be used as you . 2. Press the IDT down , then pull it away from the top and bottom...presser foot. A C Preparations IDT (integrated dual feed) D For sewing any fabric precisely PFAFF® expression™ sewing machine provides the ideal solution: the integrated dual feed, IDT system. Remove the bobbin cover by sliding it from the left to prevent shifting of the thread cutter (C).
... is fed precisely. Raise the presser foot. Replace the cover. Engaging the IDT Important: For all layers of the bobbin. Inserting the bobbin 1 2 1. Note: The bobbin cover can be used as you . 2. Press the IDT down , then pull it away from the top and bottom...presser foot. A C Preparations IDT (integrated dual feed) D For sewing any fabric precisely PFAFF® expression™ sewing machine provides the ideal solution: the integrated dual feed, IDT system. Remove the bobbin cover by sliding it from the left to prevent shifting of the thread cutter (C).
Owner's Manual
Page 22
... is lit, the needle will stop in the down position and the presser foot will be lit and the machine sews in reverse for quilt expression™ 4.0 8 9 10 11 13 12 14 15 16 Preparations 1 2 3 4 5 6 7 17 18 19 20 21 22 23 24 25 26 Needle up or down. Thread snips.... Buttons for as long as you have made. An icon on the graphic display will indicate how slow your sewing machine cuts the top and bobbin threads and raises the presser foot and the needle. The thread snips indicator will be Ànished and the machine will sew. The setting of...
... is lit, the needle will stop in the down position and the presser foot will be lit and the machine sews in reverse for quilt expression™ 4.0 8 9 10 11 13 12 14 15 16 Preparations 1 2 3 4 5 6 7 17 18 19 20 21 22 23 24 25 26 Needle up or down. Thread snips.... Buttons for as long as you have made. An icon on the graphic display will indicate how slow your sewing machine cuts the top and bobbin threads and raises the presser foot and the needle. The thread snips indicator will be Ànished and the machine will sew. The setting of...
Owner's Manual
Page 32
... length (2) Increase or decrease the stitch length using + and -. If lengthening a zigzag stitch or a decorative stitch, the entire stitch will remain the same. If the bobbin thread is visible on the underside of the fabric, the needle thread tension is changed settings will be longer. Sewing Stitch positioning (3) Press the alternatives...
... length (2) Increase or decrease the stitch length using + and -. If lengthening a zigzag stitch or a decorative stitch, the entire stitch will remain the same. If the bobbin thread is visible on the underside of the fabric, the needle thread tension is changed settings will be longer. Sewing Stitch positioning (3) Press the alternatives...
Owner's Manual
Page 36
... your garment with stabilizer in a color as close to deactivate repeat. By default, the machine will be highlighted, indicating that repeat is selected. 3:6 Place your bobbin thread. Select a darning stitch. 3. When you sew the stitch you have sewn across the hole, press the reverse button to repeat the same size darning...
... your garment with stabilizer in a color as close to deactivate repeat. By default, the machine will be highlighted, indicating that repeat is selected. 3:6 Place your bobbin thread. Select a darning stitch. 3. When you sew the stitch you have sewn across the hole, press the reverse button to repeat the same size darning...

Owner's Manual
Page 39
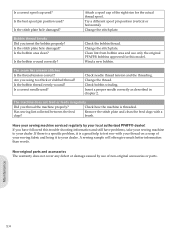
.... Mainmotor overload If you are secure. Remove thread jam (4.0) Clean the area under the stitch plate from thread and lint. Sewing Common sewing pop-ups Bobbin empty (4.0) When the bobbin is blocked when sewing, the mainmotor can get overloaded and the machine will close the popup. 3:9 Replace the empty... bobbin with a full one and press OK on the wheel to conÀrm. Press OK on the wheel to close when the mainmotor and power ...
.... Mainmotor overload If you are secure. Remove thread jam (4.0) Clean the area under the stitch plate from thread and lint. Sewing Common sewing pop-ups Bobbin empty (4.0) When the bobbin is blocked when sewing, the mainmotor can get overloaded and the machine will close the popup. 3:9 Replace the empty... bobbin with a full one and press OK on the wheel to conÀrm. Press OK on the wheel to close when the mainmotor and power ...
Owner's Manual
Page 45
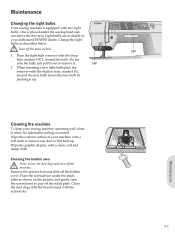
Turn off the bobbin cover. No lubrication (oiling) is placed under the stitch plate as described below. Remove the presser foot and slide off the main switch. 1 Place the ... operating well, clean it . 5W 2 When inserting a new light bulb place the remover with the accessories. 5:1 Light bulbs are available at your authorized PFAFF® dealer. Cleaning the bobbin area Note: Lower the feed dogs and turn the screwdriver to remove any dust or lint built up. One is needed. Maintenance Changing...
Turn off the bobbin cover. No lubrication (oiling) is placed under the stitch plate as described below. Remove the presser foot and slide off the main switch. 1 Place the ... operating well, clean it . 5W 2 When inserting a new light bulb place the remover with the accessories. 5:1 Light bulbs are available at your authorized PFAFF® dealer. Cleaning the bobbin area Note: Lower the feed dogs and turn the screwdriver to remove any dust or lint built up. One is needed. Maintenance Changing...

Owner's Manual
Page 46
... (B) by lifting it up . For 4.0: Use caution when cleaning around the thread snips knife. Put the bobbin case and the bobbin case holder back in the bobbin case area. A C Replacing the stitch plate With the feed dogs lowered, place the stitch plate with the brush. Maintenance 5:2 Note: ... and lint will be blown into the bobbin case area. Cleaning under the bobbin area Clean the area under the bobbin case after sewing several projects or any time you notice an accumulation of the bobbin case, by lifting it up . Remove the bobbin case holder (A), covering the front part ...
... (B) by lifting it up . For 4.0: Use caution when cleaning around the thread snips knife. Put the bobbin case and the bobbin case holder back in the bobbin case area. A C Replacing the stitch plate With the feed dogs lowered, place the stitch plate with the brush. Maintenance 5:2 Note: ... and lint will be blown into the bobbin case area. Cleaning under the bobbin area Clean the area under the bobbin case after sewing several projects or any time you notice an accumulation of the bobbin case, by lifting it up . Remove the bobbin case holder (A), covering the front part ...
Owner's Manual
Page 47
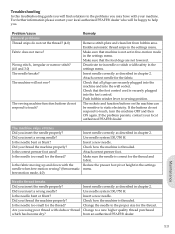
... Thread snips do not respond to a new higher quality thread purchased from bobbin area. Wrong stitch , irregular or narrow stitch? (4.0 and 3.0) The needle breaks? Remedy Remove stitch plate and clean lint from an authorized PFAFF® dealer. Enable automatic thread snips in chapter 2. Insert needle correctly ... all plugs are not lowered. Deactivate twin needle or stitch width safety in the settings menu. Check that machine is threaded. Push bobbin winder lever to touch, turn the machine OFF and then ON again. If the buttons do not respond to sewing position. The machine...
... Thread snips do not respond to a new higher quality thread purchased from bobbin area. Wrong stitch , irregular or narrow stitch? (4.0 and 3.0) The needle breaks? Remedy Remove stitch plate and clean lint from an authorized PFAFF® dealer. Enable automatic thread snips in chapter 2. Insert needle correctly ... all plugs are not lowered. Deactivate twin needle or stitch width safety in the settings menu. Check that machine is threaded. Push bobbin winder lever to touch, turn the machine OFF and then ON again. If the buttons do not respond to sewing position. The machine...
Owner's Manual
Page 48
...sewing lint collected between the feed dogs? Change the stitch plate. Have your sewing machine serviced regularly by use only the original PFAFF® bobbins approved for the actual thread spool. A sewing sample will often give much better information than words. Clean lint from... feed dogs with your thread on a scrap of your sewing fabric and bring it is a great help to your local authorized PFAFF® dealer! If you insert the bobbin properly? If there is threaded. Attach a spool cap of non-original accessories or parts. Try a different spool pin position (...
...sewing lint collected between the feed dogs? Change the stitch plate. Have your sewing machine serviced regularly by use only the original PFAFF® bobbins approved for the actual thread spool. A sewing sample will often give much better information than words. Clean lint from... feed dogs with your thread on a scrap of your sewing fabric and bring it is a great help to your local authorized PFAFF® dealer! If you insert the bobbin properly? If there is threaded. Attach a spool cap of non-original accessories or parts. Try a different spool pin position (...
Owner's Manual
Page 49
... Balance 2:17 Bobbin, insert 2:6 Bobbin winding 2:5 Winding from horizontal position 2:5 Winding through the needle 2:5 Button, sew on 3:9 Buttonholes 3:7 Manual buttonhole 3:8 Sensormatic buttonhole 3:8 Buttons expression™ 2.0 2:14-2:15 expression™ 3.0 2:12-2:13 quilt expression™ 4.0 ...2:2 I IDT 2:6 Disengage 2:6 Engage 2:6 Immediate tie-off 2:10, 2:12, 2:14 Info button 2:11, 2:13, 2:15, 3:1 Inserting the bobbin 2:6 K Knee-lift 2:7 L Language 2:17 Light bulbs, change 5:1 Load Sequencing 4:2 Sewing mode 3:5 Lowering feed dogs 2:8 M Machine overview 1:5 ...
... Balance 2:17 Bobbin, insert 2:6 Bobbin winding 2:5 Winding from horizontal position 2:5 Winding through the needle 2:5 Button, sew on 3:9 Buttonholes 3:7 Manual buttonhole 3:8 Sensormatic buttonhole 3:8 Buttons expression™ 2.0 2:14-2:15 expression™ 3.0 2:12-2:13 quilt expression™ 4.0 ...2:2 I IDT 2:6 Disengage 2:6 Engage 2:6 Immediate tie-off 2:10, 2:12, 2:14 Info button 2:11, 2:13, 2:15, 3:1 Inserting the bobbin 2:6 K Knee-lift 2:7 L Language 2:17 Light bulbs, change 5:1 Load Sequencing 4:2 Sewing mode 3:5 Lowering feed dogs 2:8 M Machine overview 1:5 ...

Owner's Manual
Page 50
... Options 3:3 Troubleshooting 5:3 Twin needle Set for twin needle 2:16, 3.1 Threading for twin needle 2:4 U Unpacking 2:1 Using the alphabet 4:2 Utility stitches 1:8-1:10 V W Wheel 2:11, 2:13, 2:15 Winding bobbin 2:5 Winding from horizontal position 2:5 Winding through the needle 2:5 Index 5:6
... Options 3:3 Troubleshooting 5:3 Twin needle Set for twin needle 2:16, 3.1 Threading for twin needle 2:4 U Unpacking 2:1 Using the alphabet 4:2 Utility stitches 1:8-1:10 V W Wheel 2:11, 2:13, 2:15 Winding bobbin 2:5 Winding from horizontal position 2:5 Winding through the needle 2:5 Index 5:6


