
Owner's Manual
Page 3
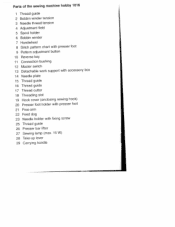
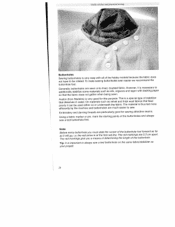
Parts of the sewing machine hobby 1016 1 Thread guide 2 Bobbin winder tension 3 Needle thread tension 4 Adjustment field 5 Spool holder 6 Bobbin winder 7 Handwheel 8 Stitch pattern chart with presser foot 9 Pattern adjustment button 10 ... Detachable work support with accessory box 14 Needle plate 15 Thread guide 16 Thread guide 17 Thread cutter 18 Threading slot 19 Hook cover (enclosing sewing hook) 20 Presser foot holder with presser foot 21 Free-arm 22 Feed dog 23 Needle holder with fixing screw 25 Thread guide 26 Presser...
Parts of the sewing machine hobby 1016 1 Thread guide 2 Bobbin winder tension 3 Needle thread tension 4 Adjustment field 5 Spool holder 6 Bobbin winder 7 Handwheel 8 Stitch pattern chart with presser foot 9 Pattern adjustment button 10 ... Detachable work support with accessory box 14 Needle plate 15 Thread guide 16 Thread guide 17 Thread cutter 18 Threading slot 19 Hook cover (enclosing sewing hook) 20 Presser foot holder with presser foot 21 Free-arm 22 Feed dog 23 Needle holder with fixing screw 25 Thread guide 26 Presser...
Owner's Manual
Page 5
...to find out just what your Pfaff dealer, who will make full use of all its features. Furthermore, it has numerous practical features which is sure to bring sewing pleasure. You have any further questions, just ask your machine can do and make sewing much easier for fun Congratulations!... We wish you with help or advice. Sewing for you countless sewmg machThe features the very latest in...
...to find out just what your Pfaff dealer, who will make full use of all its features. Furthermore, it has numerous practical features which is sure to bring sewing pleasure. You have any further questions, just ask your machine can do and make sewing much easier for fun Congratulations!... We wish you with help or advice. Sewing for you countless sewmg machThe features the very latest in...
Owner's Manual
Page 6
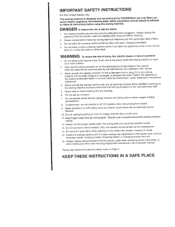
... or injury to break. 13. precautions should never be pulled into any air openings blocked. Great care is necessary when this sewing machine is used or where oxygen is designed and manufactured use an electric appliance, the following basic safety for HOUSEHOLD use this manual..... 6. Only use the proper needle plate. Always use needles recommended by pulling on a soft surface such as contained in this sewing machine for a sewing machine that has fallen into water or other liquid. WAR NNG To reduce the risk of 5. Never drop or insert anything into a...
... or injury to break. 13. precautions should never be pulled into any air openings blocked. Great care is necessary when this sewing machine is used or where oxygen is designed and manufactured use an electric appliance, the following basic safety for HOUSEHOLD use this manual..... 6. Only use the proper needle plate. Always use needles recommended by pulling on a soft surface such as contained in this sewing machine for a sewing machine that has fallen into water or other liquid. WAR NNG To reduce the risk of 5. Never drop or insert anything into a...
Owner's Manual
Page 7
... soft lint-free cloth. The user must adjust the tension of the belt drive, 5. An authorized PFAFF mechanic only must exercise adequate caution with alcohol, Please note! This machine is a high quality electronicmechanical appliance, It is : Ambient temperature 50°F (10°C) to 104...for su pervised use a dry, clean. It should changes be put into openings on the machine, 7. The maximum permissible wattage for the sewing lamp is designated for domestic sewing machines The machines meet the relevant safety requirements. 1. To remove any possible damage. 10. Notes on safety ...
... soft lint-free cloth. The user must adjust the tension of the belt drive, 5. An authorized PFAFF mechanic only must exercise adequate caution with alcohol, Please note! This machine is a high quality electronicmechanical appliance, It is : Ambient temperature 50°F (10°C) to 104...for su pervised use a dry, clean. It should changes be put into openings on the machine, 7. The maximum permissible wattage for the sewing lamp is designated for domestic sewing machines The machines meet the relevant safety requirements. 1. To remove any possible damage. 10. Notes on safety ...
Owner's Manual
Page 9
... 51 22 50 39-40 21 15 46 31 20 38 34 44 Setting utility stitches 20 Sewing feet (normal accessories) 42 Sewing feet (special accessories) 43 Sewing lamp 51 Sewing on patches 31 Sewing problems and their solutions 52 Shell edging 36 Smocking 29 Special accessories chart 43 Spool placement 10... notes Serging with the zigzag stitch z 2 Zigzag stitch 23 Zippers 23 32-33 N Needle charts Needle plate, removing Needle thread tension O Oiling the machine Optional accessories p Patchwork quilt Practical sewing Presser bar lifter o Quilt and patchwork foot R Repairing tears Reverse...
... 51 22 50 39-40 21 15 46 31 20 38 34 44 Setting utility stitches 20 Sewing feet (normal accessories) 42 Sewing feet (special accessories) 43 Sewing lamp 51 Sewing on patches 31 Sewing problems and their solutions 52 Shell edging 36 Smocking 29 Special accessories chart 43 Spool placement 10... notes Serging with the zigzag stitch z 2 Zigzag stitch 23 Zippers 23 32-33 N Needle charts Needle plate, removing Needle thread tension O Oiling the machine Optional accessories p Patchwork quilt Practical sewing Presser bar lifter o Quilt and patchwork foot R Repairing tears Reverse...
Owner's Manual
Page 12
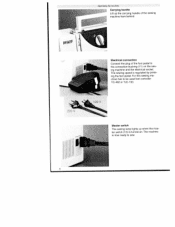
For this sewing ma chine has to be used foot controller YC-482 or TJC-1 50. 220 V Master switch The sewing lamp lights up the carrying handle of the foot pedal to sew. 8 The sewing speed is regulated by press ing the foot pedal. The machine is now ready to the connection bushing (11) on . Electrical connection Connect the plug of the sewing machine from behind. pFFF Operating the machine Carrying handle Lift up when the mas ter switch (12) is turned on the sew ing machine and the electrical socket.
For this sewing ma chine has to be used foot controller YC-482 or TJC-1 50. 220 V Master switch The sewing lamp lights up the carrying handle of the foot pedal to sew. 8 The sewing speed is regulated by press ing the foot pedal. The machine is now ready to the connection bushing (11) on . Electrical connection Connect the plug of the sewing machine from behind. pFFF Operating the machine Carrying handle Lift up when the mas ter switch (12) is turned on the sew ing machine and the electrical socket.
Owner's Manual
Page 13
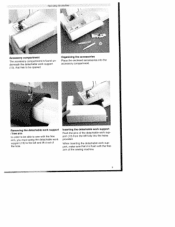
Operating the machine ) Accessory compartment The accessory compartment is flush with the tree arm, you must swing the detachable work sup port, make sure that has to the ... work sup port (13) from the left fully into the accessory compartment. Removing the detachable work support I free arm In order to be able to sew with the free arm of the hole. Organizing the accessories Place the enclosed accessories into the holes provided. When inserting the detachable work support (13...
Operating the machine ) Accessory compartment The accessory compartment is flush with the tree arm, you must swing the detachable work sup port, make sure that has to the ... work sup port (13) from the left fully into the accessory compartment. Removing the detachable work support I free arm In order to be able to sew with the free arm of the hole. Organizing the accessories Place the enclosed accessories into the holes provided. When inserting the detachable work support (13...

Owner's Manual
Page 17
The bobbin case must not fall out of the sewing hook. When doing so, pull the thread sideways through slot A and then under tension spring B so that it rests in the bobbin case. Inserting the ... movement. The bobbin case must point into cutout G. Turn setting screw C just a little to the right to decrease the bobbin thread ten sion. Operating the machine Inserting the bobbin Insert the full bobbin in the opening (see arrow). Check: Pull the bobbin thread sharply.
The bobbin case must not fall out of the sewing hook. When doing so, pull the thread sideways through slot A and then under tension spring B so that it rests in the bobbin case. Inserting the ... movement. The bobbin case must point into cutout G. Turn setting screw C just a little to the right to decrease the bobbin thread ten sion. Operating the machine Inserting the bobbin Insert the full bobbin in the opening (see arrow). Check: Pull the bobbin thread sharply.

Owner's Manual
Page 22
Lower the presser foot and insert the needle, pushing it up as far as sewing on the tension dial. I 18 To remove: Lower the presser foot and set the needle to the right. J PFAFF To insert: The flat side A of the needle thread tension (3) using the markings on buttons, the feed dog (22... and tighten the fixing screw (23) firmly. To engage the feed dog, push down wards and then to its highest point. Operaüng the machine Changing the needle Switch off the master switch (12). To do this, open the hook cover (19) and move the metallic slide to the right...
Lower the presser foot and insert the needle, pushing it up as far as sewing on the tension dial. I 18 To remove: Lower the presser foot and set the needle to the right. J PFAFF To insert: The flat side A of the needle thread tension (3) using the markings on buttons, the feed dog (22... and tighten the fixing screw (23) firmly. To engage the feed dog, push down wards and then to its highest point. Operaüng the machine Changing the needle Switch off the master switch (12). To do this, open the hook cover (19) and move the metallic slide to the right...
Owner's Manual
Page 23
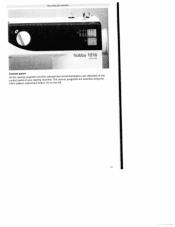
The various programs are are depicted on the selected using the stitch pattern adjustment button (9) on the left. '9 hobby 1016 Control panel All the sewing programs and control panel of your sewing the relevant foot recommendations machine. Operating the machine -
The various programs are are depicted on the selected using the stitch pattern adjustment button (9) on the left. '9 hobby 1016 Control panel All the sewing programs and control panel of your sewing the relevant foot recommendations machine. Operating the machine -

Owner's Manual
Page 24
Operating the machine Setting utitity stitches All stitch patterns that you can sew with your machine are illustrated in the adjustment field (4). Using the stitch pattern adjustment button (9) you can set the desired stitch by turning the dial until the required letter appears in the stitch pattern chart (8). Reverse sewing The machine sews in reverse only as long as the reverse sewing key (10) is pressed. 20
Operating the machine Setting utitity stitches All stitch patterns that you can sew with your machine are illustrated in the adjustment field (4). Using the stitch pattern adjustment button (9) you can set the desired stitch by turning the dial until the required letter appears in the stitch pattern chart (8). Reverse sewing The machine sews in reverse only as long as the reverse sewing key (10) is pressed. 20
Owner's Manual
Page 30
...(from Madeira) is very good for sewing attractive seams. Using a fabric marker or pin, mark the starting points of the buttonhole. Embroidery and darning threads are 0.5 cm as your project. 26 the red arrow is a special type of the hobby models because the fabric buttonholes even easier ...stitches and practical sewing Buttonholes Sewing buttonholes is not have to be water. On materials such as velvet and used either on the same fabric/stabilizer as far apart. very easy with backing paper so that feed material is thus fed more efficiently by the machine and buttonholes are...
...(from Madeira) is very good for sewing attractive seams. Using a fabric marker or pin, mark the starting points of the buttonhole. Embroidery and darning threads are 0.5 cm as your project. 26 the red arrow is a special type of the hobby models because the fabric buttonholes even easier ...stitches and practical sewing Buttonholes Sewing buttonholes is not have to be water. On materials such as velvet and used either on the same fabric/stabilizer as far apart. very easy with backing paper so that feed material is thus fed more efficiently by the machine and buttonholes are...
Owner's Manual
Page 42
... area to be embroidered and tightly hoop the fabric and stabi lizer. • Attach foot number 0 to your machine, • To make the embroidery more stable, sew all of water-soluble stabilizer and dissolve remaining small areas in water. 38 Do not cut away the fabric from ...(2 mm) from stitching. it helps maintain the shape and stability of the areas while sewing. • Embroider the contours with a satin stitch zigzag. • When all satin stitching is easy to create with your sewing machine. • Transfer your pattern onto the right side of the fabric using the straight ...
... area to be embroidered and tightly hoop the fabric and stabi lizer. • Attach foot number 0 to your machine, • To make the embroidery more stable, sew all of water-soluble stabilizer and dissolve remaining small areas in water. 38 Do not cut away the fabric from ...(2 mm) from stitching. it helps maintain the shape and stability of the areas while sewing. • Embroider the contours with a satin stitch zigzag. • When all satin stitching is easy to create with your sewing machine. • Transfer your pattern onto the right side of the fabric using the straight ...
Owner's Manual
Page 44
... practical with the straight stitch. The seam allowances of you in the templates. When the quilting is finished you can then put together. with the sewing machine, i.e. These squares will form the top ply of your quilt top us ing templates you have bought or made yourself. However, it into cushions, wearable...
... practical with the straight stitch. The seam allowances of you in the templates. When the quilting is finished you can then put together. with the sewing machine, i.e. These squares will form the top ply of your quilt top us ing templates you have bought or made yourself. However, it into cushions, wearable...

Owner's Manual
Page 46
O Standard presser foot (included) Part no: 98-694 847-00 ) --- 3 Blind-stitch foot (optional) Part no 98 694 845 00 4 Zipper foot (optional) Part no 98 694 843 00 5 Buttonhole foot (included) Part no: 98-694 882-00 Screwdriver Bobbins Machine oil Knife Needle system 1301705 H Part no: 93-040 971-41 Part no: 93-040 970-45 Part no: 93-035 910-91 Part no: 99-053 016-91 Part no: 48-020 804-32 42 AccessorIe3 and needles Sewing feet - - -- ----.
O Standard presser foot (included) Part no: 98-694 847-00 ) --- 3 Blind-stitch foot (optional) Part no 98 694 845 00 4 Zipper foot (optional) Part no 98 694 843 00 5 Buttonhole foot (included) Part no: 98-694 882-00 Screwdriver Bobbins Machine oil Knife Needle system 1301705 H Part no: 93-040 971-41 Part no: 93-040 970-45 Part no: 93-035 910-91 Part no: 99-053 016-91 Part no: 48-020 804-32 42 AccessorIe3 and needles Sewing feet - - -- ----.

Owner's Manual
Page 55
...presser foot. The needle must be at its highest position. • Remove the detachable work support (13). I : Changing the sewing lamp. The maximum permissible wattage of the machine. Loosen the two screws with the screwdriver and lift the needle plate (14). • Clean the feed dog (22) with the... brush. The sewing lamp (bulb) is located inside the needle head of the bulb is 15 watts. 5' Important! Switch off ...
...presser foot. The needle must be at its highest position. • Remove the detachable work support (13). I : Changing the sewing lamp. The maximum permissible wattage of the machine. Loosen the two screws with the screwdriver and lift the needle plate (14). • Clean the feed dog (22) with the... brush. The sewing lamp (bulb) is located inside the needle head of the bulb is 15 watts. 5' Important! Switch off ...

Owner's Manual
Page 56
...Insert a new needle. Thread tension is bent or blunt. Only use good quality threads. The machine is not properly inserted. The machine does not feed or feeds irregularly Sewing lint has collected between Remove needle plate, the feed dog teeth rows, remove lint with large... 3. Use needle system 130/705 H. of fabric. Flat side facing the back. Maintenance and troubleshooting Sewing problems and their solutions Problem/Cause Remedy 1. The machine skips stitches The needle is not properly threaded. Wrong needle is too thick. Thread is in the ...
...Insert a new needle. Thread tension is bent or blunt. Only use good quality threads. The machine is not properly inserted. The machine does not feed or feeds irregularly Sewing lint has collected between Remove needle plate, the feed dog teeth rows, remove lint with large... 3. Use needle system 130/705 H. of fabric. Flat side facing the back. Maintenance and troubleshooting Sewing problems and their solutions Problem/Cause Remedy 1. The machine skips stitches The needle is not properly threaded. Wrong needle is too thick. Thread is in the ...
Owner's Manual
Page 57
TechncaI Data Dimensions (w x h x d) Weight Nominal voltage Power consumption Sewing lamp Sewing speed Stitching width Stitching length Presser foot lift Max. max. 5 mm max. 4 mm 5 mm 11,5 mm 130 / 705 H presser foot height Needle system Package contents Sewing machine Foot control Lead cord Accessories Instruction manual 392 x 149 x 296 mm 6,6 kg 120 V / 220.240 V 80 W 15W max. 900 stitches / mm.
TechncaI Data Dimensions (w x h x d) Weight Nominal voltage Power consumption Sewing lamp Sewing speed Stitching width Stitching length Presser foot lift Max. max. 5 mm max. 4 mm 5 mm 11,5 mm 130 / 705 H presser foot height Needle system Package contents Sewing machine Foot control Lead cord Accessories Instruction manual 392 x 149 x 296 mm 6,6 kg 120 V / 220.240 V 80 W 15W max. 900 stitches / mm.


