

Owner's Manual
Page 2
D) The drive belt must never be disconnected from the power source. B) When leaving the machine, changing parts or accessories, the machine must take sufficient care to the up and down movement of the light bulb is 15 watts. C) The maximum approved wattage of the needle, the user must be adjusted by anyone but an authorized Pfatf agent, Notes on safety A) Owing to avoid injury and observe the sewing area continuously while sewing.
D) The drive belt must never be disconnected from the power source. B) When leaving the machine, changing parts or accessories, the machine must take sufficient care to the up and down movement of the light bulb is 15 watts. C) The maximum approved wattage of the needle, the user must be adjusted by anyone but an authorized Pfatf agent, Notes on safety A) Owing to avoid injury and observe the sewing area continuously while sewing.

Owner's Manual
Page 3
...thread overedge seam Adjusting the stitch length Adjusting the differential teed Disengageing the upper knife Disengageing the overedge looper Adjusting the machine for two-thread chainstitch seam Inserting the workpiece guide plate Adjusting the seam width Changing the sewing foot Sewing rolled hems... Changing the needles Changing the lower knife Changing the upper knife Changing the light bulb Cleaning the thread tensions Oiling the machine Sewing problems and their removal Accessories Specifications Thread spool net Optional accessories 2, 3 4 4, 5 5 6 7 8 9 10 11 12 ...
...thread overedge seam Adjusting the stitch length Adjusting the differential teed Disengageing the upper knife Disengageing the overedge looper Adjusting the machine for two-thread chainstitch seam Inserting the workpiece guide plate Adjusting the seam width Changing the sewing foot Sewing rolled hems... Changing the needles Changing the lower knife Changing the upper knife Changing the light bulb Cleaning the thread tensions Oiling the machine Sewing problems and their removal Accessories Specifications Thread spool net Optional accessories 2, 3 4 4, 5 5 6 7 8 9 10 11 12 ...

Owner's Manual
Page 5
... knob 17 Needle plate 18 Sewing foot 19 Needle bar 20 Sewing foot lifting lever 21 Thread spool stand 22 Thread spool holder 23 Machine socket 24 Master switch 25 Lint box 26 Foot control 27 Foot control plug 28 Mains plug 29 Lower knife 30 Knife clamp screw ...-thread chainstitch looper 34 Thread guides behind the carrying handle 35 Seam width adjustment knob behind work support 15 27 31 Controls of the sewing machine 1 Foot pressure regulating dial 2 Thread guide 3 Carrying handle 4 Left needle thread tension dial 5 Right needle thread tension dial 6 Right looper thread tension dial 7 Left...
... knob 17 Needle plate 18 Sewing foot 19 Needle bar 20 Sewing foot lifting lever 21 Thread spool stand 22 Thread spool holder 23 Machine socket 24 Master switch 25 Lint box 26 Foot control 27 Foot control plug 28 Mains plug 29 Lower knife 30 Knife clamp screw ...-thread chainstitch looper 34 Thread guides behind the carrying handle 35 Seam width adjustment knob behind work support 15 27 31 Controls of the sewing machine 1 Foot pressure regulating dial 2 Thread guide 3 Carrying handle 4 Left needle thread tension dial 5 Right needle thread tension dial 6 Right looper thread tension dial 7 Left...

Owner's Manual
Page 6
... or on page 41. j Then connect the mains plug to a power source. The accessories are illustrated on a special sewing table. Caution: When the machine is not in the machine socket. To replace the accessory box, slide it into the grooves and push it in as far as it off at the master...
... or on page 41. j Then connect the mains plug to a power source. The accessories are illustrated on a special sewing table. Caution: When the machine is not in the machine socket. To replace the accessory box, slide it into the grooves and push it in as far as it off at the master...

Owner's Manual
Page 7
1 Switching the machine ON and OFF Power and sewing light are switched on . Machine and sewing light are switched off : Press switch again. Switching on the foot control. Foot control The speed of the Hobbylook is regulated as follows: The more you press the foot control down, the faster the machine will sew, Electronic toot control Maximum speed can be preselected in two steps by the switch on : Press switch. Machine and sewing light are switched on and off simultaneously with the master switch. Position = Half speed Position 44 = Full speed 5 Switching off .
1 Switching the machine ON and OFF Power and sewing light are switched on . Machine and sewing light are switched off : Press switch again. Switching on the foot control. Foot control The speed of the Hobbylook is regulated as follows: The more you press the foot control down, the faster the machine will sew, Electronic toot control Maximum speed can be preselected in two steps by the switch on : Press switch. Machine and sewing light are switched on and off simultaneously with the master switch. Position = Half speed Position 44 = Full speed 5 Switching off .
Owner's Manual
Page 10
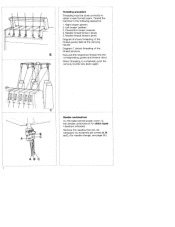
... change, see page 35.) - AS Needle combinations On the table behind the carrying handle. Chainstitch looper (mauve) 4. Remove the needles that are indicated. Thread the machine in the following sequence: 1. Needle thread tension (pink) Diagram B shows threading of the thread tensions. B Now pull the respective thread into the corresponding guides and...
... change, see page 35.) - AS Needle combinations On the table behind the carrying handle. Chainstitch looper (mauve) 4. Remove the needles that are indicated. Thread the machine in the following sequence: 1. Needle thread tension (pink) Diagram B shows threading of the thread tensions. B Now pull the respective thread into the corresponding guides and...

Owner's Manual
Page 19
On this machine, all kinds of fabric from extremely thin to extremely thick can be processed. Explanation: The screw of the upper knife. 17 For knit fabrics, a crochet ...
On this machine, all kinds of fabric from extremely thin to extremely thick can be processed. Explanation: The screw of the upper knife. 17 For knit fabrics, a crochet ...
Owner's Manual
Page 32
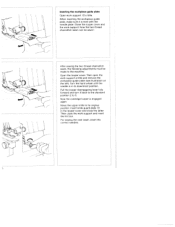
... plate Open work support and insert the lint box. When inserting the workpiece guide plate, make sure it back to the standard position 2 to the machine: Open the looper cover.
... plate Open work support and insert the lint box. When inserting the workpiece guide plate, make sure it back to the standard position 2 to the machine: Open the looper cover.

Owner's Manual
Page 36
... 1 right looper, green path 2. needle thread, pink path bulk thread polyester thread 120-140 polyester thread 120-140 For threading of the sewing machine: Needle: remove needle A and B Sewing foot: engage rolled hem foot 'R" Seam width, from 25 to 3.0 mm (depending on material) Stitch... yellow path 3. "N" approx. +5 approx. + 2.5 approx. needle thread, pink path polyester thread polyester thread polyester thread For threading of the machine, as described above. left looper, yellow path 3. "N" to 11. Rolled hem, sem with two bulk threads and one bulk thread and two...
... 1 right looper, green path 2. needle thread, pink path bulk thread polyester thread 120-140 polyester thread 120-140 For threading of the sewing machine: Needle: remove needle A and B Sewing foot: engage rolled hem foot 'R" Seam width, from 25 to 3.0 mm (depending on material) Stitch... yellow path 3. "N" approx. +5 approx. + 2.5 approx. needle thread, pink path polyester thread polyester thread polyester thread For threading of the machine, as described above. left looper, yellow path 3. "N" to 11. Rolled hem, sem with two bulk threads and one bulk thread and two...

Owner's Manual
Page 37
... spare parts Changing the lower knife. An incorrectly inserted needle will cause thread breakage and skipped stitches. 'i Changing the knives Knives are used on these machines: System 130/705 H or 15 x 1 H Although the correct needle size depends on the material and the thread size used, we recommend needle size 14. Notes...
... spare parts Changing the lower knife. An incorrectly inserted needle will cause thread breakage and skipped stitches. 'i Changing the knives Knives are used on these machines: System 130/705 H or 15 x 1 H Although the correct needle size depends on the material and the thread size used, we recommend needle size 14. Notes...
Owner's Manual
Page 41
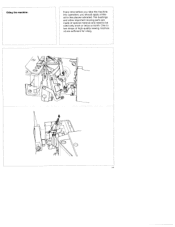
Oiling the machine: Every time before you take the machine into operation, you should apply a little oil to be oiled only once or twice a month. The bushings and other important moving parts are made of high-quality sewing machine oil are sufficient for oiling. One to two drops of special material and need to the places indicated.
Oiling the machine: Every time before you take the machine into operation, you should apply a little oil to be oiled only once or twice a month. The bushings and other important moving parts are made of high-quality sewing machine oil are sufficient for oiling. One to two drops of special material and need to the places indicated.

Owner's Manual
Page 42
... below may occur are due no to difficult adjustments to minor adjustment- Insert new needle. Thread tension too tight. 'ing prob'ems and solutions se machines have been iiade. I Puckered seams Thread tension too tight. Thread correctly (pages 7-12). Material pulled. Reduce thread tension (espe cially for easy operation, and there...
... below may occur are due no to difficult adjustments to minor adjustment- Insert new needle. Thread tension too tight. 'ing prob'ems and solutions se machines have been iiade. I Puckered seams Thread tension too tight. Thread correctly (pages 7-12). Material pulled. Reduce thread tension (espe cially for easy operation, and there...
Owner's Manual
Page 43
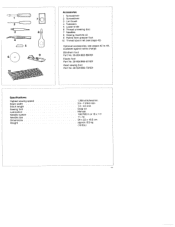
... width Stitch length Sewing foot Lubrication Needle system Needle size Dimensions Weight Accessories 1 Screwdriver 2 Screwdriver 3 Lint brush 4 Tweezers 5 Lower knife 6 Thread unreeling disc 7 Needles 8 Sewing machine oil 9 Rolled hem presser foot 10 Thread spool net (see page 42) Optional accessories, see pages 42 to 44, available against extra charge Blindhem foot...
... width Stitch length Sewing foot Lubrication Needle system Needle size Dimensions Weight Accessories 1 Screwdriver 2 Screwdriver 3 Lint brush 4 Tweezers 5 Lower knife 6 Thread unreeling disc 7 Needles 8 Sewing machine oil 9 Rolled hem presser foot 10 Thread spool net (see page 42) Optional accessories, see pages 42 to 44, available against extra charge Blindhem foot...
Owner's Manual
Page 44
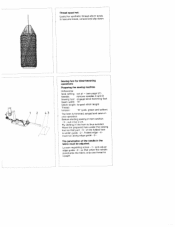
... guide -2-, Folded edge -4- Useful for synthetic thread which tends to become loose, unravel and slip down. 2 1, 3 Sewing foot for blind-hemming operations Prepanng the sewing machine Differential feed setting: set at - (see page 27) Needle: remove needles A and B Sewing foot: engage blind-hemming foot Seam width: "N" Stitch length: longest stitch length...
... guide -2-, Folded edge -4- Useful for synthetic thread which tends to become loose, unravel and slip down. 2 1, 3 Sewing foot for blind-hemming operations Prepanng the sewing machine Differential feed setting: set at - (see page 27) Needle: remove needles A and B Sewing foot: engage blind-hemming foot Seam width: "N" Stitch length: longest stitch length...

Owner's Manual
Page 46
... tape insertion: Loosen screw -2- and tilt brake -1 - The more the gathering effect is increased. upwards. is gathered and the excess fabric cut off. Preparing the machine: Differential feed setting: set at the same time the material is turned in, the more screw -2-
... tape insertion: Loosen screw -2- and tilt brake -1 - The more the gathering effect is increased. upwards. is gathered and the excess fabric cut off. Preparing the machine: Differential feed setting: set at the same time the material is turned in, the more screw -2-


