

Owner's Manual
Page 3
... length Adjusting the differential teed Disengageing the upper knife Disengageing the overedge looper Adjusting the machine for two-thread chainstitch seam Inserting the workpiece guide plate Adjusting the seam width Changing the sewing foot Sewing rolled hems Changing... Electrical connection Foot control Installing the thread spool stand Threading diagram on the lint box Needle combinations Threading the right looper Threading the left looper Threading the two-thread chainstitch looper Threading the needles Inserting the lint box Setting the standard thread tension Sewing test Points to observe...
... length Adjusting the differential teed Disengageing the upper knife Disengageing the overedge looper Adjusting the machine for two-thread chainstitch seam Inserting the workpiece guide plate Adjusting the seam width Changing the sewing foot Sewing rolled hems Changing... Electrical connection Foot control Installing the thread spool stand Threading diagram on the lint box Needle combinations Threading the right looper Threading the left looper Threading the two-thread chainstitch looper Threading the needles Inserting the lint box Setting the standard thread tension Sewing test Points to observe...

Owner's Manual
Page 5
... of the sewing machine 1 Foot pressure regulating dial 2 Thread guide 3 Carrying handle 4 Left needle thread tension dial 5 Right needle thread tension dial 6 Right looper thread tension dial 7 Left looper thread tension dial 8 Looper thread tension dial for two- thread chainstitch 9 Thread tension cover 10 Knife guard 11 Hand wheel and feed ... 16 Differential feed adjustment knob 17 Needle plate 18 Sewing foot 19 Needle bar 20 Sewing foot lifting lever 21 Thread spool stand 22 Thread spool holder 23 Machine socket 24 Master switch 25 Lint box 26 Foot control 27 Foot control plug 28 Mains...
... of the sewing machine 1 Foot pressure regulating dial 2 Thread guide 3 Carrying handle 4 Left needle thread tension dial 5 Right needle thread tension dial 6 Right looper thread tension dial 7 Left looper thread tension dial 8 Looper thread tension dial for two- thread chainstitch 9 Thread tension cover 10 Knife guard 11 Hand wheel and feed ... 16 Differential feed adjustment knob 17 Needle plate 18 Sewing foot 19 Needle bar 20 Sewing foot lifting lever 21 Thread spool stand 22 Thread spool holder 23 Machine socket 24 Master switch 25 Lint box 26 Foot control 27 Foot control plug 28 Mains...

Owner's Manual
Page 8
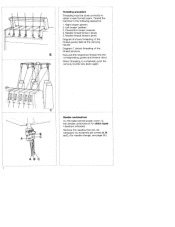
Pull up guide bar and align it up to the screw head. Push the thread guiding part into groove of the carrying handle and pull it so that the thread guides are exactly above the spool holders. Installing the thread spool stand Loosen clamp screw a little and pull washer up , then the thread guides 34 will be visible. Tighten clamp screw. Carrying handle and thread guides behind it: Insert fingers into the guide bar. Insert thread spool stand from the top. Insert the five thread spool holders.
Pull up guide bar and align it up to the screw head. Push the thread guiding part into groove of the carrying handle and pull it so that the thread guides are exactly above the spool holders. Installing the thread spool stand Loosen clamp screw a little and pull washer up , then the thread guides 34 will be visible. Tighten clamp screw. Carrying handle and thread guides behind it: Insert fingers into the guide bar. Insert thread spool stand from the top. Insert the five thread spool holders.

Owner's Manual
Page 9
...the stitch type: Behind the looper cover, the individual stitch types from 1 to be engaged or disengaged (see pages 9-i 2. and C) and the thread tensions to 6 are additionally indicated on the back of the stitch types on the table behind looper cover 12 7 Below this, a needle diagram with... color, see page 29>. Now thread along all threading paths marked with the respective set screws is filled out orange. To open the work support, push it down. The respectively necessary ...
...the stitch type: Behind the looper cover, the individual stitch types from 1 to be engaged or disengaged (see pages 9-i 2. and C) and the thread tensions to 6 are additionally indicated on the back of the stitch types on the table behind looper cover 12 7 Below this, a needle diagram with... color, see page 29>. Now thread along all threading paths marked with the respective set screws is filled out orange. To open the work support, push it down. The respectively necessary ...
Owner's Manual
Page 10
... types ito 6 are not necessary by loosening set screws A, B, or C (For needle change, see page 35.) - Needle thread tension (pink) Diagram B shows threading of the thread tensions. Threading procedure Threading must be done correctly to obtain a well-formed seam. When threading is completed, push the carrying handle fully down again. Remove the needles that are indicated.
... types ito 6 are not necessary by loosening set screws A, B, or C (For needle change, see page 35.) - Needle thread tension (pink) Diagram B shows threading of the thread tensions. Threading procedure Threading must be done correctly to obtain a well-formed seam. When threading is completed, push the carrying handle fully down again. Remove the needles that are indicated.

Owner's Manual
Page 11
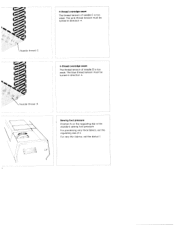
Threading the nght looper: Thread the right looper in sequence 1 to obtain perfect sewing results, the thread must be pulled between the tension discs when threading the tensions. 9 Important: In order to 9 and pull approximately 10 cm (4") of thread through the looper eye (the thread path is marked green).
Threading the nght looper: Thread the right looper in sequence 1 to obtain perfect sewing results, the thread must be pulled between the tension discs when threading the tensions. 9 Important: In order to 9 and pull approximately 10 cm (4") of thread through the looper eye (the thread path is marked green).

Owner's Manual
Page 14
...: Only sew with or without needle A). Threading overedge needles B and C (without needle A). Threading the two-thread chainstitch needle (A): Thread the two-thread chainstitch needle in sequence 1 to 7. pink. In this case, pull both threads behind the black thread retainer and the thread guide wire above it . The thread path is marked pink (point symbol). Threading needle B or C (with either one...
...: Only sew with or without needle A). Threading overedge needles B and C (without needle A). Threading the two-thread chainstitch needle (A): Thread the two-thread chainstitch needle in sequence 1 to 7. pink. In this case, pull both threads behind the black thread retainer and the thread guide wire above it . The thread path is marked pink (point symbol). Threading needle B or C (with either one...

Owner's Manual
Page 16
...The mauve tension is only needed for two-thread chainstitch), the N must be set opposite the blue triangular symbol. Only for stitch type 6 (needles B and C), the standard thread tension N for needle B must be set depends on the thread tension dials opposite the respective color symbol.... Set the N on the fabric type and thread size used. Setting the standard thread tension The thread tension to 22). Only for the blue thread tension there are ...
...The mauve tension is only needed for two-thread chainstitch), the N must be set opposite the blue triangular symbol. Only for stitch type 6 (needles B and C), the standard thread tension N for needle B must be set depends on the thread tension dials opposite the respective color symbol.... Set the N on the fabric type and thread size used. Setting the standard thread tension The thread tension to 22). Only for the blue thread tension there are ...

Owner's Manual
Page 17
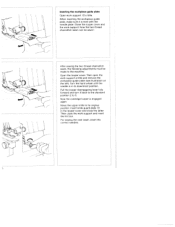
Raise sewing foot lever 20. Sewing test After threading, a sewing test test should be guided to the upper knife and lower the sewing foot. In doing so. Hold thread ends with your left hand while turning hand wheel with your right hand in the illustration. the threads must be made. as shown in the direction ndicated by the arrow. Insert test fabric up to the rear, under the presser foot Make sure that threads have inter locked correctly. Ic
Raise sewing foot lever 20. Sewing test After threading, a sewing test test should be guided to the upper knife and lower the sewing foot. In doing so. Hold thread ends with your left hand while turning hand wheel with your right hand in the illustration. the threads must be made. as shown in the direction ndicated by the arrow. Insert test fabric up to the rear, under the presser foot Make sure that threads have inter locked correctly. Ic

Owner's Manual
Page 19
... shown in the illustration. When sewing thin or medium fabrics, the screw of seam. For knit fabrics, a crochet needle can be used to pull the thread chain into the seam. Then turn the workpiece around and sew a few stitches over the seam just sewn without cutting the... thread chain. On this machine, all kinds of fabric from extremely thin to tighten or loosen the horizontal guide of the upper knife holder serves to ...
... shown in the illustration. When sewing thin or medium fabrics, the screw of seam. For knit fabrics, a crochet needle can be used to pull the thread chain into the seam. Then turn the workpiece around and sew a few stitches over the seam just sewn without cutting the... thread chain. On this machine, all kinds of fabric from extremely thin to tighten or loosen the horizontal guide of the upper knife holder serves to ...

Owner's Manual
Page 20
...: blue = triangular symbol mauve = triangular symbol Application examples: Joining seams on blouses, shirts, jeans and bed linen with serging seam Face side Two thread chain stitcn top side Reverse side -- triangular symbol pink = point symbol green -= point symbol yellow = point symbol mauve = triangular symbol Application examples: Same as stitch ...
...: blue = triangular symbol mauve = triangular symbol Application examples: Joining seams on blouses, shirts, jeans and bed linen with serging seam Face side Two thread chain stitcn top side Reverse side -- triangular symbol pink = point symbol green -= point symbol yellow = point symbol mauve = triangular symbol Application examples: Same as stitch ...

Owner's Manual
Page 21
... serging all kinds of fabric. Overedge stitch • underside Reverse side 10 Face side Overedge stitch top side 3-thread overedge seam Stitch type 4, sewn with needle C (narrow) Stitch type 5, sewn with needles B and C Thread tensions: blue = point symbol pink = point symbol green point symbol yellow = point symbol Application examples: For sewing and...
... serging all kinds of fabric. Overedge stitch • underside Reverse side 10 Face side Overedge stitch top side 3-thread overedge seam Stitch type 4, sewn with needle C (narrow) Stitch type 5, sewn with needles B and C Thread tensions: blue = point symbol pink = point symbol green point symbol yellow = point symbol Application examples: For sewing and...

Owner's Manual
Page 22
... needle B is also possible that both tensions are incorrectly set. The pink thread tension must be turned in the - Needle thread B or C Left looper thread Right looper thread 3-thread overedge seam (narrow) The right looper thread is too tight (green thread tension) or the left looper thread is too weak. Adjust tensions accordingly! Direction + = ncreased tension Direction - = decreased...
... needle B is also possible that both tensions are incorrectly set. The pink thread tension must be turned in the - Needle thread B or C Left looper thread Right looper thread 3-thread overedge seam (narrow) The right looper thread is too tight (green thread tension) or the left looper thread is too weak. Adjust tensions accordingly! Direction + = ncreased tension Direction - = decreased...

Owner's Manual
Page 23
... hat Doth tensons are ncorrectly set. j r.oons accor r gly! It a also possible t at cc tb tensor a are ncorrectly set . 3 thread overedge seam e c: ooper Thread a t o tight (ye flow son) nr e ght ooper thread s too I uper thread s too loose w t iion) or the nght looper 0 thrc i too hght (green tensofl) a also ossbIe that both tensions are flCThPty...
... hat Doth tensons are ncorrectly set. j r.oons accor r gly! It a also possible t at cc tb tensor a are ncorrectly set . 3 thread overedge seam e c: ooper Thread a t o tight (ye flow son) nr e ght ooper thread s too I uper thread s too loose w t iion) or the nght looper 0 thrc i too hght (green tensofl) a also ossbIe that both tensions are flCThPty...
Owner's Manual
Page 24
The pink thread tension must be turned in direction +. For very thin fabrics, set the regulating dial at 1. 4-thread overedge seam The thread tension of needle B is too weak The blue thread tension must be turned in direction +. thread B Sewing foot pressure Position N on the regulating dial is too weak. Needle thread C 4-thread overedge seam The thread tension of needle C is the standard sewing toot pressure. For processing very thick fabrics, set the dial at 4.
The pink thread tension must be turned in direction +. For very thin fabrics, set the regulating dial at 1. 4-thread overedge seam The thread tension of needle B is too weak The blue thread tension must be turned in direction +. thread B Sewing foot pressure Position N on the regulating dial is too weak. Needle thread C 4-thread overedge seam The thread tension of needle C is the standard sewing toot pressure. For processing very thick fabrics, set the dial at 4.

Owner's Manual
Page 25
Remove either only needle B or needle C (see page 35). Needle Thread tension 3thread overedge seam Needle B Marked pink Needle C Marked pink Pull thread behind thread retainer and thread guide wire. I l Standard seam width Maximum . 3-thread overedge seam Threethread sewing is possible by using either needle B or C (see page 12). seam width 72mm 5mm
Remove either only needle B or needle C (see page 35). Needle Thread tension 3thread overedge seam Needle B Marked pink Needle C Marked pink Pull thread behind thread retainer and thread guide wire. I l Standard seam width Maximum . 3-thread overedge seam Threethread sewing is possible by using either needle B or C (see page 12). seam width 72mm 5mm

Owner's Manual
Page 27
..., linen, dress materials Heavy materials: Tweed, suit materials, denim, heavy cloth Knit fabrics: Rolled hem Thread Cotton No. 80-100 Silk No. 80-100 Synthetic thread No. 70-140 Cotton No. 60-100 Silk No. 50-100 Synthetic thread No. 70-140 Cotton No. 40-60 Silk No. 40-60 Synthetic... thread No. 70-140 Cotton No. 40-60 Silk No. 40-60 Synthetic thread No, 70-140 Polyester thread No. 100-140 Mercerized thread (bulk thread> Stitch length 2.0 to 4.0 mm 2.0 to 4.0 mm 2.0 to 40 mm 2.0 to 4.0 mm 1.0 to 1.5mm Adjusting the ...
..., linen, dress materials Heavy materials: Tweed, suit materials, denim, heavy cloth Knit fabrics: Rolled hem Thread Cotton No. 80-100 Silk No. 80-100 Synthetic thread No. 70-140 Cotton No. 60-100 Silk No. 50-100 Synthetic thread No. 70-140 Cotton No. 40-60 Silk No. 40-60 Synthetic... thread No. 70-140 Cotton No. 40-60 Silk No. 40-60 Synthetic thread No, 70-140 Polyester thread No. 100-140 Mercerized thread (bulk thread> Stitch length 2.0 to 4.0 mm 2.0 to 4.0 mm 2.0 to 40 mm 2.0 to 4.0 mm 1.0 to 1.5mm Adjusting the ...
Owner's Manual
Page 32
Now the overedge looper is level with the needle plate. Now the two-thread chainstitch seam can be sewn I After sewing the two-thread chainstitch seam, the following adjustments must be made to its original position Insert knife guard plate 10 in its downmost position. Then open the work ...
Now the overedge looper is level with the needle plate. Now the two-thread chainstitch seam can be sewn I After sewing the two-thread chainstitch seam, the following adjustments must be made to its original position Insert knife guard plate 10 in its downmost position. Then open the work ...

Owner's Manual
Page 33
Set the upper knife at its basic position again and close the looper cover. Sew a test seam. The desired seam width is marked with adjusting knob 35. Note: After adjusting the seam width, it may be necessary to 5. The scale on page 29. Adjusting the seam width The standard seam width setting is set with N (3.5 mm). Disengage the upper knife according to the description on the seamwidth adjustment knob ranges from 2.5 to re-adjust the thread tension. 31
Set the upper knife at its basic position again and close the looper cover. Sew a test seam. The desired seam width is marked with adjusting knob 35. Note: After adjusting the seam width, it may be necessary to 5. The scale on page 29. Adjusting the seam width The standard seam width setting is set with N (3.5 mm). Disengage the upper knife according to the description on the seamwidth adjustment knob ranges from 2.5 to re-adjust the thread tension. 31

Owner's Manual
Page 35
A rolled hem is an attractive finish tor open edges. Without any effort you can sew professional rolled hems on neck scarves, shawls and valances. Face side Reverse side -T4\ 2\\ 33 A rolled hem is used for light, delicate fabrics and is sewn with polyester thread 100-140. Face side Reverse side Rolled hem sewn with three threads (see page 34).
A rolled hem is an attractive finish tor open edges. Without any effort you can sew professional rolled hems on neck scarves, shawls and valances. Face side Reverse side -T4\ 2\\ 33 A rolled hem is used for light, delicate fabrics and is sewn with polyester thread 100-140. Face side Reverse side Rolled hem sewn with three threads (see page 34).


