
Owner's Manual
Page 2
... selector dial Needle Needle position Oiling Overlock seam Presser bar lifter Reverse sewing Sewing feet Sewing mechanism Slot-threading Special accessories Special sewing feet Stitch program chart Straight stitch Thread cutter Thread tensions Trouble shooting Upper threading Utility-stitch combinations Utility stitches Winding Work support Zigzag stitch Page 2 4, 5 4, 6 7 20, 21 1 1 23 11 3 3 1 23 9 8 12...
... selector dial Needle Needle position Oiling Overlock seam Presser bar lifter Reverse sewing Sewing feet Sewing mechanism Slot-threading Special accessories Special sewing feet Stitch program chart Straight stitch Thread cutter Thread tensions Trouble shooting Upper threading Utility-stitch combinations Utility stitches Winding Work support Zigzag stitch Page 2 4, 5 4, 6 7 20, 21 1 1 23 11 3 3 1 23 9 8 12...
Owner's Manual
Page 4
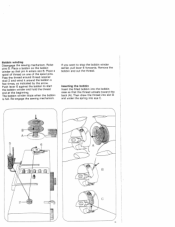
... dog 21 Presser bar lifter (on back of this mains lead are coloured in the mains lead of machine arm) 22 Top feeding foot with thread cutter 23 Needle holder with needle set screw 24 Needle plate with the letter N or coloured black. b> Make sure you pull out the power ..., when you clean and oil the machine, or when you have to use only a 15-watt light bulb in your sewing machine 1 Take-up lever 2 Thread retainer stud 3 Eraser button 4 Utility-stitch buttons 5 Spool pins 6 Bobbin winder 7 Balance wheel 8 Stop motion knob 9 Master selector dial 10 Needle position and buttonhole knob...
... dog 21 Presser bar lifter (on back of this mains lead are coloured in the mains lead of machine arm) 22 Top feeding foot with thread cutter 23 Needle holder with needle set screw 24 Needle plate with the letter N or coloured black. b> Make sure you pull out the power ..., when you clean and oil the machine, or when you have to use only a 15-watt light bulb in your sewing machine 1 Take-up lever 2 Thread retainer stud 3 Eraser button 4 Utility-stitch buttons 5 Spool pins 6 Bobbin winder 7 Balance wheel 8 Stop motion knob 9 Master selector dial 10 Needle position and buttonhole knob...
Owner's Manual
Page 9
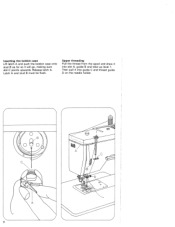
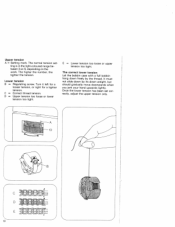
...full. Place a bobbin on one of the spool pins. Remove the bobbin and cut the thread. Raise pins 5. Push lever 6 against the bobbin to stop the bobbin winder earlier, pull lever 6 forwards. Pass the thread around thread retainer stud 2 and wind it around the bobbin a few times, as indicated by the arrow.... If you want to start the bobbin winder and hold the thread end at the beginning. Then draw the thread into slot B and under the spring into the bobbin case so that pin A enters slot B. Re-engage the sewing mechanism. ...
...full. Place a bobbin on one of the spool pins. Remove the bobbin and cut the thread. Raise pins 5. Push lever 6 against the bobbin to stop the bobbin winder earlier, pull lever 6 forwards. Pass the thread around thread retainer stud 2 and wind it around the bobbin a few times, as indicated by the arrow.... If you want to start the bobbin winder and hold the thread end at the beginning. Then draw the thread into slot B and under the spring into the bobbin case so that pin A enters slot B. Re-engage the sewing mechanism. ...
Owner's Manual
Page 10
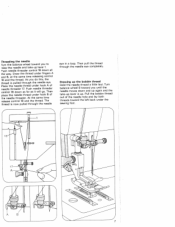
Release latch A. Latch A and stud B must be flush. Then pull it into slot A, guide B and take-up lever 1. Inserting the bobbin case Lift latch A and push the bobbin case onto stud B as far as it into guide C and thread guide D on the needle holder. Upper threading Pull the thread from the spool and draw it will go, making sure slot C points upwards.
Release latch A. Latch A and stud B must be flush. Then pull it into slot A, guide B and take-up lever 1. Inserting the bobbin case Lift latch A and push the bobbin case onto stud B as far as it into guide C and thread guide D on the needle holder. Upper threading Pull the thread from the spool and draw it will go, making sure slot C points upwards.
Owner's Manual
Page 11
... back under fingers A and B, at the same time releasing control 18 and the thread. Draw the thread under the sewing foot. 7 Then place the needle thread under hook A of the needle threader. Then pull the thread through the needle eye in a loop. Push needle threader control 18 down and up... again and the take -up the bobbin thread Hold the needle thread a little taut. The thread is pulled through the needle eye. As you do this, the thread is now pulled through the needle eye completely. Push needle threader control 18 down all ...
... back under fingers A and B, at the same time releasing control 18 and the thread. Draw the thread under the sewing foot. 7 Then place the needle thread under hook A of the needle threader. Then pull the thread through the needle eye in a loop. Push needle threader control 18 down and up... again and the take -up the bobbin thread Hold the needle thread a little taut. The thread is pulled through the needle eye. As you do this, the thread is now pulled through the needle eye completely. Push needle threader control 18 down all ...
Owner's Manual
Page 14
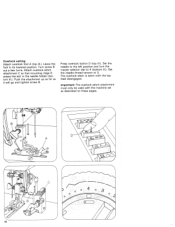
C = Correct thread tension. D. Lower tension B = Regulating screw. D = Upper tension too loose or lower tension too tight. The higher the number, the tighter the tension. It must not ... tension, or right for a tighter tension. The correct lower tension Let the bobbin case with a full bobbin hang down freely by its down by the thread. The normal tension set cor rectly, adjust the upper tension only. Once the lower tension has been set - ting is in the light-coloured range...
C = Correct thread tension. D. Lower tension B = Regulating screw. D = Upper tension too loose or lower tension too tight. The higher the number, the tighter the tension. It must not ... tension, or right for a tighter tension. The correct lower tension Let the bobbin case with a full bobbin hang down freely by its down by the thread. The normal tension set cor rectly, adjust the upper tension only. Once the lower tension has been set - ting is in the light-coloured range...
Owner's Manual
Page 16
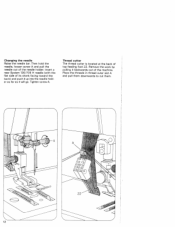
Changing the needle Raise the needle bar. Remove the work by pulling it up into the needle hold the needle, loosen screw A and pull the needle out of the needle holder. Then hold er as far as it will go. Insert a new System 130/705 H needle (with the flat side of its shank facing toward the back) and push it backwards out of top feeding foot 22. Tighten screw A. Thread cutter The thread cutter is located at the back of the machine. Place the threads in thread cuter slot A and pull them downwards to cut them.
Changing the needle Raise the needle bar. Remove the work by pulling it up into the needle hold the needle, loosen screw A and pull the needle out of the needle holder. Then hold er as far as it will go. Insert a new System 130/705 H needle (with the flat side of its shank facing toward the back) and push it backwards out of top feeding foot 22. Tighten screw A. Thread cutter The thread cutter is located at the back of the machine. Place the threads in thread cuter slot A and pull them downwards to cut them.
Owner's Manual
Page 22
... tighten screw B. Attach overlock-stitch attachment C so that mounting ridge D enters the slot in its lowered position. Press overlock button D (top ill.). Set the needle thread tension at 3. Turn screw B out a few turns. Push the attachment up as far as described on these pages. 03 C Set the needle to the left...
... tighten screw B. Attach overlock-stitch attachment C so that mounting ridge D enters the slot in its lowered position. Press overlock button D (top ill.). Set the needle thread tension at 3. Turn screw B out a few turns. Push the attachment up as far as described on these pages. 03 C Set the needle to the left...
Owner's Manual
Page 23
At the end of the two dots in range 8 the machine sews an edge-finishing seam with an edge-thread effect. Remove the work by pulling it with an edge thread effect. Then press ejector lever F (bottom ill.) to one of the seam raise the sewing foot. E F 10 Overlock seam The... overlock stitch is turned to release the thread from the thread puller. at 3. Set the upper tension at top right) and trim the threads. Edge-finishing seam When the overlock button is released and the master selector dial is used for sewing...
At the end of the two dots in range 8 the machine sews an edge-finishing seam with an edge-thread effect. Remove the work by pulling it with an edge thread effect. Then press ejector lever F (bottom ill.) to one of the seam raise the sewing foot. E F 10 Overlock seam The... overlock stitch is turned to release the thread from the thread puller. at 3. Set the upper tension at top right) and trim the threads. Edge-finishing seam When the overlock button is released and the master selector dial is used for sewing...

Owner's Manual
Page 25
... toward you to bring the take-up lever to symbol D. Turn the balance wheel toward you to 2 numbers. Pull the filler thread taut and trim both ends. Reduce the needle thread tension by sewing a buttonhole on a piece of the buttonhole foot for ward as far as the first. Sew in reverse until...
... toward you to bring the take-up lever to symbol D. Turn the balance wheel toward you to 2 numbers. Pull the filler thread taut and trim both ends. Reduce the needle thread tension by sewing a buttonhole on a piece of the buttonhole foot for ward as far as the first. Sew in reverse until...
Owner's Manual
Page 28
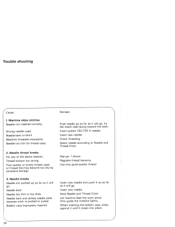
... it up as far as it snaps into place. 24 Note Needle and Thread Chart. When inserting the bobbin case, press against it until it will Needle bent. Wrong needle used . 2. Machine threaded improperly. Needle bent and strikes needle plate because work alone. Bobbin case improperly... feed the work is pushed or pulled. Trouble shooting Cause: 1. Needle too thin for thread used . Poor-quality or knotty thread used, or thread that has become too dry by excessive storage. 3. Regulate thread tensions. Needle too thin or too thick. Insert new needle. Only guide the material lightly...
... it up as far as it snaps into place. 24 Note Needle and Thread Chart. When inserting the bobbin case, press against it until it will Needle bent. Wrong needle used . 2. Machine threaded improperly. Needle bent and strikes needle plate because work alone. Bobbin case improperly... feed the work is pushed or pulled. Trouble shooting Cause: 1. Needle too thin for thread used . Poor-quality or knotty thread used, or thread that has become too dry by excessive storage. 3. Regulate thread tensions. Needle too thin or too thick. Insert new needle. Only guide the material lightly...
Owner's Manual
Page 29
...hand, but pass it at all Lint has accumulated between tooth Remove needle plate and clean out lint. Check thread tensions. 8. If you have to leave master switch. Bobbin thread wound unevenly. The seam does not look neat. Kinks appear on top and bottom of feed dog. During ... 4. Machines feeds irregularly or not at Flick lever 20 to switch children are around. Feed dog dropped. Thread too thick, knotty or hard. rows of material. off the 25 Use first-class thread only. Seam is particularly even for a important short when while, be sure to the right the left....
...hand, but pass it at all Lint has accumulated between tooth Remove needle plate and clean out lint. Check thread tensions. 8. If you have to leave master switch. Bobbin thread wound unevenly. The seam does not look neat. Kinks appear on top and bottom of feed dog. During ... 4. Machines feeds irregularly or not at Flick lever 20 to switch children are around. Feed dog dropped. Thread too thick, knotty or hard. rows of material. off the 25 Use first-class thread only. Seam is particularly even for a important short when while, be sure to the right the left....
Owner's Manual
Page 30
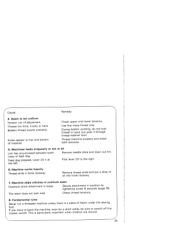
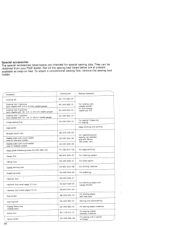
... needle gauge) Cording foot, 5 grooves (twin needle with 1.4-. 1.6- They can be obtained from your Pfaff dealer. Not all the sewing feet listed below are at present available as snap-on feet. Needle plate with 2 spools of thread ) To attach a conventional sewing foot. for fine cording needle size 70) For sewing fringes and...
... needle gauge) Cording foot, 5 grooves (twin needle with 1.4-. 1.6- They can be obtained from your Pfaff dealer. Not all the sewing feet listed below are at present available as snap-on feet. Needle plate with 2 spools of thread ) To attach a conventional sewing foot. for fine cording needle size 70) For sewing fringes and...
Owner's Manual
Page 31
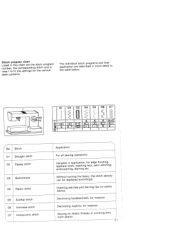
... table below. ': 01 I I I I I II CE) III 2 Iv 02 03 04 05 06 - .-.. > == == - :: - •' ' '.. -_.. A A A CD A - SLnliuntisimettsecbdhIetrinop, rttoIhhVgeisrthaccomehrarsercetshtptaaionrrengtdstihnfeogrssttihttiectchhvaparrinoodgursianm seam patterns. Inserting patches and darning rips on elastic threads or covering terry cloth seams 27 Without turning the fabric;
... table below. ': 01 I I I I I II CE) III 2 Iv 02 03 04 05 06 - .-.. > == == - :: - •' ' '.. -_.. A A A CD A - SLnliuntisimettsecbdhIetrinop, rttoIhhVgeisrthaccomehrarsercetshtptaaionrrengtdstihnfeogrssttihttiectchhvaparrinoodgursianm seam patterns. Inserting patches and darning rips on elastic threads or covering terry cloth seams 27 Without turning the fabric;
Owner's Manual
Page 33
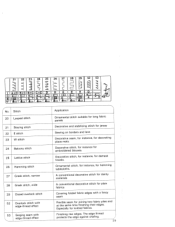
... stitch 26 Hemming stitch 27 Greek stitch, narrow 28 Greek stitch, wide 29 Closed overlock stitch 52 Overlock stitch with edge-thread effect 53 Serging seam with a fancy seam Flexible seam for embroidered blouses. Ornamental stitch, for instance, for decorating place mats...edges. A conventional decorative stitch for dainty materials A conventional decorative stitch for plain J fabrics Covering folded fabric edges with edge-thread effect Application Ornamental stitch suitable for long fabric panels Decorative and stabilizing stitch for jersey Sewing on borders and lace Decorative seam, ...
... stitch 26 Hemming stitch 27 Greek stitch, narrow 28 Greek stitch, wide 29 Closed overlock stitch 52 Overlock stitch with edge-thread effect 53 Serging seam with a fancy seam Flexible seam for embroidered blouses. Ornamental stitch, for instance, for decorating place mats...edges. A conventional decorative stitch for dainty materials A conventional decorative stitch for plain J fabrics Covering folded fabric edges with edge-thread effect Application Ornamental stitch suitable for long fabric panels Decorative and stabilizing stitch for jersey Sewing on borders and lace Decorative seam, ...


