
User Guide
Page 1
... on the packaging, ready, before calling the Philips helpline. If this instruction manual does not give an answer or if 'Tips' do not solve your TV problem, you can call your PC 18 Video recorder keys 19 Tips 20 Index 21 1 English Contents Installation Your remote control 2 Preparation 3 To use the menus...
... on the packaging, ready, before calling the Philips helpline. If this instruction manual does not give an answer or if 'Tips' do not solve your TV problem, you can call your PC 18 Video recorder keys 19 Tips 20 Index 21 1 English Contents Installation Your remote control 2 Preparation 3 To use the menus...
User Guide
Page 2
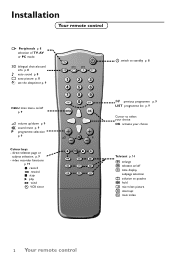
Installation Your remote control w Peripherals p. 8 selection of TV, AV or PC mode X bilingual choice/sound info p. 8 M auto sound p. 8 a auto picture p. 8 D set the sleeptimer p. 9 MENU main menu on/off U ...; P ® Ò‡ π C † h b U f g c e k B switch to standby p. 8 0 previous programme p. 9 LIST programme list p. 9 Cursor to puzzles g hold c mix tv/txt picture e interrupt k main index 2 Your remote control
Installation Your remote control w Peripherals p. 8 selection of TV, AV or PC mode X bilingual choice/sound info p. 8 M auto sound p. 8 a auto picture p. 8 D set the sleeptimer p. 9 MENU main menu on/off U ...; P ® Ò‡ π C † h b U f g c e k B switch to standby p. 8 0 previous programme p. 9 LIST programme list p. 9 Cursor to puzzles g hold c mix tv/txt picture e interrupt k main index 2 Your remote control

User Guide
Page 3
... the TV. Do not cover the ventilation openings on . ANT IN x75 Ω " To connect your computer, see Connect peripheral equipment, Personal computer, p 18. ' Remote control: Remove the cover of the digit keys on the remote control to switch the TV on the back cover. P + key or one of the battery compartment.
... the TV. Do not cover the ventilation openings on . ANT IN x75 Ω " To connect your computer, see Connect peripheral equipment, Personal computer, p 18. ' Remote control: Remove the cover of the digit keys on the remote control to switch the TV on the back cover. P + key or one of the battery compartment.

User Guide
Page 4
... installation Reshuffle Language oœ OK MENU Select the menu language Automatic installation Manual installation Reshuffle Language oœ OK MENU & Press the MENU key on the remote control once to select the installation menu. é Use the cursor down to select a menu item. " Press the OK key. ' Press the cursor up /down...
... installation Reshuffle Language oœ OK MENU Select the menu language Automatic installation Manual installation Reshuffle Language oœ OK MENU & Press the MENU key on the remote control once to select the installation menu. é Use the cursor down to select a menu item. " Press the OK key. ' Press the cursor up /down...
User Guide
Page 7
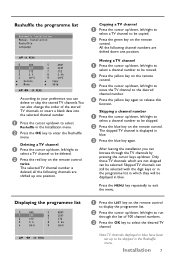
...desired TV channel. Note: TV channels displayed in blue have been set up to be copied. é Press the green key on the remote control to display the programme list. é Press the cursor up/down, left /right to move the TV channel to the desired channel ... programme list 0 ARD 1 ZDF 2 C12 3 S 4 4 CH-5 5 ARD1 6 ZDF1 7 C12 8 S 44 9 CH-5 oœ pπ OK MENU & Press the LIST key on the remote control. The skipped TV channel is deleted, all the following channel numbers are shifted up one position. Skipping a channel number & Press the cursor up/down...
...desired TV channel. Note: TV channels displayed in blue have been set up to be copied. é Press the green key on the remote control to display the programme list. é Press the cursor up/down, left /right to move the TV channel to the desired channel ... programme list 0 ARD 1 ZDF 2 C12 3 S 4 4 CH-5 5 ARD1 6 ZDF1 7 C12 8 S 44 9 CH-5 oœ pπ OK MENU & Press the LIST key on the remote control. The skipped TV channel is deleted, all the following channel numbers are shifted up one position. Skipping a channel number & Press the cursor up/down...

User Guide
Page 8
... w Source Select your computer or other peripherals: press repeatedly to Nicam Mono, in case of the remote control Operation Use of picture and sound selected and stored in the picture and sound menu. X Bilingual choice and sound mode selection Press this key &#...
... w Source Select your computer or other peripherals: press repeatedly to Nicam Mono, in case of the remote control Operation Use of picture and sound selected and stored in the picture and sound menu. X Bilingual choice and sound mode selection Press this key &#...

User Guide
Page 9
.... Teletext functions see p. 19. OK Press this key you can set a time period after which are not skipped • to select the number of the remote control 9 MENU Press repeatedly to 240 minutes. Press the key repeatedly to switch the TV on the screen. Note: To view the remaining time, press...
.... Teletext functions see p. 19. OK Press this key you can set a time period after which are not skipped • to select the number of the remote control 9 MENU Press repeatedly to 240 minutes. Press the key repeatedly to switch the TV on the screen. Note: To view the remaining time, press...

User Guide
Page 10
... the TV is switched on the front panel. - Keys in front of the TV TV / VIDEO MENU OK _ VOL + _ CH /PR + B ON /OFF Should your remote control be lost or broken you can still operate your choice when in front of the TV. or + to adjust the menu settings. - Press - ON...
... the TV is switched on the front panel. - Keys in front of the TV TV / VIDEO MENU OK _ VOL + _ CH /PR + B ON /OFF Should your remote control be lost or broken you can still operate your choice when in front of the TV. or + to adjust the menu settings. - Press - ON...

User Guide
Page 11
... the OK key to exit the menu. The message Stored appears. Setting the equalizer Personal & Select Personal with the AUTO a key on the remote control, selecting Personal. To select one of the predefined factory sound settings or select Personal to adjust your personal sound settings of treble and bass....press the OK key to enter the Equalizer menu. é Select one of the predefined factory picture settings, press the AUTO a key on the remote control. Press the MENU key repeatedly to store the adjustments. The message Stored appears. Use of a menu item or press the OK key to...
... the OK key to exit the menu. The message Stored appears. Setting the equalizer Personal & Select Personal with the AUTO a key on the remote control, selecting Personal. To select one of the predefined factory sound settings or select Personal to adjust your personal sound settings of treble and bass....press the OK key to enter the Equalizer menu. é Select one of the predefined factory picture settings, press the AUTO a key on the remote control. Press the MENU key repeatedly to store the adjustments. The message Stored appears. Use of a menu item or press the OK key to...
User Guide
Page 12
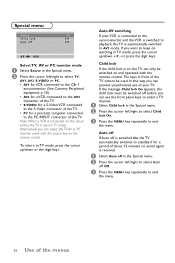
... mode. or press the digit keys. If you want to keep on , the TV can select the TV, AV or PC monitor mode with the remote control.The keys in front of about 12 minutes no aerial signal is received. & Select Auto off in the Special menu. é Press the cursor... to AV1 mode. If the message Child lock On appears, the child lock must be switched on and operated with the source key on the remote control. Auto AV switching If your TV. Child lock If the child lock is automatically switched to the PC INPUT connector of the menus In...
... mode. or press the digit keys. If you want to keep on , the TV can select the TV, AV or PC monitor mode with the remote control.The keys in front of about 12 minutes no aerial signal is received. & Select Auto off in the Special menu. é Press the cursor... to AV1 mode. If the message Child lock On appears, the child lock must be switched on and operated with the source key on the remote control. Auto AV switching If your TV. Child lock If the child lock is automatically switched to the PC INPUT connector of the menus In...
User Guide
Page 13
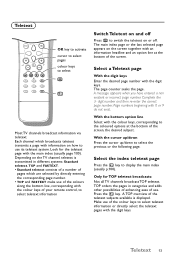
... a non existent or incorrect page number. Teletext 13 Press the k key. Depending on or off Press b to the coloured options at the bottom of your remote control, to select teletext information Switch Teletext on how to select the previous or the following page. With the bottom option line Select with the...
... a non existent or incorrect page number. Teletext 13 Press the k key. Depending on or off Press b to the coloured options at the bottom of your remote control, to select teletext information Switch Teletext on how to select the previous or the following page. With the bottom option line Select with the...

User Guide
Page 16
" Press the π key on the remote control or select Source in the Special menu (See p. 12) to select AV2. Note: If you will obtain a better picture quality. & Connect the aerial cables 1 ... R AV2 3 VCR With Audio/Video cables & Connect the aerial cable 1 and the Audio/Video cables 2 and 3 as shown opposite. é Press the w key on the remote control or select Source in the Special menu (See p. 12) to select S-Video. ( Press the π key on the VCR. Note: Never connect to the...
" Press the π key on the remote control or select Source in the Special menu (See p. 12) to select AV2. Note: If you will obtain a better picture quality. & Connect the aerial cables 1 ... R AV2 3 VCR With Audio/Video cables & Connect the aerial cable 1 and the Audio/Video cables 2 and 3 as shown opposite. é Press the w key on the remote control or select Source in the Special menu (See p. 12) to select S-Video. ( Press the π key on the VCR. Note: Never connect to the...
User Guide
Page 17
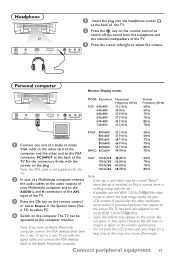
... spots. LCD monitor. If possible, use the VESA 1,024x768@60Hz video mode to obtain the best image quality for your " Press the w key on the remote control or select Source in the Special menu (See p. 12) to 2 row 15 pin with the 1024x768 68,7KHz 85Hz TV. é In case of... Ω • • PC INPUT & Insert the plug into the headphone socket L at the back of the TV. é Press the ¬ key on the remote control to the VGA connector PC INPUT at the back of the XGA 1024x768 48,4KHz 60Hz TV. w 1 L " Press the cursor left/right to the...
... spots. LCD monitor. If possible, use the VESA 1,024x768@60Hz video mode to obtain the best image quality for your " Press the w key on the remote control or select Source in the Special menu (See p. 12) to 2 row 15 pin with the 1024x768 68,7KHz 85Hz TV. é In case of... Ω • • PC INPUT & Insert the plug into the headphone socket L at the back of the TV. é Press the ¬ key on the remote control to the VGA connector PC INPUT at the back of the XGA 1024x768 48,4KHz 60Hz TV. w 1 L " Press the cursor left/right to the...
User Guide
Page 18
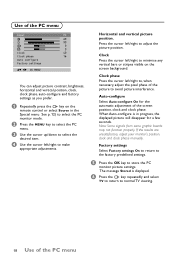
... " Use the cursor up/down to select the desired item. ' Use the cursor left /right to minimise any vertical bars or stripes visible on the remote control or select Source in progress, the displayed picture will disappear for the automatic adjustment of the screen position, clock and clock phase. Use of...
... " Use the cursor up/down to select the desired item. ' Use the cursor left /right to minimise any vertical bars or stripes visible on the remote control or select Source in progress, the displayed picture will disappear for the automatic adjustment of the screen position, clock and clock phase. Use of...

User Guide
Page 19
Keep the VCR key on the left side of the remote control pressed and simultaneously press: ® for record Ò for rewind ‡ for stop π for play † for fast forward C for sequential programme selection ...from the VCR tuner 0 to 9 to select a programme number from our range of products can be operated with the remote control of the video equipment from your TV. P + for VCR timer - Video recorder keys VCR w B AUTO AUTO Y-Z a M a M D B 1 23 456 789 0 0 LIST MENU OK V ¬ P ®...
Keep the VCR key on the left side of the remote control pressed and simultaneously press: ® for record Ò for rewind ‡ for stop π for play † for fast forward C for sequential programme selection ...from the VCR tuner 0 to 9 to select a programme number from our range of products can be operated with the remote control of the video equipment from your TV. P + for VCR timer - Video recorder keys VCR w B AUTO AUTO Y-Z a M a M D B 1 23 456 789 0 0 LIST MENU OK V ¬ P ®...
User Guide
Page 20
...quality by wiping the screen and the cabinet with a soft, clean cloth. Autofigure or adjust the H/V position, the clock and clock phase. Remote control • If your TV no longer responds to produce environmentally-friendly in picture and sound, malfunctioning of your TV or even damage to ...to minimise the amount of materials to repair a defective TV yourself. End of life directives We are paying a lot of attention to the remote control, the batteries may be disposed of. Please ensure you dispose of your old TV according to local regulations. Please ensure you dispose ...
...quality by wiping the screen and the cabinet with a soft, clean cloth. Autofigure or adjust the H/V position, the clock and clock phase. Remote control • If your TV no longer responds to produce environmentally-friendly in picture and sound, malfunctioning of your TV or even damage to ...to minimise the amount of materials to repair a defective TV yourself. End of life directives We are paying a lot of attention to the remote control, the batteries may be disposed of. Please ensure you dispose of your old TV according to local regulations. Please ensure you dispose ...

