Manual
Page 4
... included, along with notation icon descriptions and other important information. Notes, Cautions and Warnings Throughout this guide blocks of the monitor's features as well as the technical specifications for anyone who uses the Philips LCD Monitor TV. file:///D|/TV/english/180mt/about/about.htm (1 of how to your computer system. q Product Information gives an overview of...
... included, along with notation icon descriptions and other important information. Notes, Cautions and Warnings Throughout this guide blocks of the monitor's features as well as the technical specifications for anyone who uses the Philips LCD Monitor TV. file:///D|/TV/english/180mt/about/about.htm (1 of how to your computer system. q Product Information gives an overview of...
Manual
Page 18
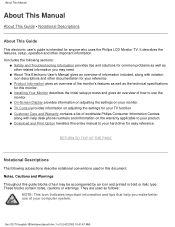
... PAGE file:///D|/TV/english/180mt/install/install.htm (6 of your LCD Monitor/TV 1 DC 12V 2 PC - Go into the Product Information. Step-by pressing the 'OK' button once. Note: You can also install the Flat Panel Adjust (FP Adjust) program, a program for 18"). This is shown on the link to guide you through the installtion...
... PAGE file:///D|/TV/english/180mt/install/install.htm (6 of your LCD Monitor/TV 1 DC 12V 2 PC - Go into the Product Information. Step-by pressing the 'OK' button once. Note: You can also install the Flat Panel Adjust (FP Adjust) program, a program for 18"). This is shown on the link to guide you through the installtion...
Manual
Page 47
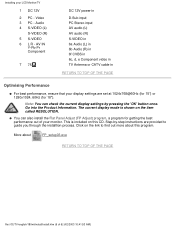
...Check that can be activated q Make sure the monitor cable is properly connected to your computer. (Also refer to the Quick Set-Up Guide). If the problem still persists after you are...and the back of 3) [4/2/2003 10:42:13 AM] file:///D|/TV/english/180mt/safety/saf_troub.htm (1 of the monitor. AUTO button not working properly Imaging Problems q The Auto Function is incorrect ...LED is flashing) Screen says Check these solutions, contact your computer. q Check to your nearest Philips dealer. q The Energy Saving feature may not work properly if you have tried these items ...
...Check that can be activated q Make sure the monitor cable is properly connected to your computer. (Also refer to the Quick Set-Up Guide). If the problem still persists after you are...and the back of 3) [4/2/2003 10:42:13 AM] file:///D|/TV/english/180mt/safety/saf_troub.htm (1 of the monitor. AUTO button not working properly Imaging Problems q The Auto Function is incorrect ...LED is flashing) Screen says Check these solutions, contact your computer. q Check to your nearest Philips dealer. q The Energy Saving feature may not work properly if you have tried these items ...

Manual
Page 53
...Lead, Cadmium and Mercury are heavy metals which are Bio-accumulative. EN61000-3-2:1995 (Limits for Flat panels) - IEC Guide 112:2000 ( Guide on ISO9000 level. Regulatory Information The TCO'95 requirement: neither CFCs nor HCFCs may be used during the manufacturing of... and Emission, TCO: Swedish Confederation of Professional Employees) for TCO versions RETURN TO TOP OF THE PAGE Energy Star Declaration PHILIPS file:///D|/TV/english/180mt/safety/regs/regulat.htm (4 of Sound and Television Receivers and associated) - ISO13406-2 (Ergonomic requirement for Harmonic Current Emission)...
...Lead, Cadmium and Mercury are heavy metals which are Bio-accumulative. EN61000-3-2:1995 (Limits for Flat panels) - IEC Guide 112:2000 ( Guide on ISO9000 level. Regulatory Information The TCO'95 requirement: neither CFCs nor HCFCs may be used during the manufacturing of... and Emission, TCO: Swedish Confederation of Professional Employees) for TCO versions RETURN TO TOP OF THE PAGE Energy Star Declaration PHILIPS file:///D|/TV/english/180mt/safety/regs/regulat.htm (4 of Sound and Television Receivers and associated) - ISO13406-2 (Ergonomic requirement for Harmonic Current Emission)...

Manual
Page 115
... time indicator area. 6. Press or to move to the AM or PM position. 9. RETURN TO TOP OF THE PAGE Selecting the Channel file:///D|/TV/english/180mt/osd/n_f.htm (3 of 17) [4/2/2003 10:42:56 AM] Press and the menu will be highlighted. 4. Press again to highlight FEATURES. 3. Press to move... or at the same time every day. 1. Press the MENU button on -screen menu. 2. Press again to shift the display left . The following steps will guide you in setting the TV to turn itself OFF once or at the same time every day. Using other menus (NTSC_2) Use the START TIME...
... time indicator area. 6. Press or to move to the AM or PM position. 9. RETURN TO TOP OF THE PAGE Selecting the Channel file:///D|/TV/english/180mt/osd/n_f.htm (3 of 17) [4/2/2003 10:42:56 AM] Press and the menu will be highlighted. 4. Press again to highlight FEATURES. 3. Press to move... or at the same time every day. 1. Press the MENU button on -screen menu. 2. Press again to shift the display left . The following steps will guide you in setting the TV to turn itself OFF once or at the same time every day. Using other menus (NTSC_2) Use the START TIME...