
Leaflet
Page 3
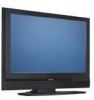
... 47PF9441D/37 Picture/Display • Color cabinet: Black • Aspect ratio: 16:9 • Brightness: 500 cd/m² • Dynamic screen contrast: 4000:1 • Response time (typical): 8 ms • Viewing angle: 176º (H) / 176º (V) • Diagonal screen size (inch): 47 inch • Display screen type: LCD Full HD W-UXGA Act. www.philips.com All...
... 47PF9441D/37 Picture/Display • Color cabinet: Black • Aspect ratio: 16:9 • Brightness: 500 cd/m² • Dynamic screen contrast: 4000:1 • Response time (typical): 8 ms • Viewing angle: 176º (H) / 176º (V) • Diagonal screen size (inch): 47 inch • Display screen type: LCD Full HD W-UXGA Act. www.philips.com All...

User manual
Page 3
... 38 Create your favorite list 39 Electronic Program guide 40 Multimedia Browser 41 To make video and audio connections . . . . . 44 Side panel overview 45 Rear panel overview 46 Connect: a VCR or DVD recorder 47 a recorder and other A/V devices . . . . . .48 a recorder and Cable box...background music 61 Annex 3 - Philips TV - Please, have the Model and Serial number which are being displayed at the back of your television set or on the packaging, ready, before calling the Philips helpline 1-888-PHILIPS (744-5477) Model: 63PF9631D/37; 47PF9441D/37 Serial No: Contents Safety ...
... 38 Create your favorite list 39 Electronic Program guide 40 Multimedia Browser 41 To make video and audio connections . . . . . 44 Side panel overview 45 Rear panel overview 46 Connect: a VCR or DVD recorder 47 a recorder and other A/V devices . . . . . .48 a recorder and Cable box...background music 61 Annex 3 - Philips TV - Please, have the Model and Serial number which are being displayed at the back of your television set or on the packaging, ready, before calling the Philips helpline 1-888-PHILIPS (744-5477) Model: 63PF9631D/37; 47PF9441D/37 Serial No: Contents Safety ...

User manual
Page 5
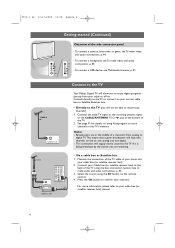
... connected to your accessory devices. See To make video and audio connections, p. 44. Supported video formats: 480i, 480p, 720p, 1080i. Note for installers/integrators : Do not connect RS232 without level shifter. Warning: disconnect all power sources before all connections are made. Before installing your TV or before hanging it on the wall, first...
... connected to your accessory devices. See To make video and audio connections, p. 44. Supported video formats: 480i, 480p, 720p, 1080i. Note for installers/integrators : Do not connect RS232 without level shifter. Warning: disconnect all power sources before all connections are made. Before installing your TV or before hanging it on the wall, first...
User manual
Page 6
To connect a USB device, see To make video and audio connections, p. 44. - Connect to the TV CABLE o ANTENNA 75 Your Philips Digital TV will allow you to make audio and video connections, p. 44. 3. Broadcasters are watching. Maintain the connection of the TV cable of a transition from your cable or off air. Connect your cable box (or satellite...
To connect a USB device, see To make video and audio connections, p. 44. - Connect to the TV CABLE o ANTENNA 75 Your Philips Digital TV will allow you to make audio and video connections, p. 44. 3. Broadcasters are watching. Maintain the connection of the TV cable of a transition from your cable or off air. Connect your cable box (or satellite...

User manual
Page 9
... buttons See Audio and Video equipment buttons, p. 56. See Multimedia browser functional buttons, p. 43... Pagina 7 Use of the remote control RC4405 (Continued) POWER PHILIPS DEVICE CONTROL FORMAT GUIDE FAV .... to display (when available) information about the selected TV channel and program or accessory device. CH Channel selection - PIP.... To select between the currently viewed channel and the previously viewed channel. 7 Numeric buttons To select a TV channel. INFO Display information: Press to adjust the volume. VOL MUTE CH SELECT - INPUT INFO PIP A/...
... buttons See Audio and Video equipment buttons, p. 56. See Multimedia browser functional buttons, p. 43... Pagina 7 Use of the remote control RC4405 (Continued) POWER PHILIPS DEVICE CONTROL FORMAT GUIDE FAV .... to display (when available) information about the selected TV channel and program or accessory device. CH Channel selection - PIP.... To select between the currently viewed channel and the previously viewed channel. 7 Numeric buttons To select a TV channel. INFO Display information: Press to adjust the volume. VOL MUTE CH SELECT - INPUT INFO PIP A/...

User manual
Page 37
...allows you to add region ratings lock options next to digital devices such as digital Cable boxes, digital TVs and digital VCRs. The Emergency alert message with analog video sources. - Press the cursor right and select one of the information disseminated by the cable operator....The standard SCTE18 defines an Emergency Alert signalling method for use by cable TV systems to signal emergencies to your preferences (continued) TV menu Installation Language...
...allows you to add region ratings lock options next to digital devices such as digital Cable boxes, digital TVs and digital VCRs. The Emergency alert message with analog video sources. - Press the cursor right and select one of the information disseminated by the cable operator....The standard SCTE18 defines an Emergency Alert signalling method for use by cable TV systems to signal emergencies to your preferences (continued) TV menu Installation Language...
User manual
Page 38
.... Digital Audio In If an accessory device has a digital audio output, you can output encoded Dolby Digital audio via Digital Audio In, the TV can connect this input. 4. If your accessory device is attached to this with a single cable to each particular input and output. 1. Press... you to identify which your amplifier or receiver has a matching connector for Digital Audio In, you have connected to the TV's DIGITAL AUDIO OUT. See To make Video and Audio connections, Digital Surround receiver, p. 55. 36 Select Connections. 2. Press the cursor right to enter the list...
.... Digital Audio In If an accessory device has a digital audio output, you can output encoded Dolby Digital audio via Digital Audio In, the TV can connect this input. 4. If your accessory device is attached to this with a single cable to each particular input and output. 1. Press... you to identify which your amplifier or receiver has a matching connector for Digital Audio In, you have connected to the TV's DIGITAL AUDIO OUT. See To make Video and Audio connections, Digital Surround receiver, p. 55. 36 Select Connections. 2. Press the cursor right to enter the list...
User manual
Page 43
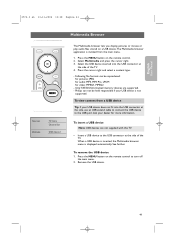
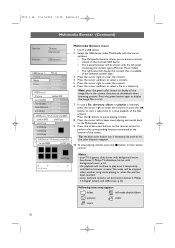
...Note: USB devices are supported. - Press the MENU button on the remote control to the USB port. Philips can be held responsible if your USB device is not supported. See further. Remove the USB device. ...Multimedia browser menu is invoked from a USB device Tip: if your dealer for video: MPEG1, MPEG2 - To remove the USB device 1. Select the USB device inserted into the USB connector...the cursor right and select a content type. - VOL MUTE CH SELECT INPUT Television Multimedia TV menu Channel list USB device 1 Multimedia Browser The Multimedia browser lets you display pictures or ...
...Note: USB devices are supported. - Press the MENU button on the remote control to the USB port. Philips can be held responsible if your USB device is not supported. See further. Remove the USB device. ...Multimedia browser menu is invoked from a USB device Tip: if your dealer for video: MPEG1, MPEG2 - To remove the USB device 1. Select the USB device inserted into the USB connector...the cursor right and select a content type. - VOL MUTE CH SELECT INPUT Television Multimedia TV menu Channel list USB device 1 Multimedia Browser The Multimedia browser lets you display pictures or ...
User manual
Page 44
... a content. 5. Press the π button to enter the content. 4. See Annex 2, Philips TV-slideshow format with background music. Following icons may appear: folder self made playlist/album pictures video music 42 In case a file, directory, album or playlist is available of the files present....2. Press the cursor right to pause playing content 8. Press the cursor right to browser screens.The audio will be found in Annex 4, Philips TV-Digital camera and USB issues, p. 65. Press the cursor up /down. > The Multimedia browser allows you to browse content stored on ...
... a content. 5. Press the π button to enter the content. 4. See Annex 2, Philips TV-slideshow format with background music. Following icons may appear: folder self made playlist/album pictures video music 42 In case a file, directory, album or playlist is available of the files present....2. Press the cursor right to pause playing content 8. Press the cursor right to browser screens.The audio will be found in Annex 4, Philips TV-Digital camera and USB issues, p. 65. Press the cursor up /down. > The Multimedia browser allows you to browse content stored on ...
User manual
Page 46
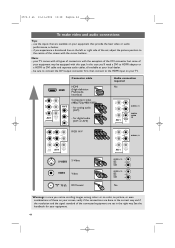
... L / R Pb /B R Y /G AV1 DIGITAL AUDIO IN DIGITAL AUDIO IN H Pr L /R AUDIO Pb V /B R VIDEO Y /G VGA (PC) via RGB-HV AV1 DIGITAL AUDIO IN RGB H/V Pr L /R AUDIO AUDIO L / R Pb /B R Y /G AV1 DIGITAL AUDIO IN S-VIDEO S-Video VIDEO Video 75 RF/Coaxial AUDIO L / R : L AV1 AV2 AUDIO SIDE R AUDIO L / R : L AV1 AV2 AUDIO SIDE ...if the resolution and the signal standard of the set in the right way. for your TV. 2572.3 en 13-11-2006 13:18 Pagina 44 To make video and audio connections Tips: - if you notice scrolling images, wrong colors or no color...
... L / R Pb /B R Y /G AV1 DIGITAL AUDIO IN DIGITAL AUDIO IN H Pr L /R AUDIO Pb V /B R VIDEO Y /G VGA (PC) via RGB-HV AV1 DIGITAL AUDIO IN RGB H/V Pr L /R AUDIO AUDIO L / R Pb /B R Y /G AV1 DIGITAL AUDIO IN S-VIDEO S-Video VIDEO Video 75 RF/Coaxial AUDIO L / R : L AV1 AV2 AUDIO SIDE R AUDIO L / R : L AV1 AV2 AUDIO SIDE ...if the resolution and the signal standard of the set in the right way. for your TV. 2572.3 en 13-11-2006 13:18 Pagina 44 To make video and audio connections Tips: - if you notice scrolling images, wrong colors or no color...

User manual
Page 47
Although the abbreviations may cause difficulties for example digital broadcastings coming from different manufacturers have the possibility of the TV. Refer to properly display. For stereo equipment also connect AUDIO R 3. USB See Multimedia browser, p. 41. 45 Digital devices from a...as specified by connecting the S-VHS cables with an S-VHS camcorder is obtained by the Electronic Industries Association standard EIA770.3. S-VHS quality with the S-VIDEO input 1 and AUDIO inputs 3. 2 3 1 Warning: do not connect cable 1 and 2 USB at the same time.This may differ ...
Although the abbreviations may cause difficulties for example digital broadcastings coming from different manufacturers have the possibility of the TV. Refer to properly display. For stereo equipment also connect AUDIO R 3. USB See Multimedia browser, p. 41. 45 Digital devices from a...as specified by connecting the S-VHS cables with an S-VHS camcorder is obtained by the Electronic Industries Association standard EIA770.3. S-VHS quality with the S-VIDEO input 1 and AUDIO inputs 3. 2 3 1 Warning: do not connect cable 1 and 2 USB at the same time.This may differ ...
User manual
Page 48
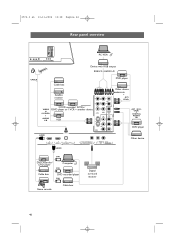
2572.3 en 13-11-2006 13:18 Pagina 46 Rear panel overview H Pr L V Pb R VIDEO AV1 S-VIDEO Y DIGITAL AUDIO IN AV3 VIDEO Pr S-VIDEO AV2 L Pb R Y SERVICE UART o HDMI 1 o HDMI 2 o ANTENNA 75 DISPLAY SYNCHRONIZED o DIGITAL AUDIO OUT o AUDIO o DISPLAY L OUT... DVD player Cable box Satellite receiver 2 DVD recorder/ 2VCRs / VIDEO 1DVD player or 1 VCR + another device or S-VIDEO + AUDIO L/R VCR Other device H Pr L /R AUDIO Pb V /B R AUDIO L/R + AV1: YPbPr VIDEO Y /G VGA (PC) via RGB-HV AV1 S-VIDEO VIDEO DIGITAL AUDIO IN AV3 Pr AV1 / AV3: YPbPr + DIGITAL...
2572.3 en 13-11-2006 13:18 Pagina 46 Rear panel overview H Pr L V Pb R VIDEO AV1 S-VIDEO Y DIGITAL AUDIO IN AV3 VIDEO Pr S-VIDEO AV2 L Pb R Y SERVICE UART o HDMI 1 o HDMI 2 o ANTENNA 75 DISPLAY SYNCHRONIZED o DIGITAL AUDIO OUT o AUDIO o DISPLAY L OUT... DVD player Cable box Satellite receiver 2 DVD recorder/ 2VCRs / VIDEO 1DVD player or 1 VCR + another device or S-VIDEO + AUDIO L/R VCR Other device H Pr L /R AUDIO Pb V /B R AUDIO L/R + AV1: YPbPr VIDEO Y /G VGA (PC) via RGB-HV AV1 S-VIDEO VIDEO DIGITAL AUDIO IN AV3 Pr AV1 / AV3: YPbPr + DIGITAL...

User manual
Page 49
...a minimum distance of your recorder has an S-VHS video jack: For improved picture quality, connect an S-video cable with the S-VIDEO input and connect the audio cables to . Connect the RF Antenna or Cable TV cable (eventually via all internal loudspeakers. 47 if your recorder. 2. in the Installation menu, ...Connections, p. 36 and link them to the AV connectors you also connect the Video, Audio Left and Right (only for sound reproduction...
...a minimum distance of your recorder has an S-VHS video jack: For improved picture quality, connect an S-video cable with the S-VIDEO input and connect the audio cables to . Connect the RF Antenna or Cable TV cable (eventually via all internal loudspeakers. 47 if your recorder. 2. in the Installation menu, ...Connections, p. 36 and link them to the AV connectors you also connect the Video, Audio Left and Right (only for sound reproduction...

User manual
Page 50
... often color-coded to the TV's input CABLE/ANTENNA 75 Ω x jack. 4. To obtain better quality, also connect the Video,Audio left loudspeaker reproduces sound. Select the equipment you have connected your other A/V devices CABLE 1 AV1 H Pr L V Pb R AV1 : L + R + VIDEO VIDEO S-VIDEO Y DIGITAL AUDIO IN AV3 R VIDEO VIDEO Pr 3 S-VIDEO L Pb R Y AV2 5 AV2 : L + R + VIDEO IN OUT IN 2 OUT 4 o ANTENNA...
... often color-coded to the TV's input CABLE/ANTENNA 75 Ω x jack. 4. To obtain better quality, also connect the Video,Audio left loudspeaker reproduces sound. Select the equipment you have connected your other A/V devices CABLE 1 AV1 H Pr L V Pb R AV1 : L + R + VIDEO VIDEO S-VIDEO Y DIGITAL AUDIO IN AV3 R VIDEO VIDEO Pr 3 S-VIDEO L Pb R Y AV2 5 AV2 : L + R + VIDEO IN OUT IN 2 OUT 4 o ANTENNA...
User manual
Page 51
...sound) recorder AV cables 4 to connectors. Connect the Video, Audio Left and Right (only for sound reproduction via all internal loudspeakers. 49 cables are often color-coded to the VIDEO, AUDIO L and R input AV2 jacks on the bottom of the cable TV signal splitter outputs 1 to the cable box's IN ...jack. 3. Use a mono to . Connect one of the TV. 4. Select the equipment you have connected in case of...
...sound) recorder AV cables 4 to connectors. Connect the Video, Audio Left and Right (only for sound reproduction via all internal loudspeakers. 49 cables are often color-coded to the VIDEO, AUDIO L and R input AV2 jacks on the bottom of the cable TV signal splitter outputs 1 to the cable box's IN ...jack. 3. Use a mono to . Connect one of the TV. 4. Select the equipment you have connected in case of...

User manual
Page 52
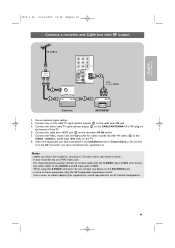
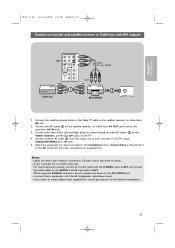
... via all internal loudspeakers. 50 Use a mono to connectors. if your equipment to the AV1 VIDEO jack; - Connect the Video, Audio left loudspeaker reproduces sound. Notes: - Connect red to red, white to the TV's CABLE/ANTENNA 75 Ω x jack. 3. Connect another RF cable 2 from the output ...:18 Pagina 50 Connect a satellite receiver or Cable box with the S-VIDEO input of AV1 and connect the audio cables to the VIDEO, L and R audio input jacks of AV1. 4. Connect the satellite antenna cable or the Cable TV cable 1 to the satellite receiver's or cable box's IN jack. ...
... via all internal loudspeakers. 50 Use a mono to connectors. if your equipment to the AV1 VIDEO jack; - Connect the Video, Audio left loudspeaker reproduces sound. Notes: - Connect red to red, white to the TV's CABLE/ANTENNA 75 Ω x jack. 3. Connect another RF cable 2 from the output ...:18 Pagina 50 Connect a satellite receiver or Cable box with the S-VIDEO input of AV1 and connect the audio cables to the VIDEO, L and R audio input jacks of AV1. 4. Connect the satellite antenna cable or the Cable TV cable 1 to the satellite receiver's or cable box's IN jack. ...
User manual
Page 53
...'s AV IN jacks. 3. Use a mono to stereo adapter (not supplied) for stereo sound) recorder AV cables 2 to the VIDEO, AUDIO L and R input AV1 jacks on the TV. 4. Connect another RF cable 3 from the output out of your equipment to. Select the equipment you have connected in case of...R input jacks of AV1. Connect the satellite antenna cable or the Cable TV cable to the AV1 VIDEO jack; - Connect the Video, Audio Left and Right (only for sound reproduction via all internal loudspeakers. 51 When using the S-VIDEO connector do not connect any device to the satellite receiver's or cable box...
...'s AV IN jacks. 3. Use a mono to stereo adapter (not supplied) for stereo sound) recorder AV cables 2 to the VIDEO, AUDIO L and R input AV1 jacks on the TV. 4. Connect another RF cable 3 from the output out of your equipment to. Select the equipment you have connected in case of...R input jacks of AV1. Connect the satellite antenna cable or the Cable TV cable to the AV1 VIDEO jack; - Connect the Video, Audio Left and Right (only for sound reproduction via all internal loudspeakers. 51 When using the S-VIDEO connector do not connect any device to the satellite receiver's or cable box...
User manual
Page 54
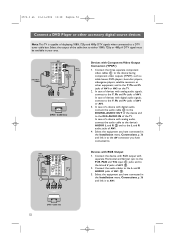
... box Devices with RGB Output 1. Connect the three separate component video cables 1 to the DIGITAL AUDIO OUT of AV1 or AV3 on the TV. 2. AV1 : H + V 2 AV1 : YPbPr (RGB) 1 H Pr L V Pb R VIDEO AV1 S-VIDEO Y DIGITAL AUDIO IN AV3 VIDEO Pr S-VIDEO AV2 L Pb R Y AV1 : L + R 3 Devices with Component Video Output Connectors (YPbPr) 1. In case of a device with digital audio...
... box Devices with RGB Output 1. Connect the three separate component video cables 1 to the DIGITAL AUDIO OUT of AV1 or AV3 on the TV. 2. AV1 : H + V 2 AV1 : YPbPr (RGB) 1 H Pr L V Pb R VIDEO AV1 S-VIDEO Y DIGITAL AUDIO IN AV3 VIDEO Pr S-VIDEO AV2 L Pb R Y AV1 : L + R 3 Devices with Component Video Output Connectors (YPbPr) 1. In case of a device with digital audio...
User manual
Page 55
... menu, Connections, p. 36 and and link it to the AV connector you have connected to where you are using the S-VIDEO connector do not connect any device to the AV1 or AV2 S-VIDEO input 1. Connect the audio cables to the device's AUDIO L and R jacks and to the L and R audio AV1 or AV2... jacks 2 on the TV accordingly to . Connect an S-Video cable to the AV VIDEO input that you connected the SVideo cable. 3. 2572.3 en 13-11-2006 13:18 Pagina 53 Connect a DVD Player or other...
... menu, Connections, p. 36 and and link it to the AV connector you have connected to where you are using the S-VIDEO connector do not connect any device to the AV1 or AV2 S-VIDEO input 1. Connect the audio cables to the device's AUDIO L and R jacks and to the L and R audio AV1 or AV2... jacks 2 on the TV accordingly to . Connect an S-Video cable to the AV VIDEO input that you connected the SVideo cable. 3. 2572.3 en 13-11-2006 13:18 Pagina 53 Connect a DVD Player or other...
User manual
Page 56
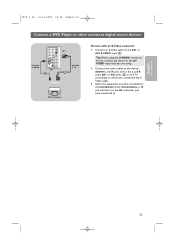
If necessary, you can adjust the picture position to HDMI 1 or 2. Connect your TV 1. 2. PC equipped with the cursor buttons. HDMI is the leading new standard for Digital video and audio interconnection.To the HDMI connector you can connect HDMI devices such as a Cable box or compatible DVD-R or DVD player with a DVI...
If necessary, you can adjust the picture position to HDMI 1 or 2. Connect your TV 1. 2. PC equipped with the cursor buttons. HDMI is the leading new standard for Digital video and audio interconnection.To the HDMI connector you can connect HDMI devices such as a Cable box or compatible DVD-R or DVD player with a DVI...


