User manual
Page 4
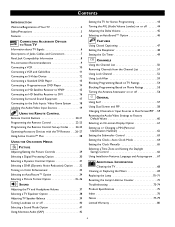
...Settings to Factory Default Values 60 Selecting an On-screen Display Option 61 Setting up or Changing a PIN (Personal Identification Number 62 Setting the Subwoofer Control 63 Setting the Clock-Auto Clock Mode 64 Setting the Clock Manually 65 Selecting a Time Zone and ... Savings Control 66 Using Installation Features: Language and Autoprogram . . .67 ADDITIONAL INFORMATION Cleaning the TV 68 Cleaning or Replacing the Filters 69 Replacing the Lamp 70-71 Resetting the Lamp's Lifetime Counter 72 Troubleshooting 73-74 Product Specifications 75 Index 76 Notes 77-79 Limited Warranty 80...
...Settings to Factory Default Values 60 Selecting an On-screen Display Option 61 Setting up or Changing a PIN (Personal Identification Number 62 Setting the Subwoofer Control 63 Setting the Clock-Auto Clock Mode 64 Setting the Clock Manually 65 Selecting a Time Zone and ... Savings Control 66 Using Installation Features: Language and Autoprogram . . .67 ADDITIONAL INFORMATION Cleaning the TV 68 Cleaning or Replacing the Filters 69 Replacing the Lamp 70-71 Resetting the Lamp's Lifetime Counter 72 Troubleshooting 73-74 Product Specifications 75 Index 76 Notes 77-79 Limited Warranty 80...
User manual
Page 17
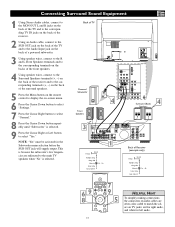
... receiver and to the corresponding terminals (+, -) on the back of Receiver (example only) Settings General Daylight saving Change PIN Subwoofer Lamp rating Lamp replaced Yes • No 69 8 INFO SELECT PIXEL PLUS TV CC SURF SURR HD SCREEN FORMAT 7 9 ® ® ® ® PIP 5 MUTE 17 HELPFUL HINT To simplify making connections, the...
... receiver and to the corresponding terminals (+, -) on the back of Receiver (example only) Settings General Daylight saving Change PIN Subwoofer Lamp rating Lamp replaced Yes • No 69 8 INFO SELECT PIXEL PLUS TV CC SURF SURR HD SCREEN FORMAT 7 9 ® ® ® ® PIP 5 MUTE 17 HELPFUL HINT To simplify making connections, the...
User manual
Page 47
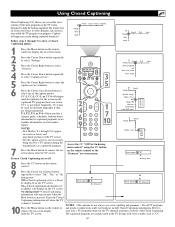
... of the TV screen. • Not all TV programs and product commercials made for the action on the captioned TV program shows on the remote to remove the onscreen menu from the TV screen. CC-1 is restored. 10 Press the Menu button on screen. Lamp Replacement Settings... General Caption service CC-1 CC-2 CC-3 CC-4 --- Using Closed Captioning Closed Captioning (CC) allows you to select "General." Press the Cursor Down button repeatedly to your area's TV program listings for captioned programs, news, weather ...
... of the TV screen. • Not all TV programs and product commercials made for the action on the captioned TV program shows on the remote to remove the onscreen menu from the TV screen. CC-1 is restored. 10 Press the Menu button on screen. Lamp Replacement Settings... General Caption service CC-1 CC-2 CC-3 CC-4 --- Using Closed Captioning Closed Captioning (CC) allows you to select "General." Press the Cursor Down button repeatedly to your area's TV program listings for captioned programs, news, weather ...

User manual
Page 60
... OK. AV+ SAP ACTIVE CONTROL CLOCK 60 TV Settings Demo Install Picture Sound Features Channels INFO SELECT PIXEL PLUS 5 TV SURF CC SURR HD SCREEN FORMAT ® ® ® ® PIP 2 MUTE 4 3 1 6 TV Settings Demo Install General Clock Source Settings General ...Clock Menu background Surf Dual screen format Freeze format Source Settings General Reset AV Settings OK Caption service OSD Change PIN Subwoofer Lamp Rating Lamp Replacement To erase settings and reset them to ...
... OK. AV+ SAP ACTIVE CONTROL CLOCK 60 TV Settings Demo Install Picture Sound Features Channels INFO SELECT PIXEL PLUS 5 TV SURF CC SURR HD SCREEN FORMAT ® ® ® ® PIP 2 MUTE 4 3 1 6 TV Settings Demo Install General Clock Source Settings General ...Clock Menu background Surf Dual screen format Freeze format Source Settings General Reset AV Settings OK Caption service OSD Change PIN Subwoofer Lamp Rating Lamp Replacement To erase settings and reset them to ...
User manual
Page 61
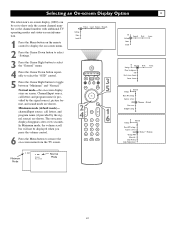
...AV settings Caption service OSD Time zone Daylight saving Minimum • Normal Settings General Reset AV Settings Caption service OSD Change PIN Subwoofer Lamp Rating Lamp Replacement Normal • Minimum Minimum Mode 10 WABC 10 WABC Automatic Mono selected Normal Mode 61 The on screen. Channel/Input source...In Minimum mode, the volume scroll bar will not be set to show only the current channel number or the channel number with additional TV operating modes and status-screen information. 1 Press the Menu button on the remote control to display the on-screen menu. 2 Press the...
...AV settings Caption service OSD Time zone Daylight saving Minimum • Normal Settings General Reset AV Settings Caption service OSD Change PIN Subwoofer Lamp Rating Lamp Replacement Normal • Minimum Minimum Mode 10 WABC 10 WABC Automatic Mono selected Normal Mode 61 The on screen. Channel/Input source...In Minimum mode, the volume scroll bar will not be set to show only the current channel number or the channel number with additional TV operating modes and status-screen information. 1 Press the Menu button on the remote control to display the on-screen menu. 2 Press the...

User manual
Page 62
...; If a PIN has previously been entered, the menu will show "Change PIN." • All number combinations from the TV screen. PIN Cancel - - - - Subwoofer Lamp rating Lamp replaced 62 Please enter your PIN, please press OK. PIN Cancel - - - - G Setting up a new PIN number or ...change your current PIN. PIN Cancel - - - - TV Settings Demo Install General Clock Source Settings General Clock Menu background Surf...
...; If a PIN has previously been entered, the menu will show "Change PIN." • All number combinations from the TV screen. PIN Cancel - - - - Subwoofer Lamp rating Lamp replaced 62 Please enter your PIN, please press OK. PIN Cancel - - - - G Setting up a new PIN number or ...change your current PIN. PIN Cancel - - - - TV Settings Demo Install General Clock Source Settings General Clock Menu background Surf...

User manual
Page 63
..." control. 5 Press the Cursor Right button to toggle the Subwoofer control to "Yes" or "No." TV Settings Demo Install Picture Sound Features Channels INFO SELECT PIXEL PLUS TV CC SURF SURR HD SCREEN FORMAT ® ® ® ® PIP 2 4 MUTE 3 ...5 1 6 AV+ SAP ACTIVE CONTROL CLOCK TV Settings Demo Install General Clock Source Settings General Clock Menu background Surf Dual screen format Freeze format Source Settings General Reset AV Settings Caption service OSD Change PIN Subwoofer Lamp Rating Lamp Replacement No • Yes Settings General Reset...
..." control. 5 Press the Cursor Right button to toggle the Subwoofer control to "Yes" or "No." TV Settings Demo Install Picture Sound Features Channels INFO SELECT PIXEL PLUS TV CC SURF SURR HD SCREEN FORMAT ® ® ® ® PIP 2 4 MUTE 3 ...5 1 6 AV+ SAP ACTIVE CONTROL CLOCK TV Settings Demo Install General Clock Source Settings General Clock Menu background Surf Dual screen format Freeze format Source Settings General Reset AV Settings Caption service OSD Change PIN Subwoofer Lamp Rating Lamp Replacement No • Yes Settings General Reset...
User manual
Page 70
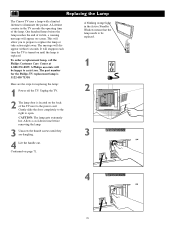
... appear on until they are the steps for the Philips TV replacement lamp is turned on screen. CAUTION: The lamp gets extremely hot. The message will be replaced. 1 Here are dangling. 3 4 Lift the handle out. A Philips associate will disappear within 6 seconds. To order a replacement lamp, call the Philips Customer Care Center at 1-800-531-0039. A blinking orange...
... appear on until they are the steps for the Philips TV replacement lamp is turned on screen. CAUTION: The lamp gets extremely hot. The message will be replaced. 1 Here are dangling. 3 4 Lift the handle out. A Philips associate will disappear within 6 seconds. To order a replacement lamp, call the Philips Customer Care Center at 1-800-531-0039. A blinking orange...
User manual
Page 71
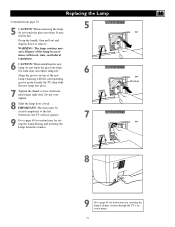
... instructions for setting the Lamp Rating and resetting the Lamp Lifetime Counter. Otherwise, the TV will not operate. 7 9 Go to remove. Replacing the Lamp Continued from skin can reduce lamp life. 6 Align the groove on top of the lamp in accordance with the corresponding groove pocket inside the TV, then slide the new lamp into place. 7 Tighten the...
... instructions for setting the Lamp Rating and resetting the Lamp Lifetime Counter. Otherwise, the TV will not operate. 7 9 Go to remove. Replacing the Lamp Continued from skin can reduce lamp life. 6 Align the groove on top of the lamp in accordance with the corresponding groove pocket inside the TV, then slide the new lamp into place. 7 Tighten the...

User manual
Page 72
Settings General A B C --- The recommended Philips replacement Lamp is rated for 6000 hours, an F rating The next step is to use the "Lamp replaced control" to tell the TV that you have changed the lamp. 10 Press the Menu button to remove the on -screen menu. 2 Press the Cursor ...to return to the "General" menu. 8 Press the Cursor Down button to select "Lamp replaced." 9 Press the OK button to confirm that you have installed a new lamp. TV Settings Demo Install Picture Sound Features Channels INFO 9 TV SURF SELECT PIXEL PLUS CC SURR HD SCREEN FORMAT 7 ® ® ® ...
Settings General A B C --- The recommended Philips replacement Lamp is rated for 6000 hours, an F rating The next step is to use the "Lamp replaced control" to tell the TV that you have changed the lamp. 10 Press the Menu button to remove the on -screen menu. 2 Press the Cursor ...to return to the "General" menu. 8 Press the Cursor Down button to select "Lamp replaced." 9 Press the OK button to confirm that you have installed a new lamp. TV Settings Demo Install Picture Sound Features Channels INFO 9 TV SURF SELECT PIXEL PLUS CC SURR HD SCREEN FORMAT 7 ® ® ® ...
User manual
Page 73
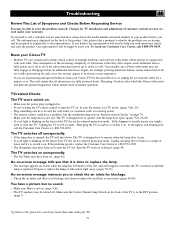
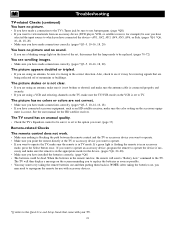
... entered protection mode. To reach our Customer Care Center, call . One consequence of the increasing complexity of televisions is in conjunction with your warranty. The TV is designed not to operate with the lamp door open. (pages *Q1, 68-69) • If a red light is blinking on the back of the... TV is that came with each time the TV is turned on until the lamp is blinking on . The TV switches off . If the problem persists, contact the Customer Care Center at 1-800-531-0039. Make sure the...
... entered protection mode. To reach our Customer Care Center, call . One consequence of the increasing complexity of televisions is in conjunction with your warranty. The TV is designed not to operate with the lamp door open. (pages *Q1, 68-69) • If a red light is blinking on the back of the... TV is that came with each time the TV is turned on until the lamp is blinking on . The TV switches off . If the problem persists, contact the Customer Care Center at 1-800-531-0039. Make sure the...
User manual
Page 74
... the device if necessary and make sure the remote is set to the Quick Use and Setup Guide that came with accessory devices. *Q refers to TV. The picture has no colors or colors are using an antenna, be sure it is in the appropriate mode for the device. (pages *Q6, 22.... (pages *Q3-5, 10-14, 16, 18) • If you may be receiving signals that the lamp needs to operate the TV, make sure the remote is facing in an accessory mode, press the Select button once. Troubleshooting TV-related Checks (continued) You have no picture. • If you have made a connection to the...
... the device if necessary and make sure the remote is set to the Quick Use and Setup Guide that came with accessory devices. *Q refers to TV. The picture has no colors or colors are using an antenna, be sure it is in the appropriate mode for the device. (pages *Q6, 22.... (pages *Q3-5, 10-14, 16, 18) • If you may be receiving signals that the lamp needs to operate the TV, make sure the remote is facing in an accessory mode, press the Select button once. Troubleshooting TV-related Checks (continued) You have no picture. • If you have made a connection to the...
User manual
Page 75
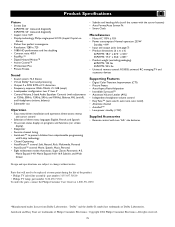
... Screen Fit • Smart Clock Miscellaneous • Mains: AC 110V ± 10% • Power consumption: Normal operation: 233W Standby: Product Specifications Picture • Screen Size 62PL9774: 62" measured diagonally 55PL9774: 55" measured diagonally • Aspect ratio: 16:9 • Display technology: Philips single-panel LCOS (Liquid Crystal on Silicon) • Flicker free;
... Screen Fit • Smart Clock Miscellaneous • Mains: AC 110V ± 10% • Power consumption: Normal operation: 233W Standby: Product Specifications Picture • Screen Size 62PL9774: 62" measured diagonally 55PL9774: 55" measured diagonally • Aspect ratio: 16:9 • Display technology: Philips single-panel LCOS (Liquid Crystal on Silicon) • Flicker free;
User manual
Page 76
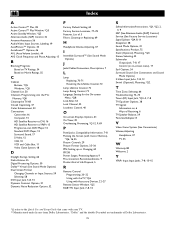
...See Sound Mode Options) J Jacks/Cables/Connectors, Descriptions, 7 L Lamp Replacing, 70-71 Resetting the Lifetime Counter, 72 Lamp Lifetime Counter, 72 Lamp Rating Control, 72 Language, Setting for the On-screen Menu, *Q8...Controls, 29 Picture Format Options, 35-36 PIN, Setting up or Changing, 62 PIP, 58 Power Surges, Protecting Against, 9 Pre-connection Recommendations, 9 Product End of Life Disposal, 5 ...R Remote Control Programming, 20-22 Using with the TV, *Q6 Using with Accessory Devices, 22-27 Remote Sensor Window, *Q5 RGB+HV Input Jack, ...
...See Sound Mode Options) J Jacks/Cables/Connectors, Descriptions, 7 L Lamp Replacing, 70-71 Resetting the Lifetime Counter, 72 Lamp Lifetime Counter, 72 Lamp Rating Control, 72 Language, Setting for the On-screen Menu, *Q8...Controls, 29 Picture Format Options, 35-36 PIN, Setting up or Changing, 62 PIP, 58 Power Surges, Protecting Against, 9 Pre-connection Recommendations, 9 Product End of Life Disposal, 5 ...R Remote Control Programming, 20-22 Using with the TV, *Q6 Using with Accessory Devices, 22-27 Remote Sensor Window, *Q5 RGB+HV Input Jack, ...
Quick start guide
Page 1
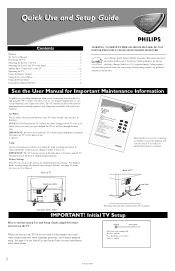
...® Partner, Philips Consumer Electronics has determined this Quick Use and Setup Guide completely before it will occur. See the User Manual for Important Maintenance Information In addition to providing information about safety, connecting accessory devices, and using the TV's features, the ...shut down if the door is opened during operation. IMPORTANT: Excessive heat inside the TV resulting from inadequate ventilation will need to be maintained and eventually replaced, and a lamp that you to enter some setup information about these menus. For optimal home viewing...
...® Partner, Philips Consumer Electronics has determined this Quick Use and Setup Guide completely before it will occur. See the User Manual for Important Maintenance Information In addition to providing information about safety, connecting accessory devices, and using the TV's features, the ...shut down if the door is opened during operation. IMPORTANT: Excessive heat inside the TV resulting from inadequate ventilation will need to be maintained and eventually replaced, and a lamp that you to enter some setup information about these menus. For optimal home viewing...

Quick start guide
Page 5
...commands from the remote control. No light is either in the window. NOTE: This connection will supply stereo sound to protect the lamp. Active Standby mode occurs when the TV is entered by a adhesive plastic film. The 30-second Active Standby period at power off . A green light shows in ... the CHANNEL K (up )/L (down ) button to the complexity and advanced design of the Cineos TV, a turn the TV off state. See page 8 for 30 seconds after the TV has been powered off is to protect the lamp. 2 Press the VOLUME + (up and down ) button to the TUNER jack on the back of...
...commands from the remote control. No light is either in the window. NOTE: This connection will supply stereo sound to protect the lamp. Active Standby mode occurs when the TV is entered by a adhesive plastic film. The 30-second Active Standby period at power off . A green light shows in ... the CHANNEL K (up )/L (down ) button to the complexity and advanced design of the Cineos TV, a turn the TV off state. See page 8 for 30 seconds after the TV has been powered off is to protect the lamp. 2 Press the VOLUME + (up and down ) button to the TUNER jack on the back of...


