User manual
Page 4
...62 Setting the Subwoofer Control 63 Setting the Clock-Auto Clock Mode 64 Setting the Clock Manually 65 Selecting a Time Zone and Setting the Daylight Savings Control 66 Using Installation Features: Language and Autoprogram . . .67 ADDITIONAL INFORMATION Cleaning the TV 68 Cleaning or Replacing the Filters 69 Replacing the Lamp... 70-71 Resetting the Lamp's Lifetime Counter 72 Troubleshooting 73-74 Product Specifications 75 Index 76 Notes...
...62 Setting the Subwoofer Control 63 Setting the Clock-Auto Clock Mode 64 Setting the Clock Manually 65 Selecting a Time Zone and Setting the Daylight Savings Control 66 Using Installation Features: Language and Autoprogram . . .67 ADDITIONAL INFORMATION Cleaning the TV 68 Cleaning or Replacing the Filters 69 Replacing the Lamp... 70-71 Resetting the Lamp's Lifetime Counter 72 Troubleshooting 73-74 Product Specifications 75 Index 76 Notes...
User manual
Page 17
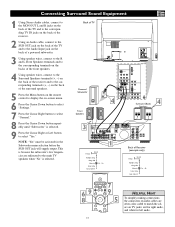
... the receiver and to the corresponding terminals (+, -) on the back of Receiver (example only) Settings General Daylight saving Change PIN Subwoofer Lamp rating Lamp replaced Yes • No 69 8 INFO SELECT PIXEL PLUS TV CC SURF SURR HD SCREEN FORMAT 7 9 ® ® ® ® PIP 5 MUTE 17 HELPFUL HINT To simplify making connections, the...
... the receiver and to the corresponding terminals (+, -) on the back of Receiver (example only) Settings General Daylight saving Change PIN Subwoofer Lamp rating Lamp replaced Yes • No 69 8 INFO SELECT PIXEL PLUS TV CC SURF SURR HD SCREEN FORMAT 7 9 ® ® ® ® PIP 5 MUTE 17 HELPFUL HINT To simplify making connections, the...
User manual
Page 47
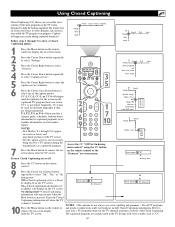
...Caption service OSD CC-1 Change PIN CC-2 CC-3 Subwoofer CC-4 Lamp Rating --- Refer to your area's TV program listings for the TV channels and times of the TV screen. • Not all TV programs and product commercials made for captioned programs, news, weather ...Menu button on the remote control to select one of television programs on the TV screen. Press the Cursor Right button to select "Caption service." Press the Cursor Down button repeatedly to select "General." Lamp Replacement Settings General Caption service CC-1 CC-2 CC-3 CC-4 --- Closed captions Off...
...Caption service OSD CC-1 Change PIN CC-2 CC-3 Subwoofer CC-4 Lamp Rating --- Refer to your area's TV program listings for the TV channels and times of the TV screen. • Not all TV programs and product commercials made for captioned programs, news, weather ...Menu button on the remote control to select one of television programs on the TV screen. Press the Cursor Right button to select "Caption service." Press the Cursor Down button repeatedly to select "General." Lamp Replacement Settings General Caption service CC-1 CC-2 CC-3 CC-4 --- Closed captions Off...

User manual
Page 60
...® PIP 2 MUTE 4 3 1 6 TV Settings Demo Install General Clock Source Settings General Clock Menu background Surf Dual screen format Freeze format Source Settings General Reset AV Settings OK Caption service OSD Change PIN Subwoofer Lamp Rating Lamp Replacement To erase settings and reset them to remove the... on-screen menu from the TV screen. G Resetting the Audio/Video Settings to Factory Default Values You can...
...® PIP 2 MUTE 4 3 1 6 TV Settings Demo Install General Clock Source Settings General Clock Menu background Surf Dual screen format Freeze format Source Settings General Reset AV Settings OK Caption service OSD Change PIN Subwoofer Lamp Rating Lamp Replacement To erase settings and reset them to remove the... on-screen menu from the TV screen. G Resetting the Audio/Video Settings to Factory Default Values You can...
User manual
Page 61
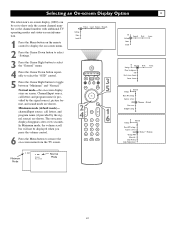
... button repeatedly to select the "OSD" control. 5 Press the Cursor Right button to remove the on-screen menu from the TV screen. channel/Input source, call letters and program name (if provided by the signal source) are shown. Selecting an On-...TV Settings Demo Install General Clock Source Settings General Clock Menu background Surf Dual screen format Freeze format Source Settings General Reset AV settings Caption service OSD Time zone Daylight saving Minimum • Normal Settings General Reset AV Settings Caption service OSD Change PIN Subwoofer Lamp Rating Lamp Replacement...
... button repeatedly to select the "OSD" control. 5 Press the Cursor Right button to remove the on-screen menu from the TV screen. channel/Input source, call letters and program name (if provided by the signal source) are shown. Selecting an On-...TV Settings Demo Install General Clock Source Settings General Clock Menu background Surf Dual screen format Freeze format Source Settings General Reset AV settings Caption service OSD Time zone Daylight saving Minimum • Normal Settings General Reset AV Settings Caption service OSD Change PIN Subwoofer Lamp Rating Lamp Replacement...

User manual
Page 62
... PIN 0-7-1-1. 7 Enter a new four-digit PIN. 8 Re-enter your current PIN using the Digit buttons to select either "Set PIN" or "Change PIN." Subwoofer Lamp rating Lamp replaced 62 TV Settings Demo Install General Clock Source Settings General Clock Menu background Surf Dual screen format Freeze format Source Settings General Reset AV Settings Caption service...
... PIN 0-7-1-1. 7 Enter a new four-digit PIN. 8 Re-enter your current PIN using the Digit buttons to select either "Set PIN" or "Change PIN." Subwoofer Lamp rating Lamp replaced 62 TV Settings Demo Install General Clock Source Settings General Clock Menu background Surf Dual screen format Freeze format Source Settings General Reset AV Settings Caption service...

User manual
Page 63
..." control. 5 Press the Cursor Right button to toggle the Subwoofer control to select the Subwoofer "Yes" option in the TV's onscreen menu. Select Yes if you will supply output. HELPFUL HINT "Yes" must be activated for the Subwoofer menu selection... 3 5 1 6 AV+ SAP ACTIVE CONTROL CLOCK TV Settings Demo Install General Clock Source Settings General Clock Menu background Surf Dual screen format Freeze format Source Settings General Reset AV Settings Caption service OSD Change PIN Subwoofer Lamp Rating Lamp Replacement No • Yes Settings General Reset AV Settings Caption...
..." control. 5 Press the Cursor Right button to toggle the Subwoofer control to select the Subwoofer "Yes" option in the TV's onscreen menu. Select Yes if you will supply output. HELPFUL HINT "Yes" must be activated for the Subwoofer menu selection... 3 5 1 6 AV+ SAP ACTIVE CONTROL CLOCK TV Settings Demo Install General Clock Source Settings General Clock Menu background Surf Dual screen format Freeze format Source Settings General Reset AV Settings Caption service OSD Change PIN Subwoofer Lamp Rating Lamp Replacement No • Yes Settings General Reset AV Settings Caption...
User manual
Page 70
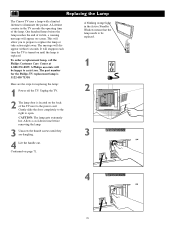
... illuminate the picture. Continued on until they are the steps for the Philips TV replacement lamp is turned on page 71. 4 70 Replacing the Lamp The Cineos TV uses a lamp with a limited lifetime to open. This will appear on the back of the lamp. Unplug the TV. 2 2 The lamp door is replaced. A Lifetime counter in the Active Standby Window means that the...
... illuminate the picture. Continued on until they are the steps for the Philips TV replacement lamp is turned on page 71. 4 70 Replacing the Lamp The Cineos TV uses a lamp with a limited lifetime to open. This will appear on the back of the lamp. Unplug the TV. 2 2 The lamp door is replaced. A Lifetime counter in the Active Standby Window means that the...
User manual
Page 71
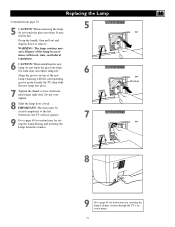
Replacing the Lamp Continued from skin can reduce lamp life. 6 Align the groove on top of the lamp in accordance with the corresponding groove pocket inside the TV, then slide the new lamp into place. 7 Tighten the thumb screws clockwise until finger tight only. It may still be closed . Dispose of the new lamp's housing with local, state...
Replacing the Lamp Continued from skin can reduce lamp life. 6 Align the groove on top of the lamp in accordance with the corresponding groove pocket inside the TV, then slide the new lamp into place. 7 Tighten the thumb screws clockwise until finger tight only. It may still be closed . Dispose of the new lamp's housing with local, state...

User manual
Page 72
... to remove the on screen to alert you have changed the lamp. 10 Press the Menu button to confirm that you have installed a new lamp. The recommended Philips replacement Lamp is provided with the lamp. Settings General A B C --- TV Settings Demo Install Picture Sound Features Channels INFO 9 TV SURF SELECT PIXEL PLUS CC SURR HD SCREEN FORMAT 7 ® ®...
... to remove the on screen to alert you have changed the lamp. 10 Press the Menu button to confirm that you have installed a new lamp. The recommended Philips replacement Lamp is provided with the lamp. Settings General A B C --- TV Settings Demo Install Picture Sound Features Channels INFO 9 TV SURF SELECT PIXEL PLUS CC SURR HD SCREEN FORMAT 7 ® ®...
User manual
Page 73
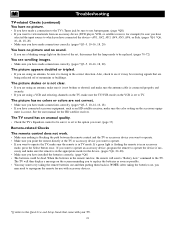
..., 24.) • Plug something else in normal operation. The TV is plugged in the INT position. (page 7) *Q refers to call . The TV is designed not to operate when the lamp door is ajar. • If a red light is not ajar. Prepare to replace the lamp or take a moment to identify the problem you are fully... and try to switch it on the front of the TV, the set may appear to be sure the wall outlet (or extension cord) is receiving power. • The remote control could have been set is that it is time to replace the lamp. • The message appears on . If you believe the...
..., 24.) • Plug something else in normal operation. The TV is plugged in the INT position. (page 7) *Q refers to call . The TV is designed not to operate when the lamp door is ajar. • If a red light is not ajar. Prepare to replace the lamp or take a moment to identify the problem you are fully... and try to switch it on the front of the TV, the set may appear to be sure the wall outlet (or extension cord) is receiving power. • The remote control could have been set is that it is time to replace the lamp. • The message appears on . If you believe the...
User manual
Page 74
... receiving signals that came with accessory devices. *Q refers to operate the TV, make sure the color setting on the accessory equip- Also, check to the TV. If a green light is flashing the remote is set , this means that the lamp needs to try taking the batteries out, you want to operate an... accessory device, program the remote to TV. When the batteries in the remote run low, the remote will then display a message on the screen reminding you to replace the batteries as soon as an...
... receiving signals that came with accessory devices. *Q refers to operate the TV, make sure the color setting on the accessory equip- Also, check to the TV. If a green light is flashing the remote is set , this means that the lamp needs to try taking the batteries out, you want to operate an... accessory device, program the remote to TV. When the batteries in the remote run low, the remote will then display a message on the screen reminding you to replace the batteries as soon as an...
User manual
Page 75
..., 500Hz, 1.5KHz, 5KHz, and 10KHz), Balance, AVL (on Silicon) • Flicker free; Product Specifications Picture • Screen Size 62PL9774: 62" measured diagonally 55PL9774: 55" measured diagonally • Aspect ratio: 16:9 • Display technology: Philips single-panel LCOS (Liquid Crystal on /off), and Headphone (volume, balance) • Subwoofer out Operation • Easy, menu-driven...
..., 500Hz, 1.5KHz, 5KHz, and 10KHz), Balance, AVL (on Silicon) • Flicker free; Product Specifications Picture • Screen Size 62PL9774: 62" measured diagonally 55PL9774: 55" measured diagonally • Aspect ratio: 16:9 • Display technology: Philips single-panel LCOS (Liquid Crystal on /off), and Headphone (volume, balance) • Subwoofer out Operation • Easy, menu-driven...
User manual
Page 76
... (See Sound Mode Options) J Jacks/Cables/Connectors, Descriptions, 7 L Lamp Replacing, 70-71 Resetting the Lifetime Counter, 72 Lamp Lifetime Counter, 72 Lamp Rating Control, 72 Language, Setting for the On-screen Menu, *Q8 ..., 29 Picture Format Options, 35-36 PIN, Setting up or Changing, 62 PIP, 58 Power Surges, Protecting Against, 9 Pre-connection Recommendations, 9 Product End of Life Disposal, 5 ...R Remote Control Programming, 20-22 Using with the TV, *Q6 Using with Accessory Devices, 22-27 Remote Sensor Window, *Q5 RGB+HV Input Jack, ...
... (See Sound Mode Options) J Jacks/Cables/Connectors, Descriptions, 7 L Lamp Replacing, 70-71 Resetting the Lifetime Counter, 72 Lamp Lifetime Counter, 72 Lamp Rating Control, 72 Language, Setting for the On-screen Menu, *Q8 ..., 29 Picture Format Options, 35-36 PIN, Setting up or Changing, 62 PIP, 58 Power Surges, Protecting Against, 9 Pre-connection Recommendations, 9 Product End of Life Disposal, 5 ...R Remote Control Programming, 20-22 Using with the TV, *Q6 Using with Accessory Devices, 22-27 Remote Sensor Window, *Q5 RGB+HV Input Jack, ...
Quick start guide
Page 1
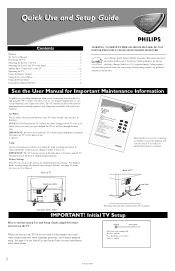
...As an Energy Star® Partner, Philips Consumer Electronics has determined this Quick Use and Setup Guide completely before it wears out. The TV contains air filters that must be maintained and eventually replaced, and a lamp that you to care for and maintain ... R L R L RGB+HV R L STANDARD/ HD INPUTS STANDARD/ HD INPUTS R L Pr Pb Y Pr Pb Y TUNER AV2 SUB OUT AV3 AV4 The lamp door must be replaced. Initial TV Setup Please read this product meets the Energy Star® guidelines for energy efficiency. registered mark. Air Filters The air filters (located at...
...As an Energy Star® Partner, Philips Consumer Electronics has determined this Quick Use and Setup Guide completely before it wears out. The TV contains air filters that must be maintained and eventually replaced, and a lamp that you to care for and maintain ... R L R L RGB+HV R L STANDARD/ HD INPUTS STANDARD/ HD INPUTS R L Pr Pb Y Pr Pb Y TUNER AV2 SUB OUT AV3 AV4 The lamp door must be replaced. Initial TV Setup Please read this product meets the Energy Star® guidelines for energy efficiency. registered mark. Air Filters The air filters (located at...


