

User manual
Page 2
...photos in thumbnail mode 14 Copy photos 16 Create and manage photo albums 18 Create a slideshow album 19 5 Use more of your Digital PhotoFrame 21 Select slideshow sequence 21 Select a transition effect 21 Select slideshow frequency 21 Display collage photos 21 Select background 22 Adjust Brightness 23 ... Set display Auto on/off 27 Set Demo 28 Set Auto Orientation 28 Set button sound 28 View status of the PhotoFrame 28 6 Product information 29 10FF3CDW/10FF3CME/10FF3CMI 29 8FF3CDW/8FF3CME 30 7 Guarantee and service 31 8 Frequently asked questions 32 EN 3
...photos in thumbnail mode 14 Copy photos 16 Create and manage photo albums 18 Create a slideshow album 19 5 Use more of your Digital PhotoFrame 21 Select slideshow sequence 21 Select a transition effect 21 Select slideshow frequency 21 Display collage photos 21 Select background 22 Adjust Brightness 23 ... Set display Auto on/off 27 Set Demo 28 Set Auto Orientation 28 Set button sound 28 View status of the PhotoFrame 28 6 Product information 29 10FF3CDW/10FF3CME/10FF3CMI 29 8FF3CDW/8FF3CME 30 7 Guarantee and service 31 8 Frequently asked questions 32 EN 3

User manual
Page 3
...;cial repair shops. Never use substances such as alcohol, chemicals or household cleaners to clean the PhotoFrame. • Never place the PhotoFrame near the PhotoFrame. • Never drop the PhotoFrame.When you drop the PhotoFrame, it . • Before you clean the screen, turn off and on ISO9000 level. Do...• 89/336/EEC (EMC Directive) • 93/68/EEC (Amendment of EMC and Low Voltage Directive) and is produced by Philips Service Centres and of the product. Repairs may void the user's authority to radio communications. Notice Any changes or modifications made to...
...;cial repair shops. Never use substances such as alcohol, chemicals or household cleaners to clean the PhotoFrame. • Never place the PhotoFrame near the PhotoFrame. • Never drop the PhotoFrame.When you drop the PhotoFrame, it . • Before you clean the screen, turn off and on ISO9000 level. Do...• 89/336/EEC (EMC Directive) • 93/68/EEC (Amendment of EMC and Low Voltage Directive) and is produced by Philips Service Centres and of the product. Repairs may void the user's authority to radio communications. Notice Any changes or modifications made to...

User manual
Page 6
... benefit from the support that Philips offers, register your purchase, and welcome to Philips! English 2 Your Digital PhotoFrame What's in the following three modes: • Slideshow • Browse • Calendar Mounting the PhotoFrame on your product at www.Philips.com/welcome. Introduction With Philips Digital PhotoFrame, you can display digital photos in ...the box Congratulations on the wall For wall mounting, please use a 7.0*25*3.0 mm screw. For best result, screw over seven turns. • Philips Digital PhotoFrame • Stand • AC-DC power adaptor EN 7
... benefit from the support that Philips offers, register your purchase, and welcome to Philips! English 2 Your Digital PhotoFrame What's in the following three modes: • Slideshow • Browse • Calendar Mounting the PhotoFrame on your product at www.Philips.com/welcome. Introduction With Philips Digital PhotoFrame, you can display digital photos in ...the box Congratulations on the wall For wall mounting, please use a 7.0*25*3.0 mm screw. For best result, screw over seven turns. • Philips Digital PhotoFrame • Stand • AC-DC power adaptor EN 7

User manual
Page 7
• CD-ROM (Digital User Manual, Philips PhotoFrame Manager and its User Manual) • USB cable to PC* PhotoFrame 8FF3CDW 8FF3CME 10FF3CDW 10FF3CME 10FF3CMI Quick start guide 1 Connect 2 Install 3 Enjoy Eng •• Quick Start Guide 8 EN
• CD-ROM (Digital User Manual, Philips PhotoFrame Manager and its User Manual) • USB cable to PC* PhotoFrame 8FF3CDW 8FF3CME 10FF3CDW 10FF3CME 10FF3CMI Quick start guide 1 Connect 2 Install 3 Enjoy Eng •• Quick Start Guide 8 EN
User manual
Page 8
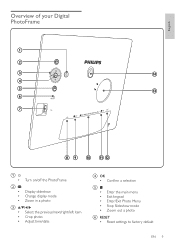
English Overview of your Digital PhotoFrame a b c n d e m f g h i j kl a • Turn on/off the PhotoFrame b • • • Display slideshow Change display mode Zoom in a photo c /// • Select the previous/next/right/left item • Crop photo • Adjust time/date d OK • Confirm a selection e Enter the main menu Exit keypad Enter/Exit Photo Menu Stop Slideshow mode Zoom out a photo f RESET • Reset settings to factory default EN 9
English Overview of your Digital PhotoFrame a b c n d e m f g h i j kl a • Turn on/off the PhotoFrame b • • • Display slideshow Change display mode Zoom in a photo c /// • Select the previous/next/right/left item • Crop photo • Adjust time/date d OK • Confirm a selection e Enter the main menu Exit keypad Enter/Exit Photo Menu Stop Slideshow mode Zoom out a photo f RESET • Reset settings to factory default EN 9

User manual
Page 10
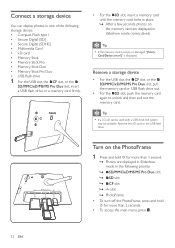
...supplied stand to the back of the PhotoFrame and to a power supply socket. a 2 Turn the stand clockwise 45 degrees to attach it to the DC socket of the PhotoFrame. 1 Insert the stand into the PhotoFrame. If you contact Philips, you position the PhotoFrame, ensure that the power plug and outlet... are easily accessible. 1 Connect the power cord to the PhotoFrame. Connect power Note • When you will be...
...supplied stand to the back of the PhotoFrame and to a power supply socket. a 2 Turn the stand clockwise 45 degrees to attach it to the DC socket of the PhotoFrame. 1 Insert the stand into the PhotoFrame. If you contact Philips, you position the PhotoFrame, ensure that the power plug and outlet... are easily accessible. 1 Connect the power cord to the PhotoFrame. Connect power Note • When you will be...
User manual
Page 11
... card firmly. • For the SD slot, insert a memory card until the memory card locks in place. » After a few seconds, photos on the PhotoFrame 1 Press and hold for more than 1 second. » Photos are displayed in the following priority: » SD/MMC/xD/MS/MS Pro Duo slot »...; SD slot RESET » CF slot » slot » PhotoFrame • To turn off the PhotoFrame, press and hold for more than 2 seconds. • To access the main menu, press . 12 EN Remove the xD card or the USB...
... card firmly. • For the SD slot, insert a memory card until the memory card locks in place. » After a few seconds, photos on the PhotoFrame 1 Press and hold for more than 1 second. » Photos are displayed in the following priority: » SD/MMC/xD/MS/MS Pro Duo slot »...; SD slot RESET » CF slot » slot » PhotoFrame • To turn off the PhotoFrame, press and hold for more than 2 seconds. • To access the main menu, press . 12 EN Remove the xD card or the USB...
User manual
Page 12
... up the on , you remove a storage device, always wait until all copy and save actions are complete. • Before you can only turn off the PhotoFrame after every power- Tip • You can select [Power on Setting]>[On] in the [Language Setting] menu. Tip • If you want to confi...
... up the on , you remove a storage device, always wait until all copy and save actions are complete. • Before you can only turn off the PhotoFrame after every power- Tip • You can select [Power on Setting]>[On] in the [Language Setting] menu. Tip • If you want to confi...
User manual
Page 13
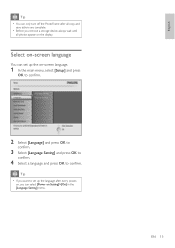
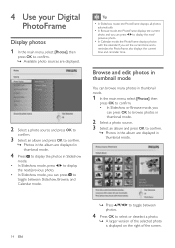
..., select [Photos], then press OK to confirm. • In Slideshow or Browse mode, you set the current time and a reminder, the PhotoFrame also displays the current time and reminder time. If you can press OK to browse photos in thumbnail mode. 2 Select a photo source. 3 Select an...photo. • In Slideshow mode, you can press / to display the next/ previous photo. • In Calendar mode, the PhotoFrame displays photos with the calendar. 4 Use your Digital PhotoFrame Display photos 1 In the main menu, select [Photos], then press OK to confirm. » Available photo sources are...
..., select [Photos], then press OK to confirm. • In Slideshow or Browse mode, you set the current time and a reminder, the PhotoFrame also displays the current time and reminder time. If you can press OK to browse photos in thumbnail mode. 2 Select a photo source. 3 Select an...photo. • In Slideshow mode, you can press / to display the next/ previous photo. • In Calendar mode, the PhotoFrame displays photos with the calendar. 4 Use your Digital PhotoFrame Display photos 1 In the main menu, select [Photos], then press OK to confirm. » Available photo sources are...
User manual
Page 15
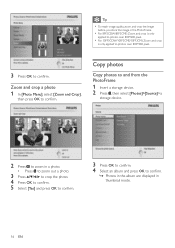
Copy photos Copy photos to and from the PhotoFrame 1 Insert a storage device. 2 Press , then select [Photos]>[Source]>a storage device. 2 Press to zoom in a photo. • Press to zoom out a photo. 3 Press / / / to crop the ... to confirm. 4 Select an album and press OK to confirm. » Photos in the album are displayed in the PhotoFrame. • For 8FF3CDW/8FF3CME: Zoom and crop is only applied to photos over 800*600 pixel. • For 10FF3CDW/10FF3CME/10FF3CMI: Zoom and crop is only applied to...
Copy photos Copy photos to and from the PhotoFrame 1 Insert a storage device. 2 Press , then select [Photos]>[Source]>a storage device. 2 Press to zoom in a photo. • Press to zoom out a photo. 3 Press / / / to crop the ... to confirm. 4 Select an album and press OK to confirm. » Photos in the album are displayed in the PhotoFrame. • For 8FF3CDW/8FF3CME: Zoom and crop is only applied to photos over 800*600 pixel. • For 10FF3CDW/10FF3CME/10FF3CMI: Zoom and crop is only applied to...
User manual
Page 16
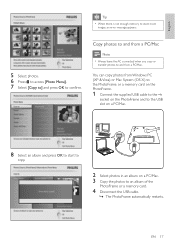
... copy or transfer photos to and from Windows PC (XP & Vista) or Mac System (OS X) to the PhotoFrame or a memory card on the PhotoFrame. 1 Connect the supplied USB cable to the socket on the PhotoFrame and to the USB slot on a PC/Mac. 3 Copy the photos to confirm. English Tip •... store more images, an error message appears. 5 Select photos. 6 Press to access [Photo Menu]. 7 Select [Copy to] and press OK to an album of the PhotoFrame or a memory card. 4 Disconnect the USB cable. » The...
... copy or transfer photos to and from Windows PC (XP & Vista) or Mac System (OS X) to the PhotoFrame or a memory card on the PhotoFrame. 1 Connect the supplied USB cable to the socket on the PhotoFrame and to the USB slot on a PC/Mac. 3 Copy the photos to confirm. English Tip •... store more images, an error message appears. 5 Select photos. 6 Press to access [Photo Menu]. 7 Select [Copy to] and press OK to an album of the PhotoFrame or a memory card. 4 Disconnect the USB cable. » The...
User manual
Page 17
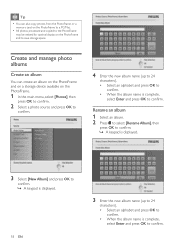
Tip • You can create an album on the PhotoFrame and on a storage device available on the PhotoFrame and to confirm. Create and manage photo albums Create an album You can also copy photos from the PhotoFrame or a memory card on the PhotoFrame to a PC/Mac. • All photos processed... and copied to the PhotoFrame may be resized for optimal display on the PhotoFrame. 1 In the main menu, select [Photos], then press OK to ...
Tip • You can create an album on the PhotoFrame and on a storage device available on the PhotoFrame and to confirm. Create and manage photo albums Create an album You can also copy photos from the PhotoFrame or a memory card on the PhotoFrame to a PC/Mac. • All photos processed... and copied to the PhotoFrame may be resized for optimal display on the PhotoFrame. 1 In the main menu, select [Photos], then press OK to ...

User manual
Page 20
English 5 Use more of your Digital PhotoFrame Select slideshow sequence You can display the slideshow in sequence or randomly. 1 In the main menu, select [Slideshow], then press OK to confirm. 2 ...
English 5 Use more of your Digital PhotoFrame Select slideshow sequence You can display the slideshow in sequence or randomly. 1 In the main menu, select [Slideshow], then press OK to confirm. 2 ...
User manual
Page 21
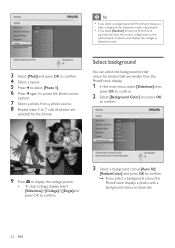
...Press again to access the photo source options. 7 Select a photo from a photo source. 8 Repeat steps 5 to 7 until all photos are smaller than the PhotoFrame display. 1 In the main menu, select [Slideshow], then press OK to confirm. 2 Select [Background Color] and press OK to confirm...3 Select a background colour/[Auto fit]/ [RadiantColor] and press OK to confirm. » If you select a background colour, the PhotoFrame displays a photo with a background colour or black bar. 22 EN Select background You can select the background border colour for photos that are selected...
...Press again to access the photo source options. 7 Select a photo from a photo source. 8 Repeat steps 5 to 7 until all photos are smaller than the PhotoFrame display. 1 In the main menu, select [Slideshow], then press OK to confirm. 2 Select [Background Color] and press OK to confirm...3 Select a background colour/[Auto fit]/ [RadiantColor] and press OK to confirm. » If you select a background colour, the PhotoFrame displays a photo with a background colour or black bar. 22 EN Select background You can select the background border colour for photos that are selected...

User manual
Page 22
English » If you select [RadiantColor], the PhotoFrame extends the colour on the edges of a photo that is smaller than the full screen to fill the screen without black bars or aspect ratio distortion. 3 Press / to fill the screen with picture distortion. EN 23 Adjust Brightness You can set the brightness of the PhotoFrame to achieve the best photo view. 1 In the main menu, select [Setup], then press OK to confirm. 2 Select [Brightness] and press OK to confirm. » If you select [Auto fit], the PhotoFrame extends a photo to adjust brightness.
English » If you select [RadiantColor], the PhotoFrame extends the colour on the edges of a photo that is smaller than the full screen to fill the screen without black bars or aspect ratio distortion. 3 Press / to fill the screen with picture distortion. EN 23 Adjust Brightness You can set the brightness of the PhotoFrame to achieve the best photo view. 1 In the main menu, select [Setup], then press OK to confirm. 2 Select [Brightness] and press OK to confirm. » If you select [Auto fit], the PhotoFrame extends a photo to adjust brightness.
User manual
Page 23
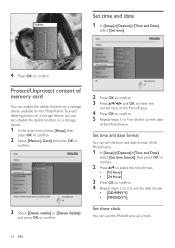
.... • [DD/MM/YY] • [MM/DD/YY] Set show clock You can also disable the delete function on a storage device, you can use the PhotoFrame as a clock. 24 EN Protect/Unprotect content of memory card You can enable the delete function on a storage device available on the... PhotoFrame.To avoid deleting photos on a storage device. 1 In the main menu, select [Setup], then press OK to confirm. 2 Select [Memory Card] and press ...
.... • [DD/MM/YY] • [MM/DD/YY] Set show clock You can also disable the delete function on a storage device, you can use the PhotoFrame as a clock. 24 EN Protect/Unprotect content of memory card You can enable the delete function on a storage device available on the... PhotoFrame.To avoid deleting photos on a storage device. 1 In the main menu, select [Setup], then press OK to confirm. 2 Select [Memory Card] and press ...
User manual
Page 24
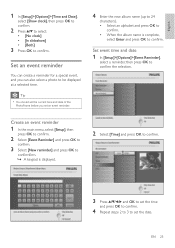
... [Setup]>[Options]>[Event Reminder], select a reminder, then press OK to confirm. Tip • You should set the current time and date of the PhotoFrame before you can create a reminder for a special event, and you set an event reminder. 4 Enter the new album name (up to 24 characters). • Select...
... [Setup]>[Options]>[Event Reminder], select a reminder, then press OK to confirm. Tip • You should set the current time and date of the PhotoFrame before you can create a reminder for a special event, and you set an event reminder. 4 Enter the new album name (up to 24 characters). • Select...

User manual
Page 26
...OK to confirm. • To enable the Smart Sleep function at the Event Reminder time, the PhotoFrame alerts the reminder and then returns to the Smart Power function 5 minutes later.The PhotoFrame does not return to confirm. Tip • Weekday: Monday 00:00 to Friday 23:59 •...function, select [Off]. EN 27 Set current] and press OK to confirm. » The PhotoFrame wakes up when the brightness of the PhotoFrame before you can configure the time for the PhotoFrame to set the current time and date of environment reaches the [On - Tip • You should set...
...OK to confirm. • To enable the Smart Sleep function at the Event Reminder time, the PhotoFrame alerts the reminder and then returns to the Smart Power function 5 minutes later.The PhotoFrame does not return to confirm. Tip • Weekday: Monday 00:00 to Friday 23:59 •...function, select [Off]. EN 27 Set current] and press OK to confirm. » The PhotoFrame wakes up when the brightness of the PhotoFrame before you can configure the time for the PhotoFrame to set the current time and date of environment reaches the [On - Tip • You should set...
User manual
Page 27
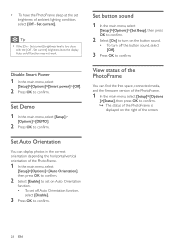
... [On] to turn off function may not work. Tip • If the [On - View status of the PhotoFrame You can display photos in the correct orientation depending the horizontal/vertical orientation of the PhotoFrame. 1 In the main menu, select [Setup]>[Options]>[Auto Orientation], then press OK to confirm. 2 Select... lighting condition, select [Off - Set Auto Orientation You can find the free space, connected media, and the firmware version of the PhotoFrame. 1 In the main menu, select [Setup]>[Options ]>[Status], then press OK to confirm. » The status of the...
... [On] to turn off function may not work. Tip • If the [On - View status of the PhotoFrame You can display photos in the correct orientation depending the horizontal/vertical orientation of the PhotoFrame. 1 In the main menu, select [Setup]>[Options]>[Auto Orientation], then press OK to confirm. 2 Select... lighting condition, select [Off - Set Auto Orientation You can find the free space, connected media, and the firmware version of the PhotoFrame. 1 In the main menu, select [Setup]>[Options ]>[Status], then press OK to confirm. » The status of the...

User manual
Page 28
... powered Accessaries • AC-DC Adaptor • USB cable to PC • Stand • Quick start guide • CD-ROM, including • User Manual • Philips PhotoFrame Manager (software and manual) Convenience • Card Reader: Built-in (3x) • Photo format supported: JPEG photo (Up to 10MB JPEG files, Up to...
... powered Accessaries • AC-DC Adaptor • USB cable to PC • Stand • Quick start guide • CD-ROM, including • User Manual • Philips PhotoFrame Manager (software and manual) Convenience • Card Reader: Built-in (3x) • Photo format supported: JPEG photo (Up to 10MB JPEG files, Up to...


