
Leaflet
Page 3
...12 12 NC: 8670 000 28438 UPC: 6 09585 12899 6 © 2009 Koninklijke Philips Electronics N.V. Trademarks are subject to change without notice. Hard disk/DVD recorder 160 GB Specifications DVDR3575H/37 Picture/Display • D/A converter: 10 bit, 54 MHz • A/D ... • Recording Media: DVD+R/+RW, DVD-R/-RW • Recording enhancements: Auto Chapter Marking, Chapter Marker Insertion, Divide, Erase, Manual Chapter Marking, One Touch Record (OTR), Safe Record, Selectable Index Pictures Video Playback • Playback Media: CD-R/CD-RW, DVD+R/+RW, DVD-R/-RW, DVD-Video, Video...
...12 12 NC: 8670 000 28438 UPC: 6 09585 12899 6 © 2009 Koninklijke Philips Electronics N.V. Trademarks are subject to change without notice. Hard disk/DVD recorder 160 GB Specifications DVDR3575H/37 Picture/Display • D/A converter: 10 bit, 54 MHz • A/D ... • Recording Media: DVD+R/+RW, DVD-R/-RW • Recording enhancements: Auto Chapter Marking, Chapter Marker Insertion, Divide, Erase, Manual Chapter Marking, One Touch Record (OTR), Safe Record, Selectable Index Pictures Video Playback • Playback Media: CD-R/CD-RW, DVD+R/+RW, DVD-R/-RW, DVD-Video, Video...
User manual
Page 4
...DVD and play back DVD/CD of picture problems with 525 (480) progressive scan output, it . • Do not stand the unit up vertically. Use of copy-protected material, including computer programs, files, broadcasts and sound recordings, may cause artifacts to radio communications. Declaration of Conformity Model Number: DVDR3575H/37 Trade Name: Philips Responsible Party: PHILIPS... conforme à la norme NMB- 003 du Canada. If this manual. Reverse engineering or disassembly is recommended that Philips offers, register your purchase, and welcome to the 'standard definition' ...
...DVD and play back DVD/CD of picture problems with 525 (480) progressive scan output, it . • Do not stand the unit up vertically. Use of copy-protected material, including computer programs, files, broadcasts and sound recordings, may cause artifacts to radio communications. Declaration of Conformity Model Number: DVDR3575H/37 Trade Name: Philips Responsible Party: PHILIPS... conforme à la norme NMB- 003 du Canada. If this manual. Reverse engineering or disassembly is recommended that Philips offers, register your purchase, and welcome to the 'standard definition' ...
User manual
Page 5
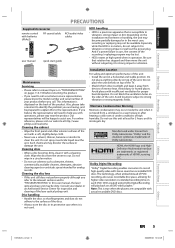
... until its protective case when it is not used. DVDs created using Dolby Digital Recording will be prepared to explain this user manual, the laser optical pickup unit may be dirty. Introduction Connections Basic Setup Recording PRECAUTIONS Supplied Accessories remote control with a soft, slightly damp... • Never use a solvent, thinner, benzene or alcohol to clean the unit. philips.com/welcome Cleaning the cabinet • Wipe the front panel and other exterior surfaces of the recording / replaying program may be lost. • HDD rotates at high speed when in operation...
... until its protective case when it is not used. DVDs created using Dolby Digital Recording will be prepared to explain this user manual, the laser optical pickup unit may be dirty. Introduction Connections Basic Setup Recording PRECAUTIONS Supplied Accessories remote control with a soft, slightly damp... • Never use a solvent, thinner, benzene or alcohol to clean the unit. philips.com/welcome Cleaning the cabinet • Wipe the front panel and other exterior surfaces of the recording / replaying program may be lost. • HDD rotates at high speed when in operation...

User manual
Page 6
... Disc 25 INITIAL SETTING 26 CHANNEL SETTING 27 Auto Channel Scan 27 Adding / Deleting Channels 28 SETTING THE CLOCK 30 Auto Clock Setting 30 Manual Clock Setting 31 Daylight Saving Time 31 TUNER SETTINGS 32 Switching Analog Mode / Digital Mode 32 Channel Selection 32 Selecting TV Audio 33 DTV... 49 DUBBING 50 Information on Dubbing 50 Settings for an External Device 51 Recording from an External Device 52 Information on DV Dubbing 53 DVC to HDD / DVD Dubbing 54 Selected Title Dubbing 56 One Title Dubbing (HDD to DVD only 58 PROTECTING A DISC 59 PLAYING THE DISCS ON OTHER...
... Disc 25 INITIAL SETTING 26 CHANNEL SETTING 27 Auto Channel Scan 27 Adding / Deleting Channels 28 SETTING THE CLOCK 30 Auto Clock Setting 30 Manual Clock Setting 31 Daylight Saving Time 31 TUNER SETTINGS 32 Switching Analog Mode / Digital Mode 32 Channel Selection 32 Selecting TV Audio 33 DTV... 49 DUBBING 50 Information on Dubbing 50 Settings for an External Device 51 Recording from an External Device 52 Information on DV Dubbing 53 DVC to HDD / DVD Dubbing 54 Selected Title Dubbing 56 One Title Dubbing (HDD to DVD only 58 PROTECTING A DISC 59 PLAYING THE DISCS ON OTHER...
User manual
Page 9
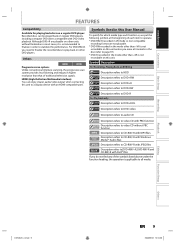
... to finalize the recorded discs to play back on this User Manual To specify for playing back discs on a regular DVD player: Recorded discs can enjoy clearer audio/video output when connecting this unit unless you do not find any of traditional television signals. Others HDD DVD Progressive scan system:...system provides less flickering and images in most cases, it is not recordable on this unit to page 97). * DVD-R recorded in this unit. HDMI (High-Definition Multimedia Interface): You can be played back on other DVD players. Symbols Used in the mode other than that of the ...
... to finalize the recorded discs to play back on this User Manual To specify for playing back discs on a regular DVD player: Recorded discs can enjoy clearer audio/video output when connecting this unit unless you do not find any of traditional television signals. Others HDD DVD Progressive scan system:...system provides less flickering and images in most cases, it is not recordable on this unit to page 97). * DVD-R recorded in this unit. HDMI (High-Definition Multimedia Interface): You can be played back on other DVD players. Symbols Used in the mode other than that of the ...
User manual
Page 20
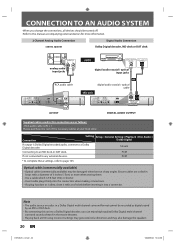
...you change the connections, all devices should be turned off. • Refer to the manual accompanying external devices for more information. 2 Channel Analog Audio Connection stereo system Digital Audio ...to page 105. Optical cable (commercially available) • Optical cable (commercially available) may be recorded as digital sound by an MD or DAT deck. • By connecting this connection are ...8226; The audio source on a disc in the movie theaters. • Playing back a DVD using incorrect settings may generate noise distortion and may also damage the speakers. 20 EN E2H40UD_v4....
...you change the connections, all devices should be turned off. • Refer to the manual accompanying external devices for more information. 2 Channel Analog Audio Connection stereo system Digital Audio ...to page 105. Optical cable (commercially available) • Optical cable (commercially available) may be recorded as digital sound by an MD or DAT deck. • By connecting this connection are ...8226; The audio source on a disc in the movie theaters. • Playing back a DVD using incorrect settings may generate noise distortion and may also damage the speakers. 20 EN E2H40UD_v4....

User manual
Page 21
...SETTING" on page 26. Initial Setup OSD Language English Français Español HDD & DVD RECORDER This is the correct viewing channel (external input channel) for the recorder. • For some TVs, there may be a button on the TV's remote control that ...may be labeled "SOURCE", "AV", or "SELECT". Refer to your TV's user manual for different brand's models of TVs. • Consult your TV manufacturer if none of "Initial Setup" menu. PHILIPS screen saver: Recording Playback Editing Function Setup Others 4 Proceed to step 2 in standby mode before proceeding....
...SETTING" on page 26. Initial Setup OSD Language English Français Español HDD & DVD RECORDER This is the correct viewing channel (external input channel) for the recorder. • For some TVs, there may be a button on the TV's remote control that ...may be labeled "SOURCE", "AV", or "SELECT". Refer to your TV's user manual for different brand's models of TVs. • Consult your TV manufacturer if none of "Initial Setup" menu. PHILIPS screen saver: Recording Playback Editing Function Setup Others 4 Proceed to step 2 in standby mode before proceeding....

User manual
Page 26
Initial Setup HDD & DVD RECORDER Channel Preset Make sure the antenna is available in your area, follow these steps when you turn on this unit for the clock setting will appear. 4 Proceed to step 5 in "Manual Clock Setting" on page 31. • If a PBS (public broadcasting station) is connected to select the type of...
Initial Setup HDD & DVD RECORDER Channel Preset Make sure the antenna is available in your area, follow these steps when you turn on this unit for the clock setting will appear. 4 Proceed to step 5 in "Manual Clock Setting" on page 31. • If a PBS (public broadcasting station) is connected to select the type of...

User manual
Page 28
...is only available for the analog TV channels. "Channel" menu will appear. 3 Use [K / L] to select "Channel", then press [OK]. HDD & DVD RECORDER 28 EN E2H40UD_v4.indd 28 2008/06/02 13:35:02 Make sure • You perform "Auto Channel Scan" before adding or deleting the channels. 1... lineup changes or if you no longer watch some channels. "General Setting" menu will appear. 4 Use [K / L] to select "Manual Channel Preset", then press [OK]. Auto Channel Preset Manual Channel Preset TV Audio Select • If you are adding or deleting analog TV/CATV channels, go to DIGITAL to continue...
...is only available for the analog TV channels. "Channel" menu will appear. 3 Use [K / L] to select "Channel", then press [OK]. HDD & DVD RECORDER 28 EN E2H40UD_v4.indd 28 2008/06/02 13:35:02 Make sure • You perform "Auto Channel Scan" before adding or deleting the channels. 1... lineup changes or if you no longer watch some channels. "General Setting" menu will appear. 4 Use [K / L] to select "Manual Channel Preset", then press [OK]. Auto Channel Preset Manual Channel Preset TV Audio Select • If you are adding or deleting analog TV/CATV channels, go to DIGITAL to continue...

User manual
Page 30
...1 Press [SETUP] and use [K / L] to select "General Setting", then press [OK]. This unit will search for several minutes to enter your area, follow "Manual Clock Setting" on them to turn off . If not, follow "Auto Clock Setting" below. CH 1 3 Press [SETUP] and turn off for the time only ... to select "Auto Clock Setting", then press [OK]. 4 Use [K / L] to set the clock. "Clock" menu will appear. 2 Use [K / L] to a PBS station. Set Channel No. HDD & DVD RECORDER Note • The clock may set the PBS channel manually by referring to select "Clock", then press [OK].
...1 Press [SETUP] and use [K / L] to select "General Setting", then press [OK]. This unit will search for several minutes to enter your area, follow "Manual Clock Setting" on them to turn off . If not, follow "Auto Clock Setting" below. CH 1 3 Press [SETUP] and turn off for the time only ... to select "Auto Clock Setting", then press [OK]. 4 Use [K / L] to set the clock. "Clock" menu will appear. 2 Use [K / L] to a PBS station. Set Channel No. HDD & DVD RECORDER Note • The clock may set the PBS channel manually by referring to select "Clock", then press [OK].

User manual
Page 43
...End CH New Program Recording Playback Editing Function Setup 1/1 HDD & DVD RECORDER Note • If you are also available. Date FEB/20 CH DTV125. 1 Start - - : - REC To HDD End - - : - Introduction Connections Basic Setup TIMER RECORDING You can program the unit to record up to 36 ...set the clock yet: Entry screen for the timer programming. 3 Use [K / L] to a disc, insert a recordable disc with the step 4 in "Manual Clock Setting" on the next page. Before recording, make sure • Set the clock before setting a timer programming. • Use [s / B] to move the...
...End CH New Program Recording Playback Editing Function Setup 1/1 HDD & DVD RECORDER Note • If you are also available. Date FEB/20 CH DTV125. 1 Start - - : - REC To HDD End - - : - Introduction Connections Basic Setup TIMER RECORDING You can program the unit to record up to 36 ...set the clock yet: Entry screen for the timer programming. 3 Use [K / L] to a disc, insert a recordable disc with the step 4 in "Manual Clock Setting" on the next page. Before recording, make sure • Set the clock before setting a timer programming. • Use [s / B] to move the...

User manual
Page 116
...to main audio (L), sub audio (R) or combination of a timer recording when the recording media is DVD. • Check if the "Disc Audio" is set the Dolby Digital Setting to "PCM" in "Playback" menu. (available only for DVD) (Refer to the manual of the picture is not supported by this unit. • ...Refer to page 72 to the disc's manual. • Even though the multi-angle feature is supported by the disc, that the selected subtitle language is not supported by the disc is abnormal. Even if it is in HDD/DVD. • When DVD recording finishes during HDD playback, the unit will ...
...to main audio (L), sub audio (R) or combination of a timer recording when the recording media is DVD. • Check if the "Disc Audio" is set the Dolby Digital Setting to "PCM" in "Playback" menu. (available only for DVD) (Refer to the manual of the picture is not supported by this unit. • ...Refer to page 72 to the disc's manual. • Even though the multi-angle feature is supported by the disc, that the selected subtitle language is not supported by the disc is abnormal. Even if it is in HDD/DVD. • When DVD recording finishes during HDD playback, the unit will ...
Quick start guide
Page 1
...DVD, proceed to page 62 in the User Manual). If you are editing the titles on DVD, press DVD first. ⁞ Press TITLE . Select "Yes", then press OK . B Deleting Selected Titles (HDD only) ⁞ Press HDD , then press TITLE . Select "Yes", then OK . DVD-RW recorded... the titles in DVD, press DVD first. ⁞ Insert a disc. Use K / L to stop the E Playing Back a USB Device with Digital Tuner DVDR3575H/37 Quick Start ...Select "Yes", then press OK . HDD & DVD PLAYER / RECORDER DVDR 3575H USB USB front of Philips Electronics North America Corp Marietta, GA 30006 0026...
...DVD, proceed to page 62 in the User Manual). If you are editing the titles on DVD, press DVD first. ⁞ Press TITLE . Select "Yes", then press OK . B Deleting Selected Titles (HDD only) ⁞ Press HDD , then press TITLE . Select "Yes", then OK . DVD-RW recorded... the titles in DVD, press DVD first. ⁞ Insert a disc. Use K / L to stop the E Playing Back a USB Device with Digital Tuner DVDR3575H/37 Quick Start ...Select "Yes", then press OK . HDD & DVD PLAYER / RECORDER DVDR 3575H USB USB front of Philips Electronics North America Corp Marietta, GA 30006 0026...

Quick start guide
Page 2
...to your couch while you are automatically scanned and memorized. Connection to the user manual for the clock setting will start getting channels available in analog TV and digital TV...Press SETUP in the dubbing list. Repeat steps 4 to 5 until you are recording to DVD): Insert a recordable DVD. once to resume live TV You can come back, press PAUSE LIVE TV again. Disconnect...3 RF coaxial cable from the TV antenna or cable TV to "ANTENNA IN" jack. Your Philips recorder is connected to the ANTENNA IN jack of your preference, then press OK when you leave the ...
...to your couch while you are automatically scanned and memorized. Connection to the user manual for the clock setting will start getting channels available in analog TV and digital TV...Press SETUP in the dubbing list. Repeat steps 4 to 5 until you are recording to DVD): Insert a recordable DVD. once to resume live TV You can come back, press PAUSE LIVE TV again. Disconnect...3 RF coaxial cable from the TV antenna or cable TV to "ANTENNA IN" jack. Your Philips recorder is connected to the ANTENNA IN jack of your preference, then press OK when you leave the ...


