Leaflet
Page 1
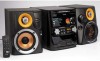
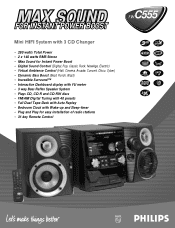
... with Auto Replay • Bedroom Clock with Wake-up and Sleep-timer • Plug and Play for easy installation of radio stations • 31-key Remote Control FWC555 VAC
... with Auto Replay • Bedroom Clock with Wake-up and Sleep-timer • Plug and Play for easy installation of radio stations • 31-key Remote Control FWC555 VAC
Leaflet
Page 2
... of frequency response for greater listening pleasure and bass reflex enclosures for comfort and convenience. Even CD-RW audio recordings on /off . FWC555 Sound Enhancement 2 x 140 Watts RMS Stereo 140 watts continuous RMS power output per channel, at 6 Ohms, from 120Hz-15kHz, with...Display An integrated Flourescent Tube Display (FTD) Volume Unit (VU) Meter shows volume level and musical amplitude during playback. 31-key Remote Control This infrared remote control operates volume +/-, all . Clock, Alarm & Sleep-Timer Set the alarm portion of listening pleasure like . Direct Play Button ...
... of frequency response for greater listening pleasure and bass reflex enclosures for comfort and convenience. Even CD-RW audio recordings on /off . FWC555 Sound Enhancement 2 x 140 Watts RMS Stereo 140 watts continuous RMS power output per channel, at 6 Ohms, from 120Hz-15kHz, with...Display An integrated Flourescent Tube Display (FTD) Volume Unit (VU) Meter shows volume level and musical amplitude during playback. 31-key Remote Control This infrared remote control operates volume +/-, all . Clock, Alarm & Sleep-Timer Set the alarm portion of listening pleasure like . Direct Play Button ...
User manual
Page 3
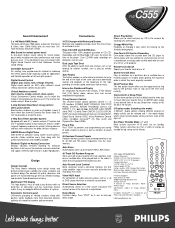
Table of Contents 3 General Information Table of Contents 3 Safety Instructions 4 Getting Started Introduction 5 Safety Information 6 System Controls Remote Control 7 Front Panel 8-9 Rear Panel 10 First Time Setup First Time Setup 11 Where Do You Start 11 Battery Installation 11 Antenna Connections 11 Speaker ...
Table of Contents 3 General Information Table of Contents 3 Safety Instructions 4 Getting Started Introduction 5 Safety Information 6 System Controls Remote Control 7 Front Panel 8-9 Rear Panel 10 First Time Setup First Time Setup 11 Where Do You Start 11 Battery Installation 11 Antenna Connections 11 Speaker ...

User manual
Page 5
...heads by a specialized company. G FM/AM Digital Tuning with 40 presets G Interactive Dashboard display with VU meter Package Contents G Remote Control G Batteries (two AA size) for about one . Maintenance and Cleaning G Do not expose the receiver, batteries, or discs ... move the CD player from the center to warm room conditions. Acknowledgement Energy Star As an ENERGY STAR Partner, Philips has determined that this system. ReWritable Recordable Environmental Information All unnecessary packaging has been omitted. Use a cotton swab slightly moistened...
...heads by a specialized company. G FM/AM Digital Tuning with 40 presets G Interactive Dashboard display with VU meter Package Contents G Remote Control G Batteries (two AA size) for about one . Maintenance and Cleaning G Do not expose the receiver, batteries, or discs ... move the CD player from the center to warm room conditions. Acknowledgement Energy Star As an ENERGY STAR Partner, Philips has determined that this system. ReWritable Recordable Environmental Information All unnecessary packaging has been omitted. Use a cotton swab slightly moistened...
User manual
Page 7
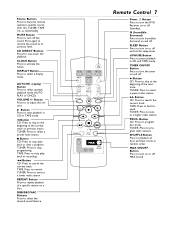
MUTE Button Press to turn off (Standby). TUNER: Press to tune to a higher radio station. Remote Control 7 Power y Button Press to turn the DVD Receiver on or off MAX Sound. TIMER ON/OFF Button Press to playback all discs and their ... CD playback. MAX ON/OFF Button Press to turn Incredible Surround on or off and set the sleep timer. 8 PAUSE Button Press to have the remote operate a specific source (CD 123, TUNER, TAPE 1/2, or AUX/CDR). Button Press to to adjust the volume. 3 Button Press to program radio stations. TUNER: Press...
MUTE Button Press to turn off (Standby). TUNER: Press to tune to a higher radio station. Remote Control 7 Power y Button Press to turn the DVD Receiver on or off MAX Sound. TIMER ON/OFF Button Press to playback all discs and their ... CD playback. MAX ON/OFF Button Press to turn Incredible Surround on or off and set the sleep timer. 8 PAUSE Button Press to have the remote operate a specific source (CD 123, TUNER, TAPE 1/2, or AUX/CDR). Button Press to to adjust the volume. 3 Button Press to program radio stations. TUNER: Press...
User manual
Page 11
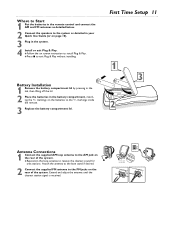
Where to Start 1 Put the batteries in the remote control and connect the AM and FM antennas as detailed below. 2 Connect the speakers to receive the clearest sound for area stations. Attach the antenna ... to exit Plug & Play without installing. First Time Setup 11 1 3 2 Antenna Connections 1 Connect the supplied AM loop antenna to install Plug & Play. markings inside the remote. 3 Replace the battery compartment lid.
Where to Start 1 Put the batteries in the remote control and connect the AM and FM antennas as detailed below. 2 Connect the speakers to receive the clearest sound for area stations. Attach the antenna ... to exit Plug & Play without installing. First Time Setup 11 1 3 2 Antenna Connections 1 Connect the supplied AM loop antenna to install Plug & Play. markings inside the remote. 3 Replace the battery compartment lid.

User manual
Page 14
... the system off ) if no buttons are off (standby). 3 Press ECO POWER or press and hold 7 in Demonstration Mode to turn the system on the remote control.) 2 Press STANDBY ON f to turn the system off . 14 Power Settings This mini hi-fi system has several power saving features including: Standby, Eco... has full brightness. G You can also press CD, TUNER, TAPE, or AUX (CD 123, TUNER, TAPE 1/2, or AUX/CDR on . G Press and hold f on the remote control to switch the system to Eco Power Standby mode.
... the system off ) if no buttons are off (standby). 3 Press ECO POWER or press and hold 7 in Demonstration Mode to turn the system on the remote control.) 2 Press STANDBY ON f to turn the system off . 14 Power Settings This mini hi-fi system has several power saving features including: Standby, Eco... has full brightness. G You can also press CD, TUNER, TAPE, or AUX (CD 123, TUNER, TAPE 1/2, or AUX/CDR on . G Press and hold f on the remote control to switch the system to Eco Power Standby mode.

User manual
Page 15
...sound select Classic YSTEM CD SYNCHRO RECORDING VOLUME 1 PROG CLOCK- The DSC button lights up. 2 Adjust the JOG CONTROL (or press DSC on the remote) to mute the sound while playback continues. JOG DSC DBB VAC Sound Options 15 2 1 MAX SOUND MAX sound provides the best mixture of the ...various sound features. 1 Press MAX SOUND (or MAX ON/OFF on the display. G The selected DSC will appear on the remote control) to your preference. 1 Press DSC. G When MAX sound is activated all other sound options will appear on the display. MUTE will switch off...
...sound select Classic YSTEM CD SYNCHRO RECORDING VOLUME 1 PROG CLOCK- The DSC button lights up. 2 Adjust the JOG CONTROL (or press DSC on the remote) to mute the sound while playback continues. JOG DSC DBB VAC Sound Options 15 2 1 MAX SOUND MAX sound provides the best mixture of the ...various sound features. 1 Press MAX SOUND (or MAX ON/OFF on the display. G The selected DSC will appear on the remote control) to your preference. 1 Press DSC. G When MAX sound is activated all other sound options will appear on the display. MUTE will switch off...

User manual
Page 16
...DBB 1), PUNCH (DBB 2, BLAST (DBB 3), or DBB OFF. The DSC button lights up . 2 Adjust the JOG CONTROL (or press DBB on the remote) to select the desired Virtual Ambience effect: HALL, CONCERT, CINEMA, DISCO ARCADE, or CYBER. G The selected VAC will be highlighted G When you select...1,2 INCREDIBLE SURROUND Incredible Surround magnifies the virtual distance between the front speakers for a wider stereo effect. 1 Press INCREDIBLE SURROUND (IS on the remote control) to turn Incredible Surround on or off , IS OFF appears on automatically. 1,2 DYNAMIC BASS BOOST (DBB) DBB allows you to adust ...
...DBB 1), PUNCH (DBB 2, BLAST (DBB 3), or DBB OFF. The DSC button lights up . 2 Adjust the JOG CONTROL (or press DBB on the remote) to select the desired Virtual Ambience effect: HALL, CONCERT, CINEMA, DISCO ARCADE, or CYBER. G The selected VAC will be highlighted G When you select...1,2 INCREDIBLE SURROUND Incredible Surround magnifies the virtual distance between the front speakers for a wider stereo effect. 1 Press INCREDIBLE SURROUND (IS on the remote control) to turn Incredible Surround on or off , IS OFF appears on automatically. 1,2 DYNAMIC BASS BOOST (DBB) DBB allows you to adust ...

User manual
Page 22
.... Press 38 to select the correct tape deck. Press 1 or ¡ to stop playback. Press 7 to search. The selected deck number will appear on the remote) to select the playback mode. on the display. DISC CHANGE DISC 1 THREE DISC DIRECT PLAY DISC 2 DISC 3 FW-996 MINI HIFI SYSTEM STANDBY-ON OPENCLOSE...
.... Press 38 to select the correct tape deck. Press 1 or ¡ to stop playback. Press 7 to search. The selected deck number will appear on the remote) to select the playback mode. on the display. DISC CHANGE DISC 1 THREE DISC DIRECT PLAY DISC 2 DISC 3 FW-996 MINI HIFI SYSTEM STANDBY-ON OPENCLOSE...

User manual
Page 24
SETTING THE CLOCK 1 Press CLOCK•TIMER on the system if it is on, press CLOCK on the remote control or CLOCK•TIMER on . or 24-hour mode. 24 Clock The clock is always displayed in Eco Power Standby mode. The time blinks ...
SETTING THE CLOCK 1 Press CLOCK•TIMER on the system if it is on, press CLOCK on the remote control or CLOCK•TIMER on . or 24-hour mode. 24 Clock The clock is always displayed in Eco Power Standby mode. The time blinks ...

User manual
Page 25
... radio station. "CANCEL" appears and TIMER disappears. Timer 25 When the Timer is active. SETTING THE TIMER 1 Press and hold CLOCK•TIMER on the remote control to the last selected level. TIMER remains on and begin at a preset time. G For TUNER, tune to select the desired source. To play a specific...
... radio station. "CANCEL" appears and TIMER disappears. Timer 25 When the Timer is active. SETTING THE TIMER 1 Press and hold CLOCK•TIMER on the remote control to the last selected level. TIMER remains on and begin at a preset time. G For TUNER, tune to select the desired source. To play a specific...
User manual
Page 27
...left and right outputs are having problems with your product, check this list of problems and possible solutions before pressing a button. • Move the remote closer to the system. • Check the batteries for correct polarity. • Replace the batteries. • Make sure the front of tape... over the missing tab space on the cassette. Remote Control does no work properly. • Select the correct source (CD, TUNER, TAPE, AUX) before requesting service. The Clock/Timer setting is ...
...left and right outputs are having problems with your product, check this list of problems and possible solutions before pressing a button. • Move the remote closer to the system. • Check the batteries for correct polarity. • Replace the batteries. • Make sure the front of tape... over the missing tab space on the cassette. Remote Control does no work properly. • Select the correct source (CD, TUNER, TAPE, AUX) before requesting service. The Clock/Timer setting is ...

User manual
Page 29
button 7 programming 18 programming radio presets 20 programming tracks 18 rear panel 10 remote control 7 repeat 19 repeat button 7 reverse 1 button 7 buttons 7 warranty 30 helpful hints (troubleshooting 27 incredible surround 16 interactive vu meter 8 introduction 5 is (incredible surround 7 limited ...
button 7 programming 18 programming radio presets 20 programming tracks 18 rear panel 10 remote control 7 repeat 19 repeat button 7 reverse 1 button 7 buttons 7 warranty 30 helpful hints (troubleshooting 27 incredible surround 16 interactive vu meter 8 introduction 5 is (incredible surround 7 limited ...
Quick start guide
Page 1
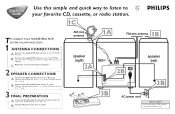
... A Connect the Right speaker wires to + and - Be sure to line up the polarity, + to the "R" jacks . B Plug the AC power cord into the remote control. Connect the colored wire to the "-" jack and the black wire to the "L" jacks . B Connect the Left speaker wires to the "+" jack. AM loop... ANTENNA jacks. Quick Use Guide Use this simple and quick way to listen to your favorite CD, cassette, or radio station. 1C TO CONNECT YOUR FWC555 MINI HI-FI SYSTEM FOLLOW THESE STEPS: 1 ANTENNA CONNECTIONS A Connect the supplied AM loop antenna to see the "Plug and Play" section on the...
... A Connect the Right speaker wires to + and - Be sure to line up the polarity, + to the "R" jacks . B Plug the AC power cord into the remote control. Connect the colored wire to the "-" jack and the black wire to the "L" jacks . B Connect the Left speaker wires to the "+" jack. AM loop... ANTENNA jacks. Quick Use Guide Use this simple and quick way to listen to your favorite CD, cassette, or radio station. 1C TO CONNECT YOUR FWC555 MINI HI-FI SYSTEM FOLLOW THESE STEPS: 1 ANTENNA CONNECTIONS A Connect the supplied AM loop antenna to see the "Plug and Play" section on the...


