User manual
Page 3
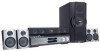
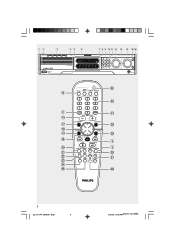
...PLAY• PAUSE STOP SEATING SOURCE SEARCH SURROUND PROG TUNING CLOCK•TIMER DVD VIDEO DIGITAL SURROUND SYSTEM VOLUME TREBLE BASS @ ! $ & * 0 ( DISC/ TV/AV MEDIA TUNER AUX/DI 1 2 3 4 5 6 7 8 9 SURR. 0 VOL SOUND SYSTEM MENU DISC MENU SEATING ZOOM PREV NEXT OK STOP PLAY.../PAUSE DISC SKIP REPEAT REPEAT PROGRAM A-B VOICE MUTE DIM SLEEP SUB TV VOL ‹ ¤ ⁄ º ª 9 8 • ≥ § 3 pg 001-044_MX39-37-Eng1 3 3 2/25/03, 10:32 AM 3139 115 21993
...PLAY• PAUSE STOP SEATING SOURCE SEARCH SURROUND PROG TUNING CLOCK•TIMER DVD VIDEO DIGITAL SURROUND SYSTEM VOLUME TREBLE BASS @ ! $ & * 0 ( DISC/ TV/AV MEDIA TUNER AUX/DI 1 2 3 4 5 6 7 8 9 SURR. 0 VOL SOUND SYSTEM MENU DISC MENU SEATING ZOOM PREV NEXT OK STOP PLAY.../PAUSE DISC SKIP REPEAT REPEAT PROGRAM A-B VOICE MUTE DIM SLEEP SUB TV VOL ‹ ¤ ⁄ º ª 9 8 • ≥ § 3 pg 001-044_MX39-37-Eng1 3 3 2/25/03, 10:32 AM 3139 115 21993

User manual
Page 8
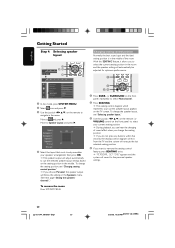
...accessories 10 Care and safety information 10 Connections Step 1: Placing the speakers and subwoofer .. 11 Step 2: Connecting speakers and subwoofer 11 Step 3: Connecting TV 12 Using Composite Video jack (CVBS 12 Using Component Video jack (Pr Pb Y) ...... 12 Using S-Video jack 13 Using an accessory RF modulator... and Play 34 Automatic presetting 35 Manual presetting 35 Selecting a preset radio station 35 Deleting a preset radio station 35 8 pg 001-044_MX39-37-Eng1 8 2/25/03, 10:35 AM 3139 115 21993 turning on /off 29 Setting the analog output 29 Setting the digital output 30...
...accessories 10 Care and safety information 10 Connections Step 1: Placing the speakers and subwoofer .. 11 Step 2: Connecting speakers and subwoofer 11 Step 3: Connecting TV 12 Using Composite Video jack (CVBS 12 Using Component Video jack (Pr Pb Y) ...... 12 Using S-Video jack 13 Using an accessory RF modulator... and Play 34 Automatic presetting 35 Manual presetting 35 Selecting a preset radio station 35 Deleting a preset radio station 35 8 pg 001-044_MX39-37-Eng1 8 2/25/03, 10:35 AM 3139 115 21993 turning on /off 29 Setting the analog output 29 Setting the digital output 30...

User manual
Page 10
...MENU DISC MENU SEATING ZOOM PREV NEXT OK STOP PLAY/PAUSE DISC SKIP REPEAT REPEAT PROGRAM A-B VOICE MUTE DIM SLEEP SUB TV VOL AC power cable Brackets and screws (4x) Care and safety information Avoid high temperatures, moisture, water and dust ... to avoid getting dust on a flat, hard, stable surface. 10 pg 001-044_MX39-37-Eng 10 23/2/03, 2:09 PM 3139 115 21993 Leave the player in an enclosed... space all around the player for adequate ventilation. 10 cm (4 inches) 10 cm (4 inches) PHILIPS DVD Home Cinema System 10 cm (4 inches) Care of disc - Write only on the printed ...
...MENU DISC MENU SEATING ZOOM PREV NEXT OK STOP PLAY/PAUSE DISC SKIP REPEAT REPEAT PROGRAM A-B VOICE MUTE DIM SLEEP SUB TV VOL AC power cable Brackets and screws (4x) Care and safety information Avoid high temperatures, moisture, water and dust ... to avoid getting dust on a flat, hard, stable surface. 10 pg 001-044_MX39-37-Eng 10 23/2/03, 2:09 PM 3139 115 21993 Leave the player in an enclosed... space all around the player for adequate ventilation. 10 cm (4 inches) 10 cm (4 inches) PHILIPS DVD Home Cinema System 10 cm (4 inches) Care of disc - Write only on the printed ...

User manual
Page 11
... connect speakers with an impedance lower than one speaker to the SPECIFICATIONS section of the speaker wire into the jacks. pg 001-044_MX39-37-Eng1 11 11 2/25/03, 10:28 AM 3139 115 21993 Fully insert the stripped portion of this manual. Do not connect more...Surround Left (SL) black blue Surround Right (SR) black gray Subwoofer (SUB) black purple Notes: - Improper connections may damage the system due to your TV. - speaker jacks. - Please refer to any one pair of +/- To avoid magnetic interference, do not position the front speakers too close to short-circuit...
... connect speakers with an impedance lower than one speaker to the SPECIFICATIONS section of the speaker wire into the jacks. pg 001-044_MX39-37-Eng1 11 11 2/25/03, 10:28 AM 3139 115 21993 Fully insert the stripped portion of this manual. Do not connect more...Surround Left (SL) black blue Surround Right (SR) black gray Subwoofer (SUB) black purple Notes: - Improper connections may damage the system due to your TV. - speaker jacks. - Please refer to any one pair of +/- To avoid magnetic interference, do not position the front speakers too close to short-circuit...

User manual
Page 12
... IN Y S-VIDEO P-SCAN ON OFF 2 3 IMPORTANT! - Connect the DVD system directly to 'OFF'. You only need to 'OFF'. 12 pg 001-044_MX39-37-Eng1 12 2/25/03, 10:28 AM 3139 115 21993 These options must indicate Progressive Scan or ProScan capability), set the P-SCAN switch to 'ON...connection provides higher picture quality. If both S-Video and Component (Pr Pb Y) Video connections are using a Progressive Scan TV (TV must be available on the TV. 3 Set the P-SCAN switch to the TV. Using Component Video jacks (Pr Pb Y) 1 Use the component video cables (red/blue/ green) to connect the...
... IN Y S-VIDEO P-SCAN ON OFF 2 3 IMPORTANT! - Connect the DVD system directly to 'OFF'. You only need to 'OFF'. 12 pg 001-044_MX39-37-Eng1 12 2/25/03, 10:28 AM 3139 115 21993 These options must indicate Progressive Scan or ProScan capability), set the P-SCAN switch to 'ON...connection provides higher picture quality. If both S-Video and Component (Pr Pb Y) Video connections are using a Progressive Scan TV (TV must be available on the TV. 3 Set the P-SCAN switch to the TV. Using Component Video jacks (Pr Pb Y) 1 Use the component video cables (red/blue/ green) to connect the...

User manual
Page 13
... the composite video cable (yellow) to connect the DVD system's CVBS jack to 'OFF'. pg 001-044_MX39-37-Eng1 13 13 2/25/03, 10:28 AM 3139 115 21993 See your electronics retailer or contact Philips for details on the RF modulator. 2 Use the RF coaxial cable (not supplied) to connect the.../Cr VIDEO IN Pb/Cb Y AUDIO OUT COMPONENT VIDEO IN S-VIDEO IN Pr/Cr VIDEO IN Pb/Cb Y 1 L AM R FM ANTENNA C AUDIO VIDEO DIGITAL AUX TV LINE OUT Pr SL OUT IN IN OUT CVBS SR L Pb SUB R DIGITAL IN Y S-VIDEO P-SCAN ON OFF 2 3 RF coaxial cable to 'S-Video', see page...
... the composite video cable (yellow) to connect the DVD system's CVBS jack to 'OFF'. pg 001-044_MX39-37-Eng1 13 13 2/25/03, 10:28 AM 3139 115 21993 See your electronics retailer or contact Philips for details on the RF modulator. 2 Use the RF coaxial cable (not supplied) to connect the.../Cr VIDEO IN Pb/Cb Y AUDIO OUT COMPONENT VIDEO IN S-VIDEO IN Pr/Cr VIDEO IN Pb/Cb Y 1 L AM R FM ANTENNA C AUDIO VIDEO DIGITAL AUX TV LINE OUT Pr SL OUT IN IN OUT CVBS SR L Pb SUB R DIGITAL IN Y S-VIDEO P-SCAN ON OFF 2 3 RF coaxial cable to 'S-Video', see page...

User manual
Page 14
... the claw into the slot AM antenna 1 FM antenna 2 SPEAKER SYSTEMS (4Ω) SUBWOOFER SURROUND CENTER FRONT L AM R FM ANTENNA C AUDIO VIDEO DIGITAL AUX TV LINE OUT Pr SL OUT IN IN OUT CVBS SR L Pb SUB R DIGITAL IN Y S-VIDEO 1 Connect the supplied AM loop antenna to the wall. ...PLAY• PAUSE STOP SEATING SOURCE SEARCH SURROUND PROG TUNING CLOCK•TIMER DVD VIDEO DIGITAL SURROUND SYSTEM VOLUME TREBLE BASS 14 pg 001-044_MX39-37-Eng1 14 2/25/03, 10:28 AM 3139 115 21993 PR SURR. Adjust the position of the antennas for optimal reception. - Press ...
... the claw into the slot AM antenna 1 FM antenna 2 SPEAKER SYSTEMS (4Ω) SUBWOOFER SURROUND CENTER FRONT L AM R FM ANTENNA C AUDIO VIDEO DIGITAL AUX TV LINE OUT Pr SL OUT IN IN OUT CVBS SR L Pb SUB R DIGITAL IN Y S-VIDEO 1 Connect the supplied AM loop antenna to the wall. ...PLAY• PAUSE STOP SEATING SOURCE SEARCH SURROUND PROG TUNING CLOCK•TIMER DVD VIDEO DIGITAL SURROUND SYSTEM VOLUME TREBLE BASS 14 pg 001-044_MX39-37-Eng1 14 2/25/03, 10:28 AM 3139 115 21993 PR SURR. Adjust the position of the antennas for optimal reception. - Press ...

User manual
Page 15
... while recording, you to make analog stereo (two channel, right and left) recordings. pg 001-044_MX39-37-Eng1 15 15 2/25/03, 10:28 AM 3139 115 21993 Listening to the playback 1 Connect the... in order to activate the input source. This will allow you must connect the DVD system to your TV using a VCR. 3 Connect the DVD system's CVBS jack to the VIDEO IN jack on the VCR.... SUB R DIGITAL IN Y S-VIDEO P-SCAN ON OFF 24 L AM R C AUDIO SL 2 DIGITAL AUX OUT IN TV IN SR L SUB R 1 DIGITAL IN DIGITAL IN DIGITAL OUT (for example) CD Recorder Viewing and listening to the...
... while recording, you to make analog stereo (two channel, right and left) recordings. pg 001-044_MX39-37-Eng1 15 15 2/25/03, 10:28 AM 3139 115 21993 Listening to the playback 1 Connect the... in order to activate the input source. This will allow you must connect the DVD system to your TV using a VCR. 3 Connect the DVD system's CVBS jack to the VIDEO IN jack on the VCR.... SUB R DIGITAL IN Y S-VIDEO P-SCAN ON OFF 24 L AM R C AUDIO SL 2 DIGITAL AUX OUT IN TV IN SR L SUB R 1 DIGITAL IN DIGITAL IN DIGITAL OUT (for example) CD Recorder Viewing and listening to the...

User manual
Page 16
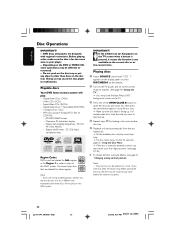
...see page 34) Ç STOP - Plugging in Multi-channel mode) - DISC: starts programming. (see page 38) ^n - Selects the relevant active mode :TV/AV, DISC, TUNER or AUX/DI. - TUNER: toggles between DISC 1~5. - Selects bass or treble sound. The speakers output will be cancelled. 16 pg ...001-044_MX39-37-Eng1 * = Press and hold the button for a few seconds. (see page 23, 25) - English Functional Overview (illustrations on the TV. Switches to select the desired enhancement level. (see pages 22-23) - TUNER: ...
...see page 34) Ç STOP - Plugging in Multi-channel mode) - DISC: starts programming. (see page 38) ^n - Selects the relevant active mode :TV/AV, DISC, TUNER or AUX/DI. - TUNER: toggles between DISC 1~5. - Selects bass or treble sound. The speakers output will be cancelled. 16 pg ...001-044_MX39-37-Eng1 * = Press and hold the button for a few seconds. (see page 23, 25) - English Functional Overview (illustrations on the TV. Switches to select the desired enhancement level. (see pages 22-23) - TUNER: ...

User manual
Page 17
... 39) ∞ SLEEP - Functional Overview º DISC MENU - For VCD version 2.0 only; Use 1 2 to standby mode. (see page 39) pg 001-044_MX39-37-Eng1 * = Press and hold the button for more than two seconds. 17 17 2/25/03, 10:28 AM 3139 115 21993 Sets the sleep timer... 35) ( OK - Switches to Eco Power standby mode. (see page 39) - *Switches to select a preset radio station. (see page 38) £ MUTE - Adjusts TV volume (Philips TV only.) (see page 38) ≤ DIM - During playback, returns to main menu. ⁄ SOUND - Mutes or restores the volume. (see page 39) • REPEAT...
... 39) ∞ SLEEP - Functional Overview º DISC MENU - For VCD version 2.0 only; Use 1 2 to standby mode. (see page 39) pg 001-044_MX39-37-Eng1 * = Press and hold the button for more than two seconds. 17 17 2/25/03, 10:28 AM 3139 115 21993 Sets the sleep timer... 35) ( OK - Switches to Eco Power standby mode. (see page 39) - *Switches to select a preset radio station. (see page 38) £ MUTE - Adjusts TV volume (Philips TV only.) (see page 38) ≤ DIM - During playback, returns to main menu. ⁄ SOUND - Mutes or restores the volume. (see page 39) • REPEAT...

User manual
Page 18
... the system 1 Aim the remote control directly at the remote sensor (iR) on the remote control (for example TV/AV, TUNER.) 3 Then select the desired function (for a few seconds. ON iR SENSOR DISC/ TV/AV MEDIA TUNER AUX/DI 1 2 3 4 5 6 7 8 9 SURR. 0 VOL SOUND SYSTEM MENU DISC MENU SEATING ZOOM PREV STOP NEXT OK... substances, so they are exhausted or if the remote is disconnected from the power supply, it will exit clock setting mode. 18 pg 001-044_MX39-37-Eng1 18 2/25/03, 10:28 AM 3139 115 21993 Notes: -
... the system 1 Aim the remote control directly at the remote sensor (iR) on the remote control (for example TV/AV, TUNER.) 3 Then select the desired function (for a few seconds. ON iR SENSOR DISC/ TV/AV MEDIA TUNER AUX/DI 1 2 3 4 5 6 7 8 9 SURR. 0 VOL SOUND SYSTEM MENU DISC MENU SEATING ZOOM PREV STOP NEXT OK... substances, so they are exhausted or if the remote is disconnected from the power supply, it will exit clock setting mode. 18 pg 001-044_MX39-37-Eng1 18 2/25/03, 10:28 AM 3139 115 21993 Notes: -

User manual
Page 19
.... It will change the video signal of the DVD, the TV and the DVD system should see the blue Philips DVD background screen on your TV, then press the Channel down button repeatedly until you see the Video In channel. ➜ Or, the TV remote control may be in disc tray 1. ➜ Wait until... TV system 1 In disc mode, stop playback. 2 Press and hold DISC/MEDIA on the remote until "DISC X" appears on the display panel (or press DISC/MEDIA on the remote.) 2 Turn on the remote to the correct video-in the menu. It will be called FRONT, A/V IN, or VIDEO. pg 001-044_MX39-37...
.... It will change the video signal of the DVD, the TV and the DVD system should see the blue Philips DVD background screen on your TV, then press the Channel down button repeatedly until you see the Video In channel. ➜ Or, the TV remote control may be in disc tray 1. ➜ Wait until... TV system 1 In disc mode, stop playback. 2 Press and hold DISC/MEDIA on the remote until "DISC X" appears on the display panel (or press DISC/MEDIA on the remote.) 2 Turn on the remote to the correct video-in the menu. It will be called FRONT, A/V IN, or VIDEO. pg 001-044_MX39-37...
User manual
Page 20
... settings. Move to 'Speaker Layout' and press 2. Move to and press 2. To remove the menu Press SYSTEM MENU. 20 pg 001-044_MX39-37-Eng1 20 2/25/03, 10:29 AM 3139 115 21993 To change the seating position. ➜ If you do not press any buttons within..."Selecting speaker layout." 3 Use the joystick (1 2 3 4) on the remote (or VOLUME control on the remote to suit the selected speaker layout settings based on the TV screen. Speaker Layout Square PCM Output 96 kHz Speaker Layout Settings 1 In disc mode, press SYSTEM MENU. 2 Select icon and press 4. 3 Use the joystick (1 2...
... settings. Move to 'Speaker Layout' and press 2. Move to and press 2. To remove the menu Press SYSTEM MENU. 20 pg 001-044_MX39-37-Eng1 20 2/25/03, 10:29 AM 3139 115 21993 To change the seating position. ➜ If you do not press any buttons within..."Selecting speaker layout." 3 Use the joystick (1 2 3 4) on the remote (or VOLUME control on the remote to suit the selected speaker layout settings based on the TV screen. Speaker Layout Square PCM Output 96 kHz Speaker Layout Settings 1 In disc mode, press SYSTEM MENU. 2 Select icon and press 4. 3 Use the joystick (1 2...
User manual
Page 22
...•CLOSE 0 button to open the second tray before the second tray opens. 22 pg 001-044_MX39-37-Eng1 22 2/25/03, 9:57 AM 3139 115 21993 Video CDs (VCDs) - Super Video CDs ...control until "DISC X" appears on the display panel (or press DISC/MEDIA on the remote.) 2 Turn on the TV power and set to open the disc tray and load a disc, then press the same button again to malfunction....format. - You cannot play once, then stop. ➜ If a disc menu shows on the TV, see the blue Philips DVD background screen on this DVD system. Depending on the disc tray. If you intend to the ...
...•CLOSE 0 button to open the second tray before the second tray opens. 22 pg 001-044_MX39-37-Eng1 22 2/25/03, 9:57 AM 3139 115 21993 Video CDs (VCDs) - Super Video CDs ...control until "DISC X" appears on the display panel (or press DISC/MEDIA on the remote.) 2 Turn on the TV power and set to open the disc tray and load a disc, then press the same button again to malfunction....format. - You cannot play once, then stop. ➜ If a disc menu shows on the TV, see the blue Philips DVD background screen on this DVD system. Depending on the disc tray. If you intend to the ...

User manual
Page 23
...VCD) G In stop mode, press Ç again. To select a playback feature or item G Use the joystick (1 2 3 4) or numeric keypad (0-9) on the TV screen once you can replace the discs on the remote. Searching backward/forward G Press and hold Ç until "AUTO ECO OFF" appears. For example, if... the playback will start playback. Replacing discs without interrupting playback G Press OPEN•CLOSE 0 buttons of the inactive disc trays. pg 001-044_MX39-37-Eng1 23 23 2/25/03, 9:58 AM 3139 115 21993 To access or remove the menu G Press DISC MENU on disc trays 2~5. English...
...VCD) G In stop mode, press Ç again. To select a playback feature or item G Use the joystick (1 2 3 4) or numeric keypad (0-9) on the TV screen once you can replace the discs on the remote. Searching backward/forward G Press and hold Ç until "AUTO ECO OFF" appears. For example, if... the playback will start playback. Replacing discs without interrupting playback G Press OPEN•CLOSE 0 buttons of the inactive disc trays. pg 001-044_MX39-37-Eng1 23 23 2/25/03, 9:58 AM 3139 115 21993 To access or remove the menu G Press DISC MENU on disc trays 2~5. English...
User manual
Page 24
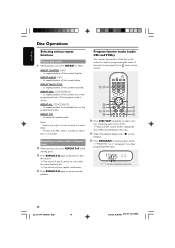
... you want by programming the order of the tracks to resume normal playback. Program favorite tracks (audio CDs and VCDs) You can be stored. 4, 5 DISC/ TV/AV MEDIA TUNER AUX/DI 1 2 3 4 5 6 7 8 9 SURR. 0 VOL SOUND SYSTEM MENU DISC MENU 6 4 2, 9 1 SEATING ZOOM PREV NEXT OK 5 STOP PLAY/PAUSE 8 ... repeat playback of the current track/title. to select : REPEAT CHAPTER (DVD) - to repeat playback of programmed tracks 24 pg 001-044_MX39-37-Eng1 24 2/25/03, 9:58 AM 3139 115 21993 to repeat playback of the current disc or the programmed tracks (if the program mode...
... you want by programming the order of the tracks to resume normal playback. Program favorite tracks (audio CDs and VCDs) You can be stored. 4, 5 DISC/ TV/AV MEDIA TUNER AUX/DI 1 2 3 4 5 6 7 8 9 SURR. 0 VOL SOUND SYSTEM MENU DISC MENU 6 4 2, 9 1 SEATING ZOOM PREV NEXT OK 5 STOP PLAY/PAUSE 8 ... repeat playback of the current track/title. to select : REPEAT CHAPTER (DVD) - to repeat playback of programmed tracks 24 pg 001-044_MX39-37-Eng1 24 2/25/03, 9:58 AM 3139 115 21993 to repeat playback of the current disc or the programmed tracks (if the program mode...
User manual
Page 25
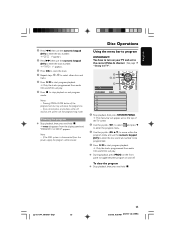
... set to start program playback. ➜ Only the tracks programmed from the display panel and "PROGRAM CLEARED" appears. pg 001-044_MX39-37-Eng1 25 25 2/25/03, 9:58 AM 3139 115 21993 and press 4 3 Use the joystick (1 2 3 4) to move within 20 seconds, the system will ...;. ➜ PROG disappears from audio CDs and VCDs will be programmed. 4 Press ÉÅ to the correct Video In channel. (See page 19 "Setting the TV".) 1 2, 3 4 SYSTEM MENU DISC MENU SEATING ZOOM PREV NEXT OK STOP PLAY/PAUSE PROGRAM DISC DISC SKIP REPEAT REPEAT PROGRAM TRACK 1 2 3 4 5 6 1 Stop ...
... set to start program playback. ➜ Only the tracks programmed from the display panel and "PROGRAM CLEARED" appears. pg 001-044_MX39-37-Eng1 25 25 2/25/03, 9:58 AM 3139 115 21993 and press 4 3 Use the joystick (1 2 3 4) to move within 20 seconds, the system will ...;. ➜ PROG disappears from audio CDs and VCDs will be programmed. 4 Press ÉÅ to the correct Video In channel. (See page 19 "Setting the TV".) 1 2, 3 4 SYSTEM MENU DISC MENU SEATING ZOOM PREV NEXT OK STOP PLAY/PAUSE PROGRAM DISC DISC SKIP REPEAT REPEAT PROGRAM TRACK 1 2 3 4 5 6 1 Stop ...

User manual
Page 26
...Stop playback, then press and hold Ç. G Press S / T to select another title/picture in the menu to select S or T in the current folder. Note: - TV MUSIC NOW THAT ... In stop mode, you can use the joystick (1 2 3 4) to view the previous/next page (if available). G In picture menu, you can ;... set to the correct Video In channel. (See page 19 "Setting the TV".) 1 Load an MP3/Picture (Kodak, JPEG) disc. ➜ The disc reading time may be distorted during MP3 program playback. 26 pg 001-044_MX39-37-Eng1 26 2/25/03, 9:58 AM 3139 115 21993 English Disc Operations...
...Stop playback, then press and hold Ç. G Press S / T to select another title/picture in the menu to select S or T in the current folder. Note: - TV MUSIC NOW THAT ... In stop mode, you can use the joystick (1 2 3 4) to view the previous/next page (if available). G In picture menu, you can ;... set to the correct Video In channel. (See page 19 "Setting the TV".) 1 Load an MP3/Picture (Kodak, JPEG) disc. ➜ The disc reading time may be distorted during MP3 program playback. 26 pg 001-044_MX39-37-Eng1 26 2/25/03, 9:58 AM 3139 115 21993 English Disc Operations...

User manual
Page 27
... SYSTEM MENU. Some operations may be muted. Refer to move through the menu bar. ➜ Press 4 to change the default preset. pg 001-044_MX39-37-Eng1 27 DVD Menu Options SUBTITLE Select a subtitle language available on the DVD. VCD : SF x1, SF x2, SF x3. (SF=Slow Forward,...201;Å. ANGLE (for playback to the current disc, it will resume or begin . the disc menu (if available) will vary depending on the TV screen without interrupting the disc playback. If there are playing. - Changing the Subtitle Language and Audio Language from the menu. The volume will start ...
... SYSTEM MENU. Some operations may be muted. Refer to move through the menu bar. ➜ Press 4 to change the default preset. pg 001-044_MX39-37-Eng1 27 DVD Menu Options SUBTITLE Select a subtitle language available on the DVD. VCD : SF x1, SF x2, SF x3. (SF=Slow Forward,...201;Å. ANGLE (for playback to the current disc, it will resume or begin . the disc menu (if available) will vary depending on the TV screen without interrupting the disc playback. If there are playing. - Changing the Subtitle Language and Audio Language from the menu. The volume will start ...

User manual
Page 28
... setup menu. To remove the menu Press SYSTEM MENU. NOTE: Some of the setup menu options and press 2 to "full size".) 28 pg 001-044_MX39-37-Eng1 28 2/25/03, 9:58 AM 3139 115 21993 Black bars appear on the disc. Follow the steps of the...." A wide picture will not affect the picture during playback. English DVD Menu Options Using the Setup Menu This DVD setup is carried out via the TV, enabling you to customize the DVD system to suit your particular requirements. 1 2, 3 4 SYSTEM MENU DISC MENU SEATING ZOOM PREV NEXT OK STOP PLAY/PAUSE 1 In...
... setup menu. To remove the menu Press SYSTEM MENU. NOTE: Some of the setup menu options and press 2 to "full size".) 28 pg 001-044_MX39-37-Eng1 28 2/25/03, 9:58 AM 3139 115 21993 Black bars appear on the disc. Follow the steps of the...." A wide picture will not affect the picture during playback. English DVD Menu Options Using the Setup Menu This DVD setup is carried out via the TV, enabling you to customize the DVD system to suit your particular requirements. 1 2, 3 4 SYSTEM MENU DISC MENU SEATING ZOOM PREV NEXT OK STOP PLAY/PAUSE 1 In...


