
Leaflet
Page 1
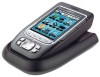
Philips Pronto Home Theater Control Panel TSU7000 Extreme colors, ultimate control The ultimate control solution for convenience in the dark • Pick-up sensor activates the remote control when picked up •...• Additional functionality through buttons and backgrounds • Create transparent background around buttons Great convenience • Control multiple devices with a single touch • LCD screen with backlighting for your home and all your entertainment devices, fully customizable to -read touchscreen color LCD display • Alpha blending allows see-through future...
Philips Pronto Home Theater Control Panel TSU7000 Extreme colors, ultimate control The ultimate control solution for convenience in the dark • Pick-up sensor activates the remote control when picked up •...• Additional functionality through buttons and backgrounds • Create transparent background around buttons Great convenience • Control multiple devices with a single touch • LCD screen with backlighting for your home and all your entertainment devices, fully customizable to -read touchscreen color LCD display • Alpha blending allows see-through future...
Leaflet
Page 2
... . Issue date 2009-02-12 Version: 4.0.8 12 NC: 3104 207 14301 UPC: 0 37849 94272 7 © 2009 Koninklijke Philips Electronics N.V. Home Theater Control Panel TSU7000/37 Specifications Picture/Display • Backlight • Backlight color: White • Diagonal screen size (inch): 3.8 inch • Display colors: 65,536 • Resolution: 320 x 240 pixels • Touch panel...
... . Issue date 2009-02-12 Version: 4.0.8 12 NC: 3104 207 14301 UPC: 0 37849 94272 7 © 2009 Koninklijke Philips Electronics N.V. Home Theater Control Panel TSU7000/37 Specifications Picture/Display • Backlight • Backlight color: White • Diagonal screen size (inch): 3.8 inch • Display colors: 65,536 • Resolution: 320 x 240 pixels • Touch panel...

User manual
Page 2
Table of Contents Taking a First Look 4 ProntoPro NG: The Home Theater Control Panel 4 The Device 5 The Touch Screen 7 The Docking Station 8 What's New for ProntoPro Next Generation? 9 Before You Start 10 Installing the Battery Pack 10 Charging the ProntoPro NG 11 Getting Started... Devices 28 Deleting Elements 30 Moving Devices 31 Adjusting the Settings 32 Setting the Brightness of the Backlight 33 Setting the Timeout of the LCD Screen 33 Setting the Volume Level 34 Setting the Navigation for ProntoPro NG 34 Setting the Animation Mode 35 Calibrating the Touch...
Table of Contents Taking a First Look 4 ProntoPro NG: The Home Theater Control Panel 4 The Device 5 The Touch Screen 7 The Docking Station 8 What's New for ProntoPro Next Generation? 9 Before You Start 10 Installing the Battery Pack 10 Charging the ProntoPro NG 11 Getting Started... Devices 28 Deleting Elements 30 Moving Devices 31 Adjusting the Settings 32 Setting the Brightness of the Backlight 33 Setting the Timeout of the LCD Screen 33 Setting the Volume Level 34 Setting the Navigation for ProntoPro NG 34 Setting the Animation Mode 35 Calibrating the Touch...
User manual
Page 4
...This TFTdisplay supports 65536 colors so you can find the latest upgrades for all kinds of commands with a color touch screen. See 'ProntoProEdit NG' on the Philips website www.pronto.philips.com. In the Downloads section of your VCR. ■ You can control almost any color picture. For other ...out at predefined times, e.g. Furthermore the ProntoPro NG is set timers for certain actions to control different brands for your own screens and define a personal look. ProntoPro NG offers you to control Philips and Marantz devices. To do this, you through the process.
...This TFTdisplay supports 65536 colors so you can find the latest upgrades for all kinds of commands with a color touch screen. See 'ProntoProEdit NG' on the Philips website www.pronto.philips.com. In the Downloads section of your VCR. ■ You can control almost any color picture. For other ...out at predefined times, e.g. Furthermore the ProntoPro NG is set timers for certain actions to control different brands for your own screens and define a personal look. ProntoPro NG offers you to control Philips and Marantz devices. To do this, you through the process.

User manual
Page 5
... button Free programmable Cursor Channel up Channel down Mute Volume up , Page down and Backlight. ■ The 4 firm keys below the touch screen are freely programmable. With the Toggle button you can program them yourself. Although these buttons each have a predefined function, you learn one of ... The buttons on the right side of your TV). navigating through the on the left side of the ProntoPro NG screen have a predefined function: ■ The buttons on screen menu of the cursor are meant for future purposes. The free programmable and the OK button are programmed to it...
... button Free programmable Cursor Channel up Channel down Mute Volume up , Page down and Backlight. ■ The 4 firm keys below the touch screen are freely programmable. With the Toggle button you can program them yourself. Although these buttons each have a predefined function, you learn one of ... The buttons on the right side of your TV). navigating through the on the left side of the ProntoPro NG screen have a predefined function: ■ The buttons on screen menu of the cursor are meant for future purposes. The free programmable and the OK button are programmed to it...

User manual
Page 7
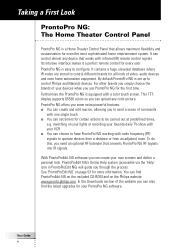
The Touch Screen Taking a First Look ProntoPro NG Icon Device Overview button Page Overview button Previous Device Next Device Soft buttons Labels for the firm keys User Guide 7
The Touch Screen Taking a First Look ProntoPro NG Icon Device Overview button Page Overview button Previous Device Next Device Soft buttons Labels for the firm keys User Guide 7

User manual
Page 9
..., let transparent buttons overlap or create transparency effects within buttons. ■ 65536 colors The number of your favorite TV-show on the screen. The Left and Right cursor buttons allow you scroll through the different pages. ■ Animation Mode ProntoPro NG provides navigation feedback through ...You can contain more natural. ■ USB ProntoPro NG has a USB port to create complex user interfaces. This new ProntoPro NG (TSU7000) offers several new features compared to use the cursor for ProntoPro Next Generation? Timers are not an entirely new feature of mode transitions ...
..., let transparent buttons overlap or create transparency effects within buttons. ■ 65536 colors The number of your favorite TV-show on the screen. The Left and Right cursor buttons allow you scroll through the different pages. ■ Animation Mode ProntoPro NG provides navigation feedback through ...You can contain more natural. ■ USB ProntoPro NG has a USB port to create complex user interfaces. This new ProntoPro NG (TSU7000) offers several new features compared to use the cursor for ProntoPro Next Generation? Timers are not an entirely new feature of mode transitions ...

User manual
Page 11
.... After a few seconds, the ProntoPro NG starts up . the battery pack does not have to charge it has finished starting up automatically and an introduction screen appears. You only need to place it in the connector. 5 Slide the battery cover back on. The ProntoPro NG beeps twice to ensure perfect performance...
.... After a few seconds, the ProntoPro NG starts up . the battery pack does not have to charge it has finished starting up automatically and an introduction screen appears. You only need to place it in the connector. 5 Slide the battery cover back on. The ProntoPro NG beeps twice to ensure perfect performance...

User manual
Page 13
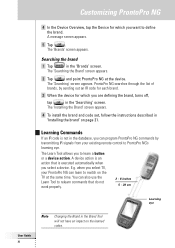
Press one of the 4 firm keys below the touch screen will be turned on page 37. 50° User Guide 13 Note When you press a hard button on page 36. Tilt ProntoPro NG more information, ... a pencil eraser to activate the display (default setting). For more information, see 'Adjusting the Pickup Sensor Settings' on in four different ways: Tap the touch screen. For more than 50 degrees (default setting). Getting Started Turning on ProntoPro NG ProntoPro NG can be executed immediately, while the 4 firm keys below the...
Press one of the 4 firm keys below the touch screen will be turned on page 37. 50° User Guide 13 Note When you press a hard button on page 36. Tilt ProntoPro NG more information, ... a pencil eraser to activate the display (default setting). For more information, see 'Adjusting the Pickup Sensor Settings' on in four different ways: Tap the touch screen. For more than 50 degrees (default setting). Getting Started Turning on ProntoPro NG ProntoPro NG can be executed immediately, while the 4 firm keys below the...

User manual
Page 14
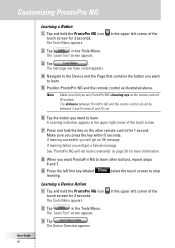
Changing the Time Format 1 Tap and hold the ProntoPro NG icon in the upper left corner of the touch screen for 3 seconds. User Guide 14 3 Tap the Time Format button in the first Settings Page. The first Settings Page appears. 3 Tap the Time button in ...; 12 hour (AM/PM): This is selected. Changing the Time 1 Tap and hold the ProntoPro NG icon in the upper left corner of the touch screen for the two middle firm keys. The labels '+' and '-' appear for 3 seconds.
Changing the Time Format 1 Tap and hold the ProntoPro NG icon in the upper left corner of the touch screen for 3 seconds. User Guide 14 3 Tap the Time Format button in the first Settings Page. The first Settings Page appears. 3 Tap the Time button in ...; 12 hour (AM/PM): This is selected. Changing the Time 1 Tap and hold the ProntoPro NG icon in the upper left corner of the touch screen for the two middle firm keys. The labels '+' and '-' appear for 3 seconds.

User manual
Page 15
The new time is selected. The Tools Menu appears. 2 Tap in the upper left corner of the touch screen for 3 seconds. The labels '+' and '-' appear for the two middle firm keys. 2 To increase the months, press (and hold) the firm key labeled '+'. -orTo decrease ...
The new time is selected. The Tools Menu appears. 2 Tap in the upper left corner of the touch screen for 3 seconds. The labels '+' and '-' appear for the two middle firm keys. 2 To increase the months, press (and hold) the firm key labeled '+'. -orTo decrease ...

User manual
Page 16
... (and hold) the firm key labeled '+'. -orTo decrease the years, press (and hold the ProntoPro NG icon in the upper left corner of the touch screen for 3 seconds. The first Settings Page appears. 3 Press the Page down hard button. The Language button toggles between five languages: ■ English; ■ German; ■...
... (and hold) the firm key labeled '+'. -orTo decrease the years, press (and hold the ProntoPro NG icon in the upper left corner of the touch screen for 3 seconds. The first Settings Page appears. 3 Press the Page down hard button. The Language button toggles between five languages: ■ English; ■ German; ■...

User manual
Page 17
... Right button at the top left. You then navigate through ProntoPro NG, using the cursor. For more information on changing the touch screen navigation to operate from the Device Overview. ■ Tap the Device Left button the previous device. All the available device pages are...can navigate between the devices in two different ways: ■ Tap the device you navigate through the devices and pages using this touch screen navigation. By default you want to cursor navigation, see 'Operating ProntoPro NG with ProntoPro NG. Device Overview button Device Left button Device...
... Right button at the top left. You then navigate through ProntoPro NG, using the cursor. For more information on changing the touch screen navigation to operate from the Device Overview. ■ Tap the Device Left button the previous device. All the available device pages are...can navigate between the devices in two different ways: ■ Tap the device you navigate through the devices and pages using this touch screen navigation. By default you want to cursor navigation, see 'Operating ProntoPro NG with ProntoPro NG. Device Overview button Device Left button Device...

User manual
Page 18
User Guide 18 To view the Page Overview, tap the Page Overview button, which displays the page number in two different ways: ■ Tap the page you a list of touch screen. Page Overview button You can navigate between the different pages in the upper area of all the pages for one device. Getting Started Page Overview The Page Overview offers you want to operate from the Page Overview. ■ Press the Page Up or Page Down hard button on the left side of ProntoPro NG.
User Guide 18 To view the Page Overview, tap the Page Overview button, which displays the page number in two different ways: ■ Tap the page you a list of touch screen. Page Overview button You can navigate between the different pages in the upper area of all the pages for one device. Getting Started Page Overview The Page Overview offers you want to operate from the Page Overview. ■ Press the Page Up or Page Down hard button on the left side of ProntoPro NG.

User manual
Page 19
.../video equipment (p. 20) Label Tool: Labeling buttons, devices and pages (p. 25) Delete Tool: Deleting buttons or devices (p. 30) Macro Tool: Programming a sequence of the touch screen for more information. Customizing ProntoPro NG What makes ProntoPro NG so powerful is the ability to extend its functionality in multiple ways, like programming additional...
.../video equipment (p. 20) Label Tool: Labeling buttons, devices and pages (p. 25) Delete Tool: Deleting buttons or devices (p. 30) Macro Tool: Programming a sequence of the touch screen for more information. Customizing ProntoPro NG What makes ProntoPro NG so powerful is the ability to extend its functionality in multiple ways, like programming additional...

User manual
Page 20
... which you have to define the brands and the corresponding code sets for the most common video and audio devices. The 'Brands' screen appears. For all devices other than one IR code set by default to control devices. The Device Overview appears. 4 In the Device Overview, tap the... action and save the changes you can either have ProntoPro NG autosearch the brand or select it . ProntoPro NG uses these IR codes to operate Philips and Marantz devices. Because there are several brands using the Tool. ■ Tap to go back to define the brand. If a device's brand contains ...
... which you have to define the brands and the corresponding code sets for the most common video and audio devices. The 'Brands' screen appears. For all devices other than one IR code set by default to control devices. The Device Overview appears. 4 In the Device Overview, tap the... action and save the changes you can either have ProntoPro NG autosearch the brand or select it . ProntoPro NG uses these IR codes to operate Philips and Marantz devices. Because there are several brands using the Tool. ■ Tap to go back to define the brand. If a device's brand contains ...

User manual
Page 21
... possible code set 1 Tap the Scroll Down button or the Scroll Up button Code Sets list. The 'Installing the Brand' screen appears again. 4 Tap in the 'Installing the Brand' screen. Go to the IR codes for the selected Device in the Brands list. 3 Tap in the 'Code Sets...' screen. Selecting the code set , a message screen appears. 4 Tap . Installing the brand 1 Tap in the 'Installing the Brand' screen. Customizing ProntoPro NG Selecting the brand 1 Tap the Scroll Down button Brands list. or the ...
... possible code set 1 Tap the Scroll Down button or the Scroll Up button Code Sets list. The 'Installing the Brand' screen appears again. 4 Tap in the 'Installing the Brand' screen. Go to the IR codes for the selected Device in the Brands list. 3 Tap in the 'Code Sets...' screen. Selecting the code set , a message screen appears. 4 Tap . Installing the brand 1 Tap in the 'Installing the Brand' screen. Customizing ProntoPro NG Selecting the brand 1 Tap the Scroll Down button Brands list. or the ...

User manual
Page 22
...out an IR code for each code set 1 Tap in the 'Code Sets' screen. The 'Searching' screen appears. The Tools Menu appears. 2 Tap in the 'Brand Tool' screen. The Tools Menu appears. 2 Tap in the 'Brand Tool' screen. Searching the Brand and Code Set for your device 1 Tap and hold the ...upper left corner of your device Note Make sure the device for which you are defining the brand, turns off, tap in the 'Searching' screen. Customizing ProntoPro NG User Guide 22 Selecting the Brand and searching the Code Set for your device as described in 'Installing the brand' on...
...out an IR code for each code set 1 Tap in the 'Code Sets' screen. The 'Searching' screen appears. The Tools Menu appears. 2 Tap in the 'Brand Tool' screen. The Tools Menu appears. 2 Tap in the 'Brand Tool' screen. Searching the Brand and Code Set for your device 1 Tap and hold the ...upper left corner of your device Note Make sure the device for which you are defining the brand, turns off, tap in the 'Searching' screen. Customizing ProntoPro NG User Guide 22 Selecting the Brand and searching the Code Set for your device as described in 'Installing the brand' on...
User manual
Page 23
...allows you select a device. when you want to define the brand. The 'Searching the Brand' screen appears. 2 Tap and point ProntoPro NG at the same time. E.g. The 'Searching' screen appears. A message screen appears. 5 Tap . Learning Commands If an IR code is executed automatically when you to learn...IR code for each brand. 3 When the device for which you are defining the brand, turns off, tap in the 'Searching' screen. Customizing ProntoPro NG 4 In the Device Overview, tap the Device for which you select TV, your existing remote control to ProntoPro NG's learning...
...allows you select a device. when you want to define the brand. The 'Searching the Brand' screen appears. 2 Tap and point ProntoPro NG at the same time. E.g. The 'Searching' screen appears. A message screen appears. 5 Tap . Learning Commands If an IR code is executed automatically when you to learn...IR code for each brand. 3 When the device for which you are defining the brand, turns off, tap in the 'Searching' screen. Customizing ProntoPro NG 4 In the Device Overview, tap the Device for which you select TV, your existing remote control to ProntoPro NG's learning...
User manual
Page 24
...other buttons, repeat steps 6 and 7. 9 Press the left corner of the 2 Tap in the upper left firm key labeled learning. The 'Learn Tool' screen appears. 3 Tap . Make sure you have visited appears. 4 Navigate to learn . If learning succeeded, you aim ProntoPro NG's learning eye at the ...remote control's IR window. The 'Learn Tool' screen appears. 3 Tap . The distance between ProntoPro NG and the remote control should be between 2 and 8 inches (5 and 20 cm). 6 Tap the button...
...other buttons, repeat steps 6 and 7. 9 Press the left corner of the 2 Tap in the upper left firm key labeled learning. The 'Learn Tool' screen appears. 3 Tap . Make sure you have visited appears. 4 Navigate to learn . If learning succeeded, you aim ProntoPro NG's learning eye at the ...remote control's IR window. The 'Learn Tool' screen appears. 3 Tap . The distance between ProntoPro NG and the remote control should be between 2 and 8 inches (5 and 20 cm). 6 Tap the button...


