
User manual
Page 6
... 56 8.1 Tune radio stations 56 8.2 Store preset radio stations 56 8.2.1 Autostore: Automatic preset program 57 8.2.2 Manual store: Manual preset program 57 8.2.3 Listen to preset station 57 8.3 RDS 58 ...music 69 10.3 Play external sources 69 11 Network settings 70 11.1 Add Stations to Wi-Fi network of Center 70 11.1.1 Delete a Station 71 11.2 Connect to Wi-Fi (wireless) enabled home network 72 11.2.1 Network settings on Center 72 11.2.2 Set network on Station 73 11.3 Connect to wired home network 74 11.3.1 Set network on Center 74 11.3.2 Set network on Station...
... 56 8.1 Tune radio stations 56 8.2 Store preset radio stations 56 8.2.1 Autostore: Automatic preset program 57 8.2.2 Manual store: Manual preset program 57 8.2.3 Listen to preset station 57 8.3 RDS 58 ...music 69 10.3 Play external sources 69 11 Network settings 70 11.1 Add Stations to Wi-Fi network of Center 70 11.1.1 Delete a Station 71 11.2 Connect to Wi-Fi (wireless) enabled home network 72 11.2.1 Network settings on Center 72 11.2.2 Set network on Station 73 11.3 Connect to wired home network 74 11.3.1 Set network on Center 74 11.3.2 Set network on Station...

User manual
Page 21
...10 )K Press to skip to previous track / press & hold to fast forward 11 SHUFFLE (3 def) Selects random playback 12 REPEAT (2 abc) Selects continuous playback 13 INCR.SURR. (6 mno) Selects Incredible Surround sound effect 14 DBB (Dynamic Bass ...Center and Station 20 MUSIC BROADCAST (only ) HD: broadcasts music from Center to Station 21 Spare 22 DIM Toggles display brightness between dim and normal 23 VIEW Toggles between playback screen and previous options list 24 SAME ARTIST (7 pqrs) HD: plays all the tracks of the current artist HD: enables wireless range extender (refer to extender's manual...
...10 )K Press to skip to previous track / press & hold to fast forward 11 SHUFFLE (3 def) Selects random playback 12 REPEAT (2 abc) Selects continuous playback 13 INCR.SURR. (6 mno) Selects Incredible Surround sound effect 14 DBB (Dynamic Bass ...Center and Station 20 MUSIC BROADCAST (only ) HD: broadcasts music from Center to Station 21 Spare 22 DIM Toggles display brightness between dim and normal 23 VIEW Toggles between playback screen and previous options list 24 SAME ARTIST (7 pqrs) HD: plays all the tracks of the current artist HD: enables wireless range extender (refer to extender's manual...

User manual
Page 23
ENGLISH 12 MUTE Deactivates the sound temporarily 25 SCROLL 3, 4 Scrolls the ...) HD: plays all the tracks of the current Genre 19 MUSIC FOLLOWS ME HD: moves music playback between Center and Station 20 (0 ) 21 MUSIC BROADCAST (only ) HD: broadcasts music from Center to Station CLEAR Text entry: deletes the input before the cursor 27 REC...wireless range extender (refer to extender's manual for details) 23 SMART EQ (4 ghi) HD: toggles between sound settings for the current Genre on or off 24 SLEEP (1 Adjusts, displays or switches off the sleep timer Your wireless music centre and station...
ENGLISH 12 MUTE Deactivates the sound temporarily 25 SCROLL 3, 4 Scrolls the ...) HD: plays all the tracks of the current Genre 19 MUSIC FOLLOWS ME HD: moves music playback between Center and Station 20 (0 ) 21 MUSIC BROADCAST (only ) HD: broadcasts music from Center to Station CLEAR Text entry: deletes the input before the cursor 27 REC...wireless range extender (refer to extender's manual for details) 23 SMART EQ (4 ghi) HD: toggles between sound settings for the current Genre on or off 24 SLEEP (1 Adjusts, displays or switches off the sleep timer Your wireless music centre and station...
User manual
Page 30
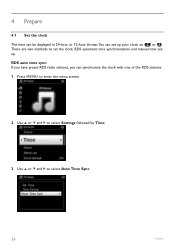
4 Prepare 4.1 Set the clock The time can be displayed in 24-hour or 12-hour format.You can synchronize the clock with one of the RDS stations. 1 Press MENU to enter the menu screen. 2 Use 3 or 4 and 2 to select Settings followed by Time. 3 Use 3 or 4 and 2 to set up your clock on or . There are two methods to select Auto Time Sync. 26 Prepare RDS auto time sync: If you have preset RDS radio stations, you can set the clock, RDS automatic time synchronization and manual time setup.
4 Prepare 4.1 Set the clock The time can be displayed in 24-hour or 12-hour format.You can synchronize the clock with one of the RDS stations. 1 Press MENU to enter the menu screen. 2 Use 3 or 4 and 2 to select Settings followed by Time. 3 Use 3 or 4 and 2 to set up your clock on or . There are two methods to select Auto Time Sync. 26 Prepare RDS auto time sync: If you have preset RDS radio stations, you can set the clock, RDS automatic time synchronization and manual time setup.
User manual
Page 47
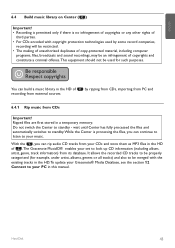
...64257;les are first stored in the HD of recording from external sources. ENGLISH 6.4 Build music library on Center ( ) Important! • Recording is permitted only if there is processing the files, you can rip audio CD tracks from your CDs and store them as MP3 files in the HD of... the recorded CD tracks to be merged with the existing tracks in the HD.To update your Gracenote® Media Database, see the section 12 Connect to standby - Hard Disk 43 You can build a music library in a temporary memory: Do not switch the Center to your PC in this manual.
...64257;les are first stored in the HD of recording from external sources. ENGLISH 6.4 Build music library on Center ( ) Important! • Recording is permitted only if there is processing the files, you can rip audio CD tracks from your CDs and store them as MP3 files in the HD of... the recorded CD tracks to be merged with the existing tracks in the HD.To update your Gracenote® Media Database, see the section 12 Connect to standby - Hard Disk 43 You can build a music library in a temporary memory: Do not switch the Center to your PC in this manual.
User manual
Page 49
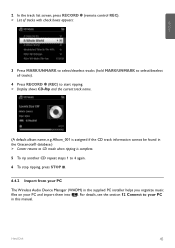
Hard Disk 45 For details, see the section 12 Connect to start ripping. > Display shows CD-Rip and the current track name. (A default album name, e.g. 2 In the track list screen, press RECORD 0 (remote control ... 0 (REC) to your PC in the supplied PC installer helps you organize music files on your PC The Wireless Audio Device Manager (WADM) in this manual. Album_001 is assigned if the CD track information cannot be found in the Gracenote® database.) > Center returns to CD mode when ripping is complete. 5 To rip another...
Hard Disk 45 For details, see the section 12 Connect to start ripping. > Display shows CD-Rip and the current track name. (A default album name, e.g. 2 In the track list screen, press RECORD 0 (remote control ... 0 (REC) to your PC in the supplied PC installer helps you organize music files on your PC The Wireless Audio Device Manager (WADM) in this manual. Album_001 is assigned if the CD track information cannot be found in the Gracenote® database.) > Center returns to CD mode when ripping is complete. 5 To rip another...
User manual
Page 52
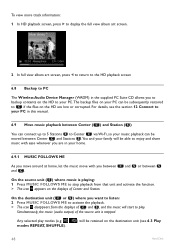
Simultaneously, the music (audio output) of and , and the music will be retained on the destination unit (see the section 12 Connect to your PC in this manual. 6.9 Move music playback between Center ( ) and Station ( ) You can connect up to 5 Stations to Center via Wi-Fi, so your music playback can be subsequently ...art screen, press 1 to return to the HD playback screen 6.8 Backup to PC The Wireless Audio Device Manager (WADM) in your home. 6.9.1 MUSIC FOLLOWS ME As you move around at home, let the music move with you between and . and or between On the source unit ( ) where...
Simultaneously, the music (audio output) of and , and the music will be retained on the destination unit (see the section 12 Connect to your PC in this manual. 6.9 Move music playback between Center ( ) and Station ( ) You can connect up to 5 Stations to Center via Wi-Fi, so your music playback can be subsequently ...art screen, press 1 to return to the HD playback screen 6.8 Backup to PC The Wireless Audio Device Manager (WADM) in your home. 6.9.1 MUSIC FOLLOWS ME As you move around at home, let the music move with you between and . and or between On the source unit ( ) where...
User manual
Page 83
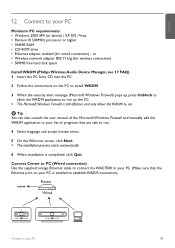
ENGLISH 12 Connect to your PC...manually add the WADM application to your PC Minimum PC requirements: • Windows 2000 SP4 (or above) / XP SP2 / Vista • Pentium III 500MHz processor or higher • 256MB RAM • CD-ROM drive • Ethernet adapter, enabled (for wireless connection) • 500MB free hard disk space Install WADM (Philips Wireless Audio... establish WADM connection). Connect Center to PC (Wired connection) Use the supplied orange Ethernet cable to connect the WAC7500 to your PC is completed, click Quit. or • Wireless network adapter 802.11 b/g (...
ENGLISH 12 Connect to your PC...manually add the WADM application to your PC Minimum PC requirements: • Windows 2000 SP4 (or above) / XP SP2 / Vista • Pentium III 500MHz processor or higher • 256MB RAM • CD-ROM drive • Ethernet adapter, enabled (for wireless connection) • 500MB free hard disk space Install WADM (Philips Wireless Audio... establish WADM connection). Connect Center to PC (Wired connection) Use the supplied orange Ethernet cable to connect the WAC7500 to your PC is completed, click Quit. or • Wireless network adapter 802.11 b/g (...
Leaflet
Page 3
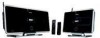
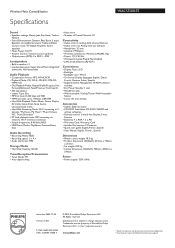
... Quick start guide: English,French ,Spanish • User Manual: English, French , Spanish Dimensions • Master carton weight...12 NC: 8670 000 34425 UPC: 6 09585 14380 7 © 2009 Koninklijke Philips Electronics N.V. Wireless Music Center&Station Specifications WACS7500...Music", "Music Follows Me", "Music Broadcast" • PC Link playback mode: MP3 streaming via network, Wi-Fi wireless connection • Sample frequencies: 8-48 kHz (MP3) • USB Direct Modes: Play/Pause, Previous/Next, Stop Audio Recording • Recording Media: HDD • Recording speed: 1 x, 4 x • Audio...
... Quick start guide: English,French ,Spanish • User Manual: English, French , Spanish Dimensions • Master carton weight...12 NC: 8670 000 34425 UPC: 6 09585 14380 7 © 2009 Koninklijke Philips Electronics N.V. Wireless Music Center&Station Specifications WACS7500...Music", "Music Follows Me", "Music Broadcast" • PC Link playback mode: MP3 streaming via network, Wi-Fi wireless connection • Sample frequencies: 8-48 kHz (MP3) • USB Direct Modes: Play/Pause, Previous/Next, Stop Audio Recording • Recording Media: HDD • Recording speed: 1 x, 4 x • Audio...


