

Operating Instructions
Page 2
Keep this manual to the customer and explain to the customer how to handle the product. Always have an installation specialist or your Plasma Display, please carefully read the "Important Information" and these "Operating Instructions" so you very much for damage caused... future. Note for Dealers: After installation, be sure to operate the Plasma Display properly. En You will know how to deliver this manual in a safe place. PIONEER cannot assume liabilities for purchasing this PIONEER product. English Operating Instructions Thank you will find it is marketed assuming ...
Keep this manual to the customer and explain to the customer how to handle the product. Always have an installation specialist or your Plasma Display, please carefully read the "Important Information" and these "Operating Instructions" so you very much for damage caused... future. Note for Dealers: After installation, be sure to operate the Plasma Display properly. En You will know how to deliver this manual in a safe place. PIONEER cannot assume liabilities for purchasing this PIONEER product. English Operating Instructions Thank you will find it is marketed assuming ...

Operating Instructions
Page 3
... and keep the manual handy for 60 minutes to the unit, read carefully in a moving image whenever possible. * Change the position of this unit has been included. The plasma display panel consists of fine picture elements (cells) with any part inside . Provide adequate space for a Class B ...PLUG AND SOCKET IS EASILY ACCESSIBLE. Do not attempt to provide long, trouble-free service. Warning Not for minimizing the occurrence of a Plasma Display Panel. 8. Important Information 2i En English NOTE: When you do not do not attempt to clean these surfaces. 2. To protect your ...
... and keep the manual handy for 60 minutes to the unit, read carefully in a moving image whenever possible. * Change the position of this unit has been included. The plasma display panel consists of fine picture elements (cells) with any part inside . Provide adequate space for a Class B ...PLUG AND SOCKET IS EASILY ACCESSIBLE. Do not attempt to provide long, trouble-free service. Warning Not for minimizing the occurrence of a Plasma Display Panel. 8. Important Information 2i En English NOTE: When you do not do not attempt to clean these surfaces. 2. To protect your ...

Operating Instructions
Page 5
...in the back of the Package Ⅺ Plasma monitor Ⅺ Power cord Ⅺ Remote control with your product to locate the nearest Pioneer Authorized Service Company in Canada. Options •... Settings Menu 17 Setting the on mode 24 Enabling/disabling the front panel controls 24 Enabling/disabling remote control wireless transmission .... 24 Loop Out setting...877)283-5901 For warranty information please see the Limited Warranty sheet included with two AAA Batteries Ⅺ Manual Ⅺ Warranty Ⅺ Safety metal fittings (2pcs)* Ⅺ Ferrite cores (large 2pcs, small 2pcs...
...in the back of the Package Ⅺ Plasma monitor Ⅺ Power cord Ⅺ Remote control with your product to locate the nearest Pioneer Authorized Service Company in Canada. Options •... Settings Menu 17 Setting the on mode 24 Enabling/disabling the front panel controls 24 Enabling/disabling remote control wireless transmission .... 24 Loop Out setting...877)283-5901 For warranty information please see the Limited Warranty sheet included with two AAA Batteries Ⅺ Manual Ⅺ Warranty Ⅺ Safety metal fittings (2pcs)* Ⅺ Ferrite cores (large 2pcs, small 2pcs...

Operating Instructions
Page 8
... the syncronization signal. This input can be controlled individually. !7 CLEAR Clears the number set for plasma display setup adjustments. t MENU/SET Press this button to your Pioneer installation technician. SET button. !8 Remote control signal transmitter Transmits the remote control signals. !9 Remote...Stereo Mini cable must be used only for Input or Output (see page 24). Press this connector without first consulting your speaker's owner's manual. Part Names and Function 7 En VIDEO1 can also be used for a display with a DVI output. SCREEN SIZE button is not ...
... the syncronization signal. This input can be controlled individually. !7 CLEAR Clears the number set for plasma display setup adjustments. t MENU/SET Press this button to your Pioneer installation technician. SET button. !8 Remote control signal transmitter Transmits the remote control signals. !9 Remote...Stereo Mini cable must be used only for Input or Output (see page 24). Press this connector without first consulting your speaker's owner's manual. Part Names and Function 7 En VIDEO1 can also be used for a display with a DVI output. SCREEN SIZE button is not ...
Operating Instructions
Page 9
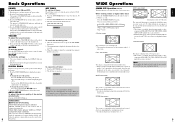
... the VOLUME button (on the remote control. 2. The pointer will be set , press the OFF TIMER button once. 2. En English WIDE Operations SCREEN SIZE Operation (manual) With this for an extended period. VOLUME To adjust the sound volume: 1. press again to the desired level. OFF TIMER 28 To cancel the off...
... the VOLUME button (on the remote control. 2. The pointer will be set , press the OFF TIMER button once. 2. En English WIDE Operations SCREEN SIZE Operation (manual) With this for an extended period. VOLUME To adjust the sound volume: 1. press again to the desired level. OFF TIMER 28 To cancel the off...
Operating Instructions
Page 11
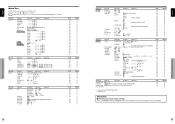
... S1/S2 PICTURE SIZE DVI SET UP Sub menu 2 Sub menu 3 Sub menu 4 OFF@AON OFF@AON ABL AUTO/LOCK 1/LOCK 2/LOCK 3 ORBITER AUTO 1 AUTO 2 MANUAL H-DOT/V-LINE/TIME OFF INVERSE OFF ON WORKING TIME/WAITING TIME WHITE SCREEN WIPER OFF ON WORKING TIME/WAITING TIME/SPEED SOFT FOCUS OFF/1/2/3/4 [email protected]...
... S1/S2 PICTURE SIZE DVI SET UP Sub menu 2 Sub menu 3 Sub menu 4 OFF@AON OFF@AON ABL AUTO/LOCK 1/LOCK 2/LOCK 3 ORBITER AUTO 1 AUTO 2 MANUAL H-DOT/V-LINE/TIME OFF INVERSE OFF ON WORKING TIME/WAITING TIME WHITE SCREEN WIPER OFF ON WORKING TIME/WAITING TIME/SPEED SOFT FOCUS OFF/1/2/3/4 [email protected]...

Operating Instructions
Page 13
...Use this mode for more easily viewable. (Use this mode for striped patterns on -screen display This sets the position of these features are made manually. * If PHASE can adjust them. Ⅵ Adjusting the Auto Picture ON: The CLOCK, PHASE and Position adjustments are not available for the ... On "OPTION1" menu, select "OSD", then press the MENU/ SET button. On "DISPLAY OSD" of the 5 BNC connectors to OFF and adjust manually. Ⅵ Adjusting the position of the image V.POSITION: Adjusts the vertical position of the menu when it appears on page 30. EXIT RETURN Information ...
...Use this mode for more easily viewable. (Use this mode for striped patterns on -screen display This sets the position of these features are made manually. * If PHASE can adjust them. Ⅵ Adjusting the Auto Picture ON: The CLOCK, PHASE and Position adjustments are not available for the ... On "OPTION1" menu, select "OSD", then press the MENU/ SET button. On "DISPLAY OSD" of the 5 BNC connectors to OFF and adjust manually. Ⅵ Adjusting the position of the image V.POSITION: Adjusts the vertical position of the menu when it appears on page 30. EXIT RETURN Information ...

Operating Instructions
Page 15
...this to set the picture shift. AUTO2: The picture moves around the screen intermittently, making the picture bigger. Adjust the ORBITER function manually Set the amount of "LONG LIFE" menu, select "AUTO1". Example: Setting so that the INVERSE mode starts in the vertical ...COMPONENT signal is input. WHITE: The entire screen turns white. You can adjust the orbiter function (Horizontal Dot, Vertical Line and Time) manually. EXIT RETURN Information Ⅵ Setting the time WORKING TIME: Set the time duration for INVERSE/WHITE Set a time duration. This is ...
...this to set the picture shift. AUTO2: The picture moves around the screen intermittently, making the picture bigger. Adjust the ORBITER function manually Set the amount of "LONG LIFE" menu, select "AUTO1". Example: Setting so that the INVERSE mode starts in the vertical ...COMPONENT signal is input. WHITE: The entire screen turns white. You can adjust the orbiter function (Horizontal Dot, Vertical Line and Time) manually. EXIT RETURN Information Ⅵ Setting the time WORKING TIME: Set the time duration for INVERSE/WHITE Set a time duration. This is ...

Operating Instructions
Page 21
...multi screen, Self Diagnosis, Image Burn reduction tools (ABL LOCK1~3, INVERSE, WHITE, ORBITER (Auto1,2/Manual), SCREEN WIPER), Color Temperature select (high/mid/mid low/low, user has 4 memories), Key... the monitor, or is produced. It indicates that the power supply circuit, plasma display panel, temperature sensor, or one of the main unit and wait until the internal... Screen Size 53.2"(H)ן29.9"(V) inches 1351(H)ן760(V) mm diagonal 61" Aspect Ratio 16 : 9 Resolution 1365(H)ן768(V) pixels Signals Synchronization Range ...
...multi screen, Self Diagnosis, Image Burn reduction tools (ABL LOCK1~3, INVERSE, WHITE, ORBITER (Auto1,2/Manual), SCREEN WIPER), Color Temperature select (high/mid/mid low/low, user has 4 memories), Key... the monitor, or is produced. It indicates that the power supply circuit, plasma display panel, temperature sensor, or one of the main unit and wait until the internal... Screen Size 53.2"(H)ן29.9"(V) inches 1351(H)ן760(V) mm diagonal 61" Aspect Ratio 16 : 9 Resolution 1365(H)ן768(V) pixels Signals Synchronization Range ...


