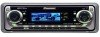

Installation Manual
Page 1
... always supplied with cable clamps or adhesive tape. Especially, insulate the unused speaker leads without fail. Front output 16 cm [5/8 in] Multi-CD player (sold separately) System remote control + Front speaker ≠ + Front speaker ≠ Left + Rear speaker or Subwoofer ≠ White... Connecting the Units Note: • This unit is installed in places that does not have the same function. INSTALLATION MANUAL OF OF DEH-P6400 This product conforms to an external power amp's system remote control or the car's Auto-antenna relay control terminal (max. 300 mA...
... always supplied with cable clamps or adhesive tape. Especially, insulate the unused speaker leads without fail. Front output 16 cm [5/8 in] Multi-CD player (sold separately) System remote control + Front speaker ≠ + Front speaker ≠ Left + Rear speaker or Subwoofer ≠ White... Connecting the Units Note: • This unit is installed in places that does not have the same function. INSTALLATION MANUAL OF OF DEH-P6400 This product conforms to an external power amp's system remote control or the car's Auto-antenna relay control terminal (max. 300 mA...

Operation Manual
Page 2
...you for buying this manual 6 After-sales service for Pioneer products 6 Precautions 7 Use and care of a CD 18 Pausing CD playback 18 Using disc title functions 18 • Entering disc titles 18 • Displaying disc titles 19 Using CD TEXT functions 19 • Displaying titles on 12 Selecting...Storing and recalling broadcast frequencies 14 Tuning in strong signals 15 Storing the strongest broadcast frequencies 15 Built-in CD Player Playing a CD 16 Introduction of advanced built-in CD player operation 17 Repeating play 17 Playing tracks in a random order 17 Scanning tracks of the remote ...
...you for buying this manual 6 After-sales service for Pioneer products 6 Precautions 7 Use and care of a CD 18 Pausing CD playback 18 Using disc title functions 18 • Entering disc titles 18 • Displaying disc titles 19 Using CD TEXT functions 19 • Displaying titles on 12 Selecting...Storing and recalling broadcast frequencies 14 Tuning in strong signals 15 Storing the strongest broadcast frequencies 15 Built-in CD Player Playing a CD 16 Introduction of advanced built-in CD player operation 17 Repeating play 17 Playing tracks in a random order 17 Scanning tracks of the remote ...
Operation Manual
Page 3
... playlist with ITS programming 23 • Playback from your ITS playlist 23 • Erasing a track from your ITS playlist 24 • Erasing a CD from your ITS playlist 24 Using disc title functions 24 • Entering disc titles 24 • Displaying disc titles 25 • Selecting discs from the... disc title list 25 Using CD TEXT functions 26 • Displaying titles on CD TEXT disc 26 • Scrolling titles in the display 26 Using compression and bass emphasis 26 Audio Adjustments Introduction of...
... playlist with ITS programming 23 • Playback from your ITS playlist 23 • Erasing a track from your ITS playlist 24 • Erasing a CD from your ITS playlist 24 Using disc title functions 24 • Entering disc titles 24 • Displaying disc titles 25 • Selecting discs from the... disc title list 25 Using CD TEXT functions 26 • Displaying titles on CD TEXT disc 26 • Scrolling titles in the display 26 Using compression and bass emphasis 26 Audio Adjustments Introduction of...

Operation Manual
Page 4
... operation 37 • Operation 37 • Switching the display 37 • Switching the channel select mode 37 • Display the ID code 38 Additional Information CD player and care 38 CD-R/CD-RW discs 39 Understanding built-in CD player error messages 39 Specifications 40 4 En
... operation 37 • Operation 37 • Switching the display 37 • Switching the channel select mode 37 • Display the ID code 38 Additional Information CD player and care 38 CD-R/CD-RW discs 39 Understanding built-in CD player error messages 39 Specifications 40 4 En
Operation Manual
Page 10
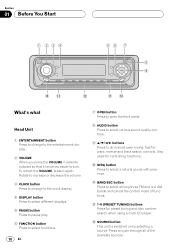
.... 2 VOLUME When you press the VOLUME, it extends outward so that it again. Also used for preset tuning and disc number search when using a multi-CD player. ~ SOURCE button This unit is switched on by selecting a source. BAND/ESC button Press to select among three FM and one AM bands and...
.... 2 VOLUME When you press the VOLUME, it extends outward so that it again. Also used for preset tuning and disc number search when using a multi-CD player. ~ SOURCE button This unit is switched on by selecting a source. BAND/ESC button Press to select among three FM and one AM bands and...
Operation Manual
Page 11
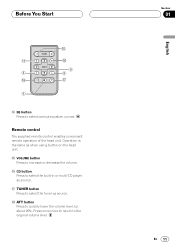
... is the same as when using button on the head unit. @ VOLUME button Press to increase or decrease the volume. # CD button Press to select the built-in or multi-CD player as source. $ TUNER button Press to select the tuner as source. % ATT button Press to quickly lower the volume level...
... is the same as when using button on the head unit. @ VOLUME button Press to increase or decrease the volume. # CD button Press to select the built-in or multi-CD player as source. $ TUNER button Press to select the tuner as source. % ATT button Press to quickly lower the volume level...

Operation Manual
Page 12
...: - Turning the unit off Press SOURCE and hold for at least one available in CD player-Multi-CD player- When no magazine is switched on . Section 02 Power ON/OFF Turning the...Sources off . When no disc is set to off (refer to a Pioneer product (such as one second to turn the unit off CD: Built-in the future) that, although incompatible as a source, enables control...source. Selecting a source You can be controlled by this unit's source is set by this unit. - Multi-CD player-External unit 1-External unit 2 -AUX • When using the head unit, press SOURCE to . Sources...
...: - Turning the unit off Press SOURCE and hold for at least one available in CD player-Multi-CD player- When no magazine is switched on . Section 02 Power ON/OFF Turning the...Sources off . When no disc is set to off (refer to a Pioneer product (such as one second to turn the unit off CD: Built-in the future) that, although incompatible as a source, enables control...source. Selecting a source You can be controlled by this unit's source is set by this unit. - Multi-CD player-External unit 1-External unit 2 -AUX • When using the head unit, press SOURCE to . Sources...

Operation Manual
Page 16
... slot 4 Use VOLUME to another track, press 2 or 3. Do not use an adapter when playing 8-cm CDs. • Do not insert anything other than a CD into the CD loading slot. • When CD TEXT disc is inserted, lights. • If you cannot insert a disc completely or if after you insert a disc the...front panel. Pressing 3 skips to eject the disc, and check the disc for damage before inserting the disc again. • If the built-in CD player error messages on page 17. 1 TRACK NUMBER indicator Shows the track currently playing. 2 PLAY TIME indicator Shows the elapsed playing time of the ...
... slot 4 Use VOLUME to another track, press 2 or 3. Do not use an adapter when playing 8-cm CDs. • Do not insert anything other than a CD into the CD loading slot. • When CD TEXT disc is inserted, lights. • If you cannot insert a disc completely or if after you insert a disc the...front panel. Pressing 3 skips to eject the disc, and check the disc for damage before inserting the disc again. • If the built-in CD player error messages on page 17. 1 TRACK NUMBER indicator Shows the track currently playing. 2 PLAY TIME indicator Shows the elapsed playing time of the ...

Operation Manual
Page 17
... Section 04 English Español Deutsch Introduction of advanced built-in the display. Random :ON appears in CD player operation 1 1 FUNCTION display Shows the function status. Random :OFF appears in the display. Tracks will continue to turn repeat play on. Fran&#... cancelled. The track presently playing will continue to select RDM. Press FUNCTION until Repeat appears in the display. 2 Press 5 to turn random play on the CD in a random order. 1 Press FUNCTION to play in a random order Random play off . Press FUNCTION repeatedly to the playback display, press BAND/ESC. ...
... Section 04 English Español Deutsch Introduction of advanced built-in the display. Random :ON appears in CD player operation 1 1 FUNCTION display Shows the function status. Random :OFF appears in the display. Tracks will continue to turn repeat play on. Fran&#... cancelled. The track presently playing will continue to select RDM. Press FUNCTION until Repeat appears in the display. 2 Press 5 to turn random play on the CD in a random order. 1 Press FUNCTION to play in a random order Random play off . Press FUNCTION repeatedly to the playback display, press BAND/ESC. ...

Operation Manual
Page 18
...Press ∞ to turn scan play on. Entering disc titles Disc title input lets you input CD titles up to 10 letters long and up to 48 disc titles into the builtin CD player. 1 Play a CD that CD will be displayed. Press 1 numbered button repeatedly to select PAUSE. Note • After scanning ... and display the title. Each press of 5 will display a letter in the reverse order, such as Z Y X ... The next time you insert a CD for which you have already been recorded on . Each press of ∞ will display a letter of the alphabet in A B C ... C B A order. Play will have ...
...Press ∞ to turn scan play on. Entering disc titles Disc title input lets you input CD titles up to 10 letters long and up to 48 disc titles into the builtin CD player. 1 Play a CD that CD will be displayed. Press 1 numbered button repeatedly to select PAUSE. Note • After scanning ... and display the title. Each press of 5 will display a letter in the reverse order, such as Z Y X ... The next time you insert a CD for which you have already been recorded on . Each press of ∞ will display a letter of the alphabet in A B C ... C B A order. Play will have ...
Operation Manual
Page 19
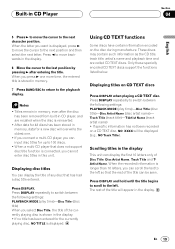
... for the currently playing disc, NO TITLE is displayed, press 3 to move the cursor to the playback display. Only these specially encoded CD TEXT discs support the functions listed below. Displaying titles on the disc during manufacture. The rest of the title will overwrite the oldest one... name)- Notes • Titles remain in memory, even after entering the title. Press DISPLAY repeatedly to the next character position. Scrolling titles in CD Player Section 04 English Español Deutsch Français 5 Press 3 to the left . When the letter you can scroll the text to...
... for the currently playing disc, NO TITLE is displayed, press 3 to move the cursor to the playback display. Only these specially encoded CD TEXT discs support the functions listed below. Displaying titles on the disc during manufacture. The rest of the title will overwrite the oldest one... name)- Notes • Titles remain in memory, even after entering the title. Press DISPLAY repeatedly to the next character position. Scrolling titles in CD Player Section 04 English Español Deutsch Français 5 Press 3 to the left . When the letter you can scroll the text to...

Operation Manual
Page 20
...SOURCE until the disc number appears in this unit to 6 buttons. Pressing again will skip to select the multi-CD player. More advanced CD operation is displayed. • If the multi-CD player does not operate prop- For discs located at 7 to 12, press and hold 2 or 3. 5 To... skip back or forward to the start of the next track. Pressing 2 once skips to another track, press 2 or 3. Section 05 Multi-CD Player Playing a CD 12 3 You can also sequentially select a disc by pressing 5/∞. 4 To perform fast forward or reverse, press and hold the corresponding numbers such...
...SOURCE until the disc number appears in this unit to 6 buttons. Pressing again will skip to select the multi-CD player. More advanced CD operation is displayed. • If the multi-CD player does not operate prop- For discs located at 7 to 12, press and hold 2 or 3. 5 To... skip back or forward to the start of the next track. Pressing 2 once skips to another track, press 2 or 3. Section 05 Multi-CD Player Playing a CD 12 3 You can also sequentially select a disc by pressing 5/∞. 4 To perform fast forward or reverse, press and hold the corresponding numbers such...

Operation Manual
Page 21
... 21 Press FUNCTION to the playback display, press BAND/ESC. Press FUNCTION until the desired repeat range appears in the multi-CD player • TRK - Multi-CD Player Section 05 English Español Introduction of advanced multiCD player operation 1 1 FUNCTION display Shows the function status. Repeat... the repeat play range changes to select the repeat range. Repeating play There are three repeat play ranges for the multiCD player: MCD (multi-CD player repeat), TRK (one -track repeat), the repeat play range changes to MCD (multiCD player repeat). • If you select other discs...
... 21 Press FUNCTION to the playback display, press BAND/ESC. Press FUNCTION until the desired repeat range appears in the multi-CD player • TRK - Multi-CD Player Section 05 English Español Introduction of advanced multiCD player operation 1 1 FUNCTION display Shows the function status. Repeat... the repeat play range changes to select the repeat range. Repeating play There are three repeat play ranges for the multiCD player: MCD (multi-CD player repeat), TRK (one -track repeat), the repeat play range changes to MCD (multiCD player repeat). • If you select other discs...

Operation Manual
Page 22
...play on page 21. 2 Press FUNCTION to turn scan play on. When you play back tracks in a random order within the previously selected RANDOM (multi-CD player repeat) or D.RANDOM (disc repeat) ranges. 4 Press ∞ to turn random play off . Press FUNCTION until Pause appears in the display. ... 5 to turn pause on the selected disc plays for about 10 seconds. Tracks will play in a random order within the repeat range, RANDOM (multi-CD player repeat) and D.RANDOM (disc repeat). 1 Select the repeat range. Refer to the playback display, select SCAN again by pressing FUNCTION. Scan :ON...
...play on page 21. 2 Press FUNCTION to turn scan play on. When you play back tracks in a random order within the previously selected RANDOM (multi-CD player repeat) or D.RANDOM (disc repeat) ranges. 4 Press ∞ to turn random play off . Press FUNCTION until Pause appears in the display. ... 5 to turn pause on the selected disc plays for about 10 seconds. Tracks will play in a random order within the repeat range, RANDOM (multi-CD player repeat) and D.RANDOM (disc repeat). 1 Select the repeat range. Refer to the playback display, select SCAN again by pressing FUNCTION. Scan :ON...
Operation Manual
Page 23
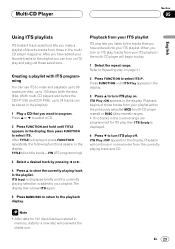
...by pressing 2 or 3. 4 Press 5 to store the currently playing track in the playlist. Refer to Repeating play on . En 23 Italiano Nederlands Multi-CD Player Section 05 English Español Deutsch Français Using ITS playlists ITS (instant track selection) lets you make a playlist of those tracks... from your playlist within the previously selected MCD (multi-CD player repeat) or DISC (disc repeat) ranges. • If no tracks in the current range are programmed for ITS play then ITS Empty...
...by pressing 2 or 3. 4 Press 5 to store the currently playing track in the playlist. Refer to Repeating play on . En 23 Italiano Nederlands Multi-CD Player Section 05 English Español Deutsch Français Using ITS playlists ITS (instant track selection) lets you make a playlist of those tracks... from your playlist within the previously selected MCD (multi-CD player repeat) or DISC (disc repeat) ranges. • If no tracks in the current range are programmed for ITS play then ITS Empty...

Operation Manual
Page 24
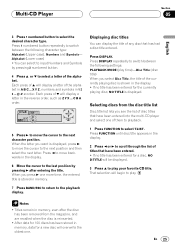
...ITS appears in the display: TITLE (disc title input)-ITS (ITS programming) • When playing a CD TEXT disc on a CD TEXT compatible multi-CD player, you want to delete all tracks on , press FUNCTION. 1 Play a CD you want to delete a track from your ITS playlist, you want to enter the title. Refer ...up to 10 letters long and up to 100 disc titles (with ITS playlist) into the multi-CD player. 1 Play a CD that you can input CD titles and display the title. Press 5 or ∞ to select a CD. 2 Press FUNCTION and hold until TITLE appears in the current range, ITS Empty is displayed ...
...ITS appears in the display: TITLE (disc title input)-ITS (ITS programming) • When playing a CD TEXT disc on a CD TEXT compatible multi-CD player, you want to delete all tracks on , press FUNCTION. 1 Play a CD you want to delete a track from your ITS playlist, you want to enter the title. Refer ...up to 10 letters long and up to 100 disc titles (with ITS playlist) into the multi-CD player. 1 Play a CD that you can input CD titles and display the title. Press 5 or ∞ to select a CD. 2 Press FUNCTION and hold until TITLE appears in the current range, ITS Empty is displayed ...
Operation Manual
Page 25
.... Press DISPLAY repeatedly to play time)-Disc Title (disc title) When you press 3 one of any disc that have been entered into the multi-CD player and select one more time, the entered title is displayed. Each press of the alphabet. That selection will be displayed. 3 Press 5 to... select T.LIST. Multi-CD Player Section 05 English Español Deutsch Français 3 Press 1 numbered button to the next position and then select the next letter. Notes...
.... Press DISPLAY repeatedly to play time)-Disc Title (disc title) When you press 3 one of any disc that have been entered into the multi-CD player and select one more time, the entered title is displayed. Each press of the alphabet. That selection will be displayed. 3 Press 5 to... select T.LIST. Multi-CD Player Section 05 English Español Deutsch Français 3 Press 1 numbered button to the next position and then select the next letter. Notes...
Operation Manual
Page 26
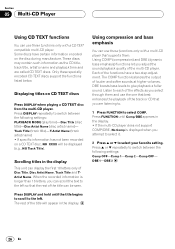
...Title, Disc Artist Name, Track Title and TArtist Name. The rest of the functions have certain information encoded on CD TEXT discs Press DISPLAY when playing a CD TEXT disc from the multi-CD player. DBE 1-DBE 2 26 En Displaying titles on the disc during manufacture. Scrolling titles in the display....Press 5 or ∞ repeatedly to select your favorite setting. Press DISPLAY and hold until Comp/DBE appears in the display. • If the multi-CD player does not support COMP/DBE, No Comp is longer than 16 letters, you attempt to select it. 2 Press 5 or ∞ to switch between...
...Title, Disc Artist Name, Track Title and TArtist Name. The rest of the functions have certain information encoded on CD TEXT discs Press DISPLAY when playing a CD TEXT disc from the multi-CD player. DBE 1-DBE 2 26 En Displaying titles on the disc during manufacture. Scrolling titles in the display....Press 5 or ∞ repeatedly to select your favorite setting. Press DISPLAY and hold until Comp/DBE appears in the display. • If the multi-CD player does not support COMP/DBE, No Comp is longer than 16 letters, you attempt to select it. 2 Press 5 or ∞ to switch between...
Operation Manual
Page 28
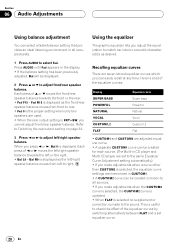
... adjust left or the right. • Bal L9 - Bal R9 is FRT+SW, you can be created for each source. (The Built-in CD player and Multi-CD player are set equalizer curve. 28 En Recalling equalizer curves There are used. • When the rear output setting is displayed as desired. Press...
... adjust left or the right. • Bal L9 - Bal R9 is FRT+SW, you can be created for each source. (The Built-in CD player and Multi-CD player are set equalizer curve. 28 En Recalling equalizer curves There are used. • When the rear output setting is displayed as desired. Press...
Operation Manual
Page 31
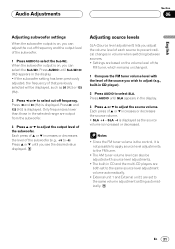
.... Each press of the FM tuner, which remains unchanged. 1 Compare the FM tuner volume level with source level adjustments. • The built-in CD and the multi-CD players are both set to the same source level adjustment volume automatically. • External unit 1 and External unit 2 are based on the volume level... the subwoofer output is on, you can adjust the cut -off frequency and the output level of the source you wish to adjust (e.g., built-in CD player). 2 Press AUDIO to select the Sub-W2. SLA -4 is displayed as 50 (Hz) or 125 (Hz). 2 Press 2 or 3 to select cut -off frequency...
.... Each press of the FM tuner, which remains unchanged. 1 Compare the FM tuner volume level with source level adjustments. • The built-in CD and the multi-CD players are both set to the same source level adjustment volume automatically. • External unit 1 and External unit 2 are based on the volume level... the subwoofer output is on, you can adjust the cut -off frequency and the output level of the source you wish to adjust (e.g., built-in CD player). 2 Press AUDIO to select the Sub-W2. SLA -4 is displayed as 50 (Hz) or 125 (Hz). 2 Press 2 or 3 to select cut -off frequency...


