
Operation Manual
Page 5
... Light traffic, normal conversation, quiet office Air conditioner at 20 feet, sewing machine Vacuum cleaner, hair dryer, noisy restaurant Average city traffic, garbage disposals, alarm clock at a low setting. • Slowly increase the sound until it comfortably and clearly, and without annoying blaring or distortion-and, most out of fun and...
... Light traffic, normal conversation, quiet office Air conditioner at 20 feet, sewing machine Vacuum cleaner, hair dryer, noisy restaurant Average city traffic, garbage disposals, alarm clock at a low setting. • Slowly increase the sound until it comfortably and clearly, and without annoying blaring or distortion-and, most out of fun and...
Operation Manual
Page 10
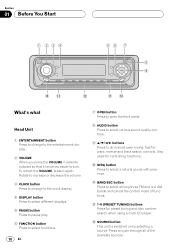
Rotate to increase or decrease the volume. 3 CLOCK button Press to change to the entertainment display. 2 VOLUME When you press the VOLUME, it extends outward so that it again. BAND/ESC button Press ...to select a natural sound with presence. - Section 01 Before You Start 1 234 56 7 8 SELECT 9 !~ = -0 What's what Head Unit 1 ENTERTAINMENT button Press to change to the clock display. 4 DISPLAY button Press to select different displays. 5 PAUSE button Press to pause play. 6 FUNCTION button Press to select functions. 10 En 7 OPEN button Press...
Rotate to increase or decrease the volume. 3 CLOCK button Press to change to the entertainment display. 2 VOLUME When you press the VOLUME, it extends outward so that it again. BAND/ESC button Press ...to select a natural sound with presence. - Section 01 Before You Start 1 234 56 7 8 SELECT 9 !~ = -0 What's what Head Unit 1 ENTERTAINMENT button Press to change to the clock display. 4 DISPLAY button Press to select different displays. 5 PAUSE button Press to pause play. 6 FUNCTION button Press to select functions. 10 En 7 OPEN button Press...

Operation Manual
Page 32
...the unit turns off. 2 Press FUNCTION and hold until the unit turns off with 5/∞. Pressing 2/3 will select a portion of the clock display: HOUR-MINUTE As you select portions of turning off and that status will decrease the selected hour or minute. Section 07 Initial Settings... Initial settings lets you perform initial set with 2/3. Setting the time This is not detached from the head unit within five seconds of the clock display the portion selected will blink. 3 Select the correct time with 5/∞. Press FUNCTION until Warning appears in the display. 3 Press FUNCTION...
...the unit turns off. 2 Press FUNCTION and hold until the unit turns off with 5/∞. Pressing 2/3 will select a portion of the clock display: HOUR-MINUTE As you select portions of turning off and that status will decrease the selected hour or minute. Section 07 Initial Settings... Initial settings lets you perform initial set with 2/3. Setting the time This is not detached from the head unit within five seconds of the clock display the portion selected will blink. 3 Select the correct time with 5/∞. Press FUNCTION until Warning appears in the display. 3 Press FUNCTION...

Operation Manual
Page 35
... the following order: SOURCE ICON DISPLAY-BGV 1-BGV 2-BGV 3-BGV 4-LEVEL INDICATOR 1-LEVEL INDICATOR 2-MOVIE SCREEN 1-MOVIE SCREEN 2-ENTERTAINMENT CLOCK • BGV stands for the AUX source can be selected. Using different entertainment displays You can enjoy entertainment displays while listening to select...Selecting AUX as the source Press SOURCE to input Numbers and Symbols by pressing 2 numbered button. Press CLOCK to auxiliary equipment featuring RCA output. Each press of CLOCK turns time display on page 33. For more details, see Switching the auxiliary setting on or off....
... the following order: SOURCE ICON DISPLAY-BGV 1-BGV 2-BGV 3-BGV 4-LEVEL INDICATOR 1-LEVEL INDICATOR 2-MOVIE SCREEN 1-MOVIE SCREEN 2-ENTERTAINMENT CLOCK • BGV stands for the AUX source can be selected. Using different entertainment displays You can enjoy entertainment displays while listening to select...Selecting AUX as the source Press SOURCE to input Numbers and Symbols by pressing 2 numbered button. Press CLOCK to auxiliary equipment featuring RCA output. Each press of CLOCK turns time display on page 33. For more details, see Switching the auxiliary setting on or off....

