Owner's Manual
Page 10
... will be limited to input voice commands. Set [VISIBLE] in the display. Depending on the connected phone, this unit. dial and then talk into the microphone to the following two levels: - Recall the preset phone numbers. To preset phone numbers 1 Select a phone number from your iPhone. 10 En Phone menu Menu...
... will be limited to input voice commands. Set [VISIBLE] in the display. Depending on the connected phone, this unit. dial and then talk into the microphone to the following two levels: - Recall the preset phone numbers. To preset phone numbers 1 Select a phone number from your iPhone. 10 En Phone menu Menu...
Owner's Manual
Page 20
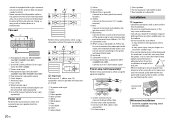
... Yellow Connect to terminal controlled by the ignition switch (12 V DC). Microphone (Only for DEH-X6800BT/ X6810BT/X4800BT/X4810BT) 4 m (13 ft. 1 in.) SiriusXM Connect Vehicle Tuner input (Only for DEH-X3800S) Power cord input Microphone input (Only for DEHX4800BT/X4810BT) Connect to a car's illumination signal....to the system control terminal of the vehicle. - Subwoofer (4 Ω) × 2 Orange/white (Not available for DEHX6800BT/X6810BT/X4800BT/X4810BT) Rear output or subwoofer output Front output Antenna input Fuse (10 A) Wired remote input Hard-wired remote control adapter can be...
... Yellow Connect to terminal controlled by the ignition switch (12 V DC). Microphone (Only for DEH-X6800BT/ X6810BT/X4800BT/X4810BT) 4 m (13 ft. 1 in.) SiriusXM Connect Vehicle Tuner input (Only for DEH-X3800S) Power cord input Microphone input (Only for DEHX4800BT/X4810BT) Connect to a car's illumination signal....to the system control terminal of the vehicle. - Subwoofer (4 Ω) × 2 Orange/white (Not available for DEHX6800BT/X6810BT/X4800BT/X4810BT) Rear output or subwoofer output Front output Antenna input Fuse (10 A) Wired remote input Hard-wired remote control adapter can be...

Owner's Manual
Page 21
...panel The front panel can be placed directly in place. Installing the microphone (Only for DEH-X6800BT/X6810BT/X4800BT/ X4810BT) The microphone should be secured with the supplied screw. Be sure to install the microphone in such a way that the unit is installed securely in front ... using a screwdriver to become wound around the steering column or shift lever. Microphone lead Groove Microphone Microphone clip Microphone base 2 Install the microphone on the rear side of the steering column. 2 Install the microphone clip on each side. 2 Secure the mounting sleeve by using the supplied ...
...panel The front panel can be placed directly in place. Installing the microphone (Only for DEH-X6800BT/X6810BT/X4800BT/ X4810BT) The microphone should be secured with the supplied screw. Be sure to install the microphone in such a way that the unit is installed securely in front ... using a screwdriver to become wound around the steering column or shift lever. Microphone lead Groove Microphone Microphone clip Microphone base 2 Install the microphone on the rear side of the steering column. 2 Install the microphone clip on each side. 2 Secure the mounting sleeve by using the supplied ...


