
Owner's Manual
Page 2
... 6 - Storing and recalling broadcast frequencies 6 - Setting the clock 9 - Before You Start Information to User 3 For Canadian model 3 About this manual before using the product for the first time, to the radio 6 - Adjusting the volume 6 Tuner 6 - Adjusting equalizer curves 8 - Please read through this unit 3 After-sales service for Pioneer products 3 Visit our website 4 Protecting...
... 6 - Storing and recalling broadcast frequencies 6 - Setting the clock 9 - Before You Start Information to User 3 For Canadian model 3 About this manual before using the product for the first time, to the radio 6 - Adjusting the volume 6 Tuner 6 - Adjusting equalizer curves 8 - Please read through this unit 3 After-sales service for Pioneer products 3 Visit our website 4 Protecting...

Owner's Manual
Page 5
...FM bands and one AM band and to increase or decrease the volume. En 5 Tuner Band and frequency are off . 7 CLOCK button Press to change to the clock display. 8 DETACH button Press to remove the front panel from your built-in CD player. 6 PAUSE button Press to turn ... seek tuning is displayed. 2 Preset number/track number indicator Shows the track number or preset number. 3 RPT indicator Shows when repeat play time, and other setting. ! Press to select various equalizer curves. Operating this unit Section 02 English What's what Head unit 12 3 4 56 dc b a 98 7 1 ...
...FM bands and one AM band and to increase or decrease the volume. En 5 Tuner Band and frequency are off . 7 CLOCK button Press to change to the clock display. 8 DETACH button Press to remove the front panel from your built-in CD player. 6 PAUSE button Press to turn ... seek tuning is displayed. 2 Preset number/track number indicator Shows the track number or preset number. 3 RPT indicator Shows when repeat play time, and other setting. ! Press to select various equalizer curves. Operating this unit Section 02 English What's what Head unit 12 3 4 56 dc b a 98 7 1 ...
Owner's Manual
Page 9
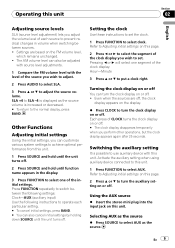
... level adjustment) lets you adjust the volume level of each particular setting. # To cancel initial settings, press BAND. # You can turn the clock display on or off . ! En 9 Setting the clock Use these instructions to set . Each press of CLOCK turns the clock display on or off . # The clock display disappears temporarily when you perform other operations, but the...
... level adjustment) lets you adjust the volume level of each particular setting. # To cancel initial settings, press BAND. # You can turn the clock display on or off . ! En 9 Setting the clock Use these instructions to set . Each press of CLOCK turns the clock display on or off . # The clock display disappears temporarily when you perform other operations, but the...


