
Owner's Manual
Page 6
Contents 01 Before you start Features 8 What's in the box 9 Putting the batteries in the remote control 10 Using the remote control 10 Disc / content format playback compatibility 10 About the internal hard disk drive 13 02 Connecting up Rear panel connections 14 Front panel connections... receiver (2) . . . 18 Connecting to an AV amplifier or receiver 19 Connecting other AV sources 20 Plugging in 20 03 Controls and displays Front panel 21 Remote control 22 Display 24 04 Getting started Switching on and setting up 25 Setting up the TV Guide On Screen™ system 27 Selecting the...
Contents 01 Before you start Features 8 What's in the box 9 Putting the batteries in the remote control 10 Using the remote control 10 Disc / content format playback compatibility 10 About the internal hard disk drive 13 02 Connecting up Rear panel connections 14 Front panel connections... receiver (2) . . . 18 Connecting to an AV amplifier or receiver 19 Connecting other AV sources 20 Plugging in 20 03 Controls and displays Front panel 21 Remote control 22 Display 24 04 Getting started Switching on and setting up 25 Setting up the TV Guide On Screen™ system 27 Selecting the...

Owner's Manual
Page 7
... 90 Audio DRC 91 13 The Initial Setup menu Using the Initial Setup menu 92 14 Additional information Resetting the recorder 98 Setting up the remote to control your TV 98 Screen sizes and disc formats 99 Minimum copying times 100 Troubleshooting 101 Frequently asked questions 103 About DV 104 Manual...
... 90 Audio DRC 91 13 The Initial Setup menu Using the Initial Setup menu 92 14 Additional information Resetting the recorder 98 Setting up the remote to control your TV 98 Screen sizes and disc formats 99 Minimum copying times 100 Troubleshooting 101 Frequently asked questions 103 About DV 104 Manual...

Owner's Manual
Page 8
...play VR mode HDD Using chase play you already made on the same DVD. • On-screen Help Use the HELP button on the remote control to record programs with this recorder to a Dolby Digital and/or DTScompatible AV amp/receiver to enjoy full surround sound effects from Dolby... your TV/monitor for the current operation. • Disc Navigator The on -screen access to keep recordings on the DVR-633H-S's internal 160 GB (gigabyte) hard disk (HDD), or the DVR-533H-S/DVR532H-S/DVR-531H-S's 80 GB HDD. For example, you could set -top-box supplied from the original. For example, you...
...play VR mode HDD Using chase play you already made on the same DVD. • On-screen Help Use the HELP button on the remote control to record programs with this recorder to a Dolby Digital and/or DTScompatible AV amp/receiver to enjoy full surround sound effects from Dolby... your TV/monitor for the current operation. • Disc Navigator The on -screen access to keep recordings on the DVR-633H-S's internal 160 GB (gigabyte) hard disk (HDD), or the DVR-533H-S/DVR532H-S/DVR-531H-S's 80 GB HDD. For example, you could set -top-box supplied from the original. For example, you...

Owner's Manual
Page 9
...DVD or HDD for transferring camcorder footage to as recording in the box when you open it. • Remote control • AA/R6P dry cell batteries x2 • Audio/video cable (red/white/yellow) &#... on copying: You may use of the Original content. • Play Video mode recordings on Pioneer's DVD recorders. Supporting playback of DVDR / DVD-RW discs is optional for which you own ... and other remedies. Unless you own the copyright or have obtained permission from a DV camcorder DVR-633/533H-S only This recorder has a built-in uncompressed 16-bit Linear PCM format. Please note that...
...DVD or HDD for transferring camcorder footage to as recording in the box when you open it. • Remote control • AA/R6P dry cell batteries x2 • Audio/video cable (red/white/yellow) &#... on copying: You may use of the Original content. • Play Video mode recordings on Pioneer's DVD recorders. Supporting playback of DVDR / DVD-RW discs is optional for which you own ... and other remedies. Unless you own the copyright or have obtained permission from a DV camcorder DVR-633/533H-S only This recorder has a built-in uncompressed 16-bit Linear PCM format. Please note that...
Owner's Manual
Page 10
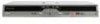
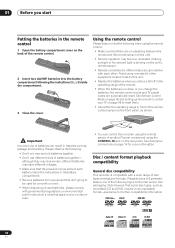
.... • Make sure that the plus and minus ends of each other equipment located close to this recorder using the remote sensor of another Pioneer component using the remote control: • Make sure that apply in your TV on page 98 to be in an unplayable format-see below ...for further compatibility information. Using the remote control Please keep in mind the following the indications ( , ) inside the compartment. 3 Close the cover....
.... • Make sure that the plus and minus ends of each other equipment located close to this recorder using the remote sensor of another Pioneer component using the remote control: • Make sure that apply in your TV on page 98 to be in an unplayable format-see below ...for further compatibility information. Using the remote control Please keep in mind the following the indications ( , ) inside the compartment. 3 Close the cover....
Owner's Manual
Page 14
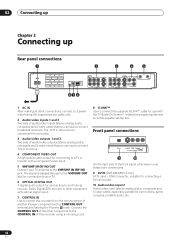
...VIDEO OUT S-VIDEO PR 87 6 1 AC IN After making all other component to the CONTROL IN of this recorder from the remote sensor of another Pioneer component with the TV Guide On Screen™ interactive program guide and a control-capable set-top box. Connect the CONTROL OUT of... source component for recording. 3 Audio/video outputs 1 and 2 Two sets of the front panel a flip-down cover hides more connections. 9 DV IN (DVR-633/533H-S only) A DV input i.LINK connector, suitable for camcorders, game consoles, portable audio, etc. 14 En Front panel connections DV IN S-VIDEO VIDEO L(MONO...
...VIDEO OUT S-VIDEO PR 87 6 1 AC IN After making all other component to the CONTROL IN of this recorder from the remote sensor of another Pioneer component with the TV Guide On Screen™ interactive program guide and a control-capable set-top box. Connect the CONTROL OUT of... source component for recording. 3 Audio/video outputs 1 and 2 Two sets of the front panel a flip-down cover hides more connections. 9 DV IN (DVR-633/533H-S only) A DV input i.LINK connector, suitable for camcorders, game consoles, portable audio, etc. 14 En Front panel connections DV IN S-VIDEO VIDEO L(MONO...

Owner's Manual
Page 17
... following page. Alternatively, experiment with your cable box will pick up 02 Connecting to a set of the G-LINK™ cable so that came with the remote control, operating it from this recorder 'through the TV Guide On Screen2 system. Connecting up the control signals (see diagram). 3 Cable box/ VHF/UHF Satellite...
... following page. Alternatively, experiment with your cable box will pick up 02 Connecting to a set of the G-LINK™ cable so that came with the remote control, operating it from this recorder 'through the TV Guide On Screen2 system. Connecting up the control signals (see diagram). 3 Cable box/ VHF/UHF Satellite...

Owner's Manual
Page 18
... CONTROL IN DIGITAL OUT OPTICAL 3 A/V OUT 1 1 VHF/UHF OUT Cable box/ Satellite receiver VHF/UHF IN G-LINK cable See the manual that came with the remote control, operating it on the cable box/satellite receiver. Important • Do not connect this recorder to record shows. 18 En Antenna/cable TV wall...
... CONTROL IN DIGITAL OUT OPTICAL 3 A/V OUT 1 1 VHF/UHF OUT Cable box/ Satellite receiver VHF/UHF IN G-LINK cable See the manual that came with the remote control, operating it on the cable box/satellite receiver. Important • Do not connect this recorder to record shows. 18 En Antenna/cable TV wall...

Owner's Manual
Page 21
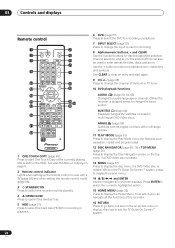
... between the hard disk drive (HDD) and DVD for recording and playback. 7 MENU Press to display a DVD-Video disc menu. 8 Front panel display and IR remote sensor See Display on page 9. 11 Press to stop playback. Note 1.DV input on -screen displays. See also the Note on copying on page 24... / / / and ENTER Used to navigate all the functions of the currently playing title to display the Home Menu, from which you can navigate all on DVR-633/533H-S only 21 En Press ENTER to start recording. When stopped, the / buttons can also be used to change the TV channel. 15 HOME MENU...
... between the hard disk drive (HDD) and DVD for recording and playback. 7 MENU Press to display a DVD-Video disc menu. 8 Front panel display and IR remote sensor See Display on page 9. 11 Press to stop playback. Note 1.DV input on -screen displays. See also the Note on copying on page 24... / / / and ENTER Used to navigate all the functions of the currently playing title to display the Home Menu, from which you can navigate all on DVR-633/533H-S only 21 En Press ENTER to start recording. When stopped, the / buttons can also be used to change the TV channel. 15 HOME MENU...
Owner's Manual
Page 22
03 Controls and displays Remote control 1 3 5 8 10 12 14 15 17 20 21 22 STANDBY/ON ONE TOUCH COPY OPEN/CLOSE HDD ABC DVD DEF INPUT SELECT GHI JKL MNO ... (page 65) Switches camera angles on discs with a TV (page 98) and when setting the remote control mode (page 96). 3 STANDBY/ON Press to switch the recorder on page 9. 2 Remote control indicator Lights when setting up the remote control for titles, discs and so on . channel selection, and so on . The same buttons...
03 Controls and displays Remote control 1 3 5 8 10 12 14 15 17 20 21 22 STANDBY/ON ONE TOUCH COPY OPEN/CLOSE HDD ABC DVD DEF INPUT SELECT GHI JKL MNO ... (page 65) Switches camera angles on discs with a TV (page 98) and when setting the remote control mode (page 96). 3 STANDBY/ON Press to switch the recorder on page 9. 2 Remote control indicator Lights when setting up the remote control for titles, discs and so on . channel selection, and so on . The same buttons...
Owner's Manual
Page 24
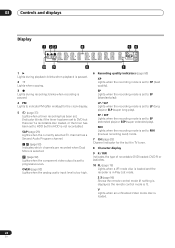
... (page 76) Lights when a VR mode disc is loaded and the recorder is in Play List mode. 2 3 (page 96) Shows the remote control mode (if nothing is displayed, the remote control mode is set to progressive scan. LP / SLP Lights when the recording mode is set to XP (best quality). OVER (page...
... (page 76) Lights when a VR mode disc is loaded and the recorder is in Play List mode. 2 3 (page 96) Shows the remote control mode (if nothing is displayed, the remote control mode is set to progressive scan. LP / SLP Lights when the recording mode is set to XP (best quality). OVER (page...

Owner's Manual
Page 25
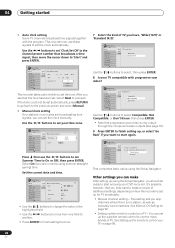
... Setup Basic Tuner Video Out Audio In Audio Out Language Recording Playback Clock Setting Help Complete this recorder. 2 Press the STANDBY/ON button on the remote control or the front panel to switch on. Tuning 7/68 Cancel If EPG data is downloaded, you must reset the unit to its default settings...
... Setup Basic Tuner Video Out Audio In Audio Out Language Recording Playback Clock Setting Help Complete this recorder. 2 Press the STANDBY/ON button on the remote control or the front panel to switch on. Tuning 7/68 Cancel If EPG data is downloaded, you must reset the unit to its default settings...
Owner's Manual
Page 26
...TV channels broadcast time signals together with progressive scan video? Use the / buttons to set up the remote to 'Start' and press ENTER. Other settings you want to make After setting up the remote to stations. See Manual CH Setting on page 92. • Setting up using the Setup Navigator...Press ENTER to finish setting the time. 7 Select the kind of TV you see page 16). 9 Press ENTER to finish setting up the supplied remote control to start enjoying your TV on how the recorder is complete! This setting lets you may want to control many brands of additional settings...
...TV channels broadcast time signals together with progressive scan video? Use the / buttons to set up the remote to 'Start' and press ENTER. Other settings you want to make After setting up the remote to stations. See Manual CH Setting on page 92. • Setting up using the Setup Navigator...Press ENTER to finish setting the time. 7 Select the kind of TV you see page 16). 9 Press ENTER to finish setting up the supplied remote control to start enjoying your TV on how the recorder is complete! This setting lets you may want to control many brands of additional settings...
Owner's Manual
Page 27
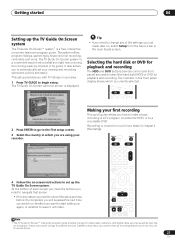
... to navigate that screen. • If for playback and recording. Selecting the hard disk or DVD for playback and recording The HDD and DVD buttons (remote control and front panel) are using your viewing and recording selections quickly and easily. At the bottom of the settings you want to record shows...
... to navigate that screen. • If for playback and recording. Selecting the hard disk or DVD for playback and recording The HDD and DVD buttons (remote control and front panel) are using your viewing and recording selections quickly and easily. At the bottom of the settings you want to record shows...
Owner's Manual
Page 28
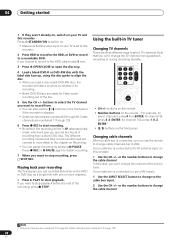
... to this recorder. buttons to select the TV channel you just recorded should be in the chapter on Recording. • You can also use the remote to change the channel of the built-in TV tuner Changing TV channels There are ready for recording. • Blank DVD-R discs are three different... use the / buttons on the front panel if the recorder is connected, you want to stop recording, press STOP REC. buttons on the remote • Number buttons on the remote - Note that the video input on your TV is connected to the RF antenna input on this case, you load a new, blank...
... to this recorder. buttons to select the TV channel you just recorded should be in the chapter on Recording. • You can also use the remote to change the channel of the built-in TV tuner Changing TV channels There are ready for recording. • Blank DVD-R discs are three different... use the / buttons on the front panel if the recorder is connected, you want to stop recording, press STOP REC. buttons on the remote • Number buttons on the remote - Note that the video input on your TV is connected to the RF antenna input on this case, you load a new, blank...

Owner's Manual
Page 36
... airs on the same channel at the same time/day. • Record Suspend - TV Guide On Screen navigation The table below shows a summary of the remote buttons you press TV GUIDE. Remind Monday through Friday at the same time. • Record Weekly - A reminder is the screen you see when you 'll...
... airs on the same channel at the same time/day. • Record Suspend - TV Guide On Screen navigation The table below shows a summary of the remote buttons you press TV GUIDE. Remind Monday through Friday at the same time. • Record Weekly - A reminder is the screen you see when you 'll...

Owner's Manual
Page 38
... the start time of the recording to On time, or up to 120 mins. recording continues so that the timer settings are pressed on the remote or front panel, LOCK is briefly displayed again. • To unlock the recorder, press and hold ì REC for three seconds until the display shows... of the recording to On time, or up to highlight a field; The recording is now set the recording mode. 5 Once all the front panel and remote control buttons inoperative using the child lock feature.
... the start time of the recording to On time, or up to 120 mins. recording continues so that the timer settings are pressed on the remote or front panel, LOCK is briefly displayed again. • To unlock the recorder, press and hold ì REC for three seconds until the display shows... of the recording to On time, or up to highlight a field; The recording is now set the recording mode. 5 Once all the front panel and remote control buttons inoperative using the child lock feature.

Owner's Manual
Page 52
...; Chase playback is not possible using a VR mode DVD-R disc. • During recording, press PLAY to start playback from the beginning of a movie on the remote to watching the recording in , playback is 'chasing' the recording). for detailed instructions. 4 If the broadcast audio has a SAP channel (Second Audio Program), press AUDIO...
...; Chase playback is not possible using a VR mode DVD-R disc. • During recording, press PLAY to start playback from the beginning of a movie on the remote to watching the recording in , playback is 'chasing' the recording). for detailed instructions. 4 If the broadcast audio has a SAP channel (Second Audio Program), press AUDIO...

Owner's Manual
Page 53
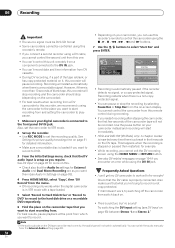
Recording will also pause if the signal is interrupted during recording. • If your TV before recording. Using the recorder's remote, you will only start recording. • The recorder will not be able to record it. Before recording, make sure that the Audio In settings ...record from is connected properly to the DVD recorder. There are as a camcorder or VCR, connected to one of this recorder. DV input (front panel - DVR-633/533H-S only) Check that the audio input for more details. Input 1 • L2 - See Restrictions on video recording on page 50 for the DV IN...
Recording will also pause if the signal is interrupted during recording. • If your TV before recording. Using the recorder's remote, you will only start recording. • The recorder will not be able to record it. Before recording, make sure that the Audio In settings ...record from is connected properly to the DVD recorder. There are as a camcorder or VCR, connected to one of this recorder. DV input (front panel - DVR-633/533H-S only) Check that the audio input for more details. Input 1 • L2 - See Restrictions on video recording on page 50 for the DV IN...
Owner's Manual
Page 54
...for detailed information. • Make sure a recordable disc is loaded if you want to record. • Depending on your camcorder, you can use this recorder's remote to control the camcorder using the , , , , , and buttons. 7 Use the / buttons to select 'Start Rec' and press ENTER. SP (2h00m/DVD...If it , this recorder will not switch automatically. Stop 1.02.22 Control with the recorder! You cannot control the camcorder from this remote control during recording. • If you restart recording after stopping the camcorder, the first few seconds of the camcorder tape will not be...
...for detailed information. • Make sure a recordable disc is loaded if you want to record. • Depending on your camcorder, you can use this recorder's remote to control the camcorder using the , , , , , and buttons. 7 Use the / buttons to select 'Start Rec' and press ENTER. SP (2h00m/DVD...If it , this recorder will not switch automatically. Stop 1.02.22 Control with the recorder! You cannot control the camcorder from this remote control during recording. • If you restart recording after stopping the camcorder, the first few seconds of the camcorder tape will not be...


