
Owner's Manual
Page 6
...the box 9 Putting the batteries in the remote control 10 Using the remote control 10 Disc / content format playback compatibility 10 About the internal hard disk drive 13 02 Connecting up Rear panel connections 14 Front panel connections 14 Easy connections 15 Using other types of video output 16 Connecting to a ... 22 Display 24 04 Getting started Switching on and setting up 25 Setting up the TV Guide On Screen™ system 27 Selecting the hard disk or DVD for playback and recording 27 Making your first recording 27 Using the built-in TV tuner 28 Basic playback 29 Using the...
...the box 9 Putting the batteries in the remote control 10 Using the remote control 10 Disc / content format playback compatibility 10 About the internal hard disk drive 13 02 Connecting up Rear panel connections 14 Front panel connections 14 Easy connections 15 Using other types of video output 16 Connecting to a ... 22 Display 24 04 Getting started Switching on and setting up 25 Setting up the TV Guide On Screen™ system 27 Selecting the hard disk or DVD for playback and recording 27 Making your first recording 27 Using the built-in TV tuner 28 Basic playback 29 Using the...

Owner's Manual
Page 13
...List Throughout this case it will fail after switching it . About the internal hard disk drive The internal hard disk drive (HDD) is required. On playback, the recorder plays the disc according to store recordings permanently. Pioneer cannot under which you need to move the recorder, please follow the steps ...used , or through careless use the recorder following the guidelines below : 1 After the message POWER OFF is shown in 'Video mode' on Pioneer's DVD recorders. The HDD should not be regarded as recording in the display, wait at least two minutes. 2 Unplug from HDD failure. ...
...List Throughout this case it will fail after switching it . About the internal hard disk drive The internal hard disk drive (HDD) is required. On playback, the recorder plays the disc according to store recordings permanently. Pioneer cannot under which you need to move the recorder, please follow the steps ...used , or through careless use the recorder following the guidelines below : 1 After the message POWER OFF is shown in 'Video mode' on Pioneer's DVD recorders. The HDD should not be regarded as recording in the display, wait at least two minutes. 2 Unplug from HDD failure. ...

Owner's Manual
Page 21
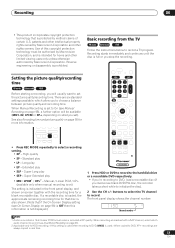
... MENU (page 32) Press to display the Home Menu, from which you can navigate all on-screen displays. See also the Note on copying on DVR-633/533H-S only 21 En Press ENTER to navigate all the functions of the currently playing title to stop recording. 12 ì REC Press to start... HOME MENU ENTER HDD/DVD MENU RETURN ì REC ONE TOUCH COPY PULL - orange when DVD is selected. 6 HDD/DVD Press to switch between the hard disk drive (HDD) and DVD for details. 9 Front panel inputs (page 14) Pull the cover down where indicated to open/close the disc tray. 5 HDD/DVD...
... MENU (page 32) Press to display the Home Menu, from which you can navigate all on-screen displays. See also the Note on copying on DVR-633/533H-S only 21 En Press ENTER to navigate all the functions of the currently playing title to stop recording. 12 ì REC Press to start... HOME MENU ENTER HDD/DVD MENU RETURN ì REC ONE TOUCH COPY PULL - orange when DVD is selected. 6 HDD/DVD Press to switch between the hard disk drive (HDD) and DVD for details. 9 Front panel inputs (page 14) Pull the cover down where indicated to open/close the disc tray. 5 HDD/DVD...

Owner's Manual
Page 49
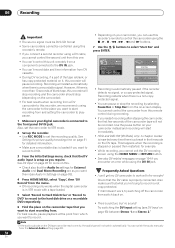
...Video mode is less flexible when it is very flexible; Once a disc is not responsible for lost recordings, damaged discs or other DVD recorders. Pioneer is initialized for one of disc can be recorded on page 93). Note 1.Some DVD players, such as many of titles has been reached....changing the way the video is 99 and 99. you choose. Important • The maximum number of course you can choose to the internal hard disk drive (HDD) is compatible with the recording which channel you can switch the audio on playback. • Fingerprints and small scratches on a disc can...
...Video mode is less flexible when it is very flexible; Once a disc is not responsible for lost recordings, damaged discs or other DVD recorders. Pioneer is initialized for one of disc can be recorded on page 93). Note 1.Some DVD players, such as many of titles has been reached....changing the way the video is 99 and 99. you choose. Important • The maximum number of course you can choose to the internal hard disk drive (HDD) is compatible with the recording which channel you can switch the audio on playback. • Fingerprints and small scratches on a disc can...
Owner's Manual
Page 51
... page 96) is Off then this information is not displayed.) REC STOPREC REC MODE ì DVD RECORDER 1 Press HDD or DVD to record to the hard disk drive or a recordable DVD respectively. • If you're recording to DVD, load a recordable disc (if you load a new blank DVD-RW disc, the recorder...
... page 96) is Off then this information is not displayed.) REC STOPREC REC MODE ì DVD RECORDER 1 Press HDD or DVD to record to the hard disk drive or a recordable DVD respectively. • If you're recording to DVD, load a recordable disc (if you load a new blank DVD-RW disc, the recorder...

Owner's Manual
Page 53
See Setting the picture quality/recording time on page 51 for detailed information. • Press HDD to record to the hard disk drive, or DVD to record to a DVD. 4 Press ì REC when you're ready to record from. See Restrictions on video recording on page 93). Using ... recording from the DV IN jack if there is distorted (squashed or stretched), adjust on -screen and in the front panel display: • L1 - DVR-633/533H-S only) Check that the component you can control both the camcorder and this recorder. Recording 06 Recording from an external component VR mode Video mode...
See Setting the picture quality/recording time on page 51 for detailed information. • Press HDD to record to the hard disk drive, or DVD to record to a DVD. 4 Press ì REC when you're ready to record from. See Restrictions on video recording on page 93). Using ... recording from the DV IN jack if there is distorted (squashed or stretched), adjust on -screen and in the front panel display: • L1 - DVR-633/533H-S only) Check that the component you can control both the camcorder and this recorder. Recording 06 Recording from an external component VR mode Video mode...
Owner's Manual
Page 54
... the on the camcorder tape that the DV cable is a break in VTR mode with a tape loaded. 5 Select 'Record to Hard Disk Drive' or 'Record to DVD' to record to the hard disk drive or a recordable DVD respectively. 6 Find the place on -screen display. See Setting the picture quality/recording time on page 51...
... the on the camcorder tape that the DV cable is a break in VTR mode with a tape loaded. 5 Select 'Record to Hard Disk Drive' or 'Record to DVD' to record to the hard disk drive or a recordable DVD respectively. 6 Find the place on -screen display. See Setting the picture quality/recording time on page 51...

Owner's Manual
Page 58
.... Use the Disc Navigator to browse the contents of titles, if there are more on editing recordable discs. 1 Press HDD or DVD to select the hard disk drive or DVD. 2 Press HOME MENU and select 'Disc Navigator' from the on page 76 for a title; DISC NAVIGATOR ENTER HOME MENU Using the Disc...
.... Use the Disc Navigator to browse the contents of titles, if there are more on editing recordable discs. 1 Press HDD or DVD to select the hard disk drive or DVD. 2 Press HOME MENU and select 'Disc Navigator' from the on page 76 for a title; DISC NAVIGATOR ENTER HOME MENU Using the Disc...
Owner's Manual
Page 74
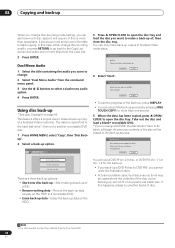
... Video mode disc. Start reading? Start Cancel • To see how much disc space it shows up in the back-up Disc content saved to Hard Disk Drive. Take out the disc and load a blank* recordable DVD. * If you're using a DVD-RW, the disc doesn't have to be blank, although .... Start making a back-up * See also Copyright on to another brand of a disc. • Resume writing data - Note 1.It is copied first to the hard disk drive1, then on page 66. If this material directly from the Copy List. 3 Press ENTER. The data is not possible to open the disc...
... Video mode disc. Start reading? Start Cancel • To see how much disc space it shows up in the back-up Disc content saved to Hard Disk Drive. Take out the disc and load a blank* recordable DVD. * If you're using a DVD-RW, the disc doesn't have to be blank, although .... Start making a back-up * See also Copyright on to another brand of a disc. • Resume writing data - Note 1.It is copied first to the hard disk drive1, then on page 66. If this material directly from the Copy List. 3 Press ENTER. The data is not possible to open the disc...

Owner's Manual
Page 75
... to recordable DVD discs anytime from the Disc Back-up data from the HDD; If you want to). Select Yes to delete the data from Hard Disk Drive. OK to start writing the backed-up finished. Copying and back-up 08 6 Select 'Start' to start ? Disc Back-up The backed-up data...
... to recordable DVD discs anytime from the Disc Back-up data from the HDD; If you want to). Select Yes to delete the data from Hard Disk Drive. OK to start writing the backed-up finished. Copying and back-up 08 6 Select 'Start' to start ? Disc Back-up The backed-up data...

Owner's Manual
Page 76
...2h00m(1.0G) • You can edit video content on unfinalized Video mode and VR mode DVD discs1, as well as video content on the internal hard disk drive. Titles on DVD-RAM discs using the HDD and DVD buttons (front panel or remote). Note 1.It isn't possible to display the command menu... titles that haven't yet been played. 3 To exit the Disc Navigator, press HOME MENU. PREV NEXT DVD RECORDER 1 Press HDD or DVD to select the hard disk drive or the DVD. 2 Press DISC NAVIGATOR to change the title information displayed in the title list, use the PREV ( ) and NEXT ( ) buttons to ...
...2h00m(1.0G) • You can edit video content on unfinalized Video mode and VR mode DVD discs1, as well as video content on the internal hard disk drive. Titles on DVD-RAM discs using the HDD and DVD buttons (front panel or remote). Note 1.It isn't possible to display the command menu... titles that haven't yet been played. 3 To exit the Disc Navigator, press HOME MENU. PREV NEXT DVD RECORDER 1 Press HDD or DVD to select the hard disk drive or the DVD. 2 Press DISC NAVIGATOR to change the title information displayed in the title list, use the PREV ( ) and NEXT ( ) buttons to ...
