Owners Manual
Page 2
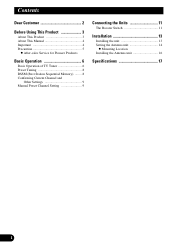
Contents Dear Customer 2 Before Using This Product 3 About This Product 3 About This Manual 4 Important 4 Precaution 5 - After-sales Service for Pioneer Products Basic Operation 6 Basic Operation of TV Tuner 6 Preset Tuning 8 BSSM (Best Station Sequential Memory) ........ 8 Confirming Current Channel and Other Settings 9 Manual Preset Channel Setting 9 Connecting the Units 11 The Booster Switch 11 Installation 13 Installing the unit 13 Setting the Antenna unit 14 - Mounting Location Installing the Antenna unit 16 Specifications 17 1
Contents Dear Customer 2 Before Using This Product 3 About This Product 3 About This Manual 4 Important 4 Precaution 5 - After-sales Service for Pioneer Products Basic Operation 6 Basic Operation of TV Tuner 6 Preset Tuning 8 BSSM (Best Station Sequential Memory) ........ 8 Confirming Current Channel and Other Settings 9 Manual Preset Channel Setting 9 Connecting the Units 11 The Booster Switch 11 Installation 13 Installing the unit 13 Setting the Antenna unit 14 - Mounting Location Installing the Antenna unit 16 Specifications 17 1
Owners Manual
Page 5
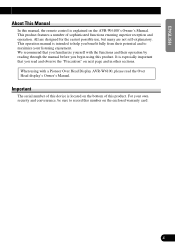
...you familiarize yourself with a Pioneer Over Head Display AVR-W6100, please read and observe the "Precaution" on the enclosed warranty card. 4 FRANÇAIS ITALIANO NEDERLANDS Important The serial number of this device is located on the AVR-W6100's Owner's Manual. All are designed for...benefit fully from their operation by reading through the manual before you read the Over Head display's Owner's Manual. For your listening enjoyment. When using this product. ENGLISH ESPAÑOL DEUTSCH About This Manual In this manual, the remote control is explained on the bottom of...
...you familiarize yourself with a Pioneer Over Head Display AVR-W6100, please read and observe the "Precaution" on the enclosed warranty card. 4 FRANÇAIS ITALIANO NEDERLANDS Important The serial number of this device is located on the AVR-W6100's Owner's Manual. All are designed for...benefit fully from their operation by reading through the manual before you read the Over Head display's Owner's Manual. For your listening enjoyment. When using this product. ENGLISH ESPAÑOL DEUTSCH About This Manual In this manual, the remote control is explained on the bottom of...
Owners Manual
Page 6
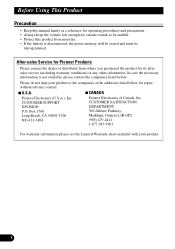
...will be erased and must be audible. • Protect this manual handy as a reference for operating procedures and precautions. • Always keep the volume low enough for repair without advance contact. 7 U.S.A. 7 CANADA Pioneer Electronics (U.S.A.), Inc. CUSTOMER SATISFACTION DEPARTMENT 300 Allstate Parkway, Markham,...For warranty information please see the Limited Warranty sheet included with your product to be reprogrammed. After-sales Service for Pioneer Products Please contact the dealer or distributor from moisture. • If the battery is not available, please contact the...
...will be erased and must be audible. • Protect this manual handy as a reference for operating procedures and precautions. • Always keep the volume low enough for repair without advance contact. 7 U.S.A. 7 CANADA Pioneer Electronics (U.S.A.), Inc. CUSTOMER SATISFACTION DEPARTMENT 300 Allstate Parkway, Markham,...For warranty information please see the Limited Warranty sheet included with your product to be reprogrammed. After-sales Service for Pioneer Products Please contact the dealer or distributor from moisture. • If the battery is not available, please contact the...
Owners Manual
Page 7
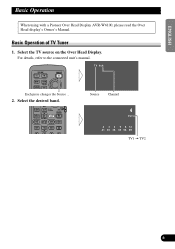
TV 4ch Each press changes the Source ... 2. Select the desired band. Select the TV source on the Over Head Display. ENGLISH ESPAÑOL Basic Operation When using with a Pioneer Over Head Display AVR-W6100, please read the Over Head display's Owner's Manual. For details, refer to the connected unit's manual. Source Channel 4 TV1 2 3 4 5 8 12 21 30 38 45 56 69 TV1 = TV2 DEUTSCH FRANÇAIS ITALIANO NEDERLANDS 6 Basic Operation of TV Tuner 1.
TV 4ch Each press changes the Source ... 2. Select the desired band. Select the TV source on the Over Head Display. ENGLISH ESPAÑOL Basic Operation When using with a Pioneer Over Head Display AVR-W6100, please read the Over Head display's Owner's Manual. For details, refer to the connected unit's manual. Source Channel 4 TV1 2 3 4 5 8 12 21 30 38 45 56 69 TV1 = TV2 DEUTSCH FRANÇAIS ITALIANO NEDERLANDS 6 Basic Operation of TV Tuner 1.
Owners Manual
Page 8
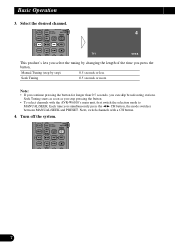
Next, switch channels with the AVR-W6100's main unit, first switch the selection mode to MANUAL/SEEK. Manual Tuning (step by changing the length of the time you stop pressing the button. • To select channels with a CH button. 4. Each time you can ... 0.5 seconds or more Note: • If you continue pressing the button for longer than 0.5 seconds, you simultaneously press the 2/3 CH button, the mode switches between MANUAL/SEEK and PRESET.
Next, switch channels with the AVR-W6100's main unit, first switch the selection mode to MANUAL/SEEK. Manual Tuning (step by changing the length of the time you stop pressing the button. • To select channels with a CH button. 4. Each time you can ... 0.5 seconds or more Note: • If you continue pressing the button for longer than 0.5 seconds, you simultaneously press the 2/3 CH button, the mode switches between MANUAL/SEEK and PRESET.
Owners Manual
Page 9
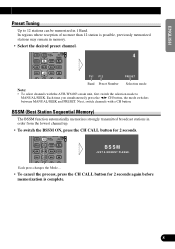
... mode Note: • To select channels with a CH button. BSSM JUST A MOMENT PLEASE. Each time you simultaneously press the 2/3 CH button, the mode switches between MANUAL/SEEK and PRESET. Each press changes the Mode ... • To cancel the process, press the CH CALL button for 2 seconds. FRANÇAIS ITALIANO NEDERLANDS... switch the BSSM ON, press the CH CALL button for 2 seconds again before memorization is complete. ENGLISH ESPAÑOL DEUTSCH Preset Tuning Up to MANUAL/SEEK.
... mode Note: • To select channels with a CH button. BSSM JUST A MOMENT PLEASE. Each time you simultaneously press the 2/3 CH button, the mode switches between MANUAL/SEEK and PRESET. Each press changes the Mode ... • To cancel the process, press the CH CALL button for 2 seconds. FRANÇAIS ITALIANO NEDERLANDS... switch the BSSM ON, press the CH CALL button for 2 seconds again before memorization is complete. ENGLISH ESPAÑOL DEUTSCH Preset Tuning Up to MANUAL/SEEK.
Owners Manual
Page 10
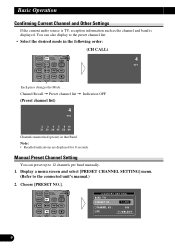
... 4 TV1 Each press changes the Mode ... Display a menu screen and select [PRESET CHANNEL SETTING] menu. (Refer to 12 channels per band manually. 1. Choose [PRESET NO.]. Basic Operation Confirming Current Channel and Other Settings If the current audio source is TV, reception information such as the channel... and band is displayed. Manual Preset Channel Setting You can also display to the preset channel list. • Select the desired mode in that Band Note: &#...
... 4 TV1 Each press changes the Mode ... Display a menu screen and select [PRESET CHANNEL SETTING] menu. (Refer to 12 channels per band manually. 1. Choose [PRESET NO.]. Basic Operation Confirming Current Channel and Other Settings If the current audio source is TV, reception information such as the channel... and band is displayed. Manual Preset Channel Setting You can also display to the preset channel list. • Select the desired mode in that Band Note: &#...
Owners Manual
Page 12
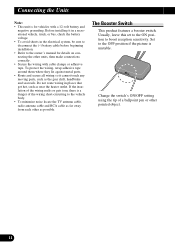
... cable as far away from each other as possible. If the insulation of the wiring short-circuiting to boost reception sensitivity. Set to the owner's manual for vehicles with cable clamps or adhesive tape. To protect the wiring, wrap adhesive tape around them where they lie against metal parts. • Route...
... cable as far away from each other as possible. If the insulation of the wiring short-circuiting to boost reception sensitivity. Set to the owner's manual for vehicles with cable clamps or adhesive tape. To protect the wiring, wrap adhesive tape around them where they lie against metal parts. • Route...


