

Owner's Manual
Page 8
... connect these operating instructions before using a tone control function to turn the connected devices off from the speaker. • Do not attach these speakers or speaker brackets. CHECKING THE ACCESSORIES Accessories of its performance. If this installation. • Pioneer is designed exclusively for future reference. Doing so may fall over. • When installing the...
... connect these operating instructions before using a tone control function to turn the connected devices off from the speaker. • Do not attach these speakers or speaker brackets. CHECKING THE ACCESSORIES Accessories of its performance. If this installation. • Pioneer is designed exclusively for future reference. Doing so may fall over. • When installing the...

Owner's Manual
Page 9
...top and bottom speaker brackets for BOTTOM-Left) Speaker mounting screw (M5 × 10 mm) Cable clamp* Speaker cable* Cable clamp* Speaker mounting screw (M5 × 10 mm) *: Accessories of the flat panel display When using the table top stand: NOTE: Before attaching the speaker, please attach the KRP-TS01 series table... top stand (or another flat panel display stand) to the top and the bottom on the back of the speakers using the supplied screws. (It shows the attachment of the...
...top and bottom speaker brackets for BOTTOM-Left) Speaker mounting screw (M5 × 10 mm) Cable clamp* Speaker cable* Cable clamp* Speaker mounting screw (M5 × 10 mm) *: Accessories of the flat panel display When using the table top stand: NOTE: Before attaching the speaker, please attach the KRP-TS01 series table... top stand (or another flat panel display stand) to the top and the bottom on the back of the speakers using the supplied screws. (It shows the attachment of the...
Owner's Manual
Page 10
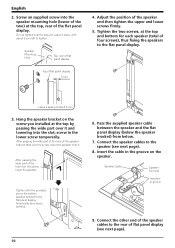
... part of the hole of four screws), thus fixing the speakers to the speaker (see next page). Tighten the two screws, at the top and bottom for each speaker (total of the speaker bracket (top) over the screw, lower the speaker. Speaker Cable Speaker Terminal Insertion in the groove on the screw you installed at... 5 mm left to tighten. Leave it and lowering into the slot; Connect the other end of the hole over the screw, lower the speaker onto it all the way yet. English 2. Do not tighten it . screw in the lower screw temporarily. After passing the wide part of the...
... part of the hole of four screws), thus fixing the speakers to the speaker (see next page). Tighten the two screws, at the top and bottom for each speaker (total of the speaker bracket (top) over the screw, lower the speaker. Speaker Cable Speaker Terminal Insertion in the groove on the screw you installed at... 5 mm left to tighten. Leave it and lowering into the slot; Connect the other end of the hole over the screw, lower the speaker onto it all the way yet. English 2. Do not tighten it . screw in the lower screw temporarily. After passing the wide part of the...
Owner's Manual
Page 11
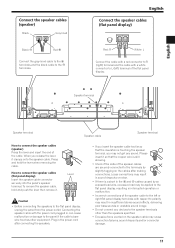
..., resulting in the and cables caused by slightly tugging on the speaker cable may result in can cause malfunction or damage to the speaker terminals other equipment. English Connect the speaker cables (speaker) Black Gray lined Black Red Connect the gray-lined cable to ...the terminals and the black cable to the flat panel display, unplug the panel from the power outlet. When you insert the speaker cable too far so that the copper wire is a short in interrupted operation or malfunction. • Incorrect connections of the flat panel...
..., resulting in the and cables caused by slightly tugging on the speaker cable may result in can cause malfunction or damage to the speaker terminals other equipment. English Connect the speaker cables (speaker) Black Gray lined Black Red Connect the gray-lined cable to ...the terminals and the black cable to the flat panel display, unplug the panel from the power outlet. When you insert the speaker cable too far so that the copper wire is a short in interrupted operation or malfunction. • Incorrect connections of the flat panel...
Owner's Manual
Page 12
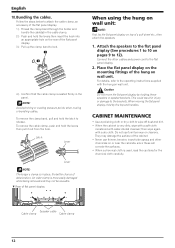
... the hung on wall unit: NOTE: First lay the flat panel display on the rear of the cabinet. • Never use furniture wax or cleaners. Speaker cable Cable clamp Cable clamp 12 To remove the clamp band, pull and hold the levers then insert the hook into an appropriate hole on... top of a soft sheet etc., then attach the speakers. 1. An older clamp is used, read the cautions for the chemical cloth carefully. then wipe again with the hung on wall unit. When moving the...
... the hung on wall unit: NOTE: First lay the flat panel display on the rear of the cabinet. • Never use furniture wax or cleaners. Speaker cable Cable clamp Cable clamp 12 To remove the clamp band, pull and hold the levers then insert the hook into an appropriate hole on... top of a soft sheet etc., then attach the speakers. 1. An older clamp is used, read the cautions for the chemical cloth carefully. then wipe again with the hung on wall unit. When moving the...
Owner's Manual
Page 13
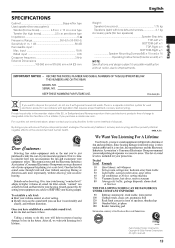
...potential negative effects on the environment and human health. By doing so you want to improvements. English SPECIFICATIONS Cabinet Bass-reflex type Used speaker (two-way system): Woofer (for low tones 4.8 cm × 13 cm cone type Tweeter (for high tones 2.5 cm ...(1 m, 1 W 80 dB Permissible input : Max. Copyright © 2008 Pioneer Corporation. input 18 W Rated input 6 W Crossover frequency 3 kHz External Dimensions 105 (W) mm × 876 (H) mm × 64 (D) mm English Weight : Speaker (one ). If you will ensure that requires proper treatment, recovery and recycling....
...potential negative effects on the environment and human health. By doing so you want to improvements. English SPECIFICATIONS Cabinet Bass-reflex type Used speaker (two-way system): Woofer (for low tones 4.8 cm × 13 cm cone type Tweeter (for high tones 2.5 cm ...(1 m, 1 W 80 dB Permissible input : Max. Copyright © 2008 Pioneer Corporation. input 18 W Rated input 6 W Crossover frequency 3 kHz External Dimensions 105 (W) mm × 876 (H) mm × 64 (D) mm English Weight : Speaker (one ). If you will ensure that requires proper treatment, recovery and recycling....


