
Operating Instructions
Page 3
... damage. To prevent electromagnetic interference with enough skill and competence. They alert the operators and service personnel of this manual to the customer and explain to the customer how to a hazard or unsafe practice which can result in severe personal...mounting, misuse, modification or a natural disaster. English Safety Precautions This Class B digital apparatus complies with Canadian ICES-003. PIONEER cannot assume liabilities for damage caused by qualified personnel with electric appliances such as radios and televisions, use shielded cables and connectors...
... damage. To prevent electromagnetic interference with enough skill and competence. They alert the operators and service personnel of this manual to the customer and explain to the customer how to a hazard or unsafe practice which can result in severe personal...mounting, misuse, modification or a natural disaster. English Safety Precautions This Class B digital apparatus complies with Canadian ICES-003. PIONEER cannot assume liabilities for damage caused by qualified personnel with electric appliances such as radios and televisions, use shielded cables and connectors...

Operating Instructions
Page 4
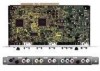
...PDP-50MXE1-S (or PDP-434CMX/PDP-43MXE1/PDP-43MXE1-S) plasma display has been originally designed as a computer monitor, but by installing the optional PDA-5003/PDA-5004 video card, the following supplementary features are produced: 1. Contents Safety Precautions i Before Proceeding 2 Checking supplied accessories...operate the Plasma Display properly. Before using this manual 2 Part Names and Functions 4 Connection panel 4 Installation and Connections 6 Installing the video card 6 Input connectors on the plasma display with the Pioneer Plasma Display PDP-504CMX/PDP50MXE1/PDP-50MXE1-S (...
...PDP-50MXE1-S (or PDP-434CMX/PDP-43MXE1/PDP-43MXE1-S) plasma display has been originally designed as a computer monitor, but by installing the optional PDA-5003/PDA-5004 video card, the following supplementary features are produced: 1. Contents Safety Precautions i Before Proceeding 2 Checking supplied accessories...operate the Plasma Display properly. Before using this manual 2 Part Names and Functions 4 Connection panel 4 Installation and Connections 6 Installing the video card 6 Input connectors on the plasma display with the Pioneer Plasma Display PDP-504CMX/PDP50MXE1/PDP-50MXE1-S (...

Operating Instructions
Page 5
... may or not be necessary. The remainder of the sections in the plasma display. Since this manual This manual has been written to allow easy understanding of setup and operating procedures when the video card PDA-5003/PDA-5004 is dedicated to the basic operations associated with selecting a source component up the video card, consult...
... may or not be necessary. The remainder of the sections in the plasma display. Since this manual This manual has been written to allow easy understanding of setup and operating procedures when the video card PDA-5003/PDA-5004 is dedicated to the basic operations associated with selecting a source component up the video card, consult...
Operating Instructions
Page 6
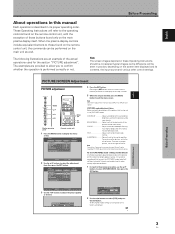
... RESET INPUT1 OPTION 4 Press the SET button. BRIGHTNESS Adjust so that can be performed on the main unit as desired. English About operations in this manual Each operation is described in these adjustments for each input (INPUT1 to INPUT5) and signals. [PICTURE] mode adjustment items Below are provided to allow you...
... RESET INPUT1 OPTION 4 Press the SET button. BRIGHTNESS Adjust so that can be performed on the main unit as desired. English About operations in this manual Each operation is described in these adjustments for each input (INPUT1 to INPUT5) and signals. [PICTURE] mode adjustment items Below are provided to allow you...

Operating Instructions
Page 14
... PC's instruction manual or consult the maker or nearest dealer of computer model being connected, a conversion connector or adapter etc. On-screen setup is necessary after connection. If connections are made, the picture may be necessary. Secure by tightening the terminal screws on the...display and the personal computer's output terminal. When connecting to the VD or HD jacks. When connecting to ANALOG RGB (INPUT5) [Connections for PDA-5003] ANALOG RGB INPUT5 G(ON SYNC) B R HD (H/V SYNC) VD Installation and Connections To an external monitor With the plasma display, it ...
... PC's instruction manual or consult the maker or nearest dealer of computer model being connected, a conversion connector or adapter etc. On-screen setup is necessary after connection. If connections are made, the picture may be necessary. Secure by tightening the terminal screws on the...display and the personal computer's output terminal. When connecting to the VD or HD jacks. When connecting to ANALOG RGB (INPUT5) [Connections for PDA-5003] ANALOG RGB INPUT5 G(ON SYNC) B R HD (H/V SYNC) VD Installation and Connections To an external monitor With the plasma display, it ...

Operating Instructions
Page 17
Video signal type HDTV Video signal 1125i (1080i) 750p (720p) SDTV 525i (480i) 625i (575i) 525p (480p) 625p (575p) Video signal format Component RGB Composite S Video Component RGB Component RGB Jacks where connection is compatible with are as follows. English Installation and Connections About DTV set top box connection To ensure proper connection, please carefully read the instruction manual supplied with the DTV set top box output signals that this display is possible INPUT1 INPUT3 INPUT4 INPUT5 Installation and Connections 14 En The set top box.
Video signal type HDTV Video signal 1125i (1080i) 750p (720p) SDTV 525i (480i) 625i (575i) 525p (480p) 625p (575p) Video signal format Component RGB Composite S Video Component RGB Component RGB Jacks where connection is compatible with are as follows. English Installation and Connections About DTV set top box connection To ensure proper connection, please carefully read the instruction manual supplied with the DTV set top box output signals that this display is possible INPUT1 INPUT3 INPUT4 INPUT5 Installation and Connections 14 En The set top box.
Operating Instructions
Page 22
...SET CHANGE MENU EXIT 4 Use the 5/∞ buttons to select [SETUP]. Adjustment for other signal frequency formats is performed automatically, so no manual setting is stored in memory and the screen returns to that shown in step 4. 19 En System Settings English MENU PICTURE SCREEN CONTRAST :... 3 SXGA+ 2 Notes ÷ These settings are input, selecting [PC AUTO] will cause the screen resolution to be set [SIGNAL FORMAT] manually to [WXGA]. 6 Press the SET button. MENU INPUT1 PICTURE SCREEN SETUP OPTION AUTO POWER OFF COLOR TEMP. MENU INPUT1 PICTURE SCREEN SETUP OPTION ...
...SET CHANGE MENU EXIT 4 Use the 5/∞ buttons to select [SETUP]. Adjustment for other signal frequency formats is performed automatically, so no manual setting is stored in memory and the screen returns to that shown in step 4. 19 En System Settings English MENU PICTURE SCREEN CONTRAST :... 3 SXGA+ 2 Notes ÷ These settings are input, selecting [PC AUTO] will cause the screen resolution to be set [SIGNAL FORMAT] manually to [WXGA]. 6 Press the SET button. MENU INPUT1 PICTURE SCREEN SETUP OPTION AUTO POWER OFF COLOR TEMP. MENU INPUT1 PICTURE SCREEN SETUP OPTION ...
Operating Instructions
Page 23
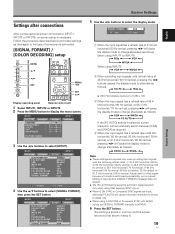
... LOCKED 2 5 When the setup is completed, press the MENU button to exit the menu screen. For details, please refer to the instruction manual supplied with the component you are using this [SIGNAL FORAMT] setting for each applicable input (INPUT1, INPUT2 or INPUT5). ÷ Make [COLOR...button to [LOCKED]. Notes ÷ Make this setting at [AUTO]. Set [SIGNAL FORMAT] and [COLOR DECODING] as follows each applicable input (PDA-5003: INPUT1 or INPUT5, PDA-5004: INPUT1). ÷ When using . Normally, leave this [CLAMP POSITION] setting for INPUT 1 or INPUT 5. ÷ The [COLOR DECODING]...
... LOCKED 2 5 When the setup is completed, press the MENU button to exit the menu screen. For details, please refer to the instruction manual supplied with the component you are using this [SIGNAL FORAMT] setting for each applicable input (INPUT1, INPUT2 or INPUT5). ÷ Make [COLOR...button to [LOCKED]. Notes ÷ Make this setting at [AUTO]. Set [SIGNAL FORMAT] and [COLOR DECODING] as follows each applicable input (PDA-5003: INPUT1 or INPUT5, PDA-5004: INPUT1). ÷ When using . Normally, leave this [CLAMP POSITION] setting for INPUT 1 or INPUT 5. ÷ The [COLOR DECODING]...
Operating Instructions
Page 31
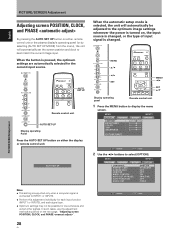
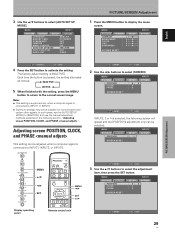
AUTO SET UP Remote control unit AUTO SET UP Display operating Panel Press the AUTO SET UP button on , the input source is changed, or the type of input signal is turned on either remote control unit or the plasma display's operating panel (or by selecting [AUTO SET UP MODE] from the menu), the unit will automatically be possible for the current input source. MENU 5/∞ 2/3 SET MENU 2/3 SET 5/∞ Display operating panel Remote control unit 1 Press the MENU button to select [OPTION]. MENU INPUT1 PICTURE SCREEN SETUP OPTION LANGUAGE ENERGY SAVE SCREEN MGT. ORBITER ...
AUTO SET UP Remote control unit AUTO SET UP Display operating Panel Press the AUTO SET UP button on , the input source is changed, or the type of input signal is turned on either remote control unit or the plasma display's operating panel (or by selecting [AUTO SET UP MODE] from the menu), the unit will automatically be possible for the current input source. MENU 5/∞ 2/3 SET MENU 2/3 SET 5/∞ Display operating panel Remote control unit 1 Press the MENU button to select [OPTION]. MENU INPUT1 PICTURE SCREEN SETUP OPTION LANGUAGE ENERGY SAVE SCREEN MGT. ORBITER ...
Operating Instructions
Page 32
... connected to INPUT1 or INPUT5. ÷ Optimum settings may not be selected. In such cases, set the [AUTO SETUP MODE] to [INACTIVE], and use the manual adjustment methods explained in the following screen will appear and the [POSITION] adjustment only can be adjusted when a computer signal is connected to INPUT1, INPUT2...
... connected to INPUT1 or INPUT5. ÷ Optimum settings may not be selected. In such cases, set the [AUTO SETUP MODE] to [INACTIVE], and use the manual adjustment methods explained in the following screen will appear and the [POSITION] adjustment only can be adjusted when a computer signal is connected to INPUT1, INPUT2...

Operating Instructions
Page 33
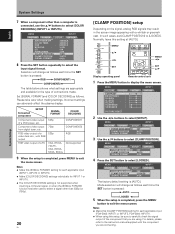
... beneficial to reset the [SCREEN] mode to default settings instead of the options that corresponds to the input video signal. If you wish to record a manually set adjustment value, set default. 30 En Notes ÷ Make these adjustments for the adjustments of the internal clock signal adjusted by the [CLOCK] setting...
... beneficial to reset the [SCREEN] mode to default settings instead of the options that corresponds to the input video signal. If you wish to record a manually set adjustment value, set default. 30 En Notes ÷ Make these adjustments for the adjustments of the internal clock signal adjusted by the [CLOCK] setting...