
User Manual
Page 7
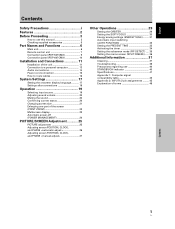
...How to use this manual 3 Checking supplied accessories 5 Part Names and Functions 6 Main unit 6 Remote control unit 7 Connection panel (PDP-507CMX 9 Connection panel (PDP-607CMX 10 Installation and Connections 11 Installation of the unit 11 Connection to a personal computer 13 Audio connections 14 Power cord connection 15...18 Operation 19 Selecting input source 19 Adjusting sound volume 20 Muting the sound 20 Confirming current status 20 Changing screen size 21 Enlarging one part of the screen (POINT ZOOM 22 Multiscreen display 23 Automatic power-off (POWER MANAGEMENT 24 ...
...How to use this manual 3 Checking supplied accessories 5 Part Names and Functions 6 Main unit 6 Remote control unit 7 Connection panel (PDP-507CMX 9 Connection panel (PDP-607CMX 10 Installation and Connections 11 Installation of the unit 11 Connection to a personal computer 13 Audio connections 14 Power cord connection 15...18 Operation 19 Selecting input source 19 Adjusting sound volume 20 Muting the sound 20 Confirming current status 20 Changing screen size 21 Enlarging one part of the screen (POINT ZOOM 22 Multiscreen display 23 Automatic power-off (POWER MANAGEMENT 24 ...

User Manual
Page 8
... on INPUT1 and INPUT2. *1 Aspect ratio and screen size appearance will differ depending on input signal. ¶ Free Installation Configuration - On the other expansion cards may result in at only 61.5 kg. Features 2 En PDP-507CMX: While producing a large 50" screen image, the display... is only 122 mm thick, and weighs in operating environment. Such features provide safety and highendurance under conditions of commercial use. ¶ Improved usability User convenience has been improved by Pioneer. PDP-607CMX: While...
... on INPUT1 and INPUT2. *1 Aspect ratio and screen size appearance will differ depending on input signal. ¶ Free Installation Configuration - On the other expansion cards may result in at only 61.5 kg. Features 2 En PDP-507CMX: While producing a large 50" screen image, the display... is only 122 mm thick, and weighs in operating environment. Such features provide safety and highendurance under conditions of commercial use. ¶ Improved usability User convenience has been improved by Pioneer. PDP-607CMX: While...

User Manual
Page 12
...24). English Part Names and Functions Main unit Main unit 4 (PDP-507CMX) 4 (PDP-607CMX) Operation panel on -screen menu (pages 17 to 36). 7 DISPLAY/SET button Use to confirm onscreen menu selections, and to change the screen size. 0 VOL +/- (}/]) buttons When not indicated for adjusting the sound... volume (pages 19 and 20). VOL + 89 0 PDP-507CMX 1 STANDBY ON 23 PDP-607CMX 31 Main unit 1 Remote control sensor Point the remote control toward...
...24). English Part Names and Functions Main unit Main unit 4 (PDP-507CMX) 4 (PDP-607CMX) Operation panel on -screen menu (pages 17 to 36). 7 DISPLAY/SET button Use to confirm onscreen menu selections, and to change the screen size. 0 VOL +/- (}/]) buttons When not indicated for adjusting the sound... volume (pages 19 and 20). VOL + 89 0 PDP-507CMX 1 STANDBY ON 23 PDP-607CMX 31 Main unit 1 Remote control sensor Point the remote control toward...

User Manual
Page 13
... by professional installers. 0 AUTO SET UP button When using the picture-in-picture mode with new ones as soon as possible. 1 SCREEN SIZE button Press to select the screen size (page 21). 2 INPUT buttons Press to select the input (page 19). 3 MENU button Press to open and close the on-screen menu...
... by professional installers. 0 AUTO SET UP button When using the picture-in-picture mode with new ones as soon as possible. 1 SCREEN SIZE button Press to select the screen size (page 21). 2 INPUT buttons Press to select the input (page 19). 3 MENU button Press to open and close the on-screen menu...

User Manual
Page 14
... limiting its operational distance. Designated batteries Please use batteries other component that is operable up to danger of the sensor. CAUTION ¶ Do not use size AA (R6) or AA (LR6). English Part Names and Functions Operating range of the remote control unit When operating the remote control unit, point it...
... limiting its operational distance. Designated batteries Please use batteries other component that is operable up to danger of the sensor. CAUTION ¶ Do not use size AA (R6) or AA (LR6). English Part Names and Functions Operating range of the remote control unit When operating the remote control unit, point it...
User Manual
Page 23
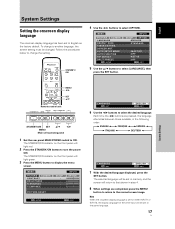
... EXIT 5 Use the 5/∞ buttons to select the desired language. System Settings MENU 2/3 SET 5/∞ Remote control unit STANDBY/ON DISPLAY MENU / SET INPUT SCREEN SIZE - E N H A N C E SETUP : : : : INPUT1 OPTION 0 0 0 0 PICTURE RESET SET ENTER MENU EXIT LANGUAGE SET SET : ENGLISH MENU EXIT 6 Use the 2/3 buttons to select [LANGUAGE], then press the SET...
... EXIT 5 Use the 5/∞ buttons to select the desired language. System Settings MENU 2/3 SET 5/∞ Remote control unit STANDBY/ON DISPLAY MENU / SET INPUT SCREEN SIZE - E N H A N C E SETUP : : : : INPUT1 OPTION 0 0 0 0 PICTURE RESET SET ENTER MENU EXIT LANGUAGE SET SET : ENGLISH MENU EXIT 6 Use the 2/3 buttons to select [LANGUAGE], then press the SET...
User Manual
Page 24
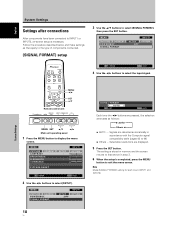
... MENU EXIT 4 Use the 2/3 buttons to select the input signal. System Settings MENU 2/3 SET 5/∞ Remote control unit STANDBY/ON DISPLAY MENU / SET INPUT SCREEN SIZE - MENU PICTURE SCREEN CONTRAST BRIGHTNESS H.ENHANCE V. Selectable resolutions are pressed, the selection alternates as they apply to the type of components connected. [SIGNAL FORMAT] setup...
... MENU EXIT 4 Use the 2/3 buttons to select the input signal. System Settings MENU 2/3 SET 5/∞ Remote control unit STANDBY/ON DISPLAY MENU / SET INPUT SCREEN SIZE - MENU PICTURE SCREEN CONTRAST BRIGHTNESS H.ENHANCE V. Selectable resolutions are pressed, the selection alternates as they apply to the type of components connected. [SIGNAL FORMAT] setup...
User Manual
Page 25
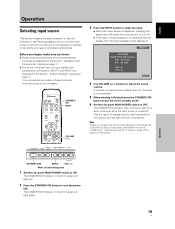
... STANDBY/ON button to light for a long time. Operation 19 En STANDBY/ ON INPUT VOLUME [+/-] Remote control unit STANDBY/ON DISPLAY MENU / SET INPUT SCREEN SIZE - POL.V: - The STANDBY/ON indicator may cause a phenomenon known as described in the section "Installation and Connections" starting on the front panel will turn the...
... STANDBY/ON button to light for a long time. Operation 19 En STANDBY/ ON INPUT VOLUME [+/-] Remote control unit STANDBY/ON DISPLAY MENU / SET INPUT SCREEN SIZE - POL.V: - The STANDBY/ON indicator may cause a phenomenon known as described in the section "Installation and Connections" starting on the front panel will turn the...
User Manual
Page 26
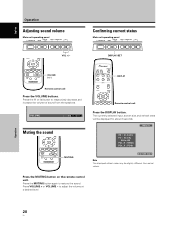
... refresh rates may be displayed for about 3 seconds. Confirming current status Main unit operating panel STANDBY/ON DISPLAY MENU / SET INPUT SCREEN SIZE - Operation 20 En Press the MUTING button on the remote control unit. to respectively decrease and increase the volume of sound from actual ... a desired level. VOLUME : 10 Muting the sound MUTING Remote control unit Press the DISPLAY button. The currently selected input, screen size and refresh rates will be slightly different from the speakers. Press the MUTING button again to restore the sound. VOL + VOL +/-
... refresh rates may be displayed for about 3 seconds. Confirming current status Main unit operating panel STANDBY/ON DISPLAY MENU / SET INPUT SCREEN SIZE - Operation 20 En Press the MUTING button on the remote control unit. to respectively decrease and increase the volume of sound from actual ... a desired level. VOLUME : 10 Muting the sound MUTING Remote control unit Press the DISPLAY button. The currently selected input, screen size and refresh rates will be slightly different from the speakers. Press the MUTING button again to restore the sound. VOL + VOL +/-

User Manual
Page 27
... screen, a portion of the picture may violate the rights of authors protected under copyright law. ÷ When [DOT BY DOT] or [4:3] screen size is selected, the display position is thus highly faithful to line ratio of the manufacturer's intentions. Although these modes are viewing. A 3 FULL The... the power is presented with a full understanding of 1:1 and is moved slightly each signal format. SCREEN SIZE Remote control unit STANDBY/ON DISPLAY MENU / SET INPUT SCREEN SIZE - For optimal viewing, we recommend that you select the screen mode that best matches the video source ...
... screen, a portion of the picture may violate the rights of authors protected under copyright law. ÷ When [DOT BY DOT] or [4:3] screen size is selected, the display position is thus highly faithful to line ratio of the manufacturer's intentions. Although these modes are viewing. A 3 FULL The... the power is presented with a full understanding of 1:1 and is moved slightly each signal format. SCREEN SIZE Remote control unit STANDBY/ON DISPLAY MENU / SET INPUT SCREEN SIZE - For optimal viewing, we recommend that you select the screen mode that best matches the video source ...

User Manual
Page 28
... and the input is changed . ¶ When using the Plasma Display in a profit-making activity, or when exhibiting images publicly, using the screen size function to move the screen to the desired part of the image. 24 R12 DISPLAY MENU POINT ZOOM 5/∞/2/3 SET 1 Press the remote control unit...'s POINT ZOOM button. 66.0 24 R12 Notes ¶ During use of the POINT ZOOM function, the screen size cannot be changed , or if the multiscreen mode is selected, the POINT ZOOM function will be canceled. English Operation 10 22.1 84.3 10 22.1 10...
... and the input is changed . ¶ When using the Plasma Display in a profit-making activity, or when exhibiting images publicly, using the screen size function to move the screen to the desired part of the image. 24 R12 DISPLAY MENU POINT ZOOM 5/∞/2/3 SET 1 Press the remote control unit...'s POINT ZOOM button. 66.0 24 R12 Notes ¶ During use of the POINT ZOOM function, the screen size cannot be changed , or if the multiscreen mode is selected, the POINT ZOOM function will be canceled. English Operation 10 22.1 84.3 10 22.1 10...

User Manual
Page 29
...a profit-making activity, or when exhibiting images publicly, using the multiscreen function. Each time the button is outputted when using the screen size function to select the subscreen input source. Notes ¶ When using the Plasma Display in multiscreen mode, the main screen and sub-... position of two inputs. English Multiscreen display The Plasma Display's multiscreen function allows the simultaneous display of the subscreen in picture-in reduced size as the subscreen image, and vice versa. The multiscreen display include two modes, side-by -side mode has been selected: The right...
...a profit-making activity, or when exhibiting images publicly, using the multiscreen function. Each time the button is outputted when using the screen size function to select the subscreen input source. Notes ¶ When using the Plasma Display in multiscreen mode, the main screen and sub-... position of two inputs. English Multiscreen display The Plasma Display's multiscreen function allows the simultaneous display of the subscreen in picture-in reduced size as the subscreen image, and vice versa. The multiscreen display include two modes, side-by -side mode has been selected: The right...
User Manual
Page 30
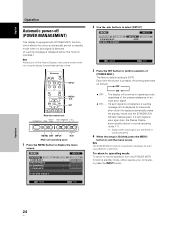
... the display for extended periods of an input sync signal. ÷ ON ....... INPUT MENU 2/3 SET Remote control unit STANDBY/ON DISPLAY MENU / SET INPUT SCREEN SIZE - VOL + MENU SET INPUT 2/3 Main unit operating panel 1 Press the MENU button to select [SETUP]. MENU PICTURE SCREEN CONTRAST BRIGHTNESS H.ENHANCE V. E N H A N C E SETUP : : : : INPUT1 OPTION 0 0 0 0 PICTURE...
... the display for extended periods of an input sync signal. ÷ ON ....... INPUT MENU 2/3 SET Remote control unit STANDBY/ON DISPLAY MENU / SET INPUT SCREEN SIZE - VOL + MENU SET INPUT 2/3 Main unit operating panel 1 Press the MENU button to select [SETUP]. MENU PICTURE SCREEN CONTRAST BRIGHTNESS H.ENHANCE V. E N H A N C E SETUP : : : : INPUT1 OPTION 0 0 0 0 PICTURE...

User Manual
Page 31
... of the options that can be seen clearly. English PICTURE/SCREEN Adjustment MENU 2/3 SET 5/∞ Remote control unit STANDBY/ON DISPLAY MENU / SET INPUT SCREEN SIZE - PICTURE/SCREEN Adjustment PICTURE adjustment 3 Use the 2/3 buttons to the surrounding brightness so that the picture can be seen clearly. MENU PICTURE SCREEN CONTRAST BRIGHTNESS...
... of the options that can be seen clearly. English PICTURE/SCREEN Adjustment MENU 2/3 SET 5/∞ Remote control unit STANDBY/ON DISPLAY MENU / SET INPUT SCREEN SIZE - PICTURE/SCREEN Adjustment PICTURE adjustment 3 Use the 2/3 buttons to the surrounding brightness so that the picture can be seen clearly. MENU PICTURE SCREEN CONTRAST BRIGHTNESS...
User Manual
Page 32
... ENTER INPUT1 SETUP OPTION :ENGLISH : S TA N D A R D :INACTIVE :OFF :ACTIVE :OFF MENU EXIT MENU 2/3 SET 5/∞ Remote control unit STANDBY/ON DISPLAY MENU / SET INPUT SCREEN SIZE -
... ENTER INPUT1 SETUP OPTION :ENGLISH : S TA N D A R D :INACTIVE :OFF :ACTIVE :OFF MENU EXIT MENU 2/3 SET 5/∞ Remote control unit STANDBY/ON DISPLAY MENU / SET INPUT SCREEN SIZE -

User Manual
Page 33
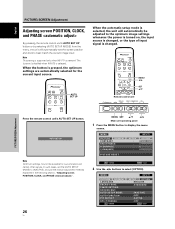
..., CLOCK, and PHASE ". PICTURE/SCREEN Adjustment Adjusting screen POSITION, CLOCK, and PHASE MENU 2/3 SET 5/∞ Remote control unit STANDBY/ON DISPLAY MENU / SET INPUT SCREEN SIZE - E N H A N C E SETUP : : : : INPUT1 OPTION 0 0 0 0 PICTURE RESET SET ENTER MENU EXIT 2 Use the 2/3 buttons to activate the setting. VOL + MENU SET 5/∞ 2/3 Main unit operating panel 1 Press...
..., CLOCK, and PHASE ". PICTURE/SCREEN Adjustment Adjusting screen POSITION, CLOCK, and PHASE MENU 2/3 SET 5/∞ Remote control unit STANDBY/ON DISPLAY MENU / SET INPUT SCREEN SIZE - E N H A N C E SETUP : : : : INPUT1 OPTION 0 0 0 0 PICTURE RESET SET ENTER MENU EXIT 2 Use the 2/3 buttons to activate the setting. VOL + MENU SET 5/∞ 2/3 Main unit operating panel 1 Press...

User Manual
Page 35
...is changed . ÷ MODE3 ......... VOL + MENU 5/∞ 2/3 Main unit operating panel 1 Press the MENU button to activate the setting. The image size is enhanced, and the screen display position is shifted in accordance with dot-by-dot orientation. 6 When finished with the setting, press the MENU button... to return to select [SCREEN MGT.], then press the SET button. The image size is reduced, and the screen display position is not supported when using the POINT ZOOM function. Note The [ORBITER] setting affects all input...
...is changed . ÷ MODE3 ......... VOL + MENU 5/∞ 2/3 Main unit operating panel 1 Press the MENU button to activate the setting. The image size is enhanced, and the screen display position is shifted in accordance with dot-by-dot orientation. 6 When finished with the setting, press the MENU button... to return to select [SCREEN MGT.], then press the SET button. The image size is reduced, and the screen display position is not supported when using the POINT ZOOM function. Note The [ORBITER] setting affects all input...
User Manual
Page 36
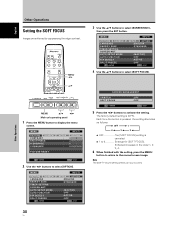
... Operations Setting the SOFT FOCUS Images are softened by suppressing the edge contrast. MENU 2/3 5/∞ Remote control unit STANDBY/ON DISPLAY MENU / SET INPUT SCREEN SIZE - AUTO SETUP MODE AUTO FUNCTION PIP DETECT SPLIT FREEZE SET ENTER INPUT1 SETUP OPTION :ENGLISH : S TA N D A R D :INACTIVE :OFF :ACTIVE :OFF MENU EXIT 4 Use the 5/∞...
... Operations Setting the SOFT FOCUS Images are softened by suppressing the edge contrast. MENU 2/3 5/∞ Remote control unit STANDBY/ON DISPLAY MENU / SET INPUT SCREEN SIZE - AUTO SETUP MODE AUTO FUNCTION PIP DETECT SPLIT FREEZE SET ENTER INPUT1 SETUP OPTION :ENGLISH : S TA N D A R D :INACTIVE :OFF :ACTIVE :OFF MENU EXIT 4 Use the 5/∞...
User Manual
Page 37
...Use the 2/3 buttons to display the menu screen. Brightness is controlled in accordance with input signal to produce easily viewed image. (PDP-507CMX only) ÷ AUTO Brightness is set automatically in [MODE1]. ÷ MODE3 Brightness is set at reducing screen aging due to...Operations English MENU PICTURE SCREEN CONTRAST BRIGHTNESS H.ENHANCE V. MENU 2/3 SET 5/∞ Remote control unit STANDBY/ON DISPLAY MENU / SET INPUT SCREEN SIZE - Effective at fixed level, regardless of input signal level. Each time the SET button is [STANDARD]. MENU PICTURE SCREEN LANGUAGE ENERGY SAVE ...
...Use the 2/3 buttons to display the menu screen. Brightness is controlled in accordance with input signal to produce easily viewed image. (PDP-507CMX only) ÷ AUTO Brightness is set automatically in [MODE1]. ÷ MODE3 Brightness is set at reducing screen aging due to...Operations English MENU PICTURE SCREEN CONTRAST BRIGHTNESS H.ENHANCE V. MENU 2/3 SET 5/∞ Remote control unit STANDBY/ON DISPLAY MENU / SET INPUT SCREEN SIZE - Effective at fixed level, regardless of input signal level. Each time the SET button is [STANDARD]. MENU PICTURE SCREEN LANGUAGE ENERGY SAVE ...
User Manual
Page 38
... FUNCTION] setting affects all input sources. MENU PICTURE SCREEN CONTRAST BRIGHTNESS H.ENHANCE V. MENU 2/3 SET 5/∞ Remote control unit STANDBY/ON DISPLAY MENU / SET INPUT SCREEN SIZE - MENU PICTURE SCREEN LANGUAGE ENERGY SAVE TIMER SETTING S C R E E N M G T. Notes ÷ The [AUTO FUNCTION] for [INPUT1] is supported only when a separate SYNC or composite SYNC analog...
... FUNCTION] setting affects all input sources. MENU PICTURE SCREEN CONTRAST BRIGHTNESS H.ENHANCE V. MENU 2/3 SET 5/∞ Remote control unit STANDBY/ON DISPLAY MENU / SET INPUT SCREEN SIZE - MENU PICTURE SCREEN LANGUAGE ENERGY SAVE TIMER SETTING S C R E E N M G T. Notes ÷ The [AUTO FUNCTION] for [INPUT1] is supported only when a separate SYNC or composite SYNC analog...


