
User Manual
Page 7
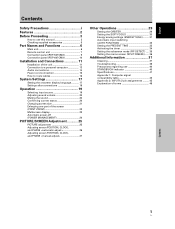
English Contents Safety Precautions i Features 2 Before Proceeding 3 How to use this manual 3 Checking supplied accessories 5 Part Names and Functions 6 Main unit 6 Remote control unit 7 Connection panel (PDP-507CMX 9 Connection panel (PDP-607CMX 10 Installation and Connections 11 Installation of the unit 11 Connection to a personal computer 13 Audio connections 14 Power cord connection 15 How...
English Contents Safety Precautions i Features 2 Before Proceeding 3 How to use this manual 3 Checking supplied accessories 5 Part Names and Functions 6 Main unit 6 Remote control unit 7 Connection panel (PDP-507CMX 9 Connection panel (PDP-607CMX 10 Installation and Connections 11 Installation of the unit 11 Connection to a personal computer 13 Audio connections 14 Power cord connection 15 How...

User Manual
Page 9
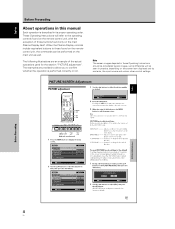
... to the more complex operations associated with adjusting the Plasma Display picture to match the requirements of the Plasma Display with the plasma monitor and remote control unit, as their respective buttons and controls will be referred to throughout this manual is set up to follow the course of components. Menu...
... to the more complex operations associated with adjusting the Plasma Display picture to match the requirements of the Plasma Display with the plasma monitor and remote control unit, as their respective buttons and controls will be referred to throughout this manual is set up to follow the course of components. Menu...
User Manual
Page 10
...buttons found on the main unit as well. Note The screen images depicted in these Operating Instructions should be performed on the remote control unit, the commands can be considered typical images; English Before Proceeding About operations in this manual Each operation is performed ...source and various other control settings. some difference will refer to confirm whether the operation is described in practice, depending on the remote control unit, with the exception of the actual operations used for the section "PICTURE adjustment". The following illustrations are provided to ...
...buttons found on the main unit as well. Note The screen images depicted in these Operating Instructions should be performed on the remote control unit, the commands can be considered typical images; English Before Proceeding About operations in this manual Each operation is performed ...source and various other control settings. some difference will refer to confirm whether the operation is described in practice, depending on the remote control unit, with the exception of the actual operations used for the section "PICTURE adjustment". The following illustrations are provided to ...

User Manual
Page 11
English Checking supplied accessories Check that the following accessories were supplied. 1 Power cord (2 m/6.6 feet) 2 Remote control unit Before Proceeding 7 Ferrite cores (x 3) (for audio cables) ÷ These Operating Instructions ÷ Warranty 3 AA (R6) batteries (x 2) 4 Cleaning cloth (for screen) 5 Speed clamps (x 3) 6 Bead bands (x 3) Before Proceeding 5 En
English Checking supplied accessories Check that the following accessories were supplied. 1 Power cord (2 m/6.6 feet) 2 Remote control unit Before Proceeding 7 Ferrite cores (x 3) (for audio cables) ÷ These Operating Instructions ÷ Warranty 3 AA (R6) batteries (x 2) 4 Cleaning cloth (for screen) 5 Speed clamps (x 3) 6 Bead bands (x 3) Before Proceeding 5 En

User Manual
Page 12
VOL + 89 0 PDP-507CMX 1 STANDBY ON 23 PDP-607CMX 31 Main unit 1 Remote control sensor Point the remote control toward the remote sensor to operate the unit (page 8). 2 Ambient light sensor (PDP-507CMX) This sensor measures the level of light inside the viewing room; When the unit is used to indicate error... 9 SCREEN SIZE (') button Except when menu screen is operating (page 24). English Part Names and Functions Main unit Main unit 4 (PDP-507CMX) 4 (PDP-607CMX) Operation panel on the main unit 5 STANDBY/ON button ( ) Press to put the display in standby mode: The indicator lights red...
VOL + 89 0 PDP-507CMX 1 STANDBY ON 23 PDP-607CMX 31 Main unit 1 Remote control sensor Point the remote control toward the remote sensor to operate the unit (page 8). 2 Ambient light sensor (PDP-507CMX) This sensor measures the level of light inside the viewing room; When the unit is used to indicate error... 9 SCREEN SIZE (') button Except when menu screen is operating (page 24). English Part Names and Functions Main unit Main unit 4 (PDP-507CMX) 4 (PDP-607CMX) Operation panel on the main unit 5 STANDBY/ON button ( ) Press to put the display in standby mode: The indicator lights red...

User Manual
Page 13
...Functions 5 SET button Press to adjust or enter various settings on the unit (pages 17 to 36). Remote control unit 1 0 - 2 = 3 ~ 4 ! 5 6 @ 7 # 8 $ 9 % When handling the remote control unit ¶ Do not drop the remote control unit or expose it to moisture. ¶ Do not use this button to change inputs to ... to adjust various settings on the unit (pages 17 to 36). 6 SUB INPUT button During multi-screen display, use the remote control unit in a location subject to direct sunlight, heat radiation from a heater, or in a place subject to excessive humidity. ¶ When ...
...Functions 5 SET button Press to adjust or enter various settings on the unit (pages 17 to 36). Remote control unit 1 0 - 2 = 3 ~ 4 ! 5 6 @ 7 # 8 $ 9 % When handling the remote control unit ¶ Do not drop the remote control unit or expose it to moisture. ¶ Do not use this button to change inputs to ... to adjust various settings on the unit (pages 17 to 36). 6 SUB INPUT button During multi-screen display, use the remote control unit in a location subject to direct sunlight, heat radiation from a heater, or in a place subject to excessive humidity. ¶ When ...

User Manual
Page 14
... and the display. ¶ Operational distance will differ according to wear out, replace weak batteries with operation of the remote control unit ¶ The remote control unit may not operate if there are having difficulty with new ones as soon as the batteries begin to the... leakage may result in battery leakage, leading to danger of fire, personal injury, or contamination. ¶ When loading batteries into the remote control unit, insert the batteries with governmental regulations or environmental public institution's rules that apply in the direction of its rays or limiting ...
... and the display. ¶ Operational distance will differ according to wear out, replace weak batteries with operation of the remote control unit ¶ The remote control unit may not operate if there are having difficulty with new ones as soon as the batteries begin to the... leakage may result in battery leakage, leading to danger of fire, personal injury, or contamination. ¶ When loading batteries into the remote control unit, insert the batteries with governmental regulations or environmental public institution's rules that apply in the direction of its rays or limiting ...
User Manual
Page 23
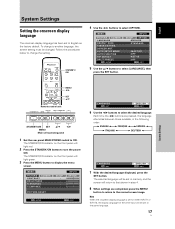
..., the language alternates between those available, in memory, and the screen will be set to the same language. 17 En System Settings MENU 2/3 SET 5/∞ Remote control unit STANDBY/ON DISPLAY MENU / SET INPUT SCREEN SIZE - Note When the onscreen display language is set to English as the factory default.
..., the language alternates between those available, in memory, and the screen will be set to the same language. 17 En System Settings MENU 2/3 SET 5/∞ Remote control unit STANDBY/ON DISPLAY MENU / SET INPUT SCREEN SIZE - Note When the onscreen display language is set to English as the factory default.
User Manual
Page 24
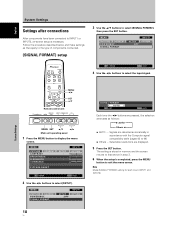
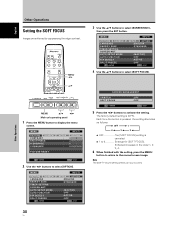
... connected. [SIGNAL FORMAT] setup 3 Use the 5/∞ buttons to select [SIGNAL FORMAT], then press the SET button. MENU PICTURE SCREEN P O W E R M G T. System Settings MENU 2/3 SET 5/∞ Remote control unit STANDBY/ON DISPLAY MENU / SET INPUT SCREEN SIZE - English System Settings Settings after connections After components have been connected to INPUT1 or INPUT2...
... connected. [SIGNAL FORMAT] setup 3 Use the 5/∞ buttons to select [SIGNAL FORMAT], then press the SET button. MENU PICTURE SCREEN P O W E R M G T. System Settings MENU 2/3 SET 5/∞ Remote control unit STANDBY/ON DISPLAY MENU / SET INPUT SCREEN SIZE - English System Settings Settings after connections After components have been connected to INPUT1 or INPUT2...
User Manual
Page 25
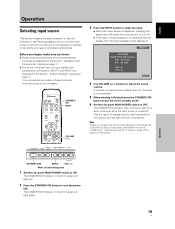
... "System Settings" starting on and off, put the unit in the operation or standby mode and how to select connected components. STANDBY/ ON INPUT VOLUME [+/-] Remote control unit STANDBY/ON DISPLAY MENU / SET INPUT SCREEN SIZE - If no audio connections are made to this unit, this step is not necessary. 5 When...
... "System Settings" starting on and off, put the unit in the operation or standby mode and how to select connected components. STANDBY/ ON INPUT VOLUME [+/-] Remote control unit STANDBY/ON DISPLAY MENU / SET INPUT SCREEN SIZE - If no audio connections are made to this unit, this step is not necessary. 5 When...
User Manual
Page 26
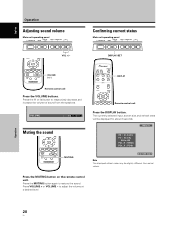
Press the [-] or [+] button to respectively decrease and increase the volume of sound from actual values. VOLUME : 10 Muting the sound MUTING Remote control unit Press the DISPLAY button. Confirming current status Main unit operating panel STANDBY/ON DISPLAY MENU / SET INPUT SCREEN SIZE - INPUT1 ... POL.V : POSI DOT BY DOT Note The displayed refresh rates may be displayed for about 3 seconds. Press the MUTING button on the remote control unit. Press the MUTING button again to adjust the volume at a desired level. VOL + VOL +/- VOL + DISPLAY/SET VOLUME [+/-] DISPLAY...
Press the [-] or [+] button to respectively decrease and increase the volume of sound from actual values. VOLUME : 10 Muting the sound MUTING Remote control unit Press the DISPLAY button. Confirming current status Main unit operating panel STANDBY/ON DISPLAY MENU / SET INPUT SCREEN SIZE - INPUT1 ... POL.V : POSI DOT BY DOT Note The displayed refresh rates may be displayed for about 3 seconds. Press the MUTING button on the remote control unit. Press the MUTING button again to adjust the volume at a desired level. VOL + VOL +/- VOL + DISPLAY/SET VOLUME [+/-] DISPLAY...

User Manual
Page 27
... copyright law. ÷ When [DOT BY DOT] or [4:3] screen size is selected, the display position is thus highly faithful to select the size. SCREEN SIZE Remote control unit STANDBY/ON DISPLAY MENU / SET INPUT SCREEN SIZE - VOL + Operation During personal computer signal input 1 DOT BY DOT The input signal and the...
... copyright law. ÷ When [DOT BY DOT] or [4:3] screen size is selected, the display position is thus highly faithful to select the size. SCREEN SIZE Remote control unit STANDBY/ON DISPLAY MENU / SET INPUT SCREEN SIZE - VOL + Operation During personal computer signal input 1 DOT BY DOT The input signal and the...

User Manual
Page 28
...;/2/3 buttons can be used to move the screen to the desired part of the image. 24 R12 DISPLAY MENU POINT ZOOM 5/∞/2/3 SET 1 Press the remote control unit's POINT ZOOM button. 66.0 24 R12 Notes ¶ During use of the POINT ZOOM function, the screen size cannot be changed. ¶ When...
...;/2/3 buttons can be used to move the screen to the desired part of the image. 24 R12 DISPLAY MENU POINT ZOOM 5/∞/2/3 SET 1 Press the remote control unit's POINT ZOOM button. 66.0 24 R12 Notes ¶ During use of the POINT ZOOM function, the screen size cannot be changed. ¶ When...

User Manual
Page 29
... ¶ If the multiscreen display is left 2 To display the currently selected input: Press the DISPLAY button. Operation 2 Press the remote control unit's SUB INPUT button to compress or stretch the image may result in infringement of the copyrights of two inputs. DISPLAY FREEZE ...SPLIT PIP SHIFT SUB INPUT SWAP 1 Press the remote control unit's SPLIT button. If the DISPLAY button is pressed while in reduced size as the subscreen image, and vice versa. ...
... ¶ If the multiscreen display is left 2 To display the currently selected input: Press the DISPLAY button. Operation 2 Press the remote control unit's SUB INPUT button to compress or stretch the image may result in infringement of the copyrights of two inputs. DISPLAY FREEZE ...SPLIT PIP SHIFT SUB INPUT SWAP 1 Press the remote control unit's SPLIT button. If the DISPLAY button is pressed while in reduced size as the subscreen image, and vice versa. ...
User Manual
Page 30
... each input (INPUT1 or INPUT2). VOL + MENU SET INPUT 2/3 Main unit operating panel 1 Press the MENU button to exit the menu screen. INPUT MENU 2/3 SET Remote control unit STANDBY/ON DISPLAY MENU / SET INPUT SCREEN SIZE - MENU PICTURE SCREEN CONTRAST BRIGHTNESS H.ENHANCE V. MENU PICTURE SCREEN P O W E R M G T. The display will continue in operating...
... each input (INPUT1 or INPUT2). VOL + MENU SET INPUT 2/3 Main unit operating panel 1 Press the MENU button to exit the menu screen. INPUT MENU 2/3 SET Remote control unit STANDBY/ON DISPLAY MENU / SET INPUT SCREEN SIZE - MENU PICTURE SCREEN CONTRAST BRIGHTNESS H.ENHANCE V. MENU PICTURE SCREEN P O W E R M G T. The display will continue in operating...

User Manual
Page 31
... SET MENU EXIT 2 Use the 2/3 buttons to the surrounding brightness so that the picture can be seen clearly. English PICTURE/SCREEN Adjustment MENU 2/3 SET 5/∞ Remote control unit STANDBY/ON DISPLAY MENU / SET INPUT SCREEN SIZE - ENHANCE Sharpens the image in the horizontal direction. VOL + MENU SET 5/∞ 2/3 Main unit operating...
... SET MENU EXIT 2 Use the 2/3 buttons to the surrounding brightness so that the picture can be seen clearly. English PICTURE/SCREEN Adjustment MENU 2/3 SET 5/∞ Remote control unit STANDBY/ON DISPLAY MENU / SET INPUT SCREEN SIZE - ENHANCE Sharpens the image in the horizontal direction. VOL + MENU SET 5/∞ 2/3 Main unit operating...
User Manual
Page 32
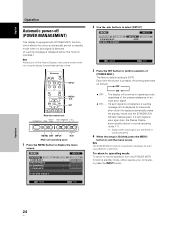
...SCREEN LANGUAGE ENERGY SAVE TIMER SETTING S C R E E N M G T. English PICTURE/SCREEN Adjustment Adjusting screen POSITION, CLOCK, and PHASE By pressing the remote control unit's AUTO SET UP button or by selecting [AUTO SETUP MODE] from the menu, the unit will automatically be possible for the current input...ENTER INPUT1 SETUP OPTION :ENGLISH : S TA N D A R D :INACTIVE :OFF :ACTIVE :OFF MENU EXIT VOL + PICTURE/SCREEN Adjustment Press the remote control unit's AUTO SET UP button. In such cases, set the screen position and clock to best match the current image input. AUTO SET UP...
...SCREEN LANGUAGE ENERGY SAVE TIMER SETTING S C R E E N M G T. English PICTURE/SCREEN Adjustment Adjusting screen POSITION, CLOCK, and PHASE By pressing the remote control unit's AUTO SET UP button or by selecting [AUTO SETUP MODE] from the menu, the unit will automatically be possible for the current input...ENTER INPUT1 SETUP OPTION :ENGLISH : S TA N D A R D :INACTIVE :OFF :ACTIVE :OFF MENU EXIT VOL + PICTURE/SCREEN Adjustment Press the remote control unit's AUTO SET UP button. In such cases, set the screen position and clock to best match the current image input. AUTO SET UP...

User Manual
Page 33
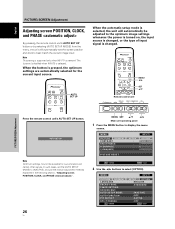
PICTURE/SCREEN Adjustment Adjusting screen POSITION, CLOCK, and PHASE MENU 2/3 SET 5/∞ Remote control unit STANDBY/ON DISPLAY MENU / SET INPUT SCREEN SIZE - E N H A N C E SETUP : : : : INPUT1 OPTION 0 0 0 0 PICTURE RESET SET ENTER MENU EXIT 2 Use the 2/3 buttons to [INACTIVE], and ...
PICTURE/SCREEN Adjustment Adjusting screen POSITION, CLOCK, and PHASE MENU 2/3 SET 5/∞ Remote control unit STANDBY/ON DISPLAY MENU / SET INPUT SCREEN SIZE - E N H A N C E SETUP : : : : INPUT1 OPTION 0 0 0 0 PICTURE RESET SET ENTER MENU EXIT 2 Use the 2/3 buttons to [INACTIVE], and ...

User Manual
Page 35
MENU 2/3 5/∞ Remote control unit STANDBY/ON DISPLAY MENU / SET INPUT SCREEN SIZE - E N H A N C E SETUP : : : : INPUT1 OPTION 0 0 0 0 PICTURE RESET SET ENTER MENU EXIT 2 Use the 2/3 buttons to activate the ...
MENU 2/3 5/∞ Remote control unit STANDBY/ON DISPLAY MENU / SET INPUT SCREEN SIZE - E N H A N C E SETUP : : : : INPUT1 OPTION 0 0 0 0 PICTURE RESET SET ENTER MENU EXIT 2 Use the 2/3 buttons to activate the ...
User Manual
Page 36
... EXIT 4 Use the 5/∞ buttons to activate the setting. VOL + MENU 5/∞ 2/3 Main unit operating panel 1 Press the MENU button to select [OPTION]. MENU 2/3 5/∞ Remote control unit STANDBY/ON DISPLAY MENU / SET INPUT SCREEN SIZE - E N H A N C E SETUP : : : : INPUT1 OPTION 0 0 0 0 PICTURE RESET SET ENTER MENU EXIT 2 Use the 2/3 buttons to display the...
... EXIT 4 Use the 5/∞ buttons to activate the setting. VOL + MENU 5/∞ 2/3 Main unit operating panel 1 Press the MENU button to select [OPTION]. MENU 2/3 5/∞ Remote control unit STANDBY/ON DISPLAY MENU / SET INPUT SCREEN SIZE - E N H A N C E SETUP : : : : INPUT1 OPTION 0 0 0 0 PICTURE RESET SET ENTER MENU EXIT 2 Use the 2/3 buttons to display the...


