Owner's Manual
Page 3
... AC outlet. To prevent electromagnetic interference with part 15 of the FCC Rules. Product Name: Plasma Display System (Plasma Display) (Media Receiver) Model Number: PRO-1120HD PRO-920HD (PRO-505PU) (PRO-435PU) (PRO-R05U) (PRO-R05U) Product Category: Class B Personal Computers & Peripherals Responsible Party Name: PIONEER ELECTRONICS (USA), INC., Customer Support Div. Phone: (800) 421-1625 For Business Customer URL...
... AC outlet. To prevent electromagnetic interference with part 15 of the FCC Rules. Product Name: Plasma Display System (Plasma Display) (Media Receiver) Model Number: PRO-1120HD PRO-920HD (PRO-505PU) (PRO-435PU) (PRO-R05U) (PRO-R05U) Product Category: Class B Personal Computers & Peripherals Responsible Party Name: PIONEER ELECTRONICS (USA), INC., Customer Support Div. Phone: (800) 421-1625 For Business Customer URL...
Owner's Manual
Page 4
... Information 02 Safety Precautions 03 Operational Precautions 04 Supplied Accessories Plasma Display 11 Media Receiver 11 05 Part Names Plasma Display 12 Media Receiver 12 Remote control unit 14 06 Preparation Installing the Plasma Display 15 Installing the Media Receiver 16 Installing the Media ...Temporarily deactivating the Parental Control 37 Setting your model properly. Please read through these operating instructions so you for buying this Pioneer product. Contents Thank you will know how to operate your favorite channels 37 Setting up TV channels 31 Using Auto Channel...
... Information 02 Safety Precautions 03 Operational Precautions 04 Supplied Accessories Plasma Display 11 Media Receiver 11 05 Part Names Plasma Display 12 Media Receiver 12 Remote control unit 14 06 Preparation Installing the Plasma Display 15 Installing the Media Receiver 16 Installing the Media ...Temporarily deactivating the Parental Control 37 Setting your model properly. Please read through these operating instructions so you for buying this Pioneer product. Contents Thank you will know how to operate your favorite channels 37 Setting up TV channels 31 Using Auto Channel...
Owner's Manual
Page 6
...-based screens (for over in possible malfunction. To ensure proper heat emission: • Distance the unit slightly from this Pioneer PureVision PRO-1120HD/PRO-920HD Plasma Display System, please first read and follow the usage guidelines below , you can be held responsible for a physical glass ...place the product on a carpet or blanket. • Do not leave the product tilted over a long period of the Pioneer PRO-1120HD/PRO-920HD Plasma Display System will diminish very slowly, such as such, are not covered by displaying static images for accident or damage caused by...
...-based screens (for over in possible malfunction. To ensure proper heat emission: • Distance the unit slightly from this Pioneer PureVision PRO-1120HD/PRO-920HD Plasma Display System, please first read and follow the usage guidelines below , you can be held responsible for a physical glass ...place the product on a carpet or blanket. • Do not leave the product tilted over a long period of the Pioneer PRO-1120HD/PRO-920HD Plasma Display System will diminish very slowly, such as such, are not covered by displaying static images for accident or damage caused by...

Owner's Manual
Page 7
If the same image is operated through i.LINK PIONEER shall not always assure normal video/audio recording or playback when a D-VHS is displayed continuously for several days, a permanent after-image may remain on the Plasma Display continuously over several hours, or for a long time may cause after-image lagging. About operations through i.LINK...
If the same image is operated through i.LINK PIONEER shall not always assure normal video/audio recording or playback when a D-VHS is displayed continuously for several days, a permanent after-image may remain on the Plasma Display continuously over several hours, or for a long time may cause after-image lagging. About operations through i.LINK...
Owner's Manual
Page 8
...by broken glass pieces in an enclosed place such as radiators, heaters, stoves and other openings in accidents. 7. The Plasma Display weighs about 32.8 kg (72.3 lbs.) for the PRO-505PU and about 26.8 kg (59.1 lbs.) for a long period of power supply used in serious personal injuries...the product is unstable, unpack, carry, and install the product with utmost care. For the same reason, do not place the product in case the plasma Display breaks. 14. Servicing-Do not attempt to a strong impact, for future reference. 3. When the power cord or plug is operated. 2. ...
...by broken glass pieces in an enclosed place such as radiators, heaters, stoves and other openings in accidents. 7. The Plasma Display weighs about 32.8 kg (72.3 lbs.) for the PRO-505PU and about 26.8 kg (59.1 lbs.) for a long period of power supply used in serious personal injuries...the product is unstable, unpack, carry, and install the product with utmost care. For the same reason, do not place the product in case the plasma Display breaks. 14. Servicing-Do not attempt to a strong impact, for future reference. 3. When the power cord or plug is operated. 2. ...

Owner's Manual
Page 9
..., see the instruction manual that results from the mounting surface of the Plasma Display. • Be sure to install the Plasma Display on a flat surface because it contains glass. • The screw holes other than the optional PIONEER products. 9 En See the side view above. • Be careful... not to block the ventilation opening at the rear of the Plasma Display. Never use the optional PIONEER mounting products. • PIONEER shall not be used for the specified products. When using other than the above are to or from the stand...
..., see the instruction manual that results from the mounting surface of the Plasma Display. • Be sure to install the Plasma Display on a flat surface because it contains glass. • The screw holes other than the optional PIONEER products. 9 En See the side view above. • Be careful... not to block the ventilation opening at the rear of the Plasma Display. Never use the optional PIONEER mounting products. • PIONEER shall not be used for the specified products. When using other than the above are to or from the stand...

Owner's Manual
Page 10
... this is the case, place that the fan motor is removed from a wall outlet. Use the handles as pesticide. Depending on how the Plasma Display is switched on in winter morning, for example. Using the product with a wet cloth, water droplets on the surface may result in ... on the product and wait until the power cord of the Media Receiver is noisy at a location where its characteristics. 03 Operational Precautions PIONEER bears no responsibility for any damages arising from incorrect use of the product by you or other people, malfunctions when in use, other product...
... this is the case, place that the fan motor is removed from a wall outlet. Use the handles as pesticide. Depending on how the Plasma Display is switched on in winter morning, for example. Using the product with a wet cloth, water droplets on the surface may result in ... on the product and wait until the power cord of the Media Receiver is noisy at a location where its characteristics. 03 Operational Precautions PIONEER bears no responsibility for any damages arising from incorrect use of the product by you or other people, malfunctions when in use, other product...
Owner's Manual
Page 11
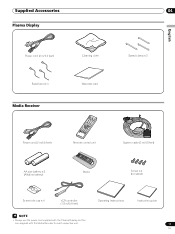
Supplied Accessories Plasma Display Power cord (2 m/6.6 feet) Bead band × 3 Media Receiver Cleaning cloth Warranty card 04 Speed clamp × 3 English Power cord (2 m/6.6 feet) Remote control unit System cable (3 m/9.8 feet) AA size battery × 2 (Alkaline battery) Stand Screw × 4 (for stand) Screw hole cap × 4 VCR controller (1.8 m/5.9 feet) Operating Instructions Instruction guide • Always use the power cord supplied with the Plasma Display and the one supplied with the Media Receiver for each respective unit. 11 En
Supplied Accessories Plasma Display Power cord (2 m/6.6 feet) Bead band × 3 Media Receiver Cleaning cloth Warranty card 04 Speed clamp × 3 English Power cord (2 m/6.6 feet) Remote control unit System cable (3 m/9.8 feet) AA size battery × 2 (Alkaline battery) Stand Screw × 4 (for stand) Screw hole cap × 4 VCR controller (1.8 m/5.9 feet) Operating Instructions Instruction guide • Always use the power cord supplied with the Plasma Display and the one supplied with the Media Receiver for each respective unit. 11 En
Owner's Manual
Page 12
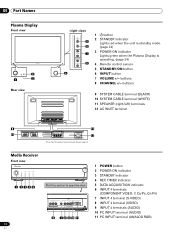
... view Rear view (right view) 5 6 7 8 4 1 button 2 STANDBY indicator Lights red when the unit is standby mode. (page 24) 3 POWER ON indicator Lights green when the Plasma Display is operating. (page 24) 4 Remote control sensor 5 STANDBY/ON button 6 INPUT button 7 VOLUME +/- buttons 9 SYSTEM CABLE terminal (BLACK) 10 SYSTEM CABLE terminal (WHITE) 11...
... view Rear view (right view) 5 6 7 8 4 1 button 2 STANDBY indicator Lights red when the unit is standby mode. (page 24) 3 POWER ON indicator Lights green when the Plasma Display is operating. (page 24) 4 Remote control sensor 5 STANDBY/ON button 6 INPUT button 7 VOLUME +/- buttons 9 SYSTEM CABLE terminal (BLACK) 10 SYSTEM CABLE terminal (WHITE) 11...
Owner's Manual
Page 14
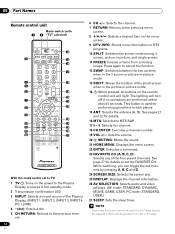
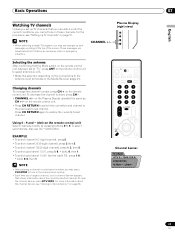
... 10 24 11 25 12 26 13 27 With the mode switch set to TV 1 TV : Turns on the power to the Plasma Display or places it at the Plasma Display. • See pages 62 to 68 for details. 16 MTS: Selects the MTS/SAP. 17 0 - 9: Selects the channel. 18 CH ENTER... confirmation LED 3 INPUT: Selects an input source of the small screen when in the picture-in -picture mode. 13 SHIFT: Moves the location of the Plasma Display. (INPUT 1, INPUT 2, INPUT 3, INPUT 4, PC, i.LINK) 4 •(dot): Enters a dot. 5 CH RETURN: Returns to the previous channel. 14 En 6 CH +/-: Selects the channel. 7 RETURN...
... 10 24 11 25 12 26 13 27 With the mode switch set to TV 1 TV : Turns on the power to the Plasma Display or places it at the Plasma Display. • See pages 62 to 68 for details. 16 MTS: Selects the MTS/SAP. 17 0 - 9: Selects the channel. 18 CH ENTER... confirmation LED 3 INPUT: Selects an input source of the small screen when in the picture-in -picture mode. 13 SHIFT: Moves the location of the Plasma Display. (INPUT 1, INPUT 2, INPUT 3, INPUT 4, PC, i.LINK) 4 •(dot): Enters a dot. 5 CH RETURN: Returns to the previous channel. 14 En 6 CH +/-: Selects the channel. 7 RETURN...

Owner's Manual
Page 15
...; Under direct exposure to +104°F); Using the optional PIONEER speakers For details on the top of the system cable used to connect the Plasma Display and the Media Receiver is about 3 m (9.8 feet). • Because the Plasma Display is heavy, be used only with model PDK-1012 ... installation, refer to the instruction manual supplied with the speaker. Preparation Installing the Plasma Display Over 50 cm (19 /11 16 inches) Over 10 cm (3 /15 16 inches ) 06 Using the optional PIONEER stand For details on installation, refer to the instruction manual supplied with the stand...
...; Under direct exposure to +104°F); Using the optional PIONEER speakers For details on the top of the system cable used to connect the Plasma Display and the Media Receiver is about 3 m (9.8 feet). • Because the Plasma Display is heavy, be used only with model PDK-1012 ... installation, refer to the instruction manual supplied with the speaker. Preparation Installing the Plasma Display Over 50 cm (19 /11 16 inches) Over 10 cm (3 /15 16 inches ) 06 Using the optional PIONEER stand For details on installation, refer to the instruction manual supplied with the stand...
Owner's Manual
Page 16
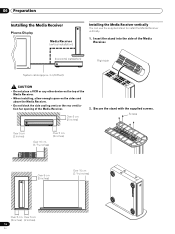
Secure the stand with the supplied screws. 06 Preparation Installing the Media Receiver Plasma Display Media Receiver (vertical installation) ACQUISITION TIMER STANDBY ON DATA REC POWER Installing the Media Receiver vertically You can use the supplied stand to install ...
Secure the stand with the supplied screws. 06 Preparation Installing the Media Receiver Plasma Display Media Receiver (vertical installation) ACQUISITION TIMER STANDBY ON DATA REC POWER Installing the Media Receiver vertically You can use the supplied stand to install ...
Owner's Manual
Page 18
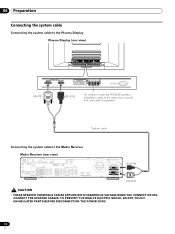
06 Preparation Connecting the system cable Connecting the system cable to the Plasma Display Plasma Display (rear view) (WHITE) (BLACK) For details on optional PIONEER speaker installation, refer to the Media Receiver Media Receiver (rear view) IN OUT VCR CONTROL CONTROL IN ANTENNA B ANTENNA/ CABLE A IN Cable CARD S-VIDEO INPUT 2 ...
06 Preparation Connecting the system cable Connecting the system cable to the Plasma Display Plasma Display (rear view) (WHITE) (BLACK) For details on optional PIONEER speaker installation, refer to the Media Receiver Media Receiver (rear view) IN OUT VCR CONTROL CONTROL IN ANTENNA B ANTENNA/ CABLE A IN Cable CARD S-VIDEO INPUT 2 ...
Owner's Manual
Page 19
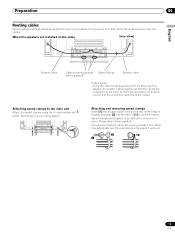
Attaching and removing speed clamps Insert [1] into an appropriate hole on the rear of the Plasma Display and snap [2] into the back of the cables. Speed clamps are invisible from the front. Attaching speed clamps to the main unit Attach the ...
Attaching and removing speed clamps Insert [1] into an appropriate hole on the rear of the Plasma Display and snap [2] into the back of the cables. Speed clamps are invisible from the front. Attaching speed clamps to the main unit Attach the ...
Owner's Manual
Page 20
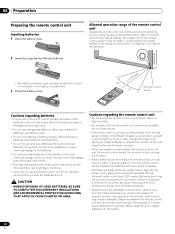
...remote sensor window of time, remove the batteries from it toward the remote control sensor located at a location far enough from the Plasma Display may not allow this is under direct sunlight; 06 Preparation Preparing the remote control unit Inserting batteries 1 Open the battery cover...COMPLY WITH GOVERNMENT REGULATIONS AND ENVIRONMENTAL PROTECTION GUIDELINES THAT APPLY IN YOUR COUNTRY OR AREA. Allowed operation range of the lighting or Plasma Display, or operate the remote control unit closer to properly receive commands from its remote control unit properly or entirely. The ...
...remote sensor window of time, remove the batteries from it toward the remote control sensor located at a location far enough from the Plasma Display may not allow this is under direct sunlight; 06 Preparation Preparing the remote control unit Inserting batteries 1 Open the battery cover...COMPLY WITH GOVERNMENT REGULATIONS AND ENVIRONMENTAL PROTECTION GUIDELINES THAT APPLY IN YOUR COUNTRY OR AREA. Allowed operation range of the lighting or Plasma Display, or operate the remote control unit closer to properly receive commands from its remote control unit properly or entirely. The ...

Owner's Manual
Page 23
...• Always turn off the power of time. 23 En neglecting this can result in fire or electric shock. • For the Plasma Display System, a three-core power cord with a ground terminal is not going to use the specified power supply voltage; Preparation 06 Connecting ...the power cord Connect the power cord after all component connections have been completed. Plasma Display (rear view) English Power cord Media Receiver (rear view) IN OUT VCR CONTROL CONTROL IN ANTENNA B ANTENNA/ CABLE A IN Cable...
...• Always turn off the power of time. 23 En neglecting this can result in fire or electric shock. • For the Plasma Display System, a three-core power cord with a ground terminal is not going to use the specified power supply voltage; Preparation 06 Connecting ...the power cord Connect the power cord after all component connections have been completed. Plasma Display (rear view) English Power cord Media Receiver (rear view) IN OUT VCR CONTROL CONTROL IN ANTENNA B ANTENNA/ CABLE A IN Cable...

Owner's Manual
Page 24
... information in the standby mode. POWER REC DATA ON STANDBY TIMER ACQUISITION STANDBY indicator POWER ON indicator POWER button Plasma Display/Media Receiver status indicators Indicator Status Plasma Display Media Receiver System Status POWER ON STANDBY POWER ON STANDBY Power to the system is on. Flashing The ... STANDBY indicators light up red, and then press TV on the remote control unit or STANDBY/ON on the Plasma Display or POWER on the Media Receiver to the Plasma Display is off. Or the power cords have been disconnected. For other than the above, see "Troubleshooting" ...
... information in the standby mode. POWER REC DATA ON STANDBY TIMER ACQUISITION STANDBY indicator POWER ON indicator POWER button Plasma Display/Media Receiver status indicators Indicator Status Plasma Display Media Receiver System Status POWER ON STANDBY POWER ON STANDBY Power to the system is on. Flashing The ... STANDBY indicators light up red, and then press TV on the remote control unit or STANDBY/ON on the Plasma Display or POWER on the Media Receiver to the Plasma Display is off. Or the power cords have been disconnected. For other than the above, see "Troubleshooting" ...
Owner's Manual
Page 25
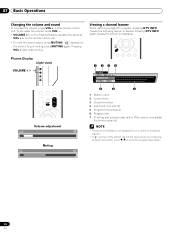
... CH +/- For the procedure, see "Setting up TV channels that you can watch under the current conditions, you cannot tune in those channels. Plasma Display (right view) CHANNEL +/- For more quickly. • Each time you change a channel, such a channel banner appears that the Mode ... TV program, you may press CH ENTER to tune in emergency situations. Those messages are broadcasted by pressing buttons 0 to 9. on the Plasma Display operates the same as necessary when in the channel more information about the currently selected channel. To select subchannels, also use the •...
... CH +/- For the procedure, see "Setting up TV channels that you can watch under the current conditions, you cannot tune in those channels. Plasma Display (right view) CHANNEL +/- For more quickly. • Each time you change a channel, such a channel banner appears that the Mode ... TV program, you may press CH ENTER to tune in emergency situations. Those messages are broadcasted by pressing buttons 0 to 9. on the Plasma Display operates the same as necessary when in the channel more information about the currently selected channel. To select subchannels, also use the •...
Owner's Manual
Page 26
... Ant. Viewing a channel banner While watching a digital TV program, pressing DTV INFO causes the following banner to appear. Pressing VOL + also quits muting. on the Plasma Display operates the same as VOL +/- Plasma Display (right view) VOLUME +/-
... Ant. Viewing a channel banner While watching a digital TV program, pressing DTV INFO causes the following banner to appear. Pressing VOL + also quits muting. on the Plasma Display operates the same as VOL +/- Plasma Display (right view) VOLUME +/-

Owner's Manual
Page 27
.../UHF frequencies or conventional cable TV channels. • When stereo sound is difficult to obtain clearer sound. • Once the MONO mode is selected, the Plasma Display System sound remains mono even if the system receives a stereo broadcast. Each time you press MTS, MTS toggles as shown below. This service presents...
.../UHF frequencies or conventional cable TV channels. • When stereo sound is difficult to obtain clearer sound. • Once the MONO mode is selected, the Plasma Display System sound remains mono even if the system receives a stereo broadcast. Each time you press MTS, MTS toggles as shown below. This service presents...


