Owner's Manual
Page 4
... Safety Precautions 03 Operational Precautions 04 Supplied Accessories Plasma Display 11 Media Receiver 11 05 Part Names Plasma Display 12 Media Receiver 12 Remote control unit 14 06 Preparation Installing the Plasma Display 15 Installing the Media Receiver 16 Installing the Media Receiver vertically 16 Connecting the ... 36 Setting Canadian French ratings 37 Temporarily deactivating the Parental Control 37 Setting your model properly. After you for buying this Pioneer product. Contents Thank you have finished reading the instructions, put them away in the explanatory drawings.
... Safety Precautions 03 Operational Precautions 04 Supplied Accessories Plasma Display 11 Media Receiver 11 05 Part Names Plasma Display 12 Media Receiver 12 Remote control unit 14 06 Preparation Installing the Plasma Display 15 Installing the Media Receiver 16 Installing the Media Receiver vertically 16 Connecting the ... 36 Setting Canadian French ratings 37 Temporarily deactivating the Parental Control 37 Setting your model properly. After you for buying this Pioneer product. Contents Thank you have finished reading the instructions, put them away in the explanatory drawings.

Owner's Manual
Page 5
English Contents 10 Adjustments and Settings Sleep Timer 40 AV Selection 40 Picture adjustments 41 Pro Adjust 41 Color Management 42 Sound adjustments 43 FOCUS 43 Front Surround 43 Power Control 44 Energy Save 44 No Signal off (AV mode only ... compatibility chart 58 Connecting the VCR controller 59 The lists of controllable recording equipment manufactures 60 Connecting control cords 61 About SR 61 13 Useful Remote Control Features Learning function of the remote control unit 62 Using the learning function 62 Presetting manufacture codes 62 Manufacture codes 63 Using the...
English Contents 10 Adjustments and Settings Sleep Timer 40 AV Selection 40 Picture adjustments 41 Pro Adjust 41 Color Management 42 Sound adjustments 43 FOCUS 43 Front Surround 43 Power Control 44 Energy Save 44 No Signal off (AV mode only ... compatibility chart 58 Connecting the VCR controller 59 The lists of controllable recording equipment manufactures 60 Connecting control cords 61 About SR 61 13 Useful Remote Control Features Learning function of the remote control unit 62 Using the learning function 62 Presetting manufacture codes 62 Manufacture codes 63 Using the...

Owner's Manual
Page 10
...to this product, gently wipe it with a soft dry cloth; This is mostly composed of nearby equipment may be interfered. If you use , the remote controls of plastic. When condensation takes place, do not use of noise. Handles at such an occasion. Cleaning the screen • When cleaning the ... coating removal. • Do not expose the product to hang the product when installing or carrying the product, for example. 03 Operational Precautions PIONEER bears no responsibility for any damages arising from this product. so this does not designate malfunction.
...to this product, gently wipe it with a soft dry cloth; This is mostly composed of nearby equipment may be interfered. If you use , the remote controls of plastic. When condensation takes place, do not use of noise. Handles at such an occasion. Cleaning the screen • When cleaning the ... coating removal. • Do not expose the product to hang the product when installing or carrying the product, for example. 03 Operational Precautions PIONEER bears no responsibility for any damages arising from this product. so this does not designate malfunction.
Owner's Manual
Page 11
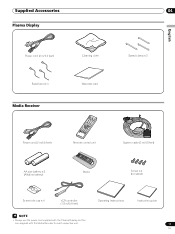
Supplied Accessories Plasma Display Power cord (2 m/6.6 feet) Bead band × 3 Media Receiver Cleaning cloth Warranty card 04 Speed clamp × 3 English Power cord (2 m/6.6 feet) Remote control unit System cable (3 m/9.8 feet) AA size battery × 2 (Alkaline battery) Stand Screw × 4 (for stand) Screw hole cap × 4 VCR controller (1.8 m/5.9 feet) Operating Instructions Instruction guide • Always use the power cord supplied with the Plasma Display and the one supplied with the Media Receiver for each respective unit. 11 En
Supplied Accessories Plasma Display Power cord (2 m/6.6 feet) Bead band × 3 Media Receiver Cleaning cloth Warranty card 04 Speed clamp × 3 English Power cord (2 m/6.6 feet) Remote control unit System cable (3 m/9.8 feet) AA size battery × 2 (Alkaline battery) Stand Screw × 4 (for stand) Screw hole cap × 4 VCR controller (1.8 m/5.9 feet) Operating Instructions Instruction guide • Always use the power cord supplied with the Plasma Display and the one supplied with the Media Receiver for each respective unit. 11 En
Owner's Manual
Page 12
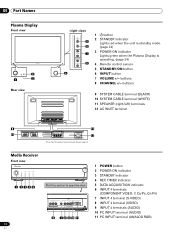
... 2 STANDBY indicator Lights red when the unit is standby mode. (page 24) 3 POWER ON indicator Lights green when the Plasma Display is operating. (page 24) 4 Remote control sensor 5 STANDBY/ON button 6 INPUT button 7 VOLUME +/-
... 2 STANDBY indicator Lights red when the unit is standby mode. (page 24) 3 POWER ON indicator Lights green when the Plasma Display is operating. (page 24) 4 Remote control sensor 5 STANDBY/ON button 6 INPUT button 7 VOLUME +/-
Owner's Manual
Page 14
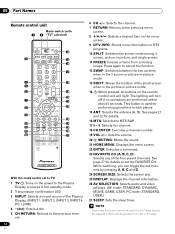
The lighting will light. PC mode: STANDARD, USER.) 27 SLEEP: Sets the sleep timer. • When using the remote control unit, point it into standby mode. 2 Transmission confirmation LED 3 INPUT: Selects an input source of the Plasma Display. (INPUT 1, INPUT 2, INPUT 3, INPUT 4, PC, i.LINK) 4 &#... picture-in-picture mode. 14 :When pressed, all buttons on this page. While watching, you can toggle the set the FAVORITE CH. 05 Part Names Remote control unit Mode switch (with 1 2 "TV" selected) 14 3 15 16 17 4 18 5 6 19 20 7 21 8 22 9 23 10 24 11 25 12 26 13 27...
The lighting will light. PC mode: STANDARD, USER.) 27 SLEEP: Sets the sleep timer. • When using the remote control unit, point it into standby mode. 2 Transmission confirmation LED 3 INPUT: Selects an input source of the Plasma Display. (INPUT 1, INPUT 2, INPUT 3, INPUT 4, PC, i.LINK) 4 &#... picture-in-picture mode. 14 :When pressed, all buttons on this page. While watching, you can toggle the set the FAVORITE CH. 05 Part Names Remote control unit Mode switch (with 1 2 "TV" selected) 14 3 15 16 17 4 18 5 6 19 20 7 21 8 22 9 23 10 24 11 25 12 26 13 27...
Owner's Manual
Page 20
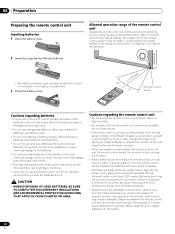
... different characteristics. • Do not mix old and new batteries. the unit may deform. • The remote control unit may not work properly if the remote sensor window of different types. If you replace the batteries, use manganese batteries. The strength of infrared rays emitted... REGULATIONS AND ENVIRONMENTAL PROTECTION GUIDELINES THAT APPLY IN YOUR COUNTRY OR AREA. When you find any obstacle exists between the remote control unit and the remote control sensor. Allowed operation range of new batteries or cause chemical leakage in old batteries. • Do not leave...
... different characteristics. • Do not mix old and new batteries. the unit may deform. • The remote control unit may not work properly if the remote sensor window of different types. If you replace the batteries, use manganese batteries. The strength of infrared rays emitted... REGULATIONS AND ENVIRONMENTAL PROTECTION GUIDELINES THAT APPLY IN YOUR COUNTRY OR AREA. When you find any obstacle exists between the remote control unit and the remote control sensor. Allowed operation range of new batteries or cause chemical leakage in old batteries. • Do not leave...

Owner's Manual
Page 22
... while watching in the 2-screen mode (TV image and video image) with TV selected will display the TV image of the slot cover on the remote control unit. • While watching a broadcast, press ANT to view the image received from the Cable Converter. When you are watching digital and/or High...
... while watching in the 2-screen mode (TV image and video image) with TV selected will display the TV image of the slot cover on the remote control unit. • While watching a broadcast, press ANT to view the image received from the Cable Converter. When you are watching digital and/or High...

Owner's Manual
Page 24
... If you are not going to the Plasma Display is off. Power to place the system into the standby mode by pressing TV on the remote control unit. Flashing The power cord has been disconnected from the Plasma Display. Or the power cord has been disconnected from the Media Receiver. Turning... off the power (Standby) 1 Press TV on the remote control unit or STANDBY/ON on the Plasma Display or POWER on the Media Receiver. • The system enters the standby mode and the image...
... If you are not going to the Plasma Display is off. Power to place the system into the standby mode by pressing TV on the remote control unit. Flashing The power cord has been disconnected from the Plasma Display. Or the power cord has been disconnected from the Media Receiver. Turning... off the power (Standby) 1 Press TV on the remote control unit or STANDBY/ON on the Plasma Display or POWER on the Media Receiver. • The system enters the standby mode and the image...
Owner's Manual
Page 25
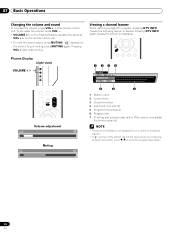
... depending on the connections to the antenna input terminals on the Media Receiver (page 21). Plasma Display (right view) CHANNEL +/- on the remote control unit. • Press CH RETURN to switch the currently tuned channel to tune in the channel more information about the channel banner,... see "Setting up TV channels" on the remote control unit has been set up TV channels that shows information about the currently selected channel. EXAMPLE • To select channel 5 (1-digit ...
... depending on the connections to the antenna input terminals on the Media Receiver (page 21). Plasma Display (right view) CHANNEL +/- on the remote control unit. • Press CH RETURN to switch the currently tuned channel to tune in the channel more information about the channel banner,... see "Setting up TV channels" on the remote control unit has been set up TV channels that shows information about the currently selected channel. EXAMPLE • To select channel 5 (1-digit ...
Owner's Manual
Page 26
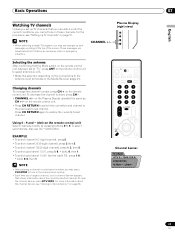
... 12:33pm WXCD • 1000 Ant. on the screen. 07 Basic Operations Changing the volume and sound To increase the volume, press VOL + on the remote control unit. • To mute the sound output, press MUTING. Plasma Display (right view) VOLUME +/- on the...
... 12:33pm WXCD • 1000 Ant. on the screen. 07 Basic Operations Changing the volume and sound To increase the volume, press VOL + on the remote control unit. • To mute the sound output, press MUTING. Plasma Display (right view) VOLUME +/- on the...

Owner's Manual
Page 27
... mode MONO mode STEREO SAP MONO • In each of the MTS/SAP modes selected using the MTS button, the display changes depending on the remote control unit. • Conventional TV channels in this case, sound is in the standby mode. See page 32. SAP sound: Listen to second language, supplementary...
... mode MONO mode STEREO SAP MONO • In each of the MTS/SAP modes selected using the MTS button, the display changes depending on the remote control unit. • Conventional TV channels in this case, sound is in the standby mode. See page 32. SAP sound: Listen to second language, supplementary...
Owner's Manual
Page 34
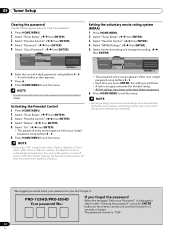
..." selected, the Parental Control is automatically activated when the power to the system is off and on the remote control unit and hold it . We suggest you write down for 3 seconds or longer. PRO-1120HD/PRO-920HD Your password No.: If you don't forget it down your password so you forget the password When...
..." selected, the Parental Control is automatically activated when the power to the system is off and on the remote control unit and hold it . We suggest you write down for 3 seconds or longer. PRO-1120HD/PRO-920HD Your password No.: If you don't forget it down your password so you forget the password When...
Owner's Manual
Page 37
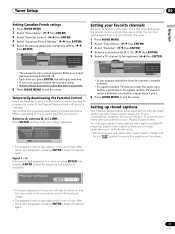
... appears. You can then quickly select from only your 4-digit password. Please look for the " " symbol to each of the four color buttons on the remote control unit (40 channels in -picture, and while freezing an image. • The password entry screen stays only for one minute. Enter your favorite channels...
... appears. You can then quickly select from only your 4-digit password. Please look for the " " symbol to each of the four color buttons on the remote control unit (40 channels in -picture, and while freezing an image. • The password entry screen stays only for one minute. Enter your favorite channels...

Owner's Manual
Page 44
...the system is switched on. • The system is switched on again by pressing STANDBY/ON on the Plasma Display or TV on the remote control unit. This setting is received from the personal computer for power saving. Picture Off Deactivates the screen to save power. To restore the ... received again, the system stays off. • The system is switched on again by pressing STANDBY/ON on the Plasma Display or TV on the remote control unit. 5 Press HOME MENU to exit the menu. • Five minutes before the system is a PC. No Signal off ". ( / then ENTER) 4 Select "Enable"....
...the system is switched on. • The system is switched on again by pressing STANDBY/ON on the Plasma Display or TV on the remote control unit. This setting is received from the personal computer for power saving. Picture Off Deactivates the screen to save power. To restore the ... received again, the system stays off. • The system is switched on again by pressing STANDBY/ON on the Plasma Display or TV on the remote control unit. 5 Press HOME MENU to exit the menu. • Five minutes before the system is a PC. No Signal off ". ( / then ENTER) 4 Select "Enable"....
Owner's Manual
Page 50
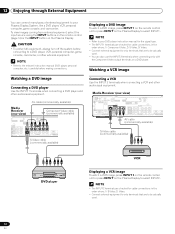
... a DVD player and other audiovisual equipment. To view images coming from external equipment, select the input source using the INPUT buttons on the remote control (page 14) or the INPUT button on the Plasma Display. • To protect all equipment, always turn off the system before ...AV cable (commercially available) S-Video cable (commercially available) DVD player VCR Displaying a VCR image To watch a DVD image, press INPUT 1 on the remote control unit or press INPUT on the Plasma Display to select INPUT1. • Refer to your DVD player instruction manual for the signal type. •...
... a DVD player and other audiovisual equipment. To view images coming from external equipment, select the input source using the INPUT buttons on the remote control (page 14) or the INPUT button on the Plasma Display. • To protect all equipment, always turn off the system before ...AV cable (commercially available) S-Video cable (commercially available) DVD player VCR Displaying a VCR image To watch a DVD image, press INPUT 1 on the remote control unit or press INPUT on the Plasma Display to select INPUT1. • Refer to your DVD player instruction manual for the signal type. •...

Owner's Manual
Page 51
Before starting the menu, press INPUT 1 (or INPUT 3) on the remote control unit or press INPUT on the Plasma Display to exit the menu. Connecting HDMI equipment Media Receiver (rear view) DIGITAL OUT OPTICAL (TS) S400 ...
Before starting the menu, press INPUT 1 (or INPUT 3) on the remote control unit or press INPUT on the Plasma Display to exit the menu. Connecting HDMI equipment Media Receiver (rear view) DIGITAL OUT OPTICAL (TS) S400 ...
Owner's Manual
Page 52
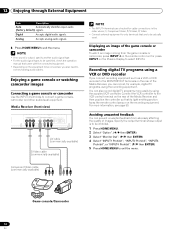
... the INPUT 4 terminals to exit the menu. You can prevent unwanted feedback from the game console or camcorder, press INPUT 4 on the remote control unit or press INPUT on the Plasma Display to the MONITOR OUT terminals on the rear of the Media Receiver, you can record, ... in the order where; 1) Component Video, 2) S-Video, 3) Video. • Connect external equipment to only terminals that its light emitting section faces the remote control sensor on the equipment to be connected, you connect recording equipment such as a VCR or DVD recorder to select INPUT4. Specify the output terminal...
... the INPUT 4 terminals to exit the menu. You can prevent unwanted feedback from the game console or camcorder, press INPUT 4 on the remote control unit or press INPUT on the Plasma Display to the MONITOR OUT terminals on the rear of the Media Receiver, you can record, ... in the order where; 1) Component Video, 2) S-Video, 3) Video. • Connect external equipment to only terminals that its light emitting section faces the remote control sensor on the equipment to be connected, you connect recording equipment such as a VCR or DVD recorder to select INPUT4. Specify the output terminal...
Owner's Manual
Page 55
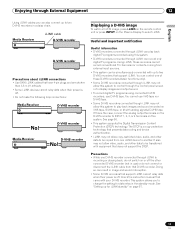
... recorder D-VHS recorder Media Receiver POWER REC DATA ON STANDBY TIMER ACQUISITION D-VHS recorder Displaying a D-VHS image To watch a D-VHS image, press i.LINK on the remote control unit or press INPUT on the Plasma Display to select i.LINK. Enjoying through External Equipment 12 English Using i.LINK cables you to change the...
... recorder D-VHS recorder Media Receiver POWER REC DATA ON STANDBY TIMER ACQUISITION D-VHS recorder Displaying a D-VHS image To watch a D-VHS image, press i.LINK on the remote control unit or press INPUT on the Plasma Display to select i.LINK. Enjoying through External Equipment 12 English Using i.LINK cables you to change the...
Owner's Manual
Page 57
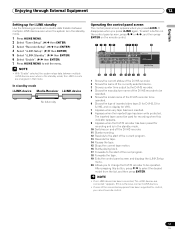
... for i.LINK standby Use the following procedure to enable data transfer between multiple i.LINK devices even when in the standby mode. 10 Switches on the remote control. 1 2 3 45 67 8 9 20 D-VHS4 XXXXXXX XXX No1394 00:00:00 D ON/OFF REC Device List • D-VHS4 A i.LINK Setup • With "Enable" selected, the...
... for i.LINK standby Use the following procedure to enable data transfer between multiple i.LINK devices even when in the standby mode. 10 Switches on the remote control. 1 2 3 45 67 8 9 20 D-VHS4 XXXXXXX XXX No1394 00:00:00 D ON/OFF REC Device List • D-VHS4 A i.LINK Setup • With "Enable" selected, the...


